Git and Github

This is a printer-friendly version. It omits exercises, optional topics (i.e., four-star topics), and other extra content such as learning outcomes.

Init

Soon you are going to take your first step in using Git. If you would like to see a quick overview of the full Git landscape before jumping in, watch the video below.

Install SourceTree which is Git + a GUI for Git. If you prefer to use Git via the command line (i.e., without a GUI), you can install Git instead.

Suppose you want to create a repository in an empty directory things. Here are the steps:

Windows: Click FileClone/New…. Click on Create button.
Mac: New...Create New Repository.

Enter the location of the directory (Windows version shown below) and click Create.

Go to the things folder and observe how a hidden folder .git has been created.

Note: If you are on Windows, you might have to configure Windows Explorer to show hidden files.


Open a Git Bash Terminal.

If you installed SourceTree, you can click the Terminal button to open a GitBash terminal.

Navigate to the things directory.

Use the command git init which should initialize the repo.

$ git init
Initialized empty Git repository in c:/repos/things/.git/

You can use the command ls -a to view all files, which should show the .git directory that was created by the previous command.

$ ls -a
.  ..  .git

You can also use the git status command to check the status of the newly-created repo. It should respond with something like the bellow

git status

# On branch master
#
# Initial commit
#
nothing to commit (create/copy files and use "git add" to track)

Commit

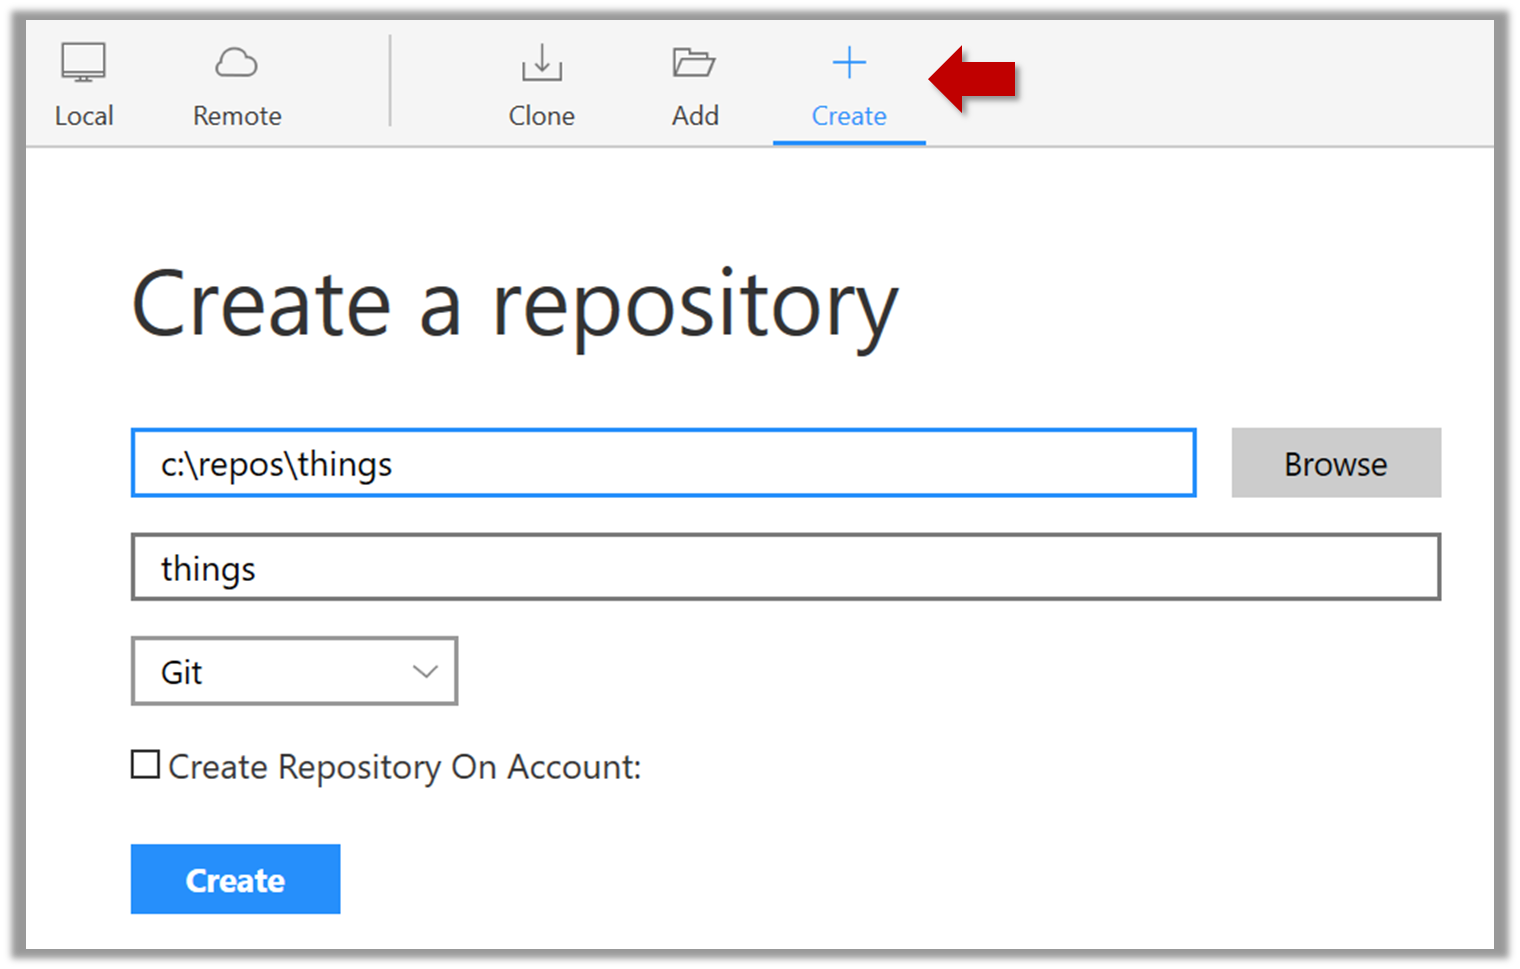
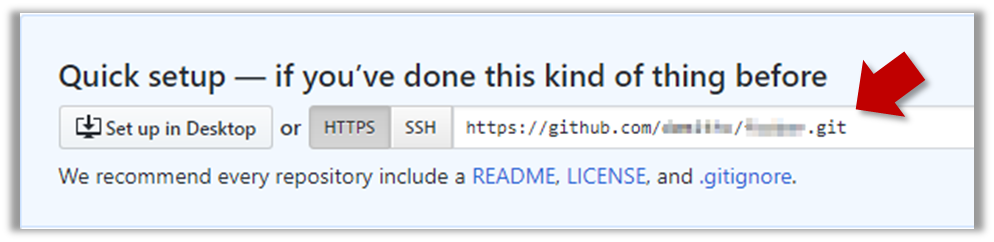
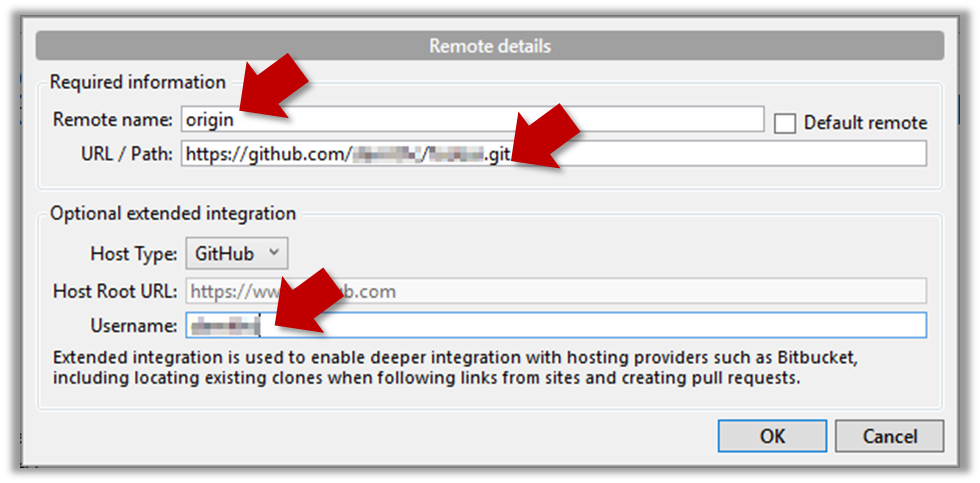
Create an empty repo.

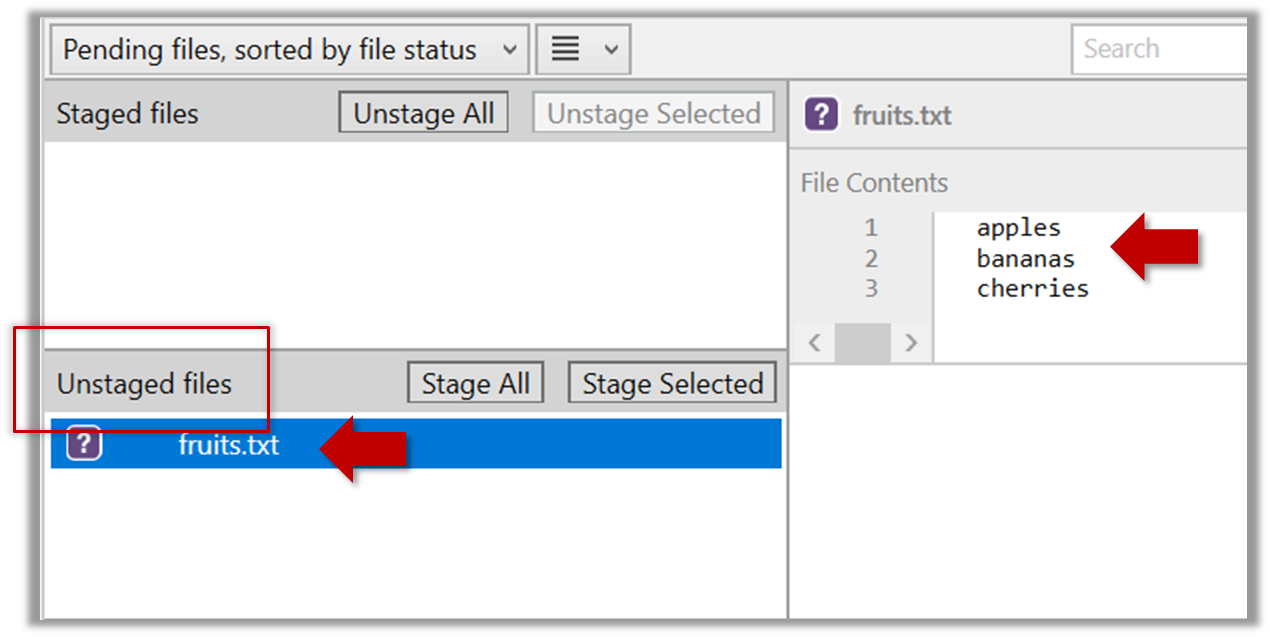
Create a file named fruits.txt in the working directory and add some dummy text to it.

Working directory: The directory the repo is based in is called the working directory.

Observe how the file is detected by Git.

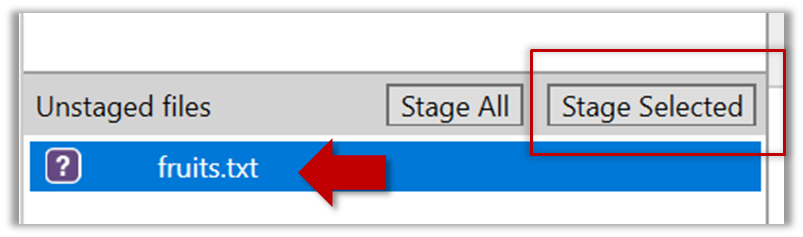
The file is shown as ‘unstaged’


You can use the git status command to check the status of the working directory.

git status

# On branch master
#
# Initial commit
#
# Untracked files:
#   (use "git add <file>..." to include in what will be committed)
#
#   a.txt
nothing added to commit but untracked files present (use "git add" to track)

Although git has detected the file in the working directory, it will not do anything with the file unless you tell it to. Suppose we want to commit the current state of the file. First, we should stage the file.

Commit: Saving the current state of the working folder into the Git revision history.

Stage: Instructing Git to prepare a file for committing.

Select the fruits.txt and click on the Stage Selected button

fruits.txt should appear in the Staged files panel now.


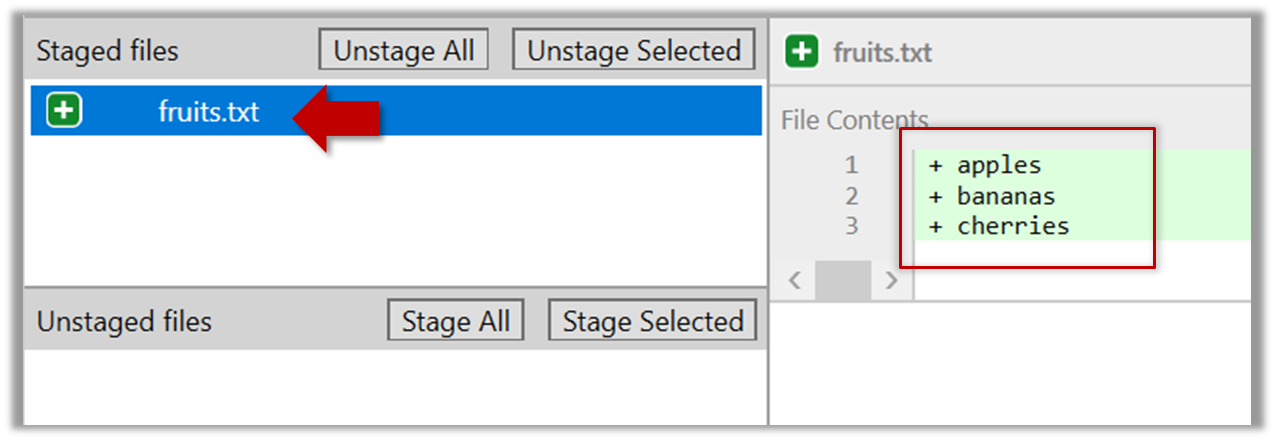
You can use the stage or the add command (they are synonyms, add is the more popular choice) to stage files.

git add fruits.txt
git status

# On branch master
#
# Initial commit
#
# Changes to be committed:
#   (use "git rm --cached <file>..." to unstage)
#
#       new file:   fruits.txt
#

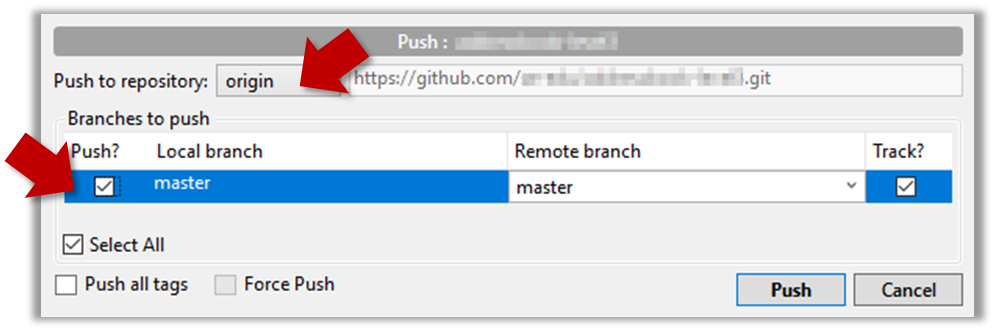
Now, you can commit the staged version of fruits.txt

Click the Commit button, enter a commit message e.g. add fruits.txt in to the text box, and click Commit


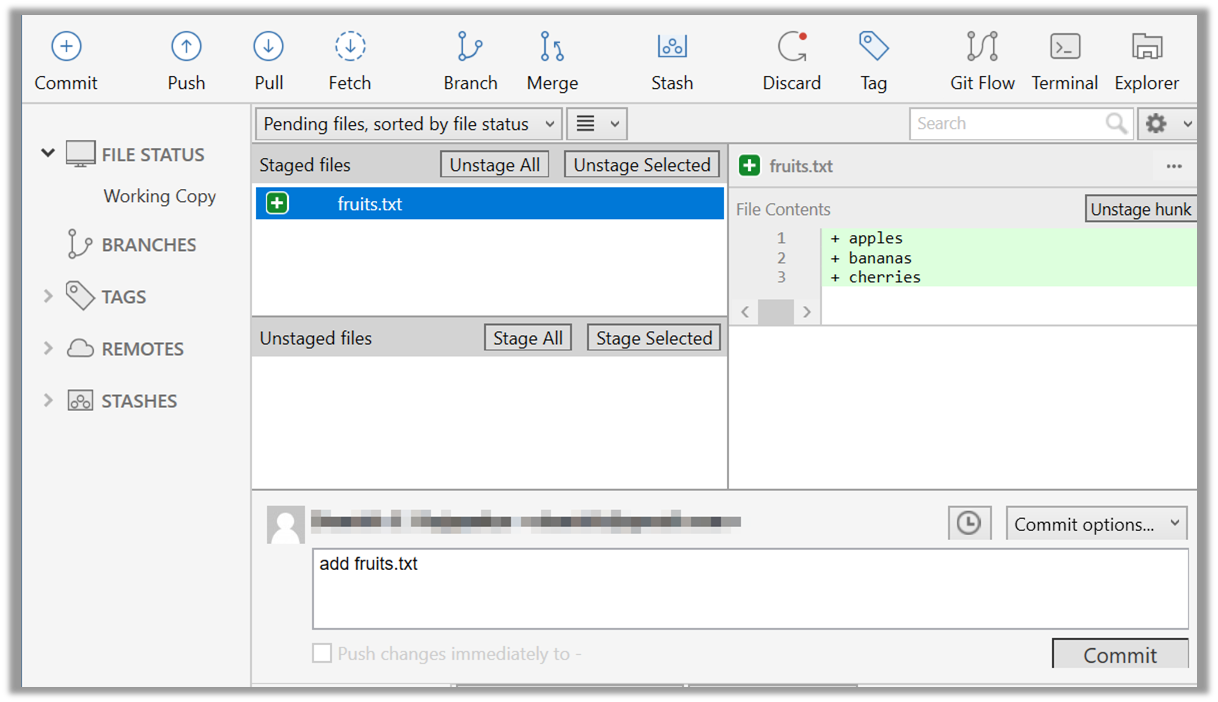
Use the commit command to commit. The -m switch is used to specify the commit message.

git commit -m "add fruits.txt"

You can use the log command to see the commit history

git log

commit 8fd30a6910efb28bb258cd01be93e481caeab846
Author: … < … @... >
Date:   Wed Jul 5 16:06:28 2017 +0800

  Add fruits.txt

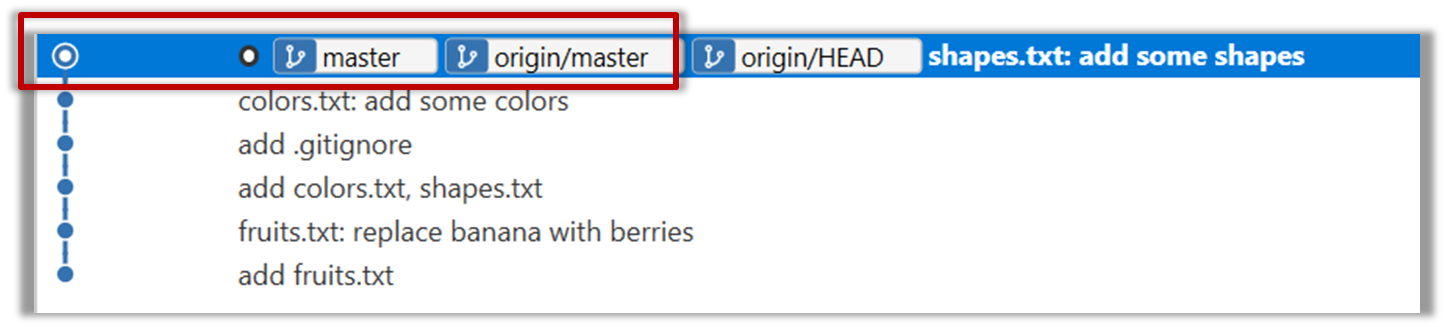
Note the existence of something called the master branch. Git allows you to have multiple branches (i.e. it is a way to evolve the content in parallel) and Git creates a default branch named master on which the commits go on by default.

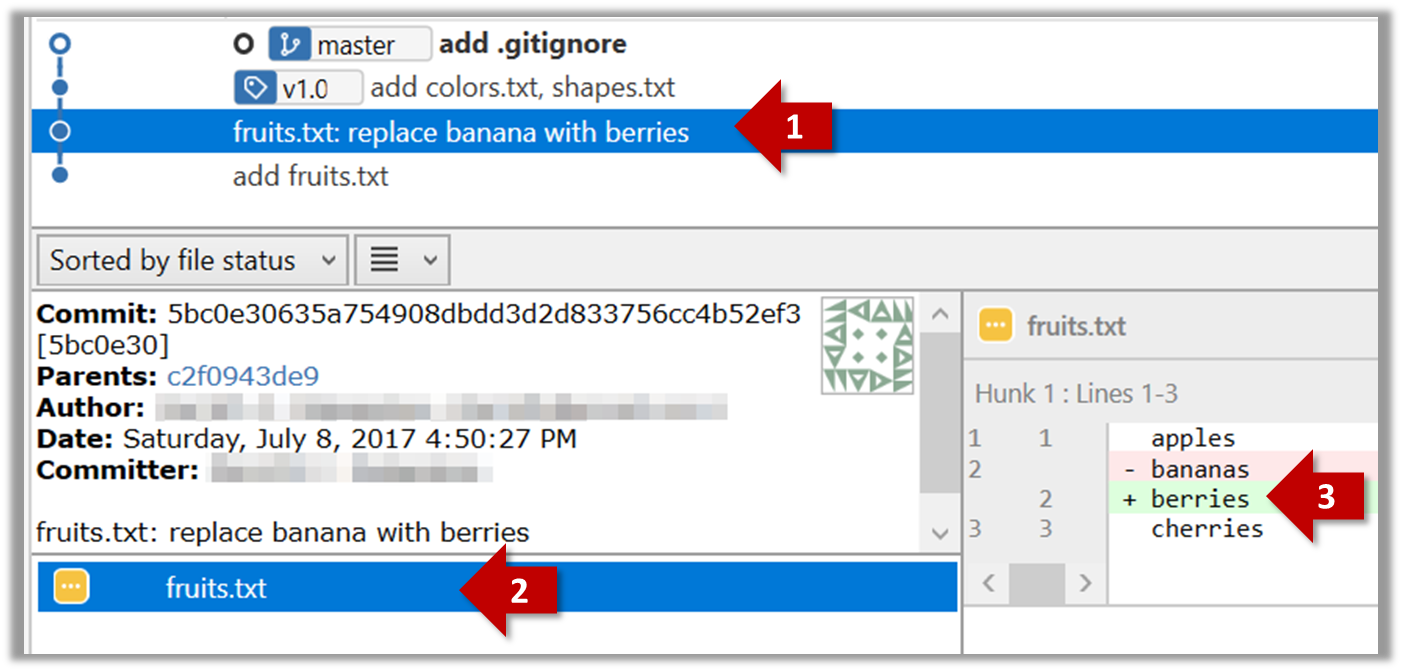
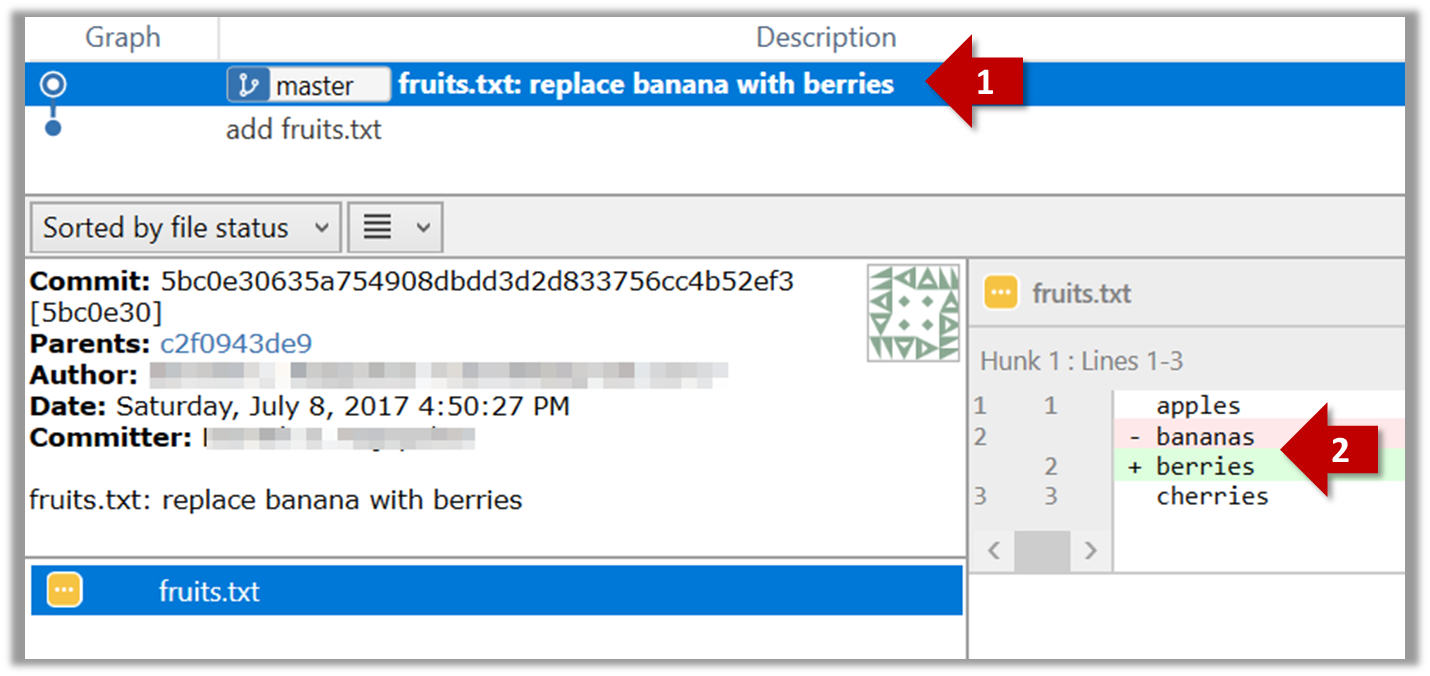
Do some changes to fruits.txt (e.g. add some text and delete some text). Stage the changes, and commit the changes using the same steps you followed before. You should end up with something like this.

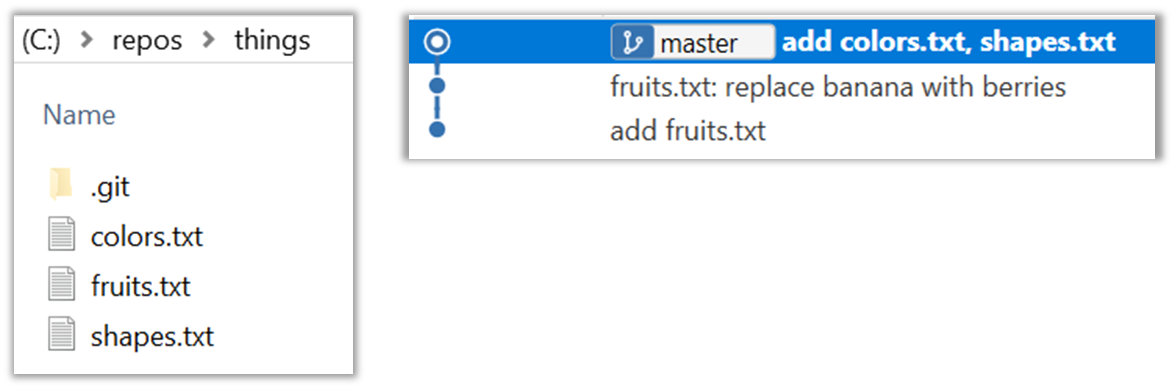
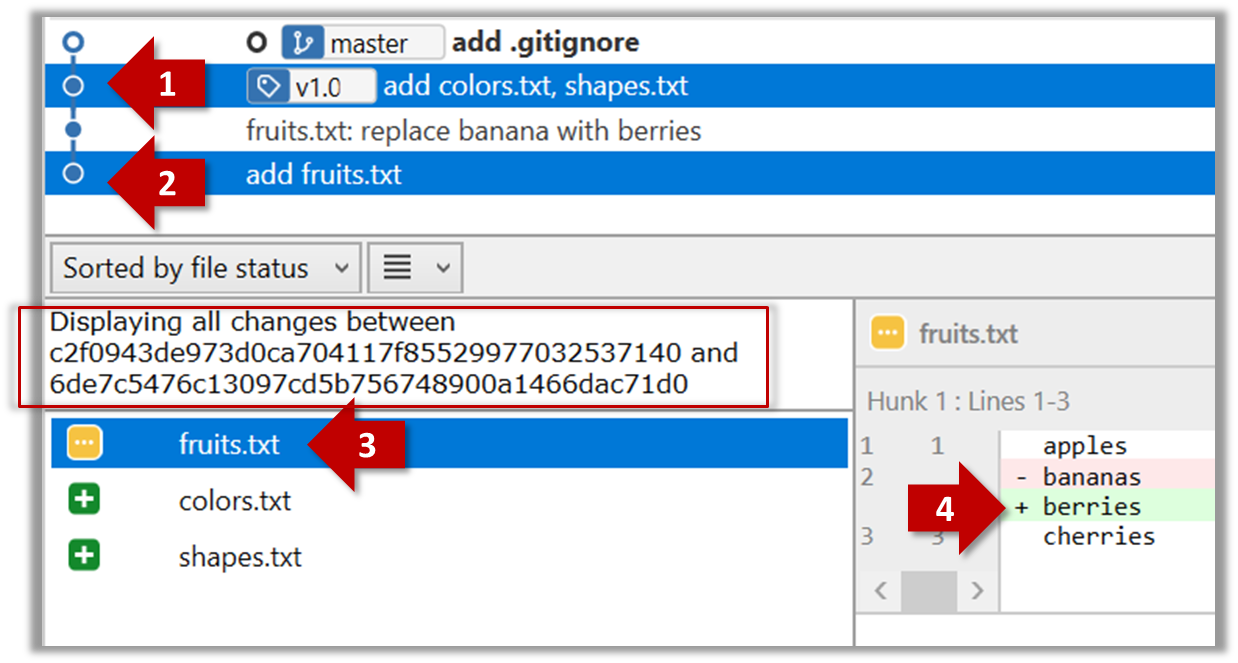
Next, add two more files colors.txt and shapes.txt to the same working directory. Add a third commit to record the current state of the working directory.

Ignore

Add a file names temp.txt to the things repo you created. Suppose we don’t want this file to be revision controlled by Git. Let’s instruct Git to ignore temp.txt

The file should be currently listed under Unstaged files. Right-click it and choose Ignore…. Choose Ignore exact filename(s) and click OK.

Observe that a file named .gitignore has been created in the working directory root and has the following line in it.

temp.txt

Create a file named .gitignore in the working directory root and add the following line in it.

temp.txt

The .gitignore file tells Git which files to ignore when tracking revision history. That file itself can be either revision controlled or ignored.

  • To version control it (the more common choice – which allows you to track how the .gitignore file changed over time), simply commit it as you would commit any other file.
  • To ignore it, follow the same steps we followed above when we set Git to ignore the temp.txt file.

Tag

Let's tag a commit in a local repo you have (e.g. the sampelrepo-things repo)

Right-click on the commit (in the graphical revision graph) you want to tag and choose Tag…

Specify the tag name e.g. v1.0 and click Add Tag.

The added tag will appear in the revision graph view.


To add a tag to the current commit as v1.0,

git tag –a v1.0

To view tags

git tag

To learn how to add a tag to a past commit, go to the ‘Git Basics – Tagging’ page of the git-scm book and refer the ‘Tagging Later’ section.


Checkout

Git can show you what changed in each commit.

To see which files changed in a commit, click on the commit. To see what changed in a specific file in that commit, click on the file name.


git show < part-of-commit-hash >

Example:

git show 251b4cf

commit 5bc0e30635a754908dbdd3d2d833756cc4b52ef3
Author: … < … >
Date:   Sat Jul 8 16:50:27 2017 +0800

    fruits.txt: replace banana with berries

diff --git a/fruits.txt b/fruits.txt
index 15b57f7..17f4528 100644
--- a/fruits.txt
+++ b/fruits.txt
@@ -1,3 +1,3 @@
 apples
-bananas
+berries
 cherries

Git can also show you the difference between two points in the history of the repo.

Select the two points you want to compare using Ctrl+Click.

The same method can be used to compare the current state of the working directory (which might have uncommitted changes) to a point in the history.


The diff command can be used to view the differences between two points of the history.

  • git diff : shows the changes (uncommitted) since the last commit
  • git diff 0023cdd..fcd6199: shows the changes between the points indicated by by commit hashes
  • git diff v1.0..HEAD: shows changes that happened from the commit tagged as v1.0 to the most recent commit.

Git can load a specific version of the history to the working directory. Note that if you have uncommitted changes in the working directory, you need to stash them first to prevent them from being overwritten.


Tools → Git and GitHub →

Stash

You can use the git's stash feature to temporarily shelve (or stash) changes you've made to your working copy so that you can work on something else, and then come back and re-apply the stashed changes later on. -- adapted from this


Follow this article from SourceTree creators. Note the GUI shown in the article is slightly outdated but you should be able to map it to the current GUI.


Follow this article from Atlassian.


Double-click the commit you want to load to the working directory, or right-click on that commit and choose Checkout....

Click OK to the warning about ‘detached HEAD’ (similar to below).

The specified version is now loaded to the working folder, as indicated by the HEAD label. HEAD is a reference to the currently checked out commit.

If you checkout a commit that come before the commit in which you added the .gitignore file, Git will now show ignored fiels as ‘unstaged modifications’ because at that stage Git hasn’t been told to ignore those files.

To go back to the latest commit, double-click it.


Use the checkout <commit-identifier> command to change the working directory to the state it was in at a specific past commit.

  • git checkout v1.0: loads the state as at commit tagged v1.0
  • git checkout 0023cdd: loads the state as at commit with the hash 0023cdd
  • git checkout HEAD~2: loads the state that is 2 commits behind the most recent commit

For now, you can ignore the warning about ‘detached HEAD’.

Use the checkout <branch-name> to go back to the most recent commit of the current branch (the default branch in git is named master)

  • git checkout master

Clone

Clone the sample repo samplerepo-things to your computer.

Note that the URL of the Github project is different form the URL you need to clone a repo in that Github project. e.g.

Github project URL: https://github.com/se-edu/samplerepo-things
Git repo URL: https://github.com/se-edu/samplerepo-things.git (note the .git at the end)

FileClone / New… and provide the URL of the repo and the destination directory.


You can use the clone command to clone a repo.

Follow instructions given here.


Pull

Clone the sample repo as explained in [Textbook Tools → Git & GitHub → Clone].

Delete the last two commits to simulate cloning the repo 2 commits ago.

Clone

Can clone a remote repo

Clone the sample repo samplerepo-things to your computer.

Note that the URL of the Github project is different form the URL you need to clone a repo in that Github project. e.g.

Github project URL: https://github.com/se-edu/samplerepo-things
Git repo URL: https://github.com/se-edu/samplerepo-things.git (note the .git at the end)

FileClone / New… and provide the URL of the repo and the destination directory.


You can use the clone command to clone a repo.

Follow instructions given here.


Right-click the target commit (i.e. the commit that is 2 commits behind the tip) and choose Reset current branch to this commit.

Choose the Hard - … option and click OK.

This is what you will see.

Note the following (cross refer the screenshot above):

Arrow marked as a: The local repo is now at this commit, marked by the master label.
Arrow marked as b: origin/master label shows what is the latest commit in the master branch in the remote repo.


Use the reset command to delete commits at the tip of the revision history.

git reset --hard HEAD~2

Now, your local repo state is exactly how it would be if you had cloned the repo 2 commits ago, as if somebody has added two more commits to the remote repo since you cloned it. To get those commits to your local repo (i.e. to sync your local repo with upstream repo) you can do a pull.

Click the Pull button in the main menu, choose origin and master in the next dialog, and click OK.

Now you should see something like this where master and origin/master are both pointing the same commit.


git pull origin


Push

  1. Create a GitHub account if you don't have one yet.

  2. Fork the samplerepo-things to your GitHub account:

    Navigate to the on GitHub and click on the button on the top-right corner.

  3. Clone the fork (not the original) to your computer.

  4. Create some commits in your repo.

  5. Push the new commits to your fork on GitHub

Click the Push button on the main menu, ensure the settings are as follows in the next dialog, and click the Push button on the dialog.


Use the command git push origin master. Enter Github username and password when prompted.


To push an existing local repo into a new remote repo on GitHub, first you need to create an empty remote repo on GitHub.

  1. Login to your GitHub account and choose to create a new Repo.

  2. In the next screen, provide a name for your repo but keep the Initialize this repo ... tick box unchecked.

  3. Note the URL of the repo. It will be of the form https://github.com/{your_user_name}/{repo_name}.git
    e.g., https://github.com/johndoe/foobar.git

Next, you can push the existing local repo to the new remote repo as follows:

  1. Open the local repo in SourceTree.
  2. Choose RepositoryRepository Settings menu option.
  3. Add a new remote to the repo with the following values.
    • Remote name: the name you want to assign to the remote repo. Recommended origin
    • URL/path: the URL of your repo (ending in .git) that you collected earlier.
    • Username: your GitHub username
  4. Now you can push your repo to the new remote the usual way.

  1. Navigate to the folder containing the local repo.
  2. Set the new remote repo as a remote of the local repo.
    command: git remote add {remote_name} {remote_repo_url}
    e.g., git remote add origin https://github.com/johndoe/foobar.git
  3. Push to the new remote the usual way. You can use the -u flag to inform Git that you wish to track the branch.
    e.g., git push -u origin master