Week 3 [Aug 27]
Todo
Admin info to read:
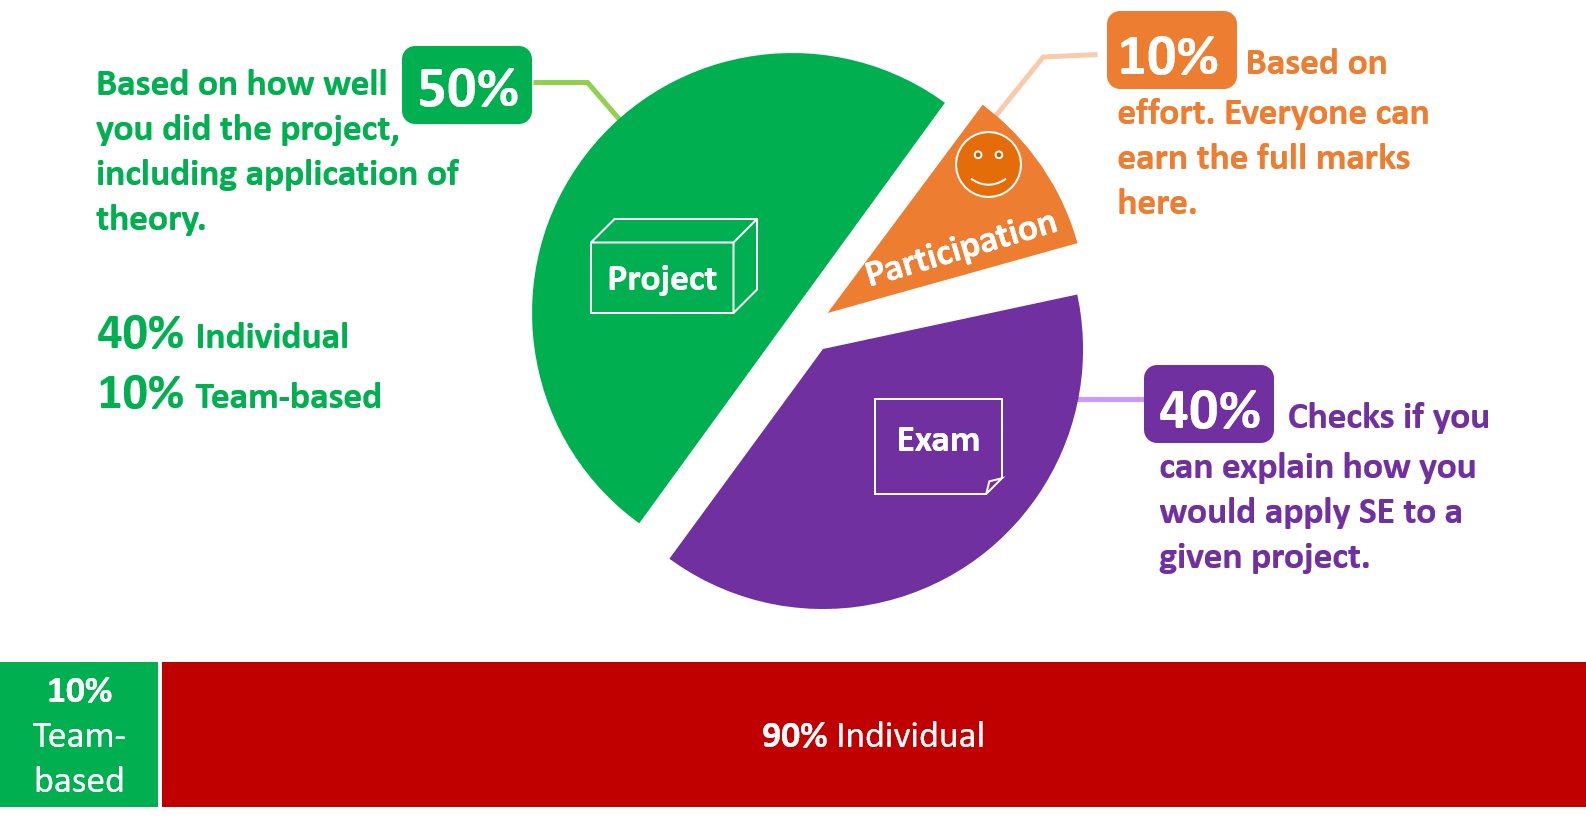
Note that project grading is not competitive (not bell curved). TIC2002T projects will be assessed separately from TIC2002 projects. This is to account for the perceived difference in workload. Given below is the marking scheme.
Total: 50 marks ( 40 individual marks + 10 team marks)
Evaluates: How well do your features fit together to form a cohesive product (not how many features or how big the features are)?
Based on: user guide and the product demo. The quality of the demo will be factored in as well.
💡 Feature that fit well with the other features will earn more marks.
Evaluates:
A. Code quality/quantity:
How good your implementation is, in terms of the quality and the quantity of the code you have written yourself.
Based on: an inspection of the parts of the code you claim as written by you.
-
Ensure your code has at least some evidence of these (see here for more info)
- logging
- exceptions
- assertions
- defensive coding
-
Ensure there are no coding standard violations e.g. all boolean variables/methods sounds like booleans. Checkstyle can prevent only some coding standard violations; others need to be checked manually.
-
Ensure SLAP is applied at a reasonable level. Long methods or deeply-nested code are symptoms of low-SLAP may be counted against your code quality.
-
Reduce code duplications i.e. if there multiple blocks of code that vary only in minor ways, try to extract out similarities into one place, especially in test code.
-
In addition, try to apply as many of the
code quality guidelines covered in the module as much as you can.
Can explain the importance of code quality
Always code as if the person who ends up maintaining your code will be a violent psychopath who knows where you live. -- Martin Golding
Can explain the importance of readability
Programs should be written and polished until they acquire publication quality. --Niklaus Wirth
Among various dimensions of code quality, such as run-time efficiency, security, and robustness, one of the most important is understandability. This is because in any non-trivial software project, code needs to be read, understood, and modified by other developers later on. Even if we do not intend to pass the code to someone else, code quality is still important because we all become 'strangers' to our own code someday.
The two code samples given below achieve the same functionality, but one is easier to read.
|
Bad |
|
Good |
|
Bad |
|
Good |
Can improve code quality using technique: avoid long methods
Be wary when a method is longer than the computer screen, and take corrective action when it goes beyond 30 LOC (lines of code). The bigger the haystack, the harder it is to find a needle.
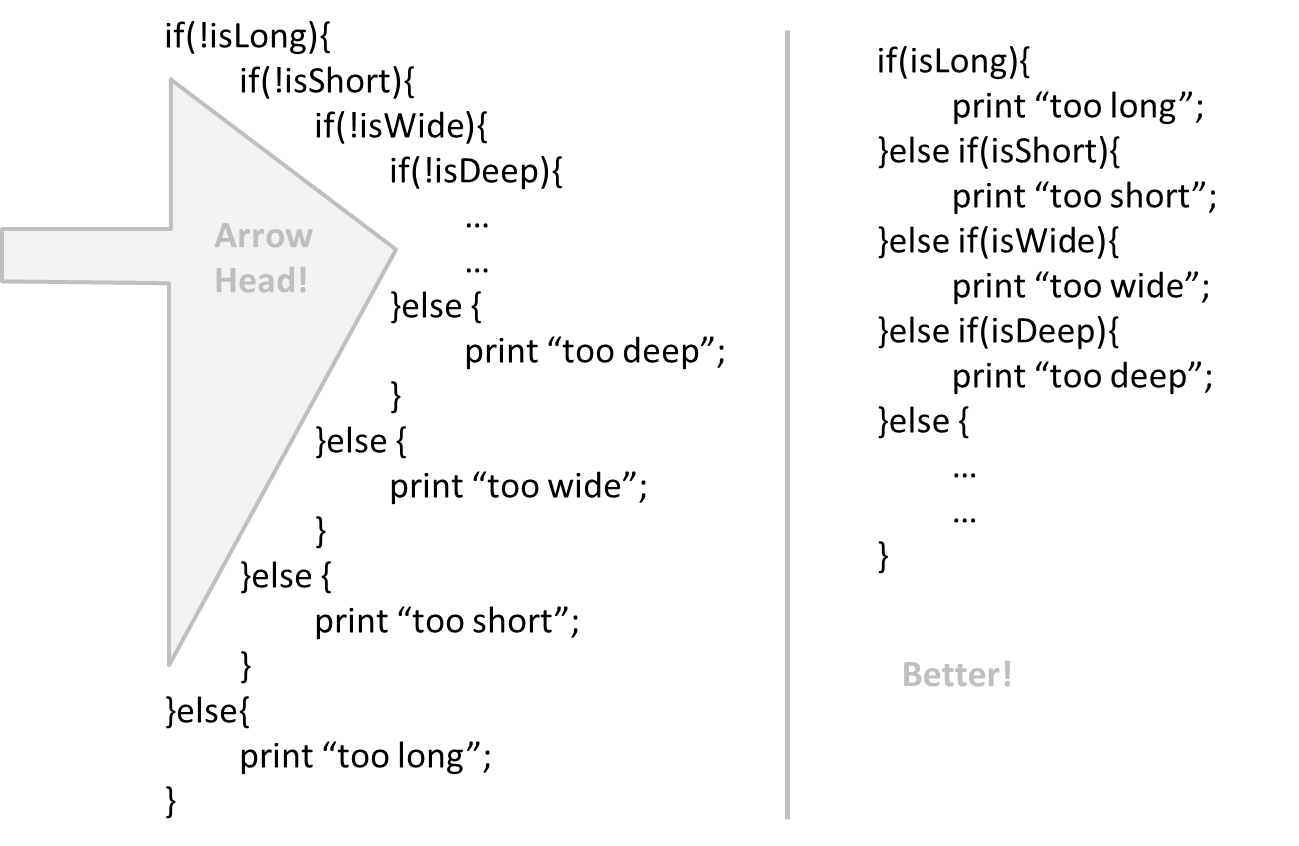
Can improve code quality using technique: avoid deep nesting
If you need more than 3 levels of indentation, you're screwed anyway, and should fix your program. --Linux 1.3.53 CodingStyle
In particular, avoid arrowhead style code.
Example:
Can improve code quality using technique: avoid complicated expressions
Avoid complicated expressions, especially those having many negations and nested parentheses. If you must evaluate complicated expressions, have it done in steps (i.e. calculate some intermediate values first and use them to calculate the final value).
Example:
Bad
return ((length < MAX_LENGTH) || (previousSize != length)) && (typeCode == URGENT);
Good
boolean isWithinSizeLimit = length < MAX_LENGTH;
boolean isSameSize = previousSize != length;
boolean isValidCode = isWithinSizeLimit || isSameSize;

boolean isUrgent = typeCode == URGENT;

return isValidCode && isUrgent;
Example:
Bad
return ((length < MAX_LENGTH) or (previous_size != length)) and (type_code == URGENT)
Good
is_within_size_limit = length < MAX_LENGTH
is_same_size = previous_size != length
is_valid_code = is_within_size_limit or is_same_size

is_urgent = type_code == URGENT

return is_valid_code and is_urgent
The competent programmer is fully aware of the strictly limited size of his own skull; therefore he approaches the programming task in full humility, and among other things he avoids clever tricks like the plague. -- Edsger Dijkstra
Can improve code quality using technique: avoid magic numbers
When the code has a number that does not explain the meaning of the number, we call that a magic number (as in “the number appears as if by magic”). Using a
Example:
|
Bad |
|
Good |
Note: Python does not have a way to make a variable a constant. However, you can use a normal variable with an ALL_CAPS name to simulate a constant.
|
Bad |
|
Good |
Similarly, we can have ‘magic’ values of other data types.
Bad
"Error 1432" // A magic string!
Can improve code quality using technique: make the code obvious
Make the code as explicit as possible, even if the language syntax allows them to be implicit. Here are some examples:
- [
Java] Use explicit type conversion instead of implicit type conversion. - [
Java,Python] Use parentheses/braces to show grouping even when they can be skipped. - [
Java,Python] Useenumerations when a certain variable can take only a small number of finite values. For example, instead of declaring the variable 'state' as an integer and using values 0,1,2 to denote the states 'starting', 'enabled', and 'disabled' respectively, declare 'state' as typeSystemStateand define an enumerationSystemStatethat has values'STARTING','ENABLED', and'DISABLED'.
Can improve code quality using technique: structure code logically
Lay out the code so that it adheres to the logical structure. The code should read like a story. Just like we use section breaks, chapters and paragraphs to organize a story, use classes, methods, indentation and line spacing in your code to group related segments of the code. For example, you can use blank lines to group related statements together. Sometimes, the correctness of your code does not depend on the order in which you perform certain intermediary steps. Nevertheless, this order may affect the clarity of the story you are trying to tell. Choose the order that makes the story most readable.
Can improve code quality using technique: do not 'trip up' reader
Avoid things that would make the reader go ‘huh?’, such as,
- unused parameters in the method signature
- similar things look different
- different things that look similar
- multiple statements in the same line
- data flow anomalies such as, pre-assigning values to variables and modifying it without any use of the pre-assigned value
Can improve code quality using technique: practice kissing
As the old adage goes, "keep it simple, stupid” (KISS). Do not try to write ‘clever’ code. For example, do not dismiss the brute-force yet simple solution in favor of a complicated one because of some ‘supposed benefits’ such as 'better reusability' unless you have a strong justification.
Debugging is twice as hard as writing the code in the first place. Therefore, if you write the code as cleverly as possible, you are, by definition, not smart enough to debug it. --Brian W. Kernighan
Programs must be written for people to read, and only incidentally for machines to execute. --Abelson and Sussman
Can improve code quality using technique: avoid premature optimizations
Optimizing code prematurely has several drawbacks:
- We may not know which parts are the real performance bottlenecks. This is especially the case when the code undergoes transformations (e.g. compiling, minifying, transpiling, etc.) before it becomes an executable. Ideally, you should use a profiler tool to identify the actual bottlenecks of the code first, and optimize only those parts.
- Optimizing can complicate the code, affecting correctness and understandability
- Hand-optimized code can be harder for the compiler to optimize (the simpler the code, the easier for the compiler to optimize it). In many cases a compiler can do a better job of optimizing the runtime code if you don't get in the way by trying to hand-optimize the source code.
A popular saying in the industry is make it work, make it right, make it fast which means in most cases getting the code to perform correctly should take priority over optimizing it. If the code doesn't work correctly, it has no value on matter how fast/efficient it it.
Premature optimization is the root of all evil in programming. --Donald Knuth
Note that there are cases where optimizing takes priority over other things e.g. when writing code for resource-constrained environments. This guideline simply a caution that you should optimize only when it is really needed.
Can improve code quality using technique: SLAP hard
Avoid varying the level of
Example:
Bad
readData();
salary = basic*rise+1000;
tax = (taxable?salary*0.07:0);
displayResult();
Good
readData();
processData();
displayResult();
Design → Design Fundamentals → Abstraction →
Abstraction is a technique for dealing with complexity. It works by establishing a level of complexity we are interested in, and suppressing the more complex details below that level.
The guiding principle of abstraction is that only details that are relevant to the current perspective or the task at hand needs to be considered. As most programs are written to solve complex problems involving large amounts of intricate details, it is impossible to deal with all these details at the same time. That is where abstraction can help.
Ignoring lower level data items and thinking in terms of bigger entities is called data abstraction.
Within a certain software component, we might deal with a user data type, while ignoring the details contained in the user data item such as name, and date of birth. These details have been ‘abstracted away’ as they do not affect the task of that software component.
Control abstraction abstracts away details of the actual control flow to focus on tasks at a simplified level.
print(“Hello”) is an abstraction of the actual output mechanism within the computer.
Abstraction can be applied repeatedly to obtain progressively higher levels of abstractions.
An example of different levels of data abstraction: a File is a data item that is at a higher level than an array and an array is at a higher level than a bit.
An example of different levels of control abstraction: execute(Game) is at a higher level than print(Char) which is at a higher than an Assembly language instruction MOV.
Abstraction is a general concept that is not limited to just data or control abstractions.
Some more general examples of abstraction:
- An OOP class is an abstraction over related data and behaviors.
- An architecture is a higher-level abstraction of the design of a software.
- Models (e.g., UML models) are abstractions of some aspect of reality.
Can improve code quality using technique: make the happy path prominent
The happy path (i.e. the execution path taken when everything goes well) should be clear and prominent in your code. Restructure the code to make the happy path unindented as much as possible. It is the ‘unusual’ cases that should be indented. Someone reading the code should not get distracted by alternative paths taken when error conditions happen. One technique that could help in this regard is the use of guard clauses.
Example:
Bad
if (!isUnusualCase) {  //detecting an unusual condition
    if (!isErrorCase) {
        start();    //main path
        process();
        cleanup();
        exit();
    } else {
        handleError();
    }
} else {
    handleUnusualCase(); //handling that unusual condition
}
In the code above,
- Unusual condition detection is separated from their handling.
- Main path is nested deeply.
Good
if (isUnusualCase) { //Guard Clause
    handleUnusualCase();
    return;
}

if (isErrorCase) { //Guard Clause
    handleError();
    return;
}

start();
process();
cleanup();
exit();
In contrast, the above code
- deals with unusual conditions as soon as they are detected so that the reader doesn't have to remember them for long.
- keeps the main path un-indented.
Can explain the need for following a standard
One essential way to improve code quality is to follow a consistent style. That is why software engineers follow a strict coding standard (aka style guide).
The aim of a coding standard is to make the entire code base look like it was written by one person. A coding standard is usually specific to a programming language and specifies guidelines such as the location of opening and closing braces, indentation styles and naming styles (e.g. whether to use Hungarian style, Pascal casing, Camel casing, etc.). It is important that the whole team/company use the same coding standard and that standard is not generally inconsistent with typical industry practices. If a company's coding standards is very different from what is used typically in the industry, new recruits will take longer to get used to the company's coding style.
💡 IDEs can help to enforce some parts of a coding standard e.g. indentation rules.
What is the recommended approach regarding coding standards?
c
What is the aim of using a coding standard? How does it help?
Can follow simple mechanical style rules
Learn basic guidelines of the Java coding standard (by OSS-Generic)
Sample coding standard: PEP 8 Python Style Guide -- by Python.org
Consider the code given below:
import java.util.*;

public class Task {
    public static final String descriptionPrefix = "description: ";
    private String description;
    private boolean important;
    List<String> pastDescription = new ArrayList<>(); // a list of past descriptions

    public Task(String d) {
      this.description = d;
      if (!d.isEmpty())
          this.important = true;
    }

    public String getAsXML() { return "<task>"+description+"</task>"; }

    /**
     * Print the description as a string.
     */
    public void printingDescription(){ System.out.println(this); }

    @Override
    public String toString() { return descriptionPrefix + description; }
}
In what ways the code violate the basic guidelines (i.e., those marked with one ⭐️) of the OSS-Generic Java Coding Standard given here?
Here are three:
descriptionPrefixis a constant and should be namedDESCRIPTION_PREFIX- method name
printingDescription()should be named asprintDescription() - boolean variable
importantshould be named to sound boolean e.g.,isImportant
There are many more.
Can follow intermediate style rules
Go through the provided Java coding standard and learn the intermediate style rules.
According to the given Java coding standard, which one of these is not a good name?
b
Explanation: checkWeight is an action. Naming variables as actions makes the code harder to follow. isWeightValid may be a better name.
Repeat the exercise in the panel below but also find violations of intermediate level guidelines.
Consider the code given below:
import java.util.*;

public class Task {
    public static final String descriptionPrefix = "description: ";
    private String description;
    private boolean important;
    List<String> pastDescription = new ArrayList<>(); // a list of past descriptions

    public Task(String d) {
      this.description = d;
      if (!d.isEmpty())
          this.important = true;
    }

    public String getAsXML() { return "<task>"+description+"</task>"; }

    /**
     * Print the description as a string.
     */
    public void printingDescription(){ System.out.println(this); }

    @Override
    public String toString() { return descriptionPrefix + description; }
}
In what ways the code violate the basic guidelines (i.e., those marked with one ⭐️) of the OSS-Generic Java Coding Standard given here?
Here are three:
descriptionPrefixis a constant and should be namedDESCRIPTION_PREFIX- method name
printingDescription()should be named asprintDescription() - boolean variable
importantshould be named to sound boolean e.g.,isImportant
There are many more.
Here's one you are more likely to miss:
* Print the description as a string.→* Prints the description as a string.
There are more.
Can explain the need for good names in code
Proper naming improves the readability. It also reduces bugs caused by ambiguities regarding the intent of a variable or a method.
There are only two hard things in Computer Science: cache invalidation and naming things. -- Phil Karlton
Can improve code quality using technique: use nouns for things and verbs for actions
Every system is built from a domain-specific language designed by the programmers to describe that system. Functions are the verbs of that language, and classes are the nouns. ― Robert C. Martin, Clean Code: A Handbook of Agile Software Craftsmanship
Use nouns for classes/variables and verbs for methods/functions.
Examples:
| Name for a | Bad | Good |
|---|---|---|
| Class | CheckLimit |
LimitChecker |
| method | result() |
calculate() |
Distinguish clearly between single-valued and multivalued variables.
Examples:
Good
Person student;
ArrayList<Person> students;
Good
student = Person('Jim')
students = [Person('Jim'), Person('Alice')]
Can improve code quality using technique: use standard words
Use correct spelling in names. Avoid 'texting-style' spelling. Avoid foreign language words, slang, and names that are only meaningful within specific contexts/times e.g. terms from private jokes, a TV show currently popular in your country
Can improve code quality using technique: use name to explain
A name is not just for differentiation; it should explain the named entity to the reader accurately and at a sufficient level of detail.
Examples:
| Bad | Good |
|---|---|
processInput() (what 'process'?) |
removeWhiteSpaceFromInput() |
flag |
isValidInput |
temp |
If the name has multiple words, they should be in a sensible order.
Examples:
| Bad | Good |
|---|---|
bySizeOrder() |
orderBySize() |
Imagine going to the doctor's and saying "My eye1 is swollen"! Don’t use numbers or case to distinguish names.
Examples:
| Bad | Bad | Good |
|---|---|---|
value1, value2 |
value, Value |
originalValue, finalValue |
Can improve code quality using technique: not too long, not too short
While it is preferable not to have lengthy names, names that are 'too short' are even worse. If you must abbreviate or use acronyms, do it consistently. Explain their full meaning at an obvious location.
Can improve code quality using technique: avoid misleading names
Related things should be named similarly, while unrelated things should NOT.
Example: Consider these variables
colorBlack: hex value for color blackcolorWhite: hex value for color whitecolorBlue: number of times blue is usedhexForRed: : hex value for color red
This is misleading because colorBlue is named similar to colorWhite and colorBlack but has a different purpose while hexForRed is named differently but has very similar purpose to the first two variables. The following is better:
hexForBlackhexForWhitehexForRedblueColorCount
Avoid misleading or ambiguous names (e.g. those with multiple meanings), similar sounding names, hard-to-pronounce ones (e.g. avoid ambiguities like "is that a lowercase L, capital I or number 1?", or "is that number 0 or letter O?"), almost similar names.
Examples:
| Bad | Good | Reason |
|---|---|---|
phase0 |
phaseZero |
Is that zero or letter O? |
rwrLgtDirn |
rowerLegitDirection |
Hard to pronounce |
right left wrong |
rightDirection leftDirection wrongResponse |
right is for 'correct' or 'opposite of 'left'? |
redBooks readBooks |
redColorBooks booksRead |
red and read (past tense) sounds the same |
FiletMignon |
egg |
If the requirement is just a name of a food, egg is a much easier to type/say choice than FiletMignon |
Can explain the need for avoiding error-prone shortcuts
It is safer to use language constructs in the way they are meant to be used, even if the language allows shortcuts. Some such coding practices are common sources of bugs. Know them and avoid them.
Can improve code quality using technique: use the default branch
Always include a default branch in case statements.
Furthermore, use it for the intended default action and not just to execute the last option. If there is no default action, you can use the 'default' branch to detect errors (i.e. if execution reached the default branch, throw an exception). This also applies to the final else of an if-else construct. That is, the final else should mean 'everything else', and not the final option. Do not use else when an if condition can be explicitly specified, unless there is absolutely no other possibility.
Bad
if (red) print "red";
else print "blue";
Good
if (red) print "red";
else if (blue) print "blue";
else error("incorrect input");
Can improve code quality using technique: don't recycle variables or parameters
- Use one variable for one purpose. Do not reuse a variable for a different purpose other than its intended one, just because the data type is the same.
- Do not reuse formal parameters as local variables inside the method.
Bad
double computeRectangleArea(double length, double width) {
    length = length * width;
    return length;
}
Good
double computeRectangleArea(double length, double width) {
    double area;
    area = length * width;
    return area;
}
Can improve code quality using technique: avoid empty catch blocks
Never write an empty catch statement. At least give a comment to explain why the catch block is left empty.
Can improve code quality using technique: delete dead code
We all feel reluctant to delete code we have painstakingly written, even if we have no use for that code any more ("I spent a lot of time writing that code; what if we need it again?"). Consider all code as baggage you have to carry; get rid of unused code the moment it becomes redundant. If you need that code again, simply recover it from the revision control tool you are using. Deleting code you wrote previously is a sign that you are improving.
Can improve code quality using technique: minimise scope of variables
Minimize global variables. Global variables may be the most convenient way to pass information around, but they do create implicit links between code segments that use the global variable. Avoid them as much as possible.
Define variables in the least possible scope. For example, if the variable is used only within the if block of the conditional statement, it should be declared inside that if block.
The most powerful technique for minimizing the scope of a local variable is to declare it where it is first used. -- Effective Java, by Joshua Bloch
Resources:
Can improve code quality using technique: minimise code duplication
Code duplication, especially when you copy-paste-modify code, often indicates a poor quality implementation. While it may not be possible to have zero duplication, always think twice before duplicating code; most often there is a better alternative.
This guideline is closely related to the
Supplmentary → Principles →
DRY (Don't Repeat Yourself) Principle: Every piece of knowledge must have a single, unambiguous, authoritative representation within a system The Pragmatic Programmer, by Andy Hunt and Dave Thomas
This principle guards against duplication of information.
The functionality implemented twice is a violation of the DRY principle even if the two implementations are different.
The value a system-wide timeout being defined in multiple places is a violation of DRY.
Can explain the need for commenting minimally but sufficiently
Good code is its own best documentation. As you’re about to add a comment, ask yourself, ‘How can I improve the code so that this comment isn’t needed?’ Improve the code and then document it to make it even clearer. --Steve McConnell, Author of Clean Code
Some think commenting heavily increases the 'code quality'. This is not so. Avoid writing comments to explain bad code. Improve the code to make it self-explanatory.
Can improve code quality using technique: do not repeat the obvious
If the code is self-explanatory, refrain from repeating the description in a comment just for the sake of 'good documentation'.
Bad
// increment x
x++;

//trim the input
trimInput();
Can improve code quality using technique: write to the reader
Do not write comments as if they are private notes to self. Instead, write them well enough to be understood by another programmer. One type of comments that is almost always useful is the header comment that you write for a class or an operation to explain its purpose.
Examples:
Bad Reason: this comment will only make sense to the person who wrote it
// a quick trim function used to fix bug I detected overnight
void trimInput(){
    ....
}
Good
/** Trims the input of leading and trailing spaces */
void trimInput(){
    ....
}
Bad Reason: this comment will only make sense to the person who wrote it
# a quick trim function used to fix bug I detected overnight
def trim_input():
    ...
Good
def trim_input():
"""Trim the input of leading and trailing spaces"""
    ...
Can improve code quality using technique: explain what and why, not how
Comments should explain what and why aspect of the code, rather than the how aspect.
What : The specification of what the code supposed to do. The reader can compare such comments to the implementation to verify if the implementation is correct
Example: This method is possibly buggy because the implementation does not seem to match the comment. In this case the comment could help the reader to detect the bug.
/** Removes all spaces from the {@code input} */
void compact(String input){
    input.trim();
}
Why : The rationale for the current implementation.
Example: Without this comment, the reader will not know the reason for calling this method.
// Remove spaces to comply with IE23.5 formatting rules
compact(input);
How : The explanation for how the code works. This should already be apparent from the code, if the code is self-explanatory. Adding comments to explain the same thing is redundant.
Example:
Bad Reason: Comment explains how the code works.
// return true if both left end and right end are correct or the size has not incremented
return (left && right) || (input.size() == size);
Good Reason: Code refactored to be self-explanatory. Comment no longer needed.
boolean isSameSize = (input.size() == size) ;
return (isLeftEndCorrect && isRightEndCorrect) || isSameSize;
null
B. Depth and completeness of your feature
Evaluates: How good is your Quality Assurance?
Based on: 1. your test code 2. our own manual testing 3. your performance in the v1.4 Practical Exam, 4. bugs found during PE.
Relevant: [
Objectives:
- Evaluate your,
- manual testing skills
- product evaluation skills
- effort estimation skills
- Peer-evaluate your
- product design
- implementation effort
- documentation quality
- Your performance in the practical exam will be considered for your final grade (under the QA category and under Implementation category, about 10 marks in total).
- You will be graded based on your effectiveness as a tester (e.g., the percentage of the bugs you found, the nature of the bugs you found) and how far off your evaluation/estimates are from the evaluator consensus. Explanation: we understand that you have limited expertise in this area; hence, we penalize only if your inputs don't seem to be based on a sincere effort to test/evaluate.
- The bugs found in your product by others will affect your v1.4 marks. You will be given a chance to reject false-positive bug reports.
Preparation:
- Ensure you have access to a computer that is able to run module projects e.g. has the right Java version.
- Have a good screen grab tool with annotation features so that you can quickly take a screenshot of a bug, annotate it, and post in the issue tracker.
- 💡 You can use Ctrl+V to paste a picture from the clipboard into a text box in GitHub issue tracker.
During:
- Take note of your team to test and your Tester ID. Both will be given to you by the teaching team (distributed via IVLE gradebook).
- Download from IVLE all files submitted by the team (i.e. jar file, User Guide, Developer Guide, and Project Portfolio Pages) into an empty folder.
- [~40 minutes] Test the product and report bugs
- Launch the jar file. Test it.
- You can use Developer Guide (Appendix named Instructions for Manual Testing) and the User Guide in your testing.
- No need to test features that are driven by GUI inputs (e.g. buttons, menus, etc.) Reason: Only CLI-driven features can earn credit, as per given project constraints. Some features might have both a GUI-driven and CLI-driven ways to invoke them, in which case test only the CLI-driven way of invoking it.
- The testing instructions in the Developer Guide can provide you some guidance but if you follow those instructions strictly, you are unlikely to find many bugs. You can deviate from the instructions to probe areas that are more likely to have bugs.
- You can do acceptance testing as well as system testing.
- Omit feature that existed in AB4. Instead, test features added by the team.
- Report bugs in the practical exam issue tracker, not in the team's repo.
- Issue title format:
[Tester ID] Issue descriptione.g.[26] Empty name crashes app - Do not use team ID in bug reports Reason: to prevent others copying your bug reports
- Issue title format:
- Report bugs only. Do not post suggestions. These are considered bugs:
- Behavior differs from the User Guide (or Developer Guide)
- A legitimate user behavior is not handled e.g. incorrect commands, extra parameters
- Behavior is not specified and differs from normal expectations e.g. error message does not match the error
- Write good quality bug reports; ❗️ poor quality or incorrect bug reports will not earn credit.
- Use a descriptive title
- Give a good description of the bug with steps to reproduce and screenshots
- Note that we will anonymize bug reports before revealing it to the receiving team.
- Assign a severity to the bug report:
Bug Severity labels:
severity.Low: A flaw that is unlikely to affect normal operations of the product. Appears only in very rare situations and causes a minor inconvenience only.severity.Medium: A flaw that causes occasional inconvenience to some users but they can continue to use the product.severity.High: A flaw that affects most users and causes major problems for users. i.e., makes the product almost unusable for most users.
-
[~40 minutes] Evaluate the following aspects. Note down your evaluation in a hard copy (as a backup). Submit via TEAMMATES.
-
A. Cohesiveness of product features []: Do the features fit together and match the stated target user and the value proposition?
low: One of these- target user is too general i.e. not narrower than AB4
- target user and value proposition is not clear from the user guide OR
- features don't seem to match for the most part.
medium: Some features match but some don't.high: All features match but the features are not very high value to the target user.excellent: The target user is clearly defined (not too general) and almost all new features are of high-value to the target user. i.e. the product is very attractive to the target user.unable to judge: You are unable to judge this aspect for some reason.
-
B. Quality of user docs []: Evaluate based on the parts of the user guide written by the person, as reproduced in the project portfolio. Evaluate from an end-user perspective.
low: Hard to understand, often inaccurate or missing important information.medium: Needs some effort to understand; some information is missing.high: Mostly easy to follow. Only a few areas for improvements.excellent: Easy to follow and accurate. Just enough information, visuals, examples etc. (not too much either).unable to judge: Less than 1 page worth of UG content written by the student.
-
C. Amount of work []: Evaluate the amount of work on a scale of 0 to 30
- Consider this PR (
historycommand) as 5 units of effort which means this PR (undo/redocommand) is about 15 points of effort. Given that 30 points matches an effort twice as that needed for theundo/redofeature (which was given as an example of anAgrade project), we expect most students to be have efforts lower than 20. - Count all implementation/testing/documentation work as mentioned in that person's portfolio page.
- ❗️ Do not give a high value just to be nice. If your estimate is wildly inaccurate, it means you are unable to estimate the effort required to implement a feature in a project that you are supposed to know well at this point. You will lose marks if that is the case.
- When estimating effort, ignore features that are driven by GUI inputs.
- Consider this PR (
-
D. Depth of feature (major feature) []: Evaluate the major feature done by the student for difficulty, depth, and completeness. Note: examples given below assumes AB4 did not have the commands
edit,undo, andredo.low: An easy feature e.g. make the existing find command case insensitive.medium: Moderately difficult feature, barely acceptable implementation e.g. an edit command that requires the user to type all fields, even the ones that are not being edited.high: One of the below- A moderately difficult feature but fully implemented e.g. an edit command that allows editing any field.
- A difficult feature with a reasonable implementation but some aspects are not covered undo/redo command that only allows a single undo/redo.
excellent: A difficult feature, all reasonable aspects are fully implemented undo/redo command that allows multiple undo/redo.outstanding: A difficult feature, implemented as good as it can be under the circumstances. undo/redo command that even allows undoing non-mutating commands such as select, allows selectively undo specific commands in the history, etc.unable to judge: You are unable to judge this aspect for some reason.
-
E. Quality of developer docs []: Evaluate based on the developer docs cited/reproduced in the respective project portfolio page. Evaluate from the perspective of a new developer trying to understand how the features are implemented.
low: One of these- Very small amount of content (i.e., 0.5 - 1 page).
- Hardly any use to the reader (i.e., content doesn't make much sense or redundant).
- Uses ad-hoc diagrams where UML diagrams could have been used instead.
- Multiple notation errors in UML diagrams.
medium: Some diagrams, some descriptions, but does not help the reader that much e.g. overly complicated diagrams.high: Enough diagrams (at lest two kinds of UML diagrams used) and enough descriptions (about 2 pages worth) but explanations are not always easy to follow.excellent: Easy to follow. Just enough information (not too much). Minimum repetition of content/diagrams. Good use of diagrams to complement text descriptions. Easy to understand diagrams with just enough details rather than very complicated diagrams that are hard to understand.unable to judge: One of these- no content at all.
- less than 0.5 pages worth of content.
- other problems in the document e.g. looks like included wrong content.
-
Bug Review Period:
There will be a review period for you to respond to the bug reports you received.
Duration: The review period will start around 1 day after the PE (exact time to be announced) and will last until the following Wednesday midnight.
Bug reviewing is recommended to be done as a team as some of the decisions need team consensus.
Instructions for Reviewing Bug Reports
-
First, don't freak out if there are lot of bug reports. Many can be duplicates and some can be false positives. In any case, we anticipate that all of these products will have some bugs and our penalty for bugs is not harsh. Furthermore, it depends on the severity of the bug. Some bug may not even be penalized.
-
Do not edit the subject or the description. Do not close bug reports. Your response (if any) should be added as a comment.
-
If the bug is reported multiple times, mark all copies EXCEPT one as duplicates using the
duplicatetag. In addition, use this technique to indicate which issue they are duplicates of. Duplicates can be omitted from processing steps given below. -
If a bug seems to be for a different product (i.e. wrongly assigned to your team), let us know (email prof).
-
Decide if it is a real bug and apply ONLY one of these labels.
Response Labels:
response.Accepted: You accept it as a bug.response.Rejected: What tester thought as a bug is in fact expected behavior. ❗️ The penalty for rejecting a bug using an unjustifiable explanation is higher than the penalty if the same bug was accepted. You can also reject bugs that you inherited from AB4.response.CannotReproduce: You are unable to reproduce the behavior reported in the bug after multiple tries.response.IssueUnclear: The issue description is not clear.
- If applicable, decide the type of bug:
Bug Type Labels:
type-FunctionalityBug: the bug is a flaw in how the product works.type-DocumentationBug: the bug is in the documentation.
- Suggest a severity for the bug:
Bug Severity labels:
severity.Low: A flaw that is unlikely to affect normal operations of the product. Appears only in very rare situations and causes a minor inconvenience only.severity.Medium: A flaw that causes occasional inconvenience to some users but they can continue to use the product.severity.High: A flaw that affects most users and causes major problems for users. i.e., makes the product almost unusable for most users.
-
Decide who should fix the bug. Use the
Assigneesfield to assign the issue to that person(s). There is no need to actually fix the bug though. It's simply an indication/acceptance of responsibility. If there is no assignee and we are unable to determine a suitable assignee ourselves, we'll have no choice but to distribute the penalty for that bug (if any) among all team members. -
Add an explanatory comment explaining your choice of labels and assignees.
- There is no requirement for a minimum coverage level. Note that in a production environment you are often required to have at least 90% of the code covered by tests. In this project, it can be less. The less coverage you have, the higher the risk of regression bugs, which will cost marks if not fixed before the final submission.
- You must write some tests so that we can evaluate your ability to write tests.
- How much of each type of testing should you do? We expect you to decide. You learned different types of testing and what they try to achieve. Based on that, you should decide how much of each type is required. Similarly, you can decide to what extent you want to automate tests, depending on the benefits and the effort required.
- Applying
TDD is optional. If you plan to test something, it is better to apply TDD because TDD ensures that you write functional code in a testable way. If you do it the normal way, you often find that it is hard to test the functional code because the code has low testability.
Evaluates: How well does your user guide achieves its objectives?
Based on: the relevant sections of your project portfolio. Criteria considered:
- Explanation should be clear and written to match the audience.
- Good use of visuals to complement text.
A. Process:
Evaluates: How well you did in project management related aspects of the project, as an individual and as a team
Based on: Supervisor observations of project milestones and GitHub data.
Milestones need to be reached the midnight before of the tutorial for it to be counted as achieved. To get a good grade for this aspect, achieve recommended weekly progress in at least 6/10 weeks.
Other criteria:
- Good use of GitHub milestones
- Good use of GitHub release mechanism
- Good version control, based on the repo
- Reasonable attempt to use the forking workflow
- Good task definition, assignment and tracking, based on the issue tracker
- Good use of buffers (opposite: everything at the last minute)
- Project done iteratively and incrementally (opposite: doing most of the work in one big burst)
B. Team-based tasks:
Evaluates: how much you contributed to common team-based tasks
Based on: peer evaluations and tutor observations
Relevant: [
Here is a non-exhaustive list of team-tasks:
- Necessary general code enhancements e.g.,
- Work related to renaming the product
- Work related to changing the product icon
- Morphing the product into a different product
- Setting up the GitHub, Travis, AppVeyor, etc.
- Maintaining the issue tracker
- Release management
- Updating user/developer docs that are not specific to a feature e.g. documenting the target user profile
- Incorporating more useful tools/libraries/frameworks into the product or the project workflow (e.g. automate more aspects of the project workflow using a GitHub plugin)
Policy on following instructions
When working with others, especially in a large class such as TIC2002, it is very important that you adhere to standards, policies, and instructions imposed on everyone. Not doing so creates unnecessary headaches for everyone and puts your work attitude in a negative light. That is why we penalize repeated violations of instructions. On the other hand we do understand that humans are liable to make mistakes. That is why we only penalize repeated or frequent mistakes.
We use the TEAMMATES online peer evaluation system to conduct several rounds of peer-evaluations. All peer evaluations will be taken into account when determining your participation marks. The system also allows you to give anonymous feedback to your teammates.
Extra Requirements: [considered for participation marks]
- Submitting peer evaluations is compulsory. If you routinely miss submitting peer evaluations, you can lose participation marks.
- 💡 TEAMMATES normally allows students to access it without using Google login. In this module, we encourage (but not require) you to login to TEAMMATES using your Google account and complete your profile with a
suitable profile photo . Reason: TIC2002 is a big class. This profile helps us to remember you better, even after the module is over.
-
The purpose of the profile photo is for the teaching team to identify you. Therefore, you should choose a recent individual photo showing your face clearly. Some examples can be seen in the 'Teaching team' page. Given below are some examples of good and bad profile photos.
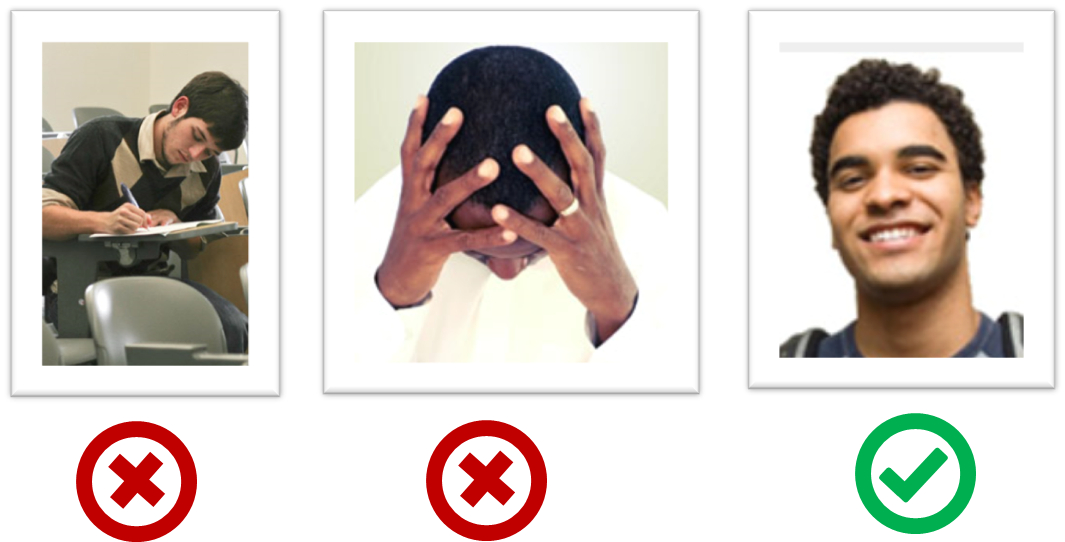
-
If you are uncomfortable posting your photo due to security reasons, you can post a lower resolution image so that it is hard for someone to misuse that image for fraudulent purposes. If you are concerned about privacy, you can request permission to omit your photo from the page by writing to prof.
Peer evaluation criteria: professional conduct
- Professional Communication :
- Communicates sufficiently and professionally. e.g. Does not use offensive language or excessive slang in project communications.
- Responds to communication from team members in a timely manner (e.g. within 24 hours).
- Punctuality: Does not cause others to waste time or slow down project progress by frequent tardiness.
- Dependability: Promises what can be done, and delivers what was promised.
- Effort: Puts in sufficient effort to, and tries their best to keep up with the module/project pace. Seeks help from others when necessary.
- Quality: Does not deliver work products that seem to be below the student's competence level i.e. tries their best to make the work product as high quality as possible within her competency level.
- Meticulousness:
- Rarely overlooks submission requirements.
- Rarely misses compulsory module activities such as pre-module survey.
- Teamwork: How willing are you to act as part of a team, contribute to team-level tasks, adhere to team decisions, etc.
Peer evaluation criteria: competency
- Technical Competency: Able to gain competency in all the required tools and techniques.
- Mentoring skills: Helps others when possible. Able to mentor others well.
- Communication skills: Able to communicate (written and spoken) well. Takes initiative in discussions.
Giving constructive feedback to others is a valuable skill for software engineers. It is also an intended learning outcome of this module. Half-hearted/trivial feedback will not earn participation marks.
Here are some things to keep in mind:
- Assume you are giving feedback to a colleague, not a friend. Keep the tone of your feedback reasonably professional. Do not use offensive language or slang.
- The feedback should be honest and consistent. Giving positive qualitative feedback (e.g.
Thanks for all the hard work!and negative ratings (e.g.Equal share - 40%) to the same team member is not being honest. - State your expectations early. All too often students give positive/neutral feedback early (hoping that the team member will improve later) and trash the team member in the final evaluation (because the he/she did not improve as expected). However, this could be confusing to the recipient. It is better to give negative feedback early so that the team member gets a clear signal that he/she needs to improve.
Relevant: [
10 marks allocated for participation can be earned in the following ways (there are ~28 available marks to choose from):
-
Good peer ratings - Criteria for professional conduct (1 mark for each criterion, max 7)
- Competency criteria (2 marks for each, max 6)
- In-lecture quizzes
- In-lecture quizzes (0.5 each, max 5 marks)
- Post-lecture quizzes (0.5 each, max 5 marks)
- Module admin tasks done on time and as instructed
- Peer evaluations (1 marks each)
- Pre-module survey (0.5 marks)
- Enhanced AB1-AB3: 1 mark each
Relevant: [
Peer evaluation criteria: professional conduct
- Professional Communication :
- Communicates sufficiently and professionally. e.g. Does not use offensive language or excessive slang in project communications.
- Responds to communication from team members in a timely manner (e.g. within 24 hours).
- Punctuality: Does not cause others to waste time or slow down project progress by frequent tardiness.
- Dependability: Promises what can be done, and delivers what was promised.
- Effort: Puts in sufficient effort to, and tries their best to keep up with the module/project pace. Seeks help from others when necessary.
- Quality: Does not deliver work products that seem to be below the student's competence level i.e. tries their best to make the work product as high quality as possible within her competency level.
- Meticulousness:
- Rarely overlooks submission requirements.
- Rarely misses compulsory module activities such as pre-module survey.
- Teamwork: How willing are you to act as part of a team, contribute to team-level tasks, adhere to team decisions, etc.
Peer evaluation criteria: competency
- Technical Competency: Able to gain competency in all the required tools and techniques.
- Mentoring skills: Helps others when possible. Able to mentor others well.
- Communication skills: Able to communicate (written and spoken) well. Takes initiative in discussions.
Relevant: [
There is no midterm.
The final exam has two parts:
- Part 1: MCQ questions (1 hour, 20 marks)
- Part 2: Essay questions (1 hour, 20 marks)
Both papers will be given to you at the start but you need to answer Part 1 first (i.e. MCQ paper). It will be collected 1 hour after the exam start time (even if arrived late for the exam). You are free to start part 2 early if you finish Part 1 early.
Final Exam: Part 1 (MCQ)
Each MCQ question gives you a statement to evaluate.
An example statement
Testing is a Q&A activity
Unless stated otherwise, the meaning of answer options are
A: Agree. If the question has multiple statements, agree with all of them.
B: Disagree. If the question has multiple statements, disagree with at least one of them
C, D, E: Not used
Number of questions: 50
Note that you have slightly more than ½ minute for each question, which means you need to go through the questions fairly quickly.
Given the fast pace required by the paper, to be fair to all students, you will not be allowed to clarify doubts about questions (in Part 1) by talking to invigilators.
- If a question is not clear, you can circle the question number and write your doubt in the exam paper, near the unclear question.
- If your doubt is justified (e.g. there is a typo in the question) or if many students found the question to be unclear, the examiner may decide to omit that question from grading.
Questions in Part 1 are confidential. You are not allowed to reveal Part 1 content to anyone after the exam. All pages of the assessment paper are to be returned at the end of the exam.
Some questions will use underlines or highlighting to draw your attention to a specific part of the question. That is because those parts are highly relevant to the answer and we don’t want you to miss the relevance of that part.
Consider the statement below:
Technique ABC can be used to generate more test cases.
The word can is underlined because the decision you need to make is whether the ABC can or cannot be used to generate more test cases; the decision is not whether ABC can be used to generate more or better test cases.
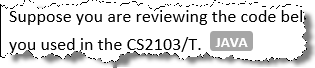
Some questions have tags e.g., the question below has a tag JAVA. These tags provide additional context about the question. In the example below, the tag indicates that the code given in the question is Java code.
The paper is open-book: you may bring any printed or written materials to the exam in hard copy format. However, given the fast pace required by Part 1, you will not have time left to refer notes during that part of the exam.
💡 Mark the OCR form as you go, rather than planning to transfer your answers to the OCR form near the end. Reason: Given there are 50 questions, it will be hard to estimate how much time you need to mass-transfer all answers to OCR forms.
💡 Write the answer in the exam paper as well as marking it in the OCR form. Reason: It will reduce the chance of missing a question. Furthermore, in case you missed a question, it will help you correct the OCR form quickly.
💡 We have tried to avoid deliberately misleading/tricky questions. If a question seems to take a very long time to figure out, you are probably over-thinking it.
You will be given a practice exam paper to familiarize yourself with this slightly unusual exam format.
Final Exam: Part 2 (Essay)
Unlike in part 1, you can ask invigilators for clarifications if you found a question to be unclear in part 2.
Yes, you may use pencils when answering part 2.
Relevant: [
Note that project grading is not competitive (not bell curved). TIC2002T projects will be assessed separately from TIC2002 projects. This is to account for the perceived difference in workload. Given below is the marking scheme.
Total: 50 marks ( 40 individual marks + 10 team marks)
Evaluates: How well do your features fit together to form a cohesive product (not how many features or how big the features are)?
Based on: user guide and the product demo. The quality of the demo will be factored in as well.
💡 Feature that fit well with the other features will earn more marks.
Evaluates:
A. Code quality/quantity:
How good your implementation is, in terms of the quality and the quantity of the code you have written yourself.
Based on: an inspection of the parts of the code you claim as written by you.
-
Ensure your code has at least some evidence of these (see here for more info)
- logging
- exceptions
- assertions
- defensive coding
-
Ensure there are no coding standard violations e.g. all boolean variables/methods sounds like booleans. Checkstyle can prevent only some coding standard violations; others need to be checked manually.
-
Ensure SLAP is applied at a reasonable level. Long methods or deeply-nested code are symptoms of low-SLAP may be counted against your code quality.
-
Reduce code duplications i.e. if there multiple blocks of code that vary only in minor ways, try to extract out similarities into one place, especially in test code.
-
In addition, try to apply as many of the
code quality guidelines covered in the module as much as you can.
Can explain the importance of code quality
Always code as if the person who ends up maintaining your code will be a violent psychopath who knows where you live. -- Martin Golding
Can explain the importance of readability
Programs should be written and polished until they acquire publication quality. --Niklaus Wirth
Among various dimensions of code quality, such as run-time efficiency, security, and robustness, one of the most important is understandability. This is because in any non-trivial software project, code needs to be read, understood, and modified by other developers later on. Even if we do not intend to pass the code to someone else, code quality is still important because we all become 'strangers' to our own code someday.
The two code samples given below achieve the same functionality, but one is easier to read.
|
Bad |
|
Good |
|
Bad |
|
Good |
Can improve code quality using technique: avoid long methods
Be wary when a method is longer than the computer screen, and take corrective action when it goes beyond 30 LOC (lines of code). The bigger the haystack, the harder it is to find a needle.
Can improve code quality using technique: avoid deep nesting
If you need more than 3 levels of indentation, you're screwed anyway, and should fix your program. --Linux 1.3.53 CodingStyle
In particular, avoid arrowhead style code.
Example:
Can improve code quality using technique: avoid complicated expressions
Avoid complicated expressions, especially those having many negations and nested parentheses. If you must evaluate complicated expressions, have it done in steps (i.e. calculate some intermediate values first and use them to calculate the final value).
Example:
Bad
return ((length < MAX_LENGTH) || (previousSize != length)) && (typeCode == URGENT);
Good
boolean isWithinSizeLimit = length < MAX_LENGTH;
boolean isSameSize = previousSize != length;
boolean isValidCode = isWithinSizeLimit || isSameSize;

boolean isUrgent = typeCode == URGENT;

return isValidCode && isUrgent;
Example:
Bad
return ((length < MAX_LENGTH) or (previous_size != length)) and (type_code == URGENT)
Good
is_within_size_limit = length < MAX_LENGTH
is_same_size = previous_size != length
is_valid_code = is_within_size_limit or is_same_size

is_urgent = type_code == URGENT

return is_valid_code and is_urgent
The competent programmer is fully aware of the strictly limited size of his own skull; therefore he approaches the programming task in full humility, and among other things he avoids clever tricks like the plague. -- Edsger Dijkstra
Can improve code quality using technique: avoid magic numbers
When the code has a number that does not explain the meaning of the number, we call that a magic number (as in “the number appears as if by magic”). Using a
Example:
|
Bad |
|
Good |
Note: Python does not have a way to make a variable a constant. However, you can use a normal variable with an ALL_CAPS name to simulate a constant.
|
Bad |
|
Good |
Similarly, we can have ‘magic’ values of other data types.
Bad
"Error 1432" // A magic string!
Can improve code quality using technique: make the code obvious
Make the code as explicit as possible, even if the language syntax allows them to be implicit. Here are some examples:
- [
Java] Use explicit type conversion instead of implicit type conversion. - [
Java,Python] Use parentheses/braces to show grouping even when they can be skipped. - [
Java,Python] Useenumerations when a certain variable can take only a small number of finite values. For example, instead of declaring the variable 'state' as an integer and using values 0,1,2 to denote the states 'starting', 'enabled', and 'disabled' respectively, declare 'state' as typeSystemStateand define an enumerationSystemStatethat has values'STARTING','ENABLED', and'DISABLED'.
Can improve code quality using technique: structure code logically
Lay out the code so that it adheres to the logical structure. The code should read like a story. Just like we use section breaks, chapters and paragraphs to organize a story, use classes, methods, indentation and line spacing in your code to group related segments of the code. For example, you can use blank lines to group related statements together. Sometimes, the correctness of your code does not depend on the order in which you perform certain intermediary steps. Nevertheless, this order may affect the clarity of the story you are trying to tell. Choose the order that makes the story most readable.
Can improve code quality using technique: do not 'trip up' reader
Avoid things that would make the reader go ‘huh?’, such as,
- unused parameters in the method signature
- similar things look different
- different things that look similar
- multiple statements in the same line
- data flow anomalies such as, pre-assigning values to variables and modifying it without any use of the pre-assigned value
Can improve code quality using technique: practice kissing
As the old adage goes, "keep it simple, stupid” (KISS). Do not try to write ‘clever’ code. For example, do not dismiss the brute-force yet simple solution in favor of a complicated one because of some ‘supposed benefits’ such as 'better reusability' unless you have a strong justification.
Debugging is twice as hard as writing the code in the first place. Therefore, if you write the code as cleverly as possible, you are, by definition, not smart enough to debug it. --Brian W. Kernighan
Programs must be written for people to read, and only incidentally for machines to execute. --Abelson and Sussman
Can improve code quality using technique: avoid premature optimizations
Optimizing code prematurely has several drawbacks:
- We may not know which parts are the real performance bottlenecks. This is especially the case when the code undergoes transformations (e.g. compiling, minifying, transpiling, etc.) before it becomes an executable. Ideally, you should use a profiler tool to identify the actual bottlenecks of the code first, and optimize only those parts.
- Optimizing can complicate the code, affecting correctness and understandability
- Hand-optimized code can be harder for the compiler to optimize (the simpler the code, the easier for the compiler to optimize it). In many cases a compiler can do a better job of optimizing the runtime code if you don't get in the way by trying to hand-optimize the source code.
A popular saying in the industry is make it work, make it right, make it fast which means in most cases getting the code to perform correctly should take priority over optimizing it. If the code doesn't work correctly, it has no value on matter how fast/efficient it it.
Premature optimization is the root of all evil in programming. --Donald Knuth
Note that there are cases where optimizing takes priority over other things e.g. when writing code for resource-constrained environments. This guideline simply a caution that you should optimize only when it is really needed.
Can improve code quality using technique: SLAP hard
Avoid varying the level of
Example:
Bad
readData();
salary = basic*rise+1000;
tax = (taxable?salary*0.07:0);
displayResult();
Good
readData();
processData();
displayResult();
Design → Design Fundamentals → Abstraction →
Abstraction is a technique for dealing with complexity. It works by establishing a level of complexity we are interested in, and suppressing the more complex details below that level.
The guiding principle of abstraction is that only details that are relevant to the current perspective or the task at hand needs to be considered. As most programs are written to solve complex problems involving large amounts of intricate details, it is impossible to deal with all these details at the same time. That is where abstraction can help.
Ignoring lower level data items and thinking in terms of bigger entities is called data abstraction.
Within a certain software component, we might deal with a user data type, while ignoring the details contained in the user data item such as name, and date of birth. These details have been ‘abstracted away’ as they do not affect the task of that software component.
Control abstraction abstracts away details of the actual control flow to focus on tasks at a simplified level.
print(“Hello”) is an abstraction of the actual output mechanism within the computer.
Abstraction can be applied repeatedly to obtain progressively higher levels of abstractions.
An example of different levels of data abstraction: a File is a data item that is at a higher level than an array and an array is at a higher level than a bit.
An example of different levels of control abstraction: execute(Game) is at a higher level than print(Char) which is at a higher than an Assembly language instruction MOV.
Abstraction is a general concept that is not limited to just data or control abstractions.
Some more general examples of abstraction:
- An OOP class is an abstraction over related data and behaviors.
- An architecture is a higher-level abstraction of the design of a software.
- Models (e.g., UML models) are abstractions of some aspect of reality.
Can improve code quality using technique: make the happy path prominent
The happy path (i.e. the execution path taken when everything goes well) should be clear and prominent in your code. Restructure the code to make the happy path unindented as much as possible. It is the ‘unusual’ cases that should be indented. Someone reading the code should not get distracted by alternative paths taken when error conditions happen. One technique that could help in this regard is the use of guard clauses.
Example:
Bad
if (!isUnusualCase) {  //detecting an unusual condition
    if (!isErrorCase) {
        start();    //main path
        process();
        cleanup();
        exit();
    } else {
        handleError();
    }
} else {
    handleUnusualCase(); //handling that unusual condition
}
In the code above,
- Unusual condition detection is separated from their handling.
- Main path is nested deeply.
Good
if (isUnusualCase) { //Guard Clause
    handleUnusualCase();
    return;
}

if (isErrorCase) { //Guard Clause
    handleError();
    return;
}

start();
process();
cleanup();
exit();
In contrast, the above code
- deals with unusual conditions as soon as they are detected so that the reader doesn't have to remember them for long.
- keeps the main path un-indented.
Can explain the need for following a standard
One essential way to improve code quality is to follow a consistent style. That is why software engineers follow a strict coding standard (aka style guide).
The aim of a coding standard is to make the entire code base look like it was written by one person. A coding standard is usually specific to a programming language and specifies guidelines such as the location of opening and closing braces, indentation styles and naming styles (e.g. whether to use Hungarian style, Pascal casing, Camel casing, etc.). It is important that the whole team/company use the same coding standard and that standard is not generally inconsistent with typical industry practices. If a company's coding standards is very different from what is used typically in the industry, new recruits will take longer to get used to the company's coding style.
💡 IDEs can help to enforce some parts of a coding standard e.g. indentation rules.
What is the recommended approach regarding coding standards?
c
What is the aim of using a coding standard? How does it help?
Can follow simple mechanical style rules
Learn basic guidelines of the Java coding standard (by OSS-Generic)
Sample coding standard: PEP 8 Python Style Guide -- by Python.org
Consider the code given below:
import java.util.*;

public class Task {
    public static final String descriptionPrefix = "description: ";
    private String description;
    private boolean important;
    List<String> pastDescription = new ArrayList<>(); // a list of past descriptions

    public Task(String d) {
      this.description = d;
      if (!d.isEmpty())
          this.important = true;
    }

    public String getAsXML() { return "<task>"+description+"</task>"; }

    /**
     * Print the description as a string.
     */
    public void printingDescription(){ System.out.println(this); }

    @Override
    public String toString() { return descriptionPrefix + description; }
}
In what ways the code violate the basic guidelines (i.e., those marked with one ⭐️) of the OSS-Generic Java Coding Standard given here?
Here are three:
descriptionPrefixis a constant and should be namedDESCRIPTION_PREFIX- method name
printingDescription()should be named asprintDescription() - boolean variable
importantshould be named to sound boolean e.g.,isImportant
There are many more.
Can follow intermediate style rules
Go through the provided Java coding standard and learn the intermediate style rules.
According to the given Java coding standard, which one of these is not a good name?
b
Explanation: checkWeight is an action. Naming variables as actions makes the code harder to follow. isWeightValid may be a better name.
Repeat the exercise in the panel below but also find violations of intermediate level guidelines.
Consider the code given below:
import java.util.*;

public class Task {
    public static final String descriptionPrefix = "description: ";
    private String description;
    private boolean important;
    List<String> pastDescription = new ArrayList<>(); // a list of past descriptions

    public Task(String d) {
      this.description = d;
      if (!d.isEmpty())
          this.important = true;
    }

    public String getAsXML() { return "<task>"+description+"</task>"; }

    /**
     * Print the description as a string.
     */
    public void printingDescription(){ System.out.println(this); }

    @Override
    public String toString() { return descriptionPrefix + description; }
}
In what ways the code violate the basic guidelines (i.e., those marked with one ⭐️) of the OSS-Generic Java Coding Standard given here?
Here are three:
descriptionPrefixis a constant and should be namedDESCRIPTION_PREFIX- method name
printingDescription()should be named asprintDescription() - boolean variable
importantshould be named to sound boolean e.g.,isImportant
There are many more.
Here's one you are more likely to miss:
* Print the description as a string.→* Prints the description as a string.
There are more.
Can explain the need for good names in code
Proper naming improves the readability. It also reduces bugs caused by ambiguities regarding the intent of a variable or a method.
There are only two hard things in Computer Science: cache invalidation and naming things. -- Phil Karlton
Can improve code quality using technique: use nouns for things and verbs for actions
Every system is built from a domain-specific language designed by the programmers to describe that system. Functions are the verbs of that language, and classes are the nouns. ― Robert C. Martin, Clean Code: A Handbook of Agile Software Craftsmanship
Use nouns for classes/variables and verbs for methods/functions.
Examples:
| Name for a | Bad | Good |
|---|---|---|
| Class | CheckLimit |
LimitChecker |
| method | result() |
calculate() |
Distinguish clearly between single-valued and multivalued variables.
Examples:
Good
Person student;
ArrayList<Person> students;
Good
student = Person('Jim')
students = [Person('Jim'), Person('Alice')]
Can improve code quality using technique: use standard words
Use correct spelling in names. Avoid 'texting-style' spelling. Avoid foreign language words, slang, and names that are only meaningful within specific contexts/times e.g. terms from private jokes, a TV show currently popular in your country
Can improve code quality using technique: use name to explain
A name is not just for differentiation; it should explain the named entity to the reader accurately and at a sufficient level of detail.
Examples:
| Bad | Good |
|---|---|
processInput() (what 'process'?) |
removeWhiteSpaceFromInput() |
flag |
isValidInput |
temp |
If the name has multiple words, they should be in a sensible order.
Examples:
| Bad | Good |
|---|---|
bySizeOrder() |
orderBySize() |
Imagine going to the doctor's and saying "My eye1 is swollen"! Don’t use numbers or case to distinguish names.
Examples:
| Bad | Bad | Good |
|---|---|---|
value1, value2 |
value, Value |
originalValue, finalValue |
Can improve code quality using technique: not too long, not too short
While it is preferable not to have lengthy names, names that are 'too short' are even worse. If you must abbreviate or use acronyms, do it consistently. Explain their full meaning at an obvious location.
Can improve code quality using technique: avoid misleading names
Related things should be named similarly, while unrelated things should NOT.
Example: Consider these variables
colorBlack: hex value for color blackcolorWhite: hex value for color whitecolorBlue: number of times blue is usedhexForRed: : hex value for color red
This is misleading because colorBlue is named similar to colorWhite and colorBlack but has a different purpose while hexForRed is named differently but has very similar purpose to the first two variables. The following is better:
hexForBlackhexForWhitehexForRedblueColorCount
Avoid misleading or ambiguous names (e.g. those with multiple meanings), similar sounding names, hard-to-pronounce ones (e.g. avoid ambiguities like "is that a lowercase L, capital I or number 1?", or "is that number 0 or letter O?"), almost similar names.
Examples:
| Bad | Good | Reason |
|---|---|---|
phase0 |
phaseZero |
Is that zero or letter O? |
rwrLgtDirn |
rowerLegitDirection |
Hard to pronounce |
right left wrong |
rightDirection leftDirection wrongResponse |
right is for 'correct' or 'opposite of 'left'? |
redBooks readBooks |
redColorBooks booksRead |
red and read (past tense) sounds the same |
FiletMignon |
egg |
If the requirement is just a name of a food, egg is a much easier to type/say choice than FiletMignon |
Can explain the need for avoiding error-prone shortcuts
It is safer to use language constructs in the way they are meant to be used, even if the language allows shortcuts. Some such coding practices are common sources of bugs. Know them and avoid them.
Can improve code quality using technique: use the default branch
Always include a default branch in case statements.
Furthermore, use it for the intended default action and not just to execute the last option. If there is no default action, you can use the 'default' branch to detect errors (i.e. if execution reached the default branch, throw an exception). This also applies to the final else of an if-else construct. That is, the final else should mean 'everything else', and not the final option. Do not use else when an if condition can be explicitly specified, unless there is absolutely no other possibility.
Bad
if (red) print "red";
else print "blue";
Good
if (red) print "red";
else if (blue) print "blue";
else error("incorrect input");
Can improve code quality using technique: don't recycle variables or parameters
- Use one variable for one purpose. Do not reuse a variable for a different purpose other than its intended one, just because the data type is the same.
- Do not reuse formal parameters as local variables inside the method.
Bad
double computeRectangleArea(double length, double width) {
    length = length * width;
    return length;
}
Good
double computeRectangleArea(double length, double width) {
    double area;
    area = length * width;
    return area;
}
Can improve code quality using technique: avoid empty catch blocks
Never write an empty catch statement. At least give a comment to explain why the catch block is left empty.
Can improve code quality using technique: delete dead code
We all feel reluctant to delete code we have painstakingly written, even if we have no use for that code any more ("I spent a lot of time writing that code; what if we need it again?"). Consider all code as baggage you have to carry; get rid of unused code the moment it becomes redundant. If you need that code again, simply recover it from the revision control tool you are using. Deleting code you wrote previously is a sign that you are improving.
Can improve code quality using technique: minimise scope of variables
Minimize global variables. Global variables may be the most convenient way to pass information around, but they do create implicit links between code segments that use the global variable. Avoid them as much as possible.
Define variables in the least possible scope. For example, if the variable is used only within the if block of the conditional statement, it should be declared inside that if block.
The most powerful technique for minimizing the scope of a local variable is to declare it where it is first used. -- Effective Java, by Joshua Bloch
Resources:
Can improve code quality using technique: minimise code duplication
Code duplication, especially when you copy-paste-modify code, often indicates a poor quality implementation. While it may not be possible to have zero duplication, always think twice before duplicating code; most often there is a better alternative.
This guideline is closely related to the
Supplmentary → Principles →
DRY (Don't Repeat Yourself) Principle: Every piece of knowledge must have a single, unambiguous, authoritative representation within a system The Pragmatic Programmer, by Andy Hunt and Dave Thomas
This principle guards against duplication of information.
The functionality implemented twice is a violation of the DRY principle even if the two implementations are different.
The value a system-wide timeout being defined in multiple places is a violation of DRY.
Can explain the need for commenting minimally but sufficiently
Good code is its own best documentation. As you’re about to add a comment, ask yourself, ‘How can I improve the code so that this comment isn’t needed?’ Improve the code and then document it to make it even clearer. --Steve McConnell, Author of Clean Code
Some think commenting heavily increases the 'code quality'. This is not so. Avoid writing comments to explain bad code. Improve the code to make it self-explanatory.
Can improve code quality using technique: do not repeat the obvious
If the code is self-explanatory, refrain from repeating the description in a comment just for the sake of 'good documentation'.
Bad
// increment x
x++;

//trim the input
trimInput();
Can improve code quality using technique: write to the reader
Do not write comments as if they are private notes to self. Instead, write them well enough to be understood by another programmer. One type of comments that is almost always useful is the header comment that you write for a class or an operation to explain its purpose.
Examples:
Bad Reason: this comment will only make sense to the person who wrote it
// a quick trim function used to fix bug I detected overnight
void trimInput(){
    ....
}
Good
/** Trims the input of leading and trailing spaces */
void trimInput(){
    ....
}
Bad Reason: this comment will only make sense to the person who wrote it
# a quick trim function used to fix bug I detected overnight
def trim_input():
    ...
Good
def trim_input():
"""Trim the input of leading and trailing spaces"""
    ...
Can improve code quality using technique: explain what and why, not how
Comments should explain what and why aspect of the code, rather than the how aspect.
What : The specification of what the code supposed to do. The reader can compare such comments to the implementation to verify if the implementation is correct
Example: This method is possibly buggy because the implementation does not seem to match the comment. In this case the comment could help the reader to detect the bug.
/** Removes all spaces from the {@code input} */
void compact(String input){
    input.trim();
}
Why : The rationale for the current implementation.
Example: Without this comment, the reader will not know the reason for calling this method.
// Remove spaces to comply with IE23.5 formatting rules
compact(input);
How : The explanation for how the code works. This should already be apparent from the code, if the code is self-explanatory. Adding comments to explain the same thing is redundant.
Example:
Bad Reason: Comment explains how the code works.
// return true if both left end and right end are correct or the size has not incremented
return (left && right) || (input.size() == size);
Good Reason: Code refactored to be self-explanatory. Comment no longer needed.
boolean isSameSize = (input.size() == size) ;
return (isLeftEndCorrect && isRightEndCorrect) || isSameSize;
null
B. Depth and completeness of your feature
Evaluates: How good is your Quality Assurance?
Based on: 1. your test code 2. our own manual testing 3. your performance in the v1.4 Practical Exam, 4. bugs found during PE.
Relevant: [
Objectives:
- Evaluate your,
- manual testing skills
- product evaluation skills
- effort estimation skills
- Peer-evaluate your
- product design
- implementation effort
- documentation quality
- Your performance in the practical exam will be considered for your final grade (under the QA category and under Implementation category, about 10 marks in total).
- You will be graded based on your effectiveness as a tester (e.g., the percentage of the bugs you found, the nature of the bugs you found) and how far off your evaluation/estimates are from the evaluator consensus. Explanation: we understand that you have limited expertise in this area; hence, we penalize only if your inputs don't seem to be based on a sincere effort to test/evaluate.
- The bugs found in your product by others will affect your v1.4 marks. You will be given a chance to reject false-positive bug reports.
Preparation:
- Ensure you have access to a computer that is able to run module projects e.g. has the right Java version.
- Have a good screen grab tool with annotation features so that you can quickly take a screenshot of a bug, annotate it, and post in the issue tracker.
- 💡 You can use Ctrl+V to paste a picture from the clipboard into a text box in GitHub issue tracker.
During:
- Take note of your team to test and your Tester ID. Both will be given to you by the teaching team (distributed via IVLE gradebook).
- Download from IVLE all files submitted by the team (i.e. jar file, User Guide, Developer Guide, and Project Portfolio Pages) into an empty folder.
- [~40 minutes] Test the product and report bugs
- Launch the jar file. Test it.
- You can use Developer Guide (Appendix named Instructions for Manual Testing) and the User Guide in your testing.
- No need to test features that are driven by GUI inputs (e.g. buttons, menus, etc.) Reason: Only CLI-driven features can earn credit, as per given project constraints. Some features might have both a GUI-driven and CLI-driven ways to invoke them, in which case test only the CLI-driven way of invoking it.
- The testing instructions in the Developer Guide can provide you some guidance but if you follow those instructions strictly, you are unlikely to find many bugs. You can deviate from the instructions to probe areas that are more likely to have bugs.
- You can do acceptance testing as well as system testing.
- Omit feature that existed in AB4. Instead, test features added by the team.
- Report bugs in the practical exam issue tracker, not in the team's repo.
- Issue title format:
[Tester ID] Issue descriptione.g.[26] Empty name crashes app - Do not use team ID in bug reports Reason: to prevent others copying your bug reports
- Issue title format:
- Report bugs only. Do not post suggestions. These are considered bugs:
- Behavior differs from the User Guide (or Developer Guide)
- A legitimate user behavior is not handled e.g. incorrect commands, extra parameters
- Behavior is not specified and differs from normal expectations e.g. error message does not match the error
- Write good quality bug reports; ❗️ poor quality or incorrect bug reports will not earn credit.
- Use a descriptive title
- Give a good description of the bug with steps to reproduce and screenshots
- Note that we will anonymize bug reports before revealing it to the receiving team.
- Assign a severity to the bug report:
Bug Severity labels:
severity.Low: A flaw that is unlikely to affect normal operations of the product. Appears only in very rare situations and causes a minor inconvenience only.severity.Medium: A flaw that causes occasional inconvenience to some users but they can continue to use the product.severity.High: A flaw that affects most users and causes major problems for users. i.e., makes the product almost unusable for most users.
-
[~40 minutes] Evaluate the following aspects. Note down your evaluation in a hard copy (as a backup). Submit via TEAMMATES.
-
A. Cohesiveness of product features []: Do the features fit together and match the stated target user and the value proposition?
low: One of these- target user is too general i.e. not narrower than AB4
- target user and value proposition is not clear from the user guide OR
- features don't seem to match for the most part.
medium: Some features match but some don't.high: All features match but the features are not very high value to the target user.excellent: The target user is clearly defined (not too general) and almost all new features are of high-value to the target user. i.e. the product is very attractive to the target user.unable to judge: You are unable to judge this aspect for some reason.
-
B. Quality of user docs []: Evaluate based on the parts of the user guide written by the person, as reproduced in the project portfolio. Evaluate from an end-user perspective.
low: Hard to understand, often inaccurate or missing important information.medium: Needs some effort to understand; some information is missing.high: Mostly easy to follow. Only a few areas for improvements.excellent: Easy to follow and accurate. Just enough information, visuals, examples etc. (not too much either).unable to judge: Less than 1 page worth of UG content written by the student.
-
C. Amount of work []: Evaluate the amount of work on a scale of 0 to 30
- Consider this PR (
historycommand) as 5 units of effort which means this PR (undo/redocommand) is about 15 points of effort. Given that 30 points matches an effort twice as that needed for theundo/redofeature (which was given as an example of anAgrade project), we expect most students to be have efforts lower than 20. - Count all implementation/testing/documentation work as mentioned in that person's portfolio page.
- ❗️ Do not give a high value just to be nice. If your estimate is wildly inaccurate, it means you are unable to estimate the effort required to implement a feature in a project that you are supposed to know well at this point. You will lose marks if that is the case.
- When estimating effort, ignore features that are driven by GUI inputs.
- Consider this PR (
-
D. Depth of feature (major feature) []: Evaluate the major feature done by the student for difficulty, depth, and completeness. Note: examples given below assumes AB4 did not have the commands
edit,undo, andredo.low: An easy feature e.g. make the existing find command case insensitive.medium: Moderately difficult feature, barely acceptable implementation e.g. an edit command that requires the user to type all fields, even the ones that are not being edited.high: One of the below- A moderately difficult feature but fully implemented e.g. an edit command that allows editing any field.
- A difficult feature with a reasonable implementation but some aspects are not covered undo/redo command that only allows a single undo/redo.
excellent: A difficult feature, all reasonable aspects are fully implemented undo/redo command that allows multiple undo/redo.outstanding: A difficult feature, implemented as good as it can be under the circumstances. undo/redo command that even allows undoing non-mutating commands such as select, allows selectively undo specific commands in the history, etc.unable to judge: You are unable to judge this aspect for some reason.
-
E. Quality of developer docs []: Evaluate based on the developer docs cited/reproduced in the respective project portfolio page. Evaluate from the perspective of a new developer trying to understand how the features are implemented.
low: One of these- Very small amount of content (i.e., 0.5 - 1 page).
- Hardly any use to the reader (i.e., content doesn't make much sense or redundant).
- Uses ad-hoc diagrams where UML diagrams could have been used instead.
- Multiple notation errors in UML diagrams.
medium: Some diagrams, some descriptions, but does not help the reader that much e.g. overly complicated diagrams.high: Enough diagrams (at lest two kinds of UML diagrams used) and enough descriptions (about 2 pages worth) but explanations are not always easy to follow.excellent: Easy to follow. Just enough information (not too much). Minimum repetition of content/diagrams. Good use of diagrams to complement text descriptions. Easy to understand diagrams with just enough details rather than very complicated diagrams that are hard to understand.unable to judge: One of these- no content at all.
- less than 0.5 pages worth of content.
- other problems in the document e.g. looks like included wrong content.
-
Bug Review Period:
There will be a review period for you to respond to the bug reports you received.
Duration: The review period will start around 1 day after the PE (exact time to be announced) and will last until the following Wednesday midnight.
Bug reviewing is recommended to be done as a team as some of the decisions need team consensus.
Instructions for Reviewing Bug Reports
-
First, don't freak out if there are lot of bug reports. Many can be duplicates and some can be false positives. In any case, we anticipate that all of these products will have some bugs and our penalty for bugs is not harsh. Furthermore, it depends on the severity of the bug. Some bug may not even be penalized.
-
Do not edit the subject or the description. Do not close bug reports. Your response (if any) should be added as a comment.
-
If the bug is reported multiple times, mark all copies EXCEPT one as duplicates using the
duplicatetag. In addition, use this technique to indicate which issue they are duplicates of. Duplicates can be omitted from processing steps given below. -
If a bug seems to be for a different product (i.e. wrongly assigned to your team), let us know (email prof).
-
Decide if it is a real bug and apply ONLY one of these labels.
Response Labels:
response.Accepted: You accept it as a bug.response.Rejected: What tester thought as a bug is in fact expected behavior. ❗️ The penalty for rejecting a bug using an unjustifiable explanation is higher than the penalty if the same bug was accepted. You can also reject bugs that you inherited from AB4.response.CannotReproduce: You are unable to reproduce the behavior reported in the bug after multiple tries.response.IssueUnclear: The issue description is not clear.
- If applicable, decide the type of bug:
Bug Type Labels:
type-FunctionalityBug: the bug is a flaw in how the product works.type-DocumentationBug: the bug is in the documentation.
- Suggest a severity for the bug:
Bug Severity labels:
severity.Low: A flaw that is unlikely to affect normal operations of the product. Appears only in very rare situations and causes a minor inconvenience only.severity.Medium: A flaw that causes occasional inconvenience to some users but they can continue to use the product.severity.High: A flaw that affects most users and causes major problems for users. i.e., makes the product almost unusable for most users.
-
Decide who should fix the bug. Use the
Assigneesfield to assign the issue to that person(s). There is no need to actually fix the bug though. It's simply an indication/acceptance of responsibility. If there is no assignee and we are unable to determine a suitable assignee ourselves, we'll have no choice but to distribute the penalty for that bug (if any) among all team members. -
Add an explanatory comment explaining your choice of labels and assignees.
- There is no requirement for a minimum coverage level. Note that in a production environment you are often required to have at least 90% of the code covered by tests. In this project, it can be less. The less coverage you have, the higher the risk of regression bugs, which will cost marks if not fixed before the final submission.
- You must write some tests so that we can evaluate your ability to write tests.
- How much of each type of testing should you do? We expect you to decide. You learned different types of testing and what they try to achieve. Based on that, you should decide how much of each type is required. Similarly, you can decide to what extent you want to automate tests, depending on the benefits and the effort required.
- Applying
TDD is optional. If you plan to test something, it is better to apply TDD because TDD ensures that you write functional code in a testable way. If you do it the normal way, you often find that it is hard to test the functional code because the code has low testability.
Evaluates: How well does your user guide achieves its objectives?
Based on: the relevant sections of your project portfolio. Criteria considered:
- Explanation should be clear and written to match the audience.
- Good use of visuals to complement text.
A. Process:
Evaluates: How well you did in project management related aspects of the project, as an individual and as a team
Based on: Supervisor observations of project milestones and GitHub data.
Milestones need to be reached the midnight before of the tutorial for it to be counted as achieved. To get a good grade for this aspect, achieve recommended weekly progress in at least 6/10 weeks.
Other criteria:
- Good use of GitHub milestones
- Good use of GitHub release mechanism
- Good version control, based on the repo
- Reasonable attempt to use the forking workflow
- Good task definition, assignment and tracking, based on the issue tracker
- Good use of buffers (opposite: everything at the last minute)
- Project done iteratively and incrementally (opposite: doing most of the work in one big burst)
B. Team-based tasks:
Evaluates: how much you contributed to common team-based tasks
Based on: peer evaluations and tutor observations
Relevant: [
Here is a non-exhaustive list of team-tasks:
- Necessary general code enhancements e.g.,
- Work related to renaming the product
- Work related to changing the product icon
- Morphing the product into a different product
- Setting up the GitHub, Travis, AppVeyor, etc.
- Maintaining the issue tracker
- Release management
- Updating user/developer docs that are not specific to a feature e.g. documenting the target user profile
- Incorporating more useful tools/libraries/frameworks into the product or the project workflow (e.g. automate more aspects of the project workflow using a GitHub plugin)
10 marks allocated for participation can be earned in the following ways (there are ~28 available marks to choose from):
-
Good peer ratings - Criteria for professional conduct (1 mark for each criterion, max 7)
- Competency criteria (2 marks for each, max 6)
- In-lecture quizzes
- In-lecture quizzes (0.5 each, max 5 marks)
- Post-lecture quizzes (0.5 each, max 5 marks)
- Module admin tasks done on time and as instructed
- Peer evaluations (1 marks each)
- Pre-module survey (0.5 marks)
- Enhanced AB1-AB3: 1 mark each
Relevant: [
Peer evaluation criteria: professional conduct
- Professional Communication :
- Communicates sufficiently and professionally. e.g. Does not use offensive language or excessive slang in project communications.
- Responds to communication from team members in a timely manner (e.g. within 24 hours).
- Punctuality: Does not cause others to waste time or slow down project progress by frequent tardiness.
- Dependability: Promises what can be done, and delivers what was promised.
- Effort: Puts in sufficient effort to, and tries their best to keep up with the module/project pace. Seeks help from others when necessary.
- Quality: Does not deliver work products that seem to be below the student's competence level i.e. tries their best to make the work product as high quality as possible within her competency level.
- Meticulousness:
- Rarely overlooks submission requirements.
- Rarely misses compulsory module activities such as pre-module survey.
- Teamwork: How willing are you to act as part of a team, contribute to team-level tasks, adhere to team decisions, etc.
Peer evaluation criteria: competency
- Technical Competency: Able to gain competency in all the required tools and techniques.
- Mentoring skills: Helps others when possible. Able to mentor others well.
- Communication skills: Able to communicate (written and spoken) well. Takes initiative in discussions.
Your tutor will serve as your project supervisor too.
The supervisor's main job is to observe, facilitate self/peer learning, evaluate, and give feedback.
Tutorial time is the main avenue for meeting your supervisor. In addition, you can meet the supervisor before/after the tutorial, or any other time, as many times you need, subject to availability in his/her schedule.
Note that it is not the supervisor’s job to chase you down and give help. It is up to you to get as much feedback from the as you need. You are free to request more feedback from the supervisor as necessary. Similarly, it is not the job of the supervisor to lead your project to success.
What if I don’t carry around a laptop?
If you do not have a laptop or prefer not to bring the laptop, it is up to you to show your work to the tutor in some way (e.g. by connecting to your home PC remotely), without requiring extra time/effort from the tutor or team members.
Reason: As you enjoy the benefits of not bring the laptop; you (not others) should bear the cost too.
Outcomes
OOP + Java
W3.1 Can use some useful Java classes
W3.1a Can use Java API documentation about classes
C++ to Java → Some Useful Classes →
Java comes with a rich collection of classes that you can use. They form what is known as the Java API (Application Programming Interface). Each class in the API comes with documentation in a standard format.
W3.1b Can use the String class
C++ to Java → Some Useful Classes →
String is a built-in Java class that you
Any class in the java.lang package can be used without importing.
Find characters of a string
Strings provide a method named charAt, which extracts a character. It returns a char, a primitive type that stores an individual character (as opposed to strings of them).
String fruit = "banana";
char letter = fruit.charAt(0);
The argument 0 means that we want the letter at position 0. Like array indexes, string indexes start at 0, so the character assigned to letter is 'b'.
You can convert a string to an array of characters using the toCharArray method.
char[] fruitChars = fruit.toCharArray()
Change a string to upper/lower case
Strings provide methods, toUpperCase and toLowerCase, that convert from uppercase to lowercase and back.
After these statements run, upperName refers to the string "ALAN TURING" but name still refers to "Alan Turing".
String name = "Alan Turing";
String upperName = name.toUpperCase();
System.out.println(name);
System.out.println(upperName);
Alan Turing
ALAN TURING
Note that a string method cannot change the string object on which the method is invoked, because strings are toUpperCase on a string "abc", you get a new string object "ABC" as the return value rather than the string "abc" being changed to "ABC". As a result, for such string methods that seemingly modify the string but actually return a new string instead e.g., toLowerCase, invoking the method has no effect if you don’t assign the return value to a variable.
String s = "Ada";
s.toUpperCase(); // no effect
s = s.toUpperCase(); // the correct way
Replacing parts of a string
Another useful method is replace, which finds and replaces instances of one string within another.
This example replaces "Computer Science" with "CS".
String text = "Computer Science is fun!";
text = text.replace("Computer Science", "CS");
System.out.println(text);
CS is fun!
Accessing substrings
The substring method returns a new string that copies letters from an existing string, starting at the given index.
"banana".substring(0)"banana""banana".substring(2)"nana""banana".substring(6)""
If it’s invoked with two arguments, they are treated as a start and end index:
"banana".substring(0, 3)"ban""banana".substring(2, 5)"nan""banana".substring(6, 6)""
Searching within strings
The indexOf method searches for a single character (or a substring) in a string and returns the index of the first occurrence. The method returns -1 if there are no occurrences.
"banana".indexOf('a')1"banana".indexOf('a', 2)3searches for'a', starting from position 2"banana".indexOf('x')-1"banana".indexOf("nan")2searches for the substring"nan"
Comparing Strings
To compare two strings, it may be tempting to use the == and != operators.
String name1 = "Alan Turing";
String name2 = "Ada Lovelace";
if (name1 == name2) {                 // wrong!
    System.out.println("The names are the same.");
}
This code compiles and runs, and most of the time it gets the answer right. But it is not correct, and sometimes it gets the answer wrong. The problem is that the == operator checks whether the two variables refer to the same object (by comparing the references). If you give it two different strings that contain the same letters, it yields false.
The right way to compare strings is with the equals method.
This example invokes equals on name1 and passes name2 as an argument. The equals method returns true if the strings contain the same characters; otherwise it returns false.
if (name1.equals(name2)) {
    System.out.println("The names are the same.");
}
If the strings differ, we can use compareTo to see which comes first in alphabetical order. The return value from compareTo is the difference between the first characters in the strings that differ. If the strings are equal, their difference is zero. If the first string (the one on which the method is invoked) comes first in the alphabet, the difference is negative. Otherwise, the difference is positive.
In this example, compareTo returns positive 8, because the second letter of "Ada" comes before the second letter of "Alan" by 8 letters.
int diff = name1.compareTo(name2);
if (diff == 0) {
    System.out.println("The names are the same.");
} else if (diff < 0) {
    System.out.println("name1 comes before name2.");
} else if (diff > 0) {
    System.out.println("name2 comes before name1.");
}
Both equals and compareTo are case-sensitive. The uppercase letters come before the lowercase letters, so "Ada" comes before "ada". To check if two strings are similar irrespective of the differences in case, you can use the equalsIgnoreCase method.
String s1 = "Apple";
String s2 = "apple";
System.out.println(s1.equals(s2)); //false
System.out.println(s1.equalsIgnoreCase(s2)); //true
Some more comparison-related String methods:
contains: checks if one string is a sub-string of the other e.g.,SnappleandappstartsWith: checks if one string has the other as a substring at the beginning e.g.,AppleandAppendsWith: checks if one string has the other as a substring at the end e.g.,Crabandab
Printing special characters (line breaks, tabs, ...)
You can embed a special character e.g., line break, tab, backspace, etc. in a string using an escape sequence.
| Escape sequence | meaning |
|---|---|
\n |
newline character |
\t |
tab character |
\b |
backspace character |
\f |
form feed character |
\r |
carriage return character |
\" |
" (double quote) character |
\' |
' (single quote) character |
\\ |
\ (back slash) character |
\uDDDD |
character from the Unicode character set, by specifying the Unicode as four hex digits in the place of DDDD |
An example of using escape sequences to printing some special characters.
System.out.println("First line\nSecond \"line\"");
First line
Second "line"
💡 As the behavior of the \n depends on the platform, the recommended way to print a line break is using the System.lineSeparator() as it works the same in all platforms.
Using System.lineSeparator() to print a line break.
System.out.println("First line" + System.lineSeparator() + "Second line");
First line
Second line
String formatting
Sometimes programs need to create strings that are formatted a certain way. String.format takes a format specifier followed by a sequence of values and returns a new string formatted as specified.
The following method returns a time string in 12-hour format. The format specifier \%02d means “two digit integer padded with zeros”, so timeString(19, 5) returns the string "07:05 PM".
public static String timeString(int hour, int minute) {
    String ampm;
    if (hour < 12) {
        ampm = "AM";
        if (hour == 0) {
            hour = 12;  // midnight
        }
    } else {
        ampm = "PM";
        hour = hour - 12;
    }
    return String.format("%02d:%02d %s", hour, minute, ampm); // returns "07:05 PM"
}
Implement the printPrice method in the code below to produce the given output. Its behavior:
- The parameter
itemis a string in the formatname--$pricei.e., a name and a price of an item separated using a--e.g.,banana--$3/50 - It prints the
NAME: pricewhere the name is in upper case. The price does not have a$sign and has.in place of the/
e.g.,banana--$3/50BANANA: 3.50 - The
namepart of the input can have trailing/leading spaces which should be omitted from the output.
e.g.,banana --$3/50BANANA: 3.50
💡 Do a Web search to find how to remove leading/trailing spaces. Suggested search terms java string remove leading trailing spaces
public class Main {


    public static void printPrice(String item) {
        // TODO: add your code here

    }

    public static void main(String[] args) {
        printPrice("sandwich  --$4/50");
        printPrice("  soda --$10/00");
        printPrice("  fries --$0/50");
    }
}
SANDWICH: 4.50
SODA: 10.00
FRIES: 0.50
Partial solution:
public static void printPrice(String item) {
    int dividerPosition = item.indexOf("--");
    String itemName = item.substring(0, dividerPosition);
    //...
    System.out.println(itemName.trim().toUpperCase() + ...);

}
Evidence:
To be able to do exercises such as these:
Implement the printPrice method in the code below to produce the given output. Its behavior:
- The parameter
itemis a string in the formatname--$pricei.e., a name and a price of an item separated using a--e.g.,banana--$3/50 - It prints the
NAME: pricewhere the name is in upper case. The price does not have a$sign and has.in place of the/
e.g.,banana--$3/50BANANA: 3.50 - The
namepart of the input can have trailing/leading spaces which should be omitted from the output.
e.g.,banana --$3/50BANANA: 3.50
💡 Do a Web search to find how to remove leading/trailing spaces. Suggested search terms java string remove leading trailing spaces
public class Main {


    public static void printPrice(String item) {
        // TODO: add your code here

    }

    public static void main(String[] args) {
        printPrice("sandwich  --$4/50");
        printPrice("  soda --$10/00");
        printPrice("  fries --$0/50");
    }
}
SANDWICH: 4.50
SODA: 10.00
FRIES: 0.50
Partial solution:
public static void printPrice(String item) {
    int dividerPosition = item.indexOf("--");
    String itemName = item.substring(0, dividerPosition);
    //...
    System.out.println(itemName.trim().toUpperCase() + ...);

}
W3.1c Can use wrapper classes for primitive
C++ to Java → Some Useful Classes →
Primitive values (like int, double, and char) do not provide methods.
For example, you can’t call equals on an int:
int i = 5;
System.out.println(i.equals(5));  // compiler error
But for each primitive type, there is a corresponding class in the Java library, called a wrapper class. The wrapper class for char is called Character; for int it’s called Integer. Other wrapper classes include Boolean, Long, and Double. They are in the java.lang package, so you can use them without importing them.
Double d = new Double(2.5);
int i = d.intValue();
System.out.println(d);
System.out.println(i);
2.5
2
Each wrapper class defines constants MIN_VALUE and MAX_VALUE. Because these constants are available in wrapper classes, you don’t have to remember them, and you don’t have to include them in your programs.
Accessing max and min values for integers:
System.out.println(Integer.MIN_VALUE + " : " + Integer.MAX_VALUE);
-2147483648 : 2147483647
Wrapper classes provide methods for converting strings to other types. In this context, parse means something like “read and translate”. Integer.parseInt converts a string to (you guessed it) an integer. The other wrapper classes provide similar methods, like Double.parseDouble and Boolean.parseBoolean.
Integer.parseInt("12345") 1234
Wrapper classes also provide toString, which returns a string representation of a value.
Integer.toString(12345) "1234"
Implement the printTotalScore method in the code below to produce the given output. Its behavior:
valuesis an array of strings, each string representing an integer e.g.,["5", "-1"]- The method prints the total of the numbers represented by the strings in the array
["5", "-1"]4
public class Main {

    public static void printTotalScore(String[] values){
        // TODO: add your code here
    }

    public static void main(String[] args) {
        printTotalScore(new String[]{});
        printTotalScore(new String[]{"0", "124", "-15"});
    }
}
0
109
💡 You can use the Integer.parseInt() method to convert a String to the equivalent int value.
Partial solution:
public static void printTotalScore(String[] values){
    int total = 0;
    for (String value: values){
        // convert the value to an int and add to the total
    }
    System.out.println(total);
}
Evidence:
To be able to do exercises such as these:
Implement the printTotalScore method in the code below to produce the given output. Its behavior:
valuesis an array of strings, each string representing an integer e.g.,["5", "-1"]- The method prints the total of the numbers represented by the strings in the array
["5", "-1"]4
public class Main {

    public static void printTotalScore(String[] values){
        // TODO: add your code here
    }

    public static void main(String[] args) {
        printTotalScore(new String[]{});
        printTotalScore(new String[]{"0", "124", "-15"});
    }
}
0
109
💡 You can use the Integer.parseInt() method to convert a String to the equivalent int value.
Partial solution:
public static void printTotalScore(String[] values){
    int total = 0;
    for (String value: values){
        // convert the value to an int and add to the total
    }
    System.out.println(total);
}
W3.1d Can use the Arrays class
C++ to Java → Some Useful Classes →
java.util.Arrays provides methods for working with arrays. One of them, toString, returns a string representation of an array. It also provides a copyOf that copies an array.
Using Arrays.copyOf and Arrays.toString:
int[] a = new int[]{1,2,3,4};

int[] b = Arrays.copyOf(a, 3); // copy first three elements
System.out.println(Arrays.toString(b));

int[] c = Arrays.copyOf(a, a.length); // copy all elements
System.out.println(Arrays.toString(c));
[1, 2, 3]
[1, 2, 3, 4]
Implement the following two methods in the code below to produce the given output.
filterEmailsfilterEmails(String[] items): String[]itemsis an array of strings each of which may be an email address or some other random string- Returns a
String[]containing email addresses that were initems. Any string containing@is considered as an email.
["aaa@bbb", "xyz"]["aaa@bbb"]
printItems(String[] items)- Prints
itemsin the standard array format. e.g.,["aaa", "bbb"][aaa, bbb]
- Prints
import java.util.Arrays;

public class Main {
    public static String[] filterEmails(String[] items){
        // TODO: add your code here
    }

    public static void printItems(String[] items){
        // TODO: add your code here
    }

    public static void main(String[] args) {
        printItems(filterEmails(new String[]{}));
        printItems(filterEmails(new String[]{"abc"}));
        printItems(filterEmails(new String[]{"adam@example.com", "aab", "john@example.com", "some@"}));
        printItems(filterEmails(new String[]{"xyz", "@bee.com", "aab"}));
    }
}
[]
[]
[adam@example.com, john@example.com, some@]
[@bee.com]
filterEmailsfilterEmails(String[] items): String[]- create a new array (say
emails) of the same size asitems - go through the elements in the
itemsand add toemailsif the element contains@(you can use thecontainsmethod of theStringclass here) - Use
Arrays.copyOfmethod to return the filled part ofemails.
- create a new array (say
printItems(String[] items)- 💡 You can use the
Arrays.toString()method for this.
- 💡 You can use the
public static String[] filterEmails(String[] items){
    String[] results = new String[items.length];
    int matchCount = 0;
    for(String item: items){
        if (item.contains("@")){
           //...
        }
    }
    return Arrays.copyOf(results, matchCount);
}

public static void printItems(String[] items){
    System.out.println(Arrays.toString(items));
}
Evidence:
To be able to do exercises such as these:
Implement the following two methods in the code below to produce the given output.
filterEmailsfilterEmails(String[] items): String[]itemsis an array of strings each of which may be an email address or some other random string- Returns a
String[]containing email addresses that were initems. Any string containing@is considered as an email.
["aaa@bbb", "xyz"]["aaa@bbb"]
printItems(String[] items)- Prints
itemsin the standard array format. e.g.,["aaa", "bbb"][aaa, bbb]
- Prints
import java.util.Arrays;

public class Main {
    public static String[] filterEmails(String[] items){
        // TODO: add your code here
    }

    public static void printItems(String[] items){
        // TODO: add your code here
    }

    public static void main(String[] args) {
        printItems(filterEmails(new String[]{}));
        printItems(filterEmails(new String[]{"abc"}));
        printItems(filterEmails(new String[]{"adam@example.com", "aab", "john@example.com", "some@"}));
        printItems(filterEmails(new String[]{"xyz", "@bee.com", "aab"}));
    }
}
[]
[]
[adam@example.com, john@example.com, some@]
[@bee.com]
filterEmailsfilterEmails(String[] items): String[]- create a new array (say
emails) of the same size asitems - go through the elements in the
itemsand add toemailsif the element contains@(you can use thecontainsmethod of theStringclass here) - Use
Arrays.copyOfmethod to return the filled part ofemails.
- create a new array (say
printItems(String[] items)- 💡 You can use the
Arrays.toString()method for this.
- 💡 You can use the
public static String[] filterEmails(String[] items){
    String[] results = new String[items.length];
    int matchCount = 0;
    for(String item: items){
        if (item.contains("@")){
           //...
        }
    }
    return Arrays.copyOf(results, matchCount);
}

public static void printItems(String[] items){
    System.out.println(Arrays.toString(items));
}
W3.1e Can use the Scanner class
C++ to Java → Some Useful Classes →
Scanner is a class that provides methods for inputting words, numbers, and other data. Scanner provides a method called nextLine that reads a line of input from the keyboard and returns a String. The following example reads two lines and repeats them back to the user:
import java.util.Scanner;

public class Echo {

    public static void main(String[] args) {
        String line;
        Scanner in = new Scanner(System.in);

        System.out.print("Type something: ");
        line = in.nextLine();
        System.out.println("You said: " + line);

        System.out.print("Type something else: ");
        line = in.nextLine();
        System.out.println("You also said: " + line);
    }
}
Scanner class normally reads inputs as strings but it can read in a specific type of input too.
The code below uses the nextInt method of the Scanner class to read an input as an integer.
Scanner in = new Scanner(System.in);

System.out.print("What is your age? ");
int age = in.nextInt();
in.nextLine();  // read the newline character the user enters following the integer
System.out.print("What is your name? ");
String name = in.nextLine();
System.out.printf("Hello %s, age %d\n", name, age);
💡 Note the use of printf method for formatting the output.
Write a program to ask the user for a description of overseas expenses (presumably, the user has just returned from an overseas trip) and calculate the total in local currency.
- The conversion rate from overseas currency to local currency : overseas
$1.0= local$1.70 - The user can describe expenses is in free form text, as one line. The program takes all amounts mentioned in the format
$amounte.g.,$1.50
Here is one example output:
Your expenses while overseas?beer $4.50 books $3.00 $5.00 for food, that's all
Expenses in overseas currency:[$4.50, $3.00, $5.00]
Total in local currency: $21.25
Here is another:
Your expenses while overseas?nothing. I lived off my friends all the time.
Expenses in overseas currency:[]
Total in local currency: $0.00
One more:
Your expenses while overseas? Just $10
Expenses in overseas currency:[$10]
Total in local currency: $17.00
Here's the skeleton code to use as the starting point:
public class Main {

    // You can add more methods here

    public static void main(String[] args) {
        String line;
        Scanner in = new Scanner(System.in);

        System.out.print("Your expenses while overseas?");
       // TODO: add your code here
    }
}
💡 You can use the split method of the String class to convert a sentence into an array of words. e.g.,
String sentence = "hello my dear";
String[] words = sentence.split(" "); // split using the space as the delimiter
System.out.println(Arrays.toString(words));
[hello, my, dear]
💡 You can use String.format("%.2f", doubleValue) to format doubleValue to two decimal points.
e.g., String.format("%.2f", 1.3334) 1.33
import java.util.Arrays;
import java.util.Scanner;

public class Main {

    public static String[] filterAmounts(String sentence) {
        String[] words = sentence.split(" ");
        String[] result = new String[words.length];
        int wordCount = 0;
        for (String word : words) {
            if (word.startsWith("$")) {
                result[wordCount] = word;
                wordCount++;
            }
        }
        return Arrays.copyOf(result, wordCount);
    }

    public static void main(String[] args) {
        String line;
        Scanner in = new Scanner(System.in);

        System.out.print("Your expenses while overseas?");
        line = in.nextLine();

        String[] amounts = filterAmounts(line);
        System.out.println("Expenses in overseas currency:" + Arrays.toString(amounts));
        double total = 0;
        for (String amount : amounts) {
            // convert amount to double, multiply by currency conversion rate, and add to total
        }
        System.out.println("Total in local currency: $" + String.format("%.2f", total));

    }
}
This is a good time to put together some of the topics you have learned so far to create something useful. In this exercise you will write a small TaskManager program that can store a list of tasks.
- It is a
CLI program. - In this version, the task list is not saved to the disk i.e., the task list does not persist between multiple runs of the program
Here is an example output:
Welcome to TaskManager-Level1!
Your task? add submit report
Tasks in the list: 1
Your task? add return library book
Tasks in the list: 2
Your task? add remind boss about meeting
Tasks in the list: 3
Your task? xyz
Unknown command! please try again
Your task? print
[1] submit report
[2] return library book
[3] remind boss about meeting
Your task? add set up meeting with boss
Tasks in the list: 4
Your task? print
[1] submit report
[2] return library book
[3] remind boss about meeting
[4] set up meeting with boss
Your task? exit
Bye!
Summary of behavior:
- Task Manager prompts for user input with the message
Your task? addtask description: adds thetask descriptionto the task listprint: prints the tasks added so farexitor empty input: terminates the program
If you are new to programming, we recommend you to build the program in small steps, as follows:
- Write a program that reads any user input, prints it back to the user, and exits.
- Update the program to do the above in a loop until user types
exit. - Add greetings printed at the start and the end.
- If the first word is not
addorexit, print an error message. Suggestion: use aswitchstatement to choose between multiple actions. - Create a
Taskclass to represent tasks and add anTask[]to store tasks. - If the first word of the user input is
add, add the whole line (no need to omit the first word) to the task list. - Update the code in the previous step to omit the word
addfrom the task description. - Add support for the
printcommand. - Add support for terminating if the user input is empty
- and so on ...
import java.util.Scanner;

public class Main {
    static Scanner in = new Scanner(System.in);
    static Task[] tasks = new Task[100];
    static int count = 0;  // to keep track of number of tasks in the list

    public static void main(String[] args) {
        printWelcome();
        String line;
        boolean isExit = false;
        while (!isExit) {
            line = getInput();
            String command = line.split(" ")[0]; //extract the first word of the user input
            switch (command) {
                case "exit":
                case "": // exit if user input is empty
                    isExit = true;
                    break;
                case "add":
                    // todo: add code here
                default:
                    printError();
            }
        }
        exit();

    }

    private static void printWelcome() {
        System.out.println("Welcome to TaskManager-Level1!");
    }

    private static void printTasks() {
        for (int i = 0; i < count; i++) {
            System.out.println("[" + (i + 1) + "] " + tasks[i].getDescription());
        }
    }

    // todo: add missing methods
}
Evidence:
To be able to do exercises such as these:
Write a program to ask the user for a description of overseas expenses (presumably, the user has just returned from an overseas trip) and calculate the total in local currency.
- The conversion rate from overseas currency to local currency : overseas
$1.0= local$1.70 - The user can describe expenses is in free form text, as one line. The program takes all amounts mentioned in the format
$amounte.g.,$1.50
Here is one example output:
Your expenses while overseas?beer $4.50 books $3.00 $5.00 for food, that's all
Expenses in overseas currency:[$4.50, $3.00, $5.00]
Total in local currency: $21.25
Here is another:
Your expenses while overseas?nothing. I lived off my friends all the time.
Expenses in overseas currency:[]
Total in local currency: $0.00
One more:
Your expenses while overseas? Just $10
Expenses in overseas currency:[$10]
Total in local currency: $17.00
Here's the skeleton code to use as the starting point:
public class Main {

    // You can add more methods here

    public static void main(String[] args) {
        String line;
        Scanner in = new Scanner(System.in);

        System.out.print("Your expenses while overseas?");
       // TODO: add your code here
    }
}
💡 You can use the split method of the String class to convert a sentence into an array of words. e.g.,
String sentence = "hello my dear";
String[] words = sentence.split(" "); // split using the space as the delimiter
System.out.println(Arrays.toString(words));
[hello, my, dear]
💡 You can use String.format("%.2f", doubleValue) to format doubleValue to two decimal points.
e.g., String.format("%.2f", 1.3334) 1.33
import java.util.Arrays;
import java.util.Scanner;

public class Main {

    public static String[] filterAmounts(String sentence) {
        String[] words = sentence.split(" ");
        String[] result = new String[words.length];
        int wordCount = 0;
        for (String word : words) {
            if (word.startsWith("$")) {
                result[wordCount] = word;
                wordCount++;
            }
        }
        return Arrays.copyOf(result, wordCount);
    }

    public static void main(String[] args) {
        String line;
        Scanner in = new Scanner(System.in);

        System.out.print("Your expenses while overseas?");
        line = in.nextLine();

        String[] amounts = filterAmounts(line);
        System.out.println("Expenses in overseas currency:" + Arrays.toString(amounts));
        double total = 0;
        for (String amount : amounts) {
            // convert amount to double, multiply by currency conversion rate, and add to total
        }
        System.out.println("Total in local currency: $" + String.format("%.2f", total));

    }
}
This is a good time to put together some of the topics you have learned so far to create something useful. In this exercise you will write a small TaskManager program that can store a list of tasks.
- It is a
CLI program. - In this version, the task list is not saved to the disk i.e., the task list does not persist between multiple runs of the program
Here is an example output:
Welcome to TaskManager-Level1!
Your task? add submit report
Tasks in the list: 1
Your task? add return library book
Tasks in the list: 2
Your task? add remind boss about meeting
Tasks in the list: 3
Your task? xyz
Unknown command! please try again
Your task? print
[1] submit report
[2] return library book
[3] remind boss about meeting
Your task? add set up meeting with boss
Tasks in the list: 4
Your task? print
[1] submit report
[2] return library book
[3] remind boss about meeting
[4] set up meeting with boss
Your task? exit
Bye!
Summary of behavior:
- Task Manager prompts for user input with the message
Your task? addtask description: adds thetask descriptionto the task listprint: prints the tasks added so farexitor empty input: terminates the program
If you are new to programming, we recommend you to build the program in small steps, as follows:
- Write a program that reads any user input, prints it back to the user, and exits.
- Update the program to do the above in a loop until user types
exit. - Add greetings printed at the start and the end.
- If the first word is not
addorexit, print an error message. Suggestion: use aswitchstatement to choose between multiple actions. - Create a
Taskclass to represent tasks and add anTask[]to store tasks. - If the first word of the user input is
add, add the whole line (no need to omit the first word) to the task list. - Update the code in the previous step to omit the word
addfrom the task description. - Add support for the
printcommand. - Add support for terminating if the user input is empty
- and so on ...
import java.util.Scanner;

public class Main {
    static Scanner in = new Scanner(System.in);
    static Task[] tasks = new Task[100];
    static int count = 0;  // to keep track of number of tasks in the list

    public static void main(String[] args) {
        printWelcome();
        String line;
        boolean isExit = false;
        while (!isExit) {
            line = getInput();
            String command = line.split(" ")[0]; //extract the first word of the user input
            switch (command) {
                case "exit":
                case "": // exit if user input is empty
                    isExit = true;
                    break;
                case "add":
                    // todo: add code here
                default:
                    printError();
            }
        }
        exit();

    }

    private static void printWelcome() {
        System.out.println("Welcome to TaskManager-Level1!");
    }

    private static void printTasks() {
        for (int i = 0; i < count; i++) {
            System.out.println("[" + (i + 1) + "] " + tasks[i].getDescription());
        }
    }

    // todo: add missing methods
}
W3.2 Can use inheritance
W3.2a Can explain the meaning of inheritance
Paradigms → Object Oriented Programming → Inheritance →
The OOP concept Inheritance allows you to define a new class based on an existing class.
For example, you can use inheritance to define an EvaluationReport class based on an existing Report class so that the EvaluationReport class does not have to duplicate code that is already implemented in the Report class. The EvaluationReport can inherit the wordCount attribute and the print() method from the base class Report.
- Other names for Base class: Parent class, Super class
- Other names for Derived class: Child class, Sub class, Extended class
A superclass is said to be more general than the subclass. Conversely, a subclass is said to be more specialized than the superclass.
Applying inheritance on a group of similar classes can result in the common parts among classes being extracted into more general classes.
Man and Woman behaves the same way for certain things. However, the two classes cannot be simply replaced with a more general class Person because of the need to distinguish between Man and Woman for certain other things. A solution is to add the Person class as a superclass (to contain the code common to men and woment) and let Man and Woman inherit from Person class.
Inheritance implies the derived class can be considered as a sub-type of the base class (and the base class is a super-type of the derived class), resulting in an is a relationship.
Inheritance does not necessarily mean a sub-type relationship exists. However, the two often go hand-in-hand. For simplicity, at this point let us assume inheritance implies a sub-type relationship.
To continue the previous example,
Womanis aPersonManis aPerson
Inheritance relationships through a chain of classes can result in inheritance hierarchies (aka inheritance trees).
Two inheritance hierarchies/trees are given below. Note that the triangle points to the parent class. Observe how the Parrot is a Bird as well as it is an Animal.
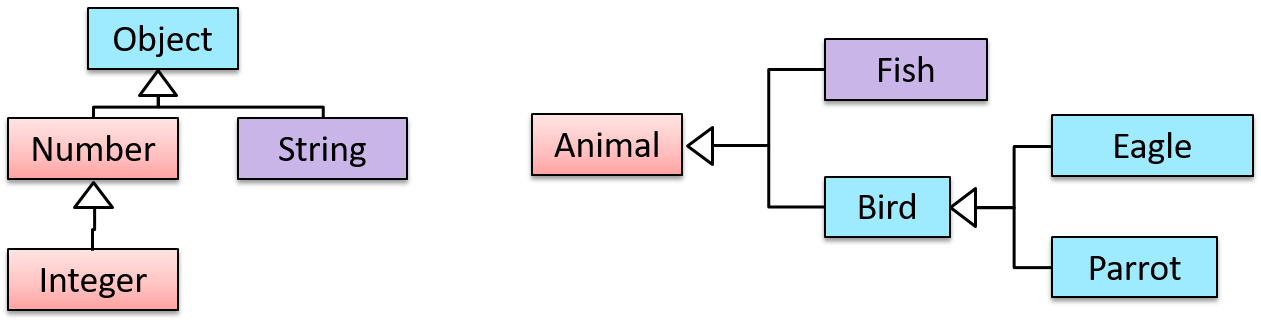
Multiple Inheritance is when a class inherits directly from multiple classes. Multiple inheritance among classes is allowed in some languages (e.g., Python, C++) but not in other languages (e.g., Java, C#).
The Honey class inherits from the Food class and the Medicine class because honey can be consumed as a food as well as a medicine (in some oriental medicine practices). Similarly, a Car is an Vehicle, an Asset and a Liability.
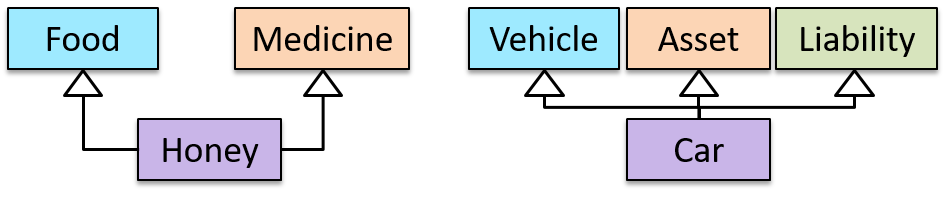
Which of these are correct?
- a. Superclass is more general than the subclass.
- b. Child class is more specialized than the parent class.
- c. A class can inherit behavior from its ancestor classes (ancestor classes = classes above it in the inheritance hierarchy).
- d. Code reuse can be one benefit of inheritance.
- e. A change to the superclass will not affect its subclasses.
(a) (b) (c) (d)
Explanation: (e) is incorrect. Because subclasses inherit behavior from the superclass, any changes to the superclass could affect subclasses.
W3.2b Can explain method overloading
Paradigms → Object Oriented Programming → Inheritance →
Method overloading is when there are multiple methods with the same name but different type signatures. Overloading is used to indicate that multiple operations do similar things but take different parameters.
Type Signature: The type signature of an operation is the type sequence of the parameters. The return type and parameter names are not part of the type signature. However, the parameter order is significant.
| Method | Type Signature |
|---|---|
int add(int X, int Y) |
(int, int) |
void add(int A, int B) |
(int, int) |
void m(int X, double Y) |
(int, double) |
void m(double X, int Y) |
(double, int) |
In the case below, the calculate method is overloaded because the two methods have the same name but different type signatures (String) and (int)
calculate(String): voidcalculate(int): void
W3.2c Can explain method overriding
Paradigms → Object Oriented Programming → Inheritance →
Method overriding is when a sub-class changes the behavior inherited from the parent class by re-implementing the method. Overridden methods have the same name, same type signature, and same return type.
Consider the following case of EvaluationReport class inheriting the Report class:
Report methods |
EvaluationReport methods |
Overrides? |
|---|---|---|
print() |
print() |
Yes |
write(String) |
write(String) |
Yes |
read():String |
read(int):String |
No. Reason: the two methods have different signatures; This is a case of |
Paradigms → Object Oriented Programming → Inheritance →
Method overloading is when there are multiple methods with the same name but different type signatures. Overloading is used to indicate that multiple operations do similar things but take different parameters.
Type Signature: The type signature of an operation is the type sequence of the parameters. The return type and parameter names are not part of the type signature. However, the parameter order is significant.
| Method | Type Signature |
|---|---|
int add(int X, int Y) |
(int, int) |
void add(int A, int B) |
(int, int) |
void m(int X, double Y) |
(int, double) |
void m(double X, int Y) |
(double, int) |
In the case below, the calculate method is overloaded because the two methods have the same name but different type signatures (String) and (int)
calculate(String): voidcalculate(int): void
Which of these methods override another method? A is the parent class. B inherits A.
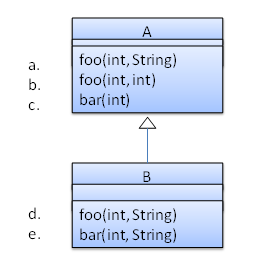
- a
- b
- c
- d
- e
d
Explanation: Method overriding requires a method in a child class to use the same method name and same parameter sequence used by one of its ancestors
W3.2d Can use basic inheritance
C++ to Java → Inheritance →
Given below is an extract from the -- Java Tutorial, with slight adaptations.
A class that is derived from another class is called a subclass (also a derived class, extended class, or child class). The class from which the subclass is derived is called a superclass (also a base class or a parent class).
A subclass inherits all the members (fields, methods, and nested classes) from its superclass. Constructors are not members, so they are not inherited by subclasses, but the constructor of the superclass can be invoked from the subclass.
Every class has one and only one direct superclass (single inheritance), except the Object class, which has no superclass, . In the absence of any other explicit superclass, every class is implicitly a subclass of Object. Classes can be derived from classes that are derived from classes that are derived from classes, and so on, and ultimately derived from the topmost class, Object. Such a class is said to be descended from all the classes in the inheritance chain stretching back to Object. Java does not support multiple inheritance among classes.
The java.lang.Object class defines and implements behavior common to all classes—including the ones that you write. In the Java platform, many classes derive directly from Object, other classes derive from some of those classes, and so on, forming a hierarchy of classes.
The keyword extends indicates one class inheriting from another.
Here is the sample code for a possible implementation of a Bicycle class and a MountainBike class that is a subclass of the Bicycle:
public class Bicycle {

    public int gear;
    public int speed;

    public Bicycle(int startSpeed, int startGear) {
        gear = startGear;
        speed = startSpeed;
    }

    public void setGear(int newValue) {
        gear = newValue;
    }

    public void applyBrake(int decrement) {
        speed -= decrement;
    }

    public void speedUp(int increment) {
        speed += increment;
    }

}
public class MountainBike extends Bicycle {

    // the MountainBike subclass adds one field
    public int seatHeight;

    // the MountainBike subclass has one constructor
    public MountainBike(int startHeight, int startSpeed, int startGear) {
        super(startSpeed, startGear);
        seatHeight = startHeight;
    }

    // the MountainBike subclass adds one method
    public void setHeight(int newValue) {
        seatHeight = newValue;
    }
}
A subclass inherits all the fields and methods of the superclass. In the example above, MountainBike inherits all the fields and methods of Bicycle and adds the field seatHeight and a method to set it.
Accessing Superclass Members
If your method overrides one of its superclass's methods, you can invoke the overridden method through the use of the keyword super. You can also use super to refer to a
Consider this class, Superclass and a subclass, called Subclass, that overrides printMethod():
public class Superclass {

    public void printMethod() {
        System.out.println("Printed in Superclass.");
    }
}
public class Subclass extends Superclass {

    // overrides printMethod in Superclass
    public void printMethod() {
        super.printMethod();
        System.out.println("Printed in Subclass");
    }
    public static void main(String[] args) {
        Subclass s = new Subclass();
        s.printMethod();
    }
}
Printed in Superclass.
Printed in Subclass
Within Subclass, the simple name printMethod() refers to the one declared in Subclass, which overrides the one in Superclass. So, to refer to printMethod() inherited from Superclass, Subclass must use a qualified name, using super as shown. Compiling and executing Subclass prints the following:
Subclass Constructors
A subclass constructor can invoke the superclass constructor. Invocation of a superclass constructor must be the first line in the subclass constructor.
The syntax for calling a superclass constructor is super() (which invokes the no-argument constructor of the superclass) or super(parameter list) (to invoke the superclass constructor with a matching parameter list).
The following example illustrates how to use the super keyword to invoke a superclass's constructor. Recall from the Bicycle example that MountainBike is a subclass of Bicycle. Here is the MountainBike (subclass) constructor that calls the superclass constructor and then adds initialization code of its own:
public MountainBike(int startHeight, int startSpeed, int startGear) {
    super(startSpeed, startGear);
    seatHeight = startHeight;
}
Note: If a constructor does not explicitly invoke a superclass constructor, the Java compiler automatically inserts a call to the no-argument constructor of the superclass. If the superclass does not have a no-argument constructor, you will get a compile-time error. Object does have such a constructor, so if Object is the only superclass, there is no problem.
Access Modifiers (simplified)
Access level modifiers determine whether other classes can use a particular field or invoke a particular method. Given below is a simplified version of Java access modifiers, assuming you have not yet started placing your classes in different packages i.e., all classes are places in the root level. A full explanation of access modifiers is given in a later topic.
There are two levels of access control:
-
At the class level:
public: the class is visible to all other classes- no modifier: same as
public
-
At the member level:
public: the class is visible to all other classes- no modifier: same as
public protected: same aspublicprivate: the member can only be accessed in its own class
Background: Suppose we are creating a software to manage various tasks a person has to do. Two types of such tasks are,
- Todos: i.e., things that needs to be done some day e.g., 'Read the book Lord of the Rings'
- Deadlines: i.e., things to be done by a specific date/time e.g., 'Read the text book by Nov 25th'
The Task class is given below:
public class Task {
    protected String description;

    public Task(String description) {
        this.description = description;
    }

    public String getDescription() {
        return description;
    }
}
- Write a
Todoclass that inherits from theTaskclass.- It should have an additional
booleanfieldisDoneto indicate whether the todo is done or not done. - It should have a
isDone()method to access theisDonefield and asetDone(boolean)method to set theisDonefield.
- It should have an additional
- Write a
Deadlineclass that inherits from theTodoclass that you implemented in the previous step. It should have,- an additional
Stringfieldbyto store the details of when the task to be done e.g.,Jan 25th 5pm - a
getBy()method to access the value of thebyfield, and a correspondingsetBy(String)method. - a constructor of the form
Deadline(String description, String by)
- an additional
The expected behavior of the two classes is as follows:
public class Main {
    public static void main(String[] args) {
        // create a todo task and print details
        Todo t = new Todo("Read a good book");
        System.out.println(t.getDescription());
        System.out.println(t.isDone());

        // change todo fields and print again
        t.setDone(true);
        System.out.println(t.isDone());

        // create a deadline task and print details
        Deadline d = new Deadline("Read textbook", "Nov 16");
        System.out.println(d.getDescription());
        System.out.println(d.isDone());
        System.out.println(d.getBy());

        // change deadline details and print again
        d.setDone(true);
        d.setBy("Postponed to Nov 18th");
        System.out.println(d.isDone());
        System.out.println(d.getBy());
    }
}
Read a good book
false
true
Read textbook
false
Nov 16
true
Postponed to Nov 18th
Todo class is given below. You can follow a similar approach for the Deadline class.
public class Todo extends Task {
    protected boolean isDone;

    public Todo(String description) {
        super(description);
        isDone = false;
    }
}
Evidence:
To be able to do exercises such as these:
Background: Suppose we are creating a software to manage various tasks a person has to do. Two types of such tasks are,
- Todos: i.e., things that needs to be done some day e.g., 'Read the book Lord of the Rings'
- Deadlines: i.e., things to be done by a specific date/time e.g., 'Read the text book by Nov 25th'
The Task class is given below:
public class Task {
    protected String description;

    public Task(String description) {
        this.description = description;
    }

    public String getDescription() {
        return description;
    }
}
- Write a
Todoclass that inherits from theTaskclass.- It should have an additional
booleanfieldisDoneto indicate whether the todo is done or not done. - It should have a
isDone()method to access theisDonefield and asetDone(boolean)method to set theisDonefield.
- It should have an additional
- Write a
Deadlineclass that inherits from theTodoclass that you implemented in the previous step. It should have,- an additional
Stringfieldbyto store the details of when the task to be done e.g.,Jan 25th 5pm - a
getBy()method to access the value of thebyfield, and a correspondingsetBy(String)method. - a constructor of the form
Deadline(String description, String by)
- an additional
The expected behavior of the two classes is as follows:
public class Main {
    public static void main(String[] args) {
        // create a todo task and print details
        Todo t = new Todo("Read a good book");
        System.out.println(t.getDescription());
        System.out.println(t.isDone());

        // change todo fields and print again
        t.setDone(true);
        System.out.println(t.isDone());

        // create a deadline task and print details
        Deadline d = new Deadline("Read textbook", "Nov 16");
        System.out.println(d.getDescription());
        System.out.println(d.isDone());
        System.out.println(d.getBy());

        // change deadline details and print again
        d.setDone(true);
        d.setBy("Postponed to Nov 18th");
        System.out.println(d.isDone());
        System.out.println(d.getBy());
    }
}
Read a good book
false
true
Read textbook
false
Nov 16
true
Postponed to Nov 18th
Todo class is given below. You can follow a similar approach for the Deadline class.
public class Todo extends Task {
    protected boolean isDone;

    public Todo(String description) {
        super(description);
        isDone = false;
    }
}
W3.2e Can use Object class
C++ to Java → Inheritance →
As you know, all Java objects inherit from the Object class. Let us look at some of the useful methods in the Object class that can be used by other classes.
The toString method
Every class inherits a toString method from the Object class that is used by Java to get a string representation of the object e.g., for printing. By default it simply returns the type of the object and its address (in hexadecimal).
Suppose you defined a class called Time, to represent a moment in time. If you create a Time object and display it with println:
class Time {
    int hours;
    int minutes;
    int seconds;

    Time(int hours, int minutes, int seconds) {
        this.hours = hours;
        this.minutes = minutes;
        this.seconds = seconds;
    }
}
 Time t = new Time(5, 20, 13);
 System.out.println(t);
Time@80cc7c0 (the address part can vary)
You can override the toString method in your classes to provide a more meaningful string representation of the objects of that class.
Here's an example of overriding the toString method of the Time class:
class Time{

   //...

   @Override
   public String toString() {
       return String.format("%02d:%02d:%02d\n", this.hours, this.minutes, this.seconds);
   }
}
 Time t = new Time(5, 20, 13);
 System.out.println(t);
05:20:13
💡 @Override is an optional annotation you can use to indicate that the method is overriding a method from the parent class.
The equals method
There are two ways to check whether values are equal: the == operator and the equals method. With objects you can use either one, but they are not the same.
- The
==operator checks whether objects are identical; that is, whether they are the same object. - The
equalsmethod checks whether they are equivalent; that is, whether they have the same value.
The definition of identity is always the same, so the == operator always does the same thing.
Consider the following variables:
Time time1 = new Time(9, 30, 0);
Time time2 = time1;
Time time3 = new Time(9, 30, 0);
- The assignment operator copies references, so
time1andtime2refer to the same object. Because they are identical,time1 == time2istrue. - But
time1andtime3refer to different objects. Because they are not identical,time1 == time3isfalse.
By default, the equals method inherited from the Object class does the same thing as ==. As the definition of equivalence is different for different classes, you can override the equals method to define your own criteria for equivalence of objects of your class.
Here's how you can override the equals method of the Time class to provide an equals method that considers two Time objects equivalent as long as they represent the same time of the day:
public class Time {
    int hours;
    int minutes;
    int seconds;

    // ...

    @Override
    public boolean equals(Object o) {
        Time other = (Time) o;
        return this.hours == other.hours
                && this.minutes == other.minutes
                && this.seconds == other.seconds;
    }
}
Time t1 = new Time(5, 20, 13);
Time t2 = new Time(5, 20, 13);
System.out.println(t1 == t2);
System.out.println(t1.equals(t2));
false
true
Note that a proper equals method implementation is more complex than the example above. See the article How to Implement Java’s equals Method Correctly by Nicolai Parlog for a detailed explanation before you implement your own equals method.
Suppose you have the following classes Task, Todo, Deadline:
public class Task {
    protected String description;

    public Task(String description) {
        this.description = description;
    }

    public String getDescription() {
        return description;
    }
}
public class Todo extends Task {
    protected boolean isDone;

    public Todo(String description) {
        super(description);
        isDone = false;
    }

    public void setDone(boolean done) {
        isDone = done;
    }

    public boolean isDone() {
        return isDone;
    }
}
public class Deadline extends Todo {

    protected String by;

    public Deadline(String description, String by) {
        super(description);
        this.by = by;
    }

    public void setBy(String by) {
        this.by = by;
    }

    public String getBy() {
        return by;
    }
}
Override the toString method of the three classes to produce the following behavior.
public class Main {
    public static void main(String[] args) {
        // create a todo task and print it
        Todo t = new Todo("Read a good book");
        System.out.println(t);

        // change todo fields and print again
        t.setDone(true);
        System.out.println(t);

        // create a deadline task and print it
        Deadline d = new Deadline("Read textbook", "Nov 16");
        System.out.println(d);

        // change deadline details and print again
        d.setDone(true);
        d.setBy("Postponed to Nov 18th");
        System.out.println(d);
    }
}
description: Read a good book
is done? No
description: Read a good book
is done? Yes
description: Read textbook
is done? No
do by: Nov 16
description: Read textbook
is done? Yes
do by: Postponed to Nov 18th
💡 You can use the super.toString from the subclass to invoke the behavior of the method you are overriding. This is useful here because the overriding method is simply adding onto the behavior of the overridden method.
toString() method of Task class and Todo class are given below. You can follow a similar approach for the Deadline class.
public class Task {
    // ...

    @Override
    public String toString() {
        return "description: " + description;
    }
}
public class Todo extends Task {
    // ...

    @Override
    public String toString() {
        String status = null;
        if (isDone){
            status = "Yes";
        } else {
            status = "No";
        }
        return super.toString() + System.lineSeparator() + "is done? " + status;
    }
}
Evidence:
To be able to do exercises such as these:
Suppose you have the following classes Task, Todo, Deadline:
public class Task {
    protected String description;

    public Task(String description) {
        this.description = description;
    }

    public String getDescription() {
        return description;
    }
}
public class Todo extends Task {
    protected boolean isDone;

    public Todo(String description) {
        super(description);
        isDone = false;
    }

    public void setDone(boolean done) {
        isDone = done;
    }

    public boolean isDone() {
        return isDone;
    }
}
public class Deadline extends Todo {

    protected String by;

    public Deadline(String description, String by) {
        super(description);
        this.by = by;
    }

    public void setBy(String by) {
        this.by = by;
    }

    public String getBy() {
        return by;
    }
}
Override the toString method of the three classes to produce the following behavior.
public class Main {
    public static void main(String[] args) {
        // create a todo task and print it
        Todo t = new Todo("Read a good book");
        System.out.println(t);

        // change todo fields and print again
        t.setDone(true);
        System.out.println(t);

        // create a deadline task and print it
        Deadline d = new Deadline("Read textbook", "Nov 16");
        System.out.println(d);

        // change deadline details and print again
        d.setDone(true);
        d.setBy("Postponed to Nov 18th");
        System.out.println(d);
    }
}
description: Read a good book
is done? No
description: Read a good book
is done? Yes
description: Read textbook
is done? No
do by: Nov 16
description: Read textbook
is done? Yes
do by: Postponed to Nov 18th
💡 You can use the super.toString from the subclass to invoke the behavior of the method you are overriding. This is useful here because the overriding method is simply adding onto the behavior of the overridden method.
toString() method of Task class and Todo class are given below. You can follow a similar approach for the Deadline class.
public class Task {
    // ...

    @Override
    public String toString() {
        return "description: " + description;
    }
}
public class Todo extends Task {
    // ...

    @Override
    public String toString() {
        String status = null;
        if (isDone){
            status = "Yes";
        } else {
            status = "No";
        }
        return super.toString() + System.lineSeparator() + "is done? " + status;
    }
}
IDEs
W3.3 Can use intermediate level features of an IDE
W3.3a Can explain debugging
Implementation → IDEs → Debugging →
Debugging is the process of discovering defects in the program. Here are some approaches to debugging:
-
Bad -- By inserting temporary print statements: This is an ad-hoc approach in which print statements are inserted in the program to print information relevant to debugging, such as variable values. e.g.
Exiting process() method, x is 5.347. This approach is not recommended due to these reasons.- Incurs extra effort when inserting and removing the print statements.
- Unnecessary program modifications increases the risk of introducing errors into the program.
- These print statements, if not promptly removed, may even appear unexpectedly in the production version.
-
Bad -- By manually tracing through the code: Otherwise known as ‘eye-balling’, this approach doesn't have the cons of the previous approach, but it too is not recommended (other than as a 'quick try') due to these reasons:
- It is difficult, time consuming, and error-prone technique.
- If you didn't spot the error while writing code, you might not spot the error when reading code too.
-
Good -- Using a debugger: A debugger tool allows you to pause the execution, then step through one statement at a time while examining the internal state if necessary. Most IDEs come with an inbuilt debugger. This is the recommended approach for debugging.
W3.3b Can step through a program using a debugger
Tools → Intellij IDEA →
This video (from LaunchCode) gives a pretty good explanation of how to use the Intellij IDEA debugger.
- Intellij IDEA Documentation: Debugging Basics - Can be used as a reference document when you want to recall how to use a debugging feature.
W3.3c Can use some useful IDE productivity shortcuts
Testing
W3.4 Can automate simple regression testing of text UIs
W3.4a Can explain testing
Quality Assurance → Testing → Introduction →
Testing: Testing is operating a system or component under specified conditions, observing or recording the results, and making an evaluation of some aspect of the system or component. –- source: IEEE
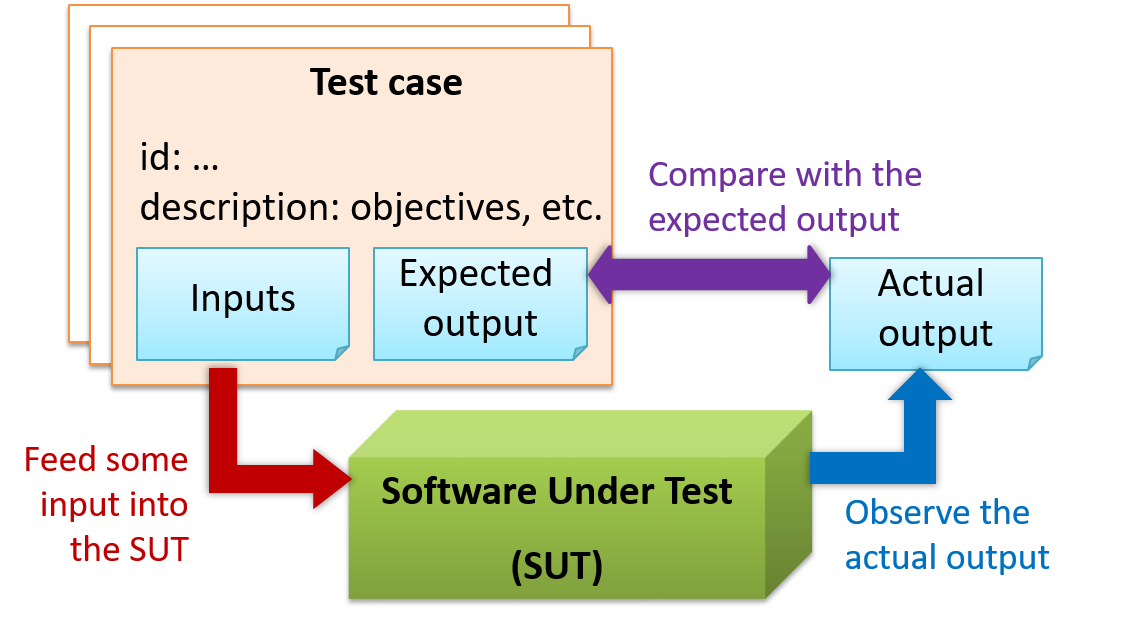
When testing, we execute a set of test cases. A test case specifies how to perform a test. At a minimum, it specifies the input to the software under test (SUT) and the expected behavior.
Example: A minimal test case for testing a browser:
- Input – Start the browser using a blank page (vertical scrollbar disabled). Then, load
longfile.htmllocated in thetest datafolder. - Expected behavior – The scrollbar should be automatically enabled upon loading
longfile.html.
Test cases can be determined based on the specification, reviewing similar existing systems, or comparing to the past behavior of the SUT.
A more elaborate test case can have other details such as those given below.
- A unique identifier : e.g. TC0034-a
- A descriptive name: e.g. vertical scrollbar activation for long web pages
- Objectives: e.g. to check whether the vertical scrollbar is correctly activated when a long web page is loaded to the browser
- Classification information: e.g. priority - medium, category - UI features
- Cleanup, if any: e.g. empty the browser cache.
For each test case we do the following:
- Feed the input to the SUT
- Observe the actual output
- Compare actual output with the expected output
A test case failure is a mismatch between the expected behavior and the actual behavior. A failure is caused by a defect (or a bug).
Example: In the browser example above, a test case failure is implied if the scrollbar remains disabled after loading longfile.html. The defect/bug causing that failure could be an uninitialized variable.
Here is another definition of testing:
Software testing consists of the dynamic verification that a program provides expected behaviors on a finite set of test cases, suitably selected from the usually infinite execution domain. -– source: Software Engineering Book of Knowledge V3
Some things to note (indicated by keywords in the above definition):
- Dynamic: Testing involves executing the software. It is not by examining the code statically.
- Finite: In most non-trivial cases there are potentially infinite test scenarios but resource constraints dictate that we can test only a finite number of scenarios.
- Selected: In most cases it is not possible to test all scenarios. That means we need to select what scenarios to test.
- Expected: Testing requires some knowledge of how the software is expected to behave.
Explain how the concepts of testing, test case, test failure, and defect are related to each other.
Evidence:
Explain how the concepts of testing, test case, test failure, and defect are related to each other.
W3.4b Can explain regression testing
Quality Assurance → Testing → Regression Testing →
When we modify a system, the modification may result in some unintended and undesirable effects on the system. Such an effect is called a regression.
Regression testing is re-testing the software to detect regressions. Note that to detect regressions, we need to retest all related components, even if they were tested before.
Regression testing is more effective when it is done frequently, after each small change. However, doing so can be prohibitively expensive if testing is done manually. Hence, regression testing is more practical when it is automated.
Regression testing is the automated re-testing of a software after it has been modified.
c.
Explanation: Regression testing need not be automated but automation is highly recommended.
Explain why and when you would do regression testing in a software project.
Evidence:
Explain why and when you would do regression testing in a software project.
W3.4c Can explain test automation
Quality Assurance → Testing → Test Automation →
An automated test case can be run programmatically and the result of the test case (pass or fail) is determined programmatically. Compared to manual testing, automated testing reduces the effort required to run tests repeatedly and increases precision of testing (because manual testing is susceptible to human errors).
Side readings:
- [Quora post] What is the best way to avoid bugs
- [Quora post] Is automated testing relevant to startups?
W3.4d Can semi-automate testing of CLIs
Quality Assurance → Testing → Test Automation →
A simple way to semi-automate testing of a CLI(Command Line Interface) app is by using input/output re-direction.
- First, we feed the app with a sequence of test inputs that is stored in a file while redirecting the output to another file.
- Next, we compare the actual output file with another file containing the expected output.
Let us assume we are testing a CLI app called AddressBook. Here are the detailed steps:
-
Store the test input in the text file
input.txt.add Valid Name p/12345 valid@email.butNoPrefix add Valid Name 12345 e/valid@email.butPhonePrefixMissing -
Store the output we expect from the SUT in another text file
expected.txt.Command: || [add Valid Name p/12345 valid@email.butNoPrefix] Invalid command format: add Command: || [add Valid Name 12345 e/valid@email.butPhonePrefixMissing] Invalid command format: add -
Run the program as given below, which will redirect the text in
input.txtas the input toAddressBookand similarly, will redirect the output of AddressBook to a text fileoutput.txt. Note that this does not require any code changes toAddressBook.java AddressBook < input.txt > output.txt-
💡 The way to run a CLI program differs based on the language.
e.g., In Python, assuming the code is inAddressBook.pyfile, use the command
python AddressBook.py < input.txt > output.txt -
💡 If you are using Windows, use a normal command window to run the app, not a Power Shell window.
More on the >operator and the<operator. tangentialA CLI program takes input from the keyboard and outputs to the console. That is because those two are default input and output streams, respectively. But you can change that behavior using
<and>operators. For example, if you runAddressBookin a command window, the output will be shown in the console, but if you run it like this,java AddressBook > output.txtthe Operating System then creates a file
output.txtand stores the output in that file instead of displaying it in the console. No file I/O coding is required. Similarly, adding< input.txt(or any other filename) makes the OS redirect the contents of the file as input to the program, as if the user typed the content of the file one line at a time.Resources:
-
-
Next, we compare
output.txtwith theexpected.txt. This can be done using a utility such as WindowsFC(i.e. File Compare) command, Unixdiffcommand, or a GUI tool such as WinMerge.FC output.txt expected.txt
Note that the above technique is only suitable when testing CLI apps, and only if the exact output can be predetermined. If the output varies from one run to the other (e.g. it contains a time stamp), this technique will not work. In those cases we need more sophisticated ways of automating tests.
CLI App: An application that has a Command Line Interface. i.e. user interacts with the app by typing in commands.
Evidence:
Use this technique to test any program you have written.
🅿️ Project
W3.5 Project preparation: Can write a small program from scratch
Ensure that you are able to do this exercise based on your current Java knowledge. There is no need to do the exercise if you have prior programming experience and you are confident of being able to do it. But if you are new to programming, we highly recommend you to attempt this exercise and get help from the prof if you are unable to complete it.
We recommend you to do this exercise on your own computer rather than on repl.it.
This is a good time to put together some of the topics you have learned so far to create something useful. In this exercise you will write a small TaskManager program that can store a list of tasks.
- It is a
CLI program. - In this version, the task list is not saved to the disk i.e., the task list does not persist between multiple runs of the program
Here is an example output:
Welcome to TaskManager-Level1!
Your task? add submit report
Tasks in the list: 1
Your task? add return library book
Tasks in the list: 2
Your task? add remind boss about meeting
Tasks in the list: 3
Your task? xyz
Unknown command! please try again
Your task? print
[1] submit report
[2] return library book
[3] remind boss about meeting
Your task? add set up meeting with boss
Tasks in the list: 4
Your task? print
[1] submit report
[2] return library book
[3] remind boss about meeting
[4] set up meeting with boss
Your task? exit
Bye!
Summary of behavior:
- Task Manager prompts for user input with the message
Your task? addtask description: adds thetask descriptionto the task listprint: prints the tasks added so farexitor empty input: terminates the program
If you are new to programming, we recommend you to build the program in small steps, as follows:
- Write a program that reads any user input, prints it back to the user, and exits.
- Update the program to do the above in a loop until user types
exit. - Add greetings printed at the start and the end.
- If the first word is not
addorexit, print an error message. Suggestion: use aswitchstatement to choose between multiple actions. - Create a
Taskclass to represent tasks and add anTask[]to store tasks. - If the first word of the user input is
add, add the whole line (no need to omit the first word) to the task list. - Update the code in the previous step to omit the word
addfrom the task description. - Add support for the
printcommand. - Add support for terminating if the user input is empty
- and so on ...
import java.util.Scanner;

public class Main {
    static Scanner in = new Scanner(System.in);
    static Task[] tasks = new Task[100];
    static int count = 0;  // to keep track of number of tasks in the list

    public static void main(String[] args) {
        printWelcome();
        String line;
        boolean isExit = false;
        while (!isExit) {
            line = getInput();
            String command = line.split(" ")[0]; //extract the first word of the user input
            switch (command) {
                case "exit":
                case "": // exit if user input is empty
                    isExit = true;
                    break;
                case "add":
                    // todo: add code here
                default:
                    printError();
            }
        }
        exit();

    }

    private static void printWelcome() {
        System.out.println("Welcome to TaskManager-Level1!");
    }

    private static void printTasks() {
        for (int i = 0; i < count; i++) {
            System.out.println("[" + (i + 1) + "] " + tasks[i].getDescription());
        }
    }

    // todo: add missing methods
}
Tutorial 3
W2.1b Can describe how OOP relates to the real world
Paradigms → Object Oriented Programming → Objects →
Every object has both state (data) and behavior (operations on data). In that, they’re not much different from ordinary physical objects. It’s easy to see how a mechanical device, such as a pocket watch or a piano, embodies both state and behavior. But almost anything that’s designed to do a job does, too. Even simple things with no moving parts such as an ordinary bottle combine state (how full the bottle is, whether or not it’s open, how warm its contents are) with behavior (the ability to dispense its contents at various flow rates, to be opened or closed, to withstand high or low temperatures).
It’s this resemblance to real things that gives objects much of their power and appeal. They can not only model components of real systems, but equally as well fulfill assigned roles as components in software systems.
Object Oriented Programming (OOP) views the world as a network of interacting objects.
A real world scenario viewed as a network of interacting objects:
You are asked to find out the average age of a group of people Adam, Beth, Charlie, and Daisy. You take a piece of paper and pen, go to each person, ask for their age, and note it down. After collecting the age of all four, you enter it into a calculator to find the total. And then, use the same calculator to divide the total by four, to get the average age. This can be viewed as the objects You, Pen, Paper, Calculator, Adam, Beth, Charlie, and Daisy interacting to accomplish the end result of calculating the average age of the four persons. These objects can be considered as connected in a certain network of certain structure.
OOP solutions try to create a similar object network inside the computer’s memory – a sort of a virtual simulation of the corresponding real world scenario – so that a similar result can be achieved programmatically.
OOP does not demand that the virtual world object network follow the real world exactly.
Our previous example can be tweaked a bit as follows:
- Use an object called
Mainto represent your role in the scenario. - As there is no physical writing involved, we can replace the
PenandPaperwith an object calledAgeListthat is able to keep a list of ages.
Every object has both state (data) and behavior (operations on data).
| Object | Real World? | Virtual World? | Example of State (i.e. Data) | Examples of Behavior (i.e. Operations) |
|---|---|---|---|---|
| Adam | Name, Date of Birth | Calculate age based on birthday | ||
| Pen | - | Ink color, Amount of ink remaining | Write | |
| AgeList | - | Recorded ages | Give the number of entries, Accept an entry to record | |
| Calculator | Numbers already entered | Calculate the sum, divide | ||
| You/Main | Average age, Sum of ages | Use other objects to calculate |
Every object has an interface and an implementation.
Every real world object has:
- an interface that other objects can interact with
- an implementation that supports the interface but may not be accessible to the other object
The interface and implementation of some real-world objects in our example:
- Calculator: the buttons and the display are part of the interface; circuits are part of the implementation.
- Adam: In the context of our 'calculate average age' example, the interface of Adam consists of requests that adam will respond to, e.g. "Give age to the nearest year, as at Jan 1st of this year" "State your name"; the implementation includes the mental calculation Adam uses to calculate the age which is not visible to other objects.
Similarly, every object in the virtual world has an interface and an implementation.
The interface and implementation of some virtual-world objects in our example:
Adam: the interface might have a methodgetAge(Date asAt); the implementation of that method is not visible to other objects.
Objects interact by sending messages.
Both real world and virtual world object interactions can be viewed as objects sending message to each other. The message can result in the sender object receiving a response and/or the receiving object’s state being changed. Furthermore, the result can vary based on which object received the message, even if the message is identical (see rows 1 and 2 in the example below).
Examples:
| World | Sender | Receiver | Message | Response | State Change |
|---|---|---|---|---|---|
| Real | You | Adam | "What is your name?" | "Adam" | - |
| Real | as above | Beth | as above | "Beth" | - |
| Real | You | Pen | Put nib on paper and apply pressure | Makes a mark on your paper | Ink level goes down |
| Virtual | Main | Calculator (current total is 50) | add(int i): int i = 23 | 73 | total = total + 23 |
Consider the following real-world scenario.
Tom read a Software Engineering textbook (he has been assigned to read the book) and highlighted some of the text in it.
Explain the following statements about OOP using the above scenario as an example.
- Object Oriented Programming (OOP) views the world as a network of interacting objects.
- Every object has both state (data) and behavior (operations on data).
- Every object has an interface and an implementation.
- Objects interact by sending messages.
- OOP does not demand that the virtual world object network follow the real world exactly.
[1] Object Oriented Programming (OOP) views the world as a network of interacting objects.
Interacting objects in the scenario: Tom, SE Textbook (Book for short), Text, (possibly) Highlighter
💡 objects usually match nouns in the description
[2]Every object has both state (data) and behavior (operations on data).
| Object | Examples of state | Examples of behavior |
|---|---|---|
Tom |
memory of the text read | read |
Book |
title | show text |
Text |
font size | get highlighted |
[3] Every object has an interface and an implementation.
- Interface of an object consists of how other objects interact with it i.e., what other objects can do to that object
- Implementation consist of internals of the object that facilitate the interactions but not visible to other objects.
| Object | Examples of interface | Examples of implementation |
|---|---|---|
Tom |
receive reading assignment | understand/memorize the text read, remember the reading assignment |
Book |
show text, turn page | how pages are bound to the spine |
Text |
read | how characters/words are connected together or fixed to the book |
[4] Objects interact by sending messages.
Examples:
Tomsends messageturn pageto theBookTomsends messageshow textto theBook. When theBookshows theText,Tomsends the messagereadto theTextwhich returns the text content toTom.Tomsends messagehighlightto theHighlighterwhile specifying whichTextto highlight. Then theHighlightersends the messagehighlightto the specifiedText.
[5] OOP does not demand that the virtual world object network follow the real world exactly.
Examples:
- A virtual world simulation of the above scenario can omit the
Highlighterobject. Instead, we can teachTextto highlight themselves when requested.
Evidence:
Consider the following real-world scenario.
Tom read a Software Engineering textbook (he has been assigned to read the book) and highlighted some of the text in it.
Explain the following statements about OOP using the above scenario as an example.
- Object Oriented Programming (OOP) views the world as a network of interacting objects.
- Every object has both state (data) and behavior (operations on data).
- Every object has an interface and an implementation.
- Objects interact by sending messages.
- OOP does not demand that the virtual world object network follow the real world exactly.
[1] Object Oriented Programming (OOP) views the world as a network of interacting objects.
Interacting objects in the scenario: Tom, SE Textbook (Book for short), Text, (possibly) Highlighter
💡 objects usually match nouns in the description
[2]Every object has both state (data) and behavior (operations on data).
| Object | Examples of state | Examples of behavior |
|---|---|---|
Tom |
memory of the text read | read |
Book |
title | show text |
Text |
font size | get highlighted |
[3] Every object has an interface and an implementation.
- Interface of an object consists of how other objects interact with it i.e., what other objects can do to that object
- Implementation consist of internals of the object that facilitate the interactions but not visible to other objects.
| Object | Examples of interface | Examples of implementation |
|---|---|---|
Tom |
receive reading assignment | understand/memorize the text read, remember the reading assignment |
Book |
show text, turn page | how pages are bound to the spine |
Text |
read | how characters/words are connected together or fixed to the book |
[4] Objects interact by sending messages.
Examples:
Tomsends messageturn pageto theBookTomsends messageshow textto theBook. When theBookshows theText,Tomsends the messagereadto theTextwhich returns the text content toTom.Tomsends messagehighlightto theHighlighterwhile specifying whichTextto highlight. Then theHighlightersends the messagehighlightto the specifiedText.
[5] OOP does not demand that the virtual world object network follow the real world exactly.
Examples:
- A virtual world simulation of the above scenario can omit the
Highlighterobject. Instead, we can teachTextto highlight themselves when requested.
W2.1c Can explain the relationship between classes and objects
Paradigms → Object Oriented Programming → Classes →
Writing an OOP program is essentially writing instructions that the computer uses to,
- create the virtual world of object network, and
- provide it the inputs to produce the outcome we want.
A class contains instructions for creating a specific kind of objects. It turns out sometimes multiple objects have the same behavior because they are of the same kind. Instructions for creating a one kind (or ‘class’) of objects can be done once and that same instructions can be used to
Classes and objects in an example scenario
Consider the example of writing an OOP program to calculate the average age of Adam, Beth, Charlie, and Daisy.
Instructions for creating objects Adam, Beth, Charlie, and Daisy will be very similar because they are all of the same kind : they all represent ‘persons’ with the same interface, the same kind of data (i.e. name, DoB, etc.), and the same kind of behavior (i.e. getAge(Date), getName(), etc.). Therefore, we can have a class called Person containing instructions on how to create Person objects and use that class to instantiate objects Adam, Beth, Charlie, and Daisy.
Similarly, we need classes AgeList, Calculator, and Main classes to instantiate one each of AgeList, Calculator, and Main objects.
| Class | Objects |
|---|---|
Person |
objects representing Adam, Beth, Charlie, Daisy |
AgeList |
an object to represent the age list |
Calculator |
an object to do the calculations |
Main |
an object to represent you who manages the whole operation |
Consider the following scenario. If you were to simulate this in an OOP program, what are the classes and the objects you would use?
| Class | Objects |
|---|---|
Customer |
john |
Book |
LoTR, GoT |
Cheque |
checqueJohnGave |
Cashier |
peter |
Assume you are writing a CLI program called CityConnect for storing and querying distances between cities. The behavior is as follows:
Welcome to CityConnect!

Enter command: addroute Clementi BuonaVista 12
Route from Clementi to BuonaVista with distance 12km added

Enter command: getdistance Clementi BuonaVista
Distance from Clementi to BuonaVista is 12

Enter command: getdistance Clementi JurongWest
No route exists from Clementi to JurongWest!

Enter command: addroute Clementi JurongWest 24
Route from Clementi to JurongWest with distance 24km added

Enter command: getdistance Clementi JurongWest
Distance from Clementi to JurongWest is 24

Enter command: exit
What classes would you have in your code if you write your program based on the OOP paradigm?
One class you can have is Route
Evidence:
Consider the following scenario. If you were to simulate this in an OOP program, what are the classes and the objects you would use?
| Class | Objects |
|---|---|
Customer |
john |
Book |
LoTR, GoT |
Cheque |
checqueJohnGave |
Cashier |
peter |
W2.2a Can use in-built Java objects
C++ to Java → Objects →
Java is an "object-oriented" language, which means that it uses objects to represent data and provide methods related to them. Object types are called classes e.g., you can use String objects in Java and those objects belong to the String class.
importing
Java comes with many inbuilt classes which are organized into packages. Here are some examples:
| package | Some example classes in the package |
|---|---|
java.lang |
String, Math, System |
Before using a class in your code, you need to import the class. import statements appear at the top of the code.
This example imports the java.awt.Point (i.e., the Point class in the java.awt package) class -- which can be used to represent main method.
In mathematical notation, points are often written in parentheses with a comma separating the coordinates. For example, (0,0) indicates the origin, and (x,y) indicates the point x units to the right and y units up from the origin.
import java.awt.Point;

public class Main{
    public static void main(String[] args) {
        Point spot = new Point(3, 4);
        int x = spot.x;
        System.out.println(x);
   }
}
💡 You might wonder why we can use the System class without importing it. System belongs to the java.lang package, which is imported automatically.
new operator
To create a new object, you have to use the new operator
This line shows how to create a new Point object using the new operator:
Point spot = new Point(3, 4);
Update the code below to create a new Rectangle object as described in the code comments, to produce the given output.
- The
Rectangleclass is found in thejava.awtpackage. - The parameters you need to supply when creating new
Rectangleobjects are(int x, int y, int width, int height).
public class Main {
    public static void main(String[] args) {
        Rectangle r;

        // TODO create a Rectangle object that has the properties x=0, y=0, width=5, height=10
        // assign it to r

        System.out.println(r);
    }
}
java.awt.Rectangle[x=0,y=0,width=5,height=10]
- Import the
java.awt.Rectangleclass - This is how you create the required object
new Rectangle(0, 0, 5, 10)
Evidence:
To be able to do exercises such as these:
Update the code below to create a new Rectangle object as described in the code comments, to produce the given output.
- The
Rectangleclass is found in thejava.awtpackage. - The parameters you need to supply when creating new
Rectangleobjects are(int x, int y, int width, int height).
public class Main {
    public static void main(String[] args) {
        Rectangle r;

        // TODO create a Rectangle object that has the properties x=0, y=0, width=5, height=10
        // assign it to r

        System.out.println(r);
    }
}
java.awt.Rectangle[x=0,y=0,width=5,height=10]
- Import the
java.awt.Rectangleclass - This is how you create the required object
new Rectangle(0, 0, 5, 10)
W2.2b Can use instance members of objects
C++ to Java → Objects →
Variables that belong to an object are called attributes (or fields).
To access an attribute of an object, Java uses dot notation.
The code below uses spot.x which means "go to the object spot refers to, and get the value of the attribute x."
Point spot = new Point(3, 4);
int sum = spot.x * spot.x + spot.y * spot.y;
System.out.println(spot.x + ", " + spot.y + ", " + sum);
3, 4, 25
You can
This example changes the x value of the Point object to 5.
Point spot = new Point(3, 4);
spot.x = 5;
System.out.println(spot.x + ", " + spot.y);
5, 4
Java uses the dot notation to invoke methods on an object too.
This example invokes the translate method on a Point object so that it moves to a different location.
Point spot = new Point(3, 4);
System.out.println(spot.x + ", " + spot.y);
spot.translate(5,5);
System.out.println(spot.x + ", " + spot.y);
3, 4
8, 9
Update the code below as described in code comments, to produce the given output.
import java.awt.Rectangle;

public class Main {
    public static void main(String[] args) {
        Rectangle r = new Rectangle(0, 0, 4, 6);
        System.out.println(r);

        int area;
        //TODO: add a line below to calculate the area using width and height properties of r
        // and assign it to the variable area

        System.out.println("Area: " + area);

        //TODO: add a line here to set the size of r to 8x10 (width x height)
        //Recommended: use the setSize(int height, int width) method of the Rectangle object

        System.out.println(r);
    }

}
java.awt.Rectangle[x=0,y=0,width=4,height=6]
Area: 24
java.awt.Rectangle[x=0,y=0,width=8,height=10]
- Area can be calculated as
r.width * r.height - Setting the size can be done as
r.setSize(8, 10)
Evidence:
To be able to do exercises such as these:
Update the code below as described in code comments, to produce the given output.
import java.awt.Rectangle;

public class Main {
    public static void main(String[] args) {
        Rectangle r = new Rectangle(0, 0, 4, 6);
        System.out.println(r);

        int area;
        //TODO: add a line below to calculate the area using width and height properties of r
        // and assign it to the variable area

        System.out.println("Area: " + area);

        //TODO: add a line here to set the size of r to 8x10 (width x height)
        //Recommended: use the setSize(int height, int width) method of the Rectangle object

        System.out.println(r);
    }

}
java.awt.Rectangle[x=0,y=0,width=4,height=6]
Area: 24
java.awt.Rectangle[x=0,y=0,width=8,height=10]
- Area can be calculated as
r.width * r.height - Setting the size can be done as
r.setSize(8, 10)
W2.2c Can pass objects between methods
C++ to Java → Objects →
You can pass objects as parameters to a method in the usual way.
The printPoint method below takes a Point object as an argument and displays its attributes in (x,y) format.
public static void printPoint(Point p) {
    System.out.println("(" + p.x + ", " + p.y + ")");
}

public static void main(String[] args) {
    Point spot = new Point(3, 4);
    printPoint(spot);
}
3, 4
You can return an object from a method too.
The java.awt package also provides a class called Rectangle. Rectangle objects are similar to points, but they have four attributes: x, y, width, and height. The findCenter method below takes a Rectangle as an argument and returns a Point that corresponds to the center of the rectangle:
public static Point findCenter(Rectangle box) {
    int x = box.x + box.width / 2;
    int y = box.y + box.height / 2;
    return new Point(x, y);
}
The return type of this method is Point. The last line creates a new Point object and returns a reference to it.
null and NullPointerException
null is a special value that means "no object". You can assign null to a variable to indicate that the variable is 'empty' at the moment. However, if you try to use a null value, either by accessing an attribute or invoking a method, Java throws a NullPointerException.
In this example, the variable spot is assigned a null value. As a result, trying to access spot.x attribute or invoke spot.translate method results in a NullPointerException.
Point spot = null;
int x = spot.x;          // NullPointerException
spot.translate(50, 50);  // NullPointerException
On the other hand, it is legal return null from a method or to pass a null reference as an argument to a method.
Returning null from a method.
public static Point createCopy(Point p) {
    if (p == null) {
        return null; // return null if p is null
    }

    // create a new object with same x,y values
    return new Point(p.x, p.y);
}
Passing null as the argument.
Point result = createCopy(null);
System.out.println(result);
null
It is possible to have multiple variables that refer to the same object.
Notice how p1 and p2 are aliases for the same object. When the object is changed using the variable p1, the changes are visible via p2 as well (and vice versa), because they both point to the same Point object.
Point p1 = new Point(0,0);
Point p2 = p1;
System.out.println("p1: " + p1.x + ", " + p1.y);
System.out.println("p2: " + p2.x + ", " + p2.y);
p1.x = 1;
p2.y = 2;
System.out.println("p1: " + p1.x + ", " + p1.y);
System.out.println("p2: " + p2.x + ", " + p2.y);
p1: 0, 0
p2: 0, 0
p1: 1, 2
p2: 1, 2
Java does not have explicit pointers (and other related things such as pointer de-referencing, pointer arithmetic). When an object is passed into a method as an argument, the method gains access to the original object. If the method changes the object it received, the changes are retained in the object even after the method is completed.
Note how p3 retains changes done to it by the method swapCoordinates even after the method call.
public static void swapCoordinates(Point p){
    int temp = p.x;
    p.x = p.y;
    p.y = temp;
}

public static void main(String[] args) {
    Point p3 = new Point(2,3);
    System.out.println("p3: " + p3.x + ", " + p3.y);
    swapCoordinates(p3);
    System.out.println("p3: " + p3.x + ", " + p3.y);
}
p3: 2, 3
p3: 3, 2
Add a method move(Point p, Rectangle r) to the code below, to produce the given output. The behavior of the method is as follows:
- Returns a new
Pointobject that has attributesxandythat match those ofr - Does not modify
p - Updates
rso that its attributesxandymatch those ofp - Returns
nulland does nothing if eitherporris null
import java.awt.Point;
import java.awt.Rectangle;

public class Main {

    //TODO add your method here

    public static void main(String[] args) {
        Point p1 = new Point(0, 0);
        Rectangle r1 = new Rectangle(2, 3, 5, 6);
        System.out.println("arguments: " + p1 + ", " + r1);

        Point p2 = move(p1, r1);
        System.out.println("argument point after method call: " + p1);
        System.out.println("argument rectangle after method call: " + r1);
        System.out.println("returned point: " + p2);

        System.out.println(move(null, null));
    }
}
arguments: java.awt.Point[x=0,y=0], java.awt.Rectangle[x=2,y=3,width=5,height=6]
argument point after method call: java.awt.Point[x=0,y=0]
argument rectangle after method call: java.awt.Rectangle[x=0,y=0,width=5,height=6]
returned point: java.awt.Point[x=2,y=3]
null
Partial solution:
public static Point move(Point p, Rectangle r){
    if (p == null || r == null){
        // ...
    }
    Point newPoint = new Point(r.x, r.y);
    r.x = p.x;
    // ...
    return newPoint;
}
Evidence:
To be able to do exercises such as these:
Add a method move(Point p, Rectangle r) to the code below, to produce the given output. The behavior of the method is as follows:
- Returns a new
Pointobject that has attributesxandythat match those ofr - Does not modify
p - Updates
rso that its attributesxandymatch those ofp - Returns
nulland does nothing if eitherporris null
import java.awt.Point;
import java.awt.Rectangle;

public class Main {

    //TODO add your method here

    public static void main(String[] args) {
        Point p1 = new Point(0, 0);
        Rectangle r1 = new Rectangle(2, 3, 5, 6);
        System.out.println("arguments: " + p1 + ", " + r1);

        Point p2 = move(p1, r1);
        System.out.println("argument point after method call: " + p1);
        System.out.println("argument rectangle after method call: " + r1);
        System.out.println("returned point: " + p2);

        System.out.println(move(null, null));
    }
}
arguments: java.awt.Point[x=0,y=0], java.awt.Rectangle[x=2,y=3,width=5,height=6]
argument point after method call: java.awt.Point[x=0,y=0]
argument rectangle after method call: java.awt.Rectangle[x=0,y=0,width=5,height=6]
returned point: java.awt.Point[x=2,y=3]
null
Partial solution:
public static Point move(Point p, Rectangle r){
    if (p == null || r == null){
        // ...
    }
    Point newPoint = new Point(r.x, r.y);
    r.x = p.x;
    // ...
    return newPoint;
}
W2.3a Can define Java classes
C++ to Java → Classes →
As you know,
- Defining a class creates a new object type with the same name.
- Every object belongs to some object type; that is, it is an instance of some class.
- A class definition is like a template for objects: it specifies what attributes the objects have and what methods can operate on them.
- The
newoperator instantiates objects, that is, it creates new instances of a class. - The methods that operate on an object type are defined in the class for that object.
Here's a class called Time, intended to represent a moment in time. It has three attributes and no methods.
public class Time {
    private int hour;
    private int minute;
    private int second;
}
You can give a class any name you like. The Java convention is to use
The code should be in a file whose name matches the class e.g., the Time class should be in a file named Time.java.
When a class is public (e.g., the Time class in the above example) it can be used in other classes. But the private (e.g., the hour, minute and second attributes of the Time class) can only be accessed from inside the Time class.
Constructos
The syntax for
- The name of the constructor is the same as the name of the class.
- The keyword
staticis omitted. - Do not return anything. A constructor returns the created object by default.
When you invoke new, Java creates the object and calls your constructor to initialize the instance variables. When the constructor is done, new returns a reference to the new object.
Here is an example constructor for the Time class:
public Time() {
    hour = 0;
    minute = 0;
    second = 0;
}
This constructor does not take any arguments. Each line initializes an instance variable to zero (which in this example means midnight).
Now you can create Time objects.
Time time = new Time();
Like other methods, constructors can be overloaded, which means you can provide multiple constructors with different parameters.
You can add another constructor to the Time class to allow creating Time objects that are initialized to a specific time:
public Time(int h, int m, int s) {
    hour = h;
    minute = m;
    second = s;
}
Here's how you can invoke the new constructor:
Time justBeforeMidnight = new Time(11, 59, 59);
this keyword
The this keyword is a reference variable in Java that refers to the current object. You can use this the same way you use the name of any other object. For example, you can read and write the instance variables of this, and you can pass this as an argument to other methods. But you do not declare this, and you can’t make an assignment to it.
In the following version of the constructor, the names and types of the parameters are the same as the instance variables (parameters don’t have to use the same names, but that’s a common style). As a result, the parameters shadow (or hide) the instance variables, so the keyword this is necessary to tell them apart.
public Time(int hour, int minute, int second) {
    this.hour = hour;
    this.minute = minute;
    this.second = second;
}
this can be used to refer to a constructor of a class within the same class too.
In this example the constructor Time() uses the this keyword to call its own overloaded constructor Time(int, int, int)
public Time() {
    this(0, 0, 0); // call the overloaded constructor
}

public Time(int hour, int minute, int second) {
    // ...
}
Instance methods
You can add methods to a class which can then be used from the objects of that class. These instance methods do not have the static keyword in the method signature. Instance methods can access attributes of the class.
Here's how you can add a method to the Time class to get the number of seconds passed till midnight.
public int secondsSinceMidnight() {
    return hour*60*60 + minute*60 + second;
}
Here's how you can use that method.
Time t = new Time(0, 2, 5);
System.out.println(t.secondsSinceMidnight() + " seconds since midnight!");
Define a Circle class so that the code given below produces the given output. The nature of the class is a follows:
- Attributes(all
private):int x,int y: represents the location of the circledouble radius: the radius of the circle
- Constructors:
Circle(): initializesx,y,radiusto 0Circle(int x, int y, double radius): initializes the attributes to the given values
- Methods:
getArea():int
Returns the area of the circle as anintvalue (notdouble). Calculated as 2xPIx(radius)2
💡 You can convert todoubleto anintusing(int)e.g.,x = (int)2.25givesxthe value2.
💡 You can useMath.PIto get the value of Pi
💡 You can useMath.pow()to raise a number to a specific power e.g.,Math.pow(3, 2)calculates 32
public class Main {
    public static void main(String[] args) {
        Circle c = new Circle();

        System.out.println(c.getArea());
        c = new Circle(1, 2, 5);
        System.out.println(c.getArea());

    }
}
0
78
- Put the
Circleclass in a file calledCircle.java
Partial solution:
public class Circle {
    private int x;
    // ...

    public Circle(){
        this(0, 0, 0);
    }

    public Circle(int x, int y, double radius){
        this.x = x;
        // ...
    }

    public int getArea(){
        double area = Math.PI * Math.pow(radius, 2);
        return (int)area;
    }

}
Evidence:
To be able to do exercises such as these:
Define a Circle class so that the code given below produces the given output. The nature of the class is a follows:
- Attributes(all
private):int x,int y: represents the location of the circledouble radius: the radius of the circle
- Constructors:
Circle(): initializesx,y,radiusto 0Circle(int x, int y, double radius): initializes the attributes to the given values
- Methods:
getArea():int
Returns the area of the circle as anintvalue (notdouble). Calculated as 2xPIx(radius)2
💡 You can convert todoubleto anintusing(int)e.g.,x = (int)2.25givesxthe value2.
💡 You can useMath.PIto get the value of Pi
💡 You can useMath.pow()to raise a number to a specific power e.g.,Math.pow(3, 2)calculates 32
public class Main {
    public static void main(String[] args) {
        Circle c = new Circle();

        System.out.println(c.getArea());
        c = new Circle(1, 2, 5);
        System.out.println(c.getArea());

    }
}
0
78
- Put the
Circleclass in a file calledCircle.java
Partial solution:
public class Circle {
    private int x;
    // ...

    public Circle(){
        this(0, 0, 0);
    }

    public Circle(int x, int y, double radius){
        this.x = x;
        // ...
    }

    public int getArea(){
        double area = Math.PI * Math.pow(radius, 2);
        return (int)area;
    }

}
W2.3b Can define getters and setters
C++ to Java → Classes →
As the instance variables of Time are private, you can access them from within the Time class only. To compensate, you can provide methods to access attributes:
public int getHour() {
    return hour;
}

public int getMinute() {
    return minute;
}

public int getSecond() {
    return second;
}
Methods like these are formally called “accessors”, but more commonly referred to as getters. By convention, the method that gets a variable named something is called getSomething.
Similarly, you can provide setter methods to modify attributes of a Time object:
public void setHour(int hour) {
    this.hour = hour;
}

public void setMinute(int minute) {
    this.minute = minute;
}

public void setSecond(int second) {
    this.second = second;
}
Consider the Circle class below:
public class Circle {
    private int x;
    private int y;
    private double radius;

    public Circle(){
        this(0, 0, 0);
    }

    public Circle(int x, int y, double radius){
        this.x = x;
        this.y = y;
        this.radius = radius;
    }

    public int getArea(){
        double area = Math.PI * Math.pow(radius, 2);
        return (int)area;
    }

}
Update it as follows so that code given below produces the given output.
- Add getter/setter methods for all three attributes
- Update the setters and constructors such that if the radius supplied is negative, the code automatically set the radius to 0 instead.
public class Main {
    public static void main(String[] args) {
        Circle c = new Circle(1,2, 5);

        c.setX(4);
        c.setY(5);
        c.setRadius(6);
        System.out.println("x      : " + c.getX());
        System.out.println("y      : " + c.getY());
        System.out.println("radius : " + c.getRadius());
        System.out.println("area   : " + c.getArea());

        c.setRadius(-5);
        System.out.println("radius : " + c.getRadius());
        c = new Circle(1, 1, -4);
        System.out.println("radius : " + c.getRadius());

    }
}
x      : 4
y      : 5
radius : 6.0
area   : 113
radius : 0.0
radius : 0.0
Partial solution:
public Circle(int x, int y, double radius){
setX(x);
setY(y);
setRadius(radius);
}
public void setRadius(double radius) {
this.radius = Math.max(radius, 0);
}
Evidence:
To be able to do exercises such as these:
Consider the Circle class below:
public class Circle {
private int x;
private int y;
private double radius;
public Circle(){
this(0, 0, 0);
}
public Circle(int x, int y, double radius){
this.x = x;
this.y = y;
this.radius = radius;
}
public int getArea(){
double area = Math.PI * Math.pow(radius, 2);
return (int)area;
}
}
Update it as follows so that code given below produces the given output.
- Add getter/setter methods for all three attributes
- Update the setters and constructors such that if the radius supplied is negative, the code automatically set the radius to 0 instead.
public class Main {
public static void main(String[] args) {
Circle c = new Circle(1,2, 5);
c.setX(4);
c.setY(5);
c.setRadius(6);
System.out.println("x : " + c.getX());
System.out.println("y : " + c.getY());
System.out.println("radius : " + c.getRadius());
System.out.println("area : " + c.getArea());
c.setRadius(-5);
System.out.println("radius : " + c.getRadius());
c = new Circle(1, 1, -4);
System.out.println("radius : " + c.getRadius());
}
}
x : 4
y : 5
radius : 6.0
area : 113
radius : 0.0
radius : 0.0
Partial solution:
public Circle(int x, int y, double radius){
setX(x);
setY(y);
setRadius(radius);
}
public void setRadius(double radius) {
this.radius = Math.max(radius, 0);
}
W2.3c Can use class-level members
C++ to Java → Classes →
The content below is an extract from -- Java Tutorial, with slight adaptations.
When a number of objects are created from the same class blueprint, they each have their own distinct copies of instance variables. In the case of a Bicycle class, the instance variables are gear, and speed. Each Bicycle object has its own values for these variables, stored in different memory locations.
Sometimes, you want to have variables that are common to all objects. This is accomplished with the static modifier. Fields that have the static modifier in their declaration are called static fields or class variables. They are associated with the class, rather than with any object. Every instance of the class shares a class variable, which is in one fixed location in memory. Any object can change the value of a class variable, but class variables can also be manipulated without creating an instance of the class.
Suppose you want to create a number of Bicycle objects and assign each a serial number, beginning with 1 for the first object. This ID number is unique to each object and is therefore an instance variable. At the same time, you need a field to keep track of how many Bicycle objects have been created so that you know what ID to assign to the next one. Such a field is not related to any individual object, but to the class as a whole. For this you need a class variable, numberOfBicycles, as follows:
public class Bicycle {
private int gear;
private int speed;
// an instance variable for the object ID
private int id;
// a class variable for the number of Bicycle objects instantiated
private static int numberOfBicycles = 0;
...
}
Class variables are referenced by the class name itself, as in Bicycle.numberOfBicycles This makes it clear that they are class variables.
The Java programming language supports static methods as well as static variables. Static methods, which have the static modifier in their declarations, should be invoked with the class name, without the need for creating an instance of the class, as in ClassName.methodName(args)
The static modifier, in combination with the final modifier, is also used to define constants. The final modifier indicates that the value of this field cannot change.For example, the following variable declaration defines a constant named PI, whose value is an approximation of pi (the ratio of the circumference of a circle to its diameter):
static final double PI = 3.141592653589793;
Here is an example with class-level variables and class-level methods:
public class Bicycle {
private int gear;
private int speed;
private int id;
private static int numberOfBicycles = 0;
public Bicycle(int startSpeed, int startGear) {
gear = startGear;
speed = startSpeed;
numberOfBicycles++;
id = numberOfBicycles;
}
public int getID() {
return id;
}
public static int getNumberOfBicycles() {
return numberOfBicycles;
}
public int getGear(){
return gear;
}
public void setGear(int newValue) {
gear = newValue;
}
public int getSpeed() {
return speed;
}
// ...
}
💡 Explanation of System.out.println(...):
outis a class-level public attribute of theSystemclass.printlnis a instance level method of theoutobject.
Consider the Circle class below:
public class Circle {
private int x;
private int y;
private double radius;
public Circle(){
this(0, 0, 0);
}
public Circle(int x, int y, double radius){
setX(x);
setY(y);
setRadius(radius);
}
public int getX() {
return x;
}
public void setX(int x) {
this.x = x;
}
public int getY() {
return y;
}
public void setY(int y) {
this.y = y;
}
public double getRadius() {
return radius;
}
public void setRadius(double radius) {
this.radius = Math.max(radius, 0);
}
public int getArea(){
double area = Math.PI * Math.pow(radius, 2);
return (int)area;
}
}
Update it as follows so that code given below produces the given output.
- Add a class-level
getMaxRadiusmethod that returns the maximum radius that has been used in allCircleobjects created thus far.
public class Main {
public static void main(String[] args) {
Circle c = new Circle();
System.out.println("max radius used so far : " + Circle.getMaxRadius());
c = new Circle(0, 0, 10);
System.out.println("max radius used so far : " + Circle.getMaxRadius());
c = new Circle(0, 0, -15);
System.out.println("max radius used so far : " + Circle.getMaxRadius());
c.setRadius(12);
System.out.println("max radius used so far : " + Circle.getMaxRadius());
}
}
max radius used so far : 0.0
max radius used so far : 10.0
max radius used so far : 10.0
max radius used so far : 12.0
You can use a static variable maxRadius to track the maximum value used for the radius attribute so far.
Partial solution:
public void setRadius(double radius) {
this.radius = Math.max(radius, 0);
if (maxRadius < this.radius){
// ...
}
}
Evidence:
To be able to do exercises such as these:
Consider the Circle class below:
public class Circle {
private int x;
private int y;
private double radius;
public Circle(){
this(0, 0, 0);
}
public Circle(int x, int y, double radius){
setX(x);
setY(y);
setRadius(radius);
}
public int getX() {
return x;
}
public void setX(int x) {
this.x = x;
}
public int getY() {
return y;
}
public void setY(int y) {
this.y = y;
}
public double getRadius() {
return radius;
}
public void setRadius(double radius) {
this.radius = Math.max(radius, 0);
}
public int getArea(){
double area = Math.PI * Math.pow(radius, 2);
return (int)area;
}
}
Update it as follows so that code given below produces the given output.
- Add a class-level
getMaxRadiusmethod that returns the maximum radius that has been used in allCircleobjects created thus far.
public class Main {
public static void main(String[] args) {
Circle c = new Circle();
System.out.println("max radius used so far : " + Circle.getMaxRadius());
c = new Circle(0, 0, 10);
System.out.println("max radius used so far : " + Circle.getMaxRadius());
c = new Circle(0, 0, -15);
System.out.println("max radius used so far : " + Circle.getMaxRadius());
c.setRadius(12);
System.out.println("max radius used so far : " + Circle.getMaxRadius());
}
}
max radius used so far : 0.0
max radius used so far : 10.0
max radius used so far : 10.0
max radius used so far : 12.0
You can use a static variable maxRadius to track the maximum value used for the radius attribute so far.
Partial solution:
public void setRadius(double radius) {
this.radius = Math.max(radius, 0);
if (maxRadius < this.radius){
// ...
}
}
W2.4a Can explain IDEs
Implementation → IDEs →
Professional software engineers often write code using Integrated Development Environments (IDEs). IDEs support all development-related work within the same tool.
An IDE generally consists of:
- A source code editor that includes features such as syntax coloring, auto-completion, easy code navigation, error highlighting, and code-snippet generation.
- A compiler and/or an interpreter (together with other build automation support) that facilitates the compilation/linking/running/deployment of a program.
- A debugger that allows the developer to execute the program one step at a time to observe the run-time behavior in order to locate bugs.
- Other tools that aid various aspects of coding e.g. support for automated testing, drag-and-drop construction of UI components, version management support, simulation of the target runtime platform, and modeling support.
Examples of popular IDEs:
- Java: Eclipse, Intellij IDEA, NetBeans
- C#, C++: Visual Studio
- Swift: XCode
- Python: PyCharm
Some Web-based IDEs have appeared in recent times too e.g., Amazon's Cloud9 IDE.
Some experienced developers, in particular those with a UNIX background, prefer lightweight yet powerful text editors with scripting capabilities (e.g. Emacs) over heavier IDEs.
- a. Compiling
- b. Syntax error highlighting
- c. Debugging
- d. Code navigation e.g., to navigate from a method call to the method implementation
- e. Simulation e.g., run a mobile app in a simulator
- f. Code analysis e.g. to find unreachable code
- g. Reverse engineering design/documentation e.g. generate diagrams from code
- h. Visual programming e.g. Write programs using ‘drag and drop’ actions instead of typing code
- i. Syntax assistance e.g., show hints as you type
- j. Code generation e.g., to generate the code required by simply specifying which component/structure you want to implement
- k. Extension i.e., ability add more functionality to the IDE using plugins
All.
Explanation: While all of these features may not be present in some IDEs, most do have these features in some form or other.
Evidence:
Install Intellij IDEA on your computer. Either the Community Edition (free) or the Ultimate Edition (free for students) is fine.
W2.4b Can setup a project in an IDE
W2.4c Can navigate code effectively using IDE features
Tools → Intellij IDEA →
Some useful navigation shortcuts:
- Quickly locate a file by name.
- Go to the definition of a method from where it is used.
- Go back to the previous location.
- View the documentation of a method from where the method is being used, without navigating to the method itself.
- Find where a method/field is being used.
Evidence:
Add more code to your project in the IDE so that you have multiple files and multiple methods. Navigate through the code using IDE features e.g., jump from method call to the method definition.
Lecture 3
Questions to discuss during the lecture:
Suggest ways to improve the quality of the code below.
...
private static final String MESSAGE_COMMAND_HELP_PARAMETERS = "Parameters: %1$s";
private static final String MESSAGE_COMMAND_HELP_EXAMPLE = "Example: %1$s";
private static final String MESSAGE_DISPLAY_PERSON_DATA = "%1$s Phone Number: %2$s Email: %3$s";
private static final String GOODBYE_MESSAGE = "Exiting Address Book... Good bye!";
private static final String MESSAGE_INVALID_COMMAND_FORMAT = "Invalid command format: %1$s";
...
/** List of all persons in the address book. */
private static final ArrayList<String> person = new ArrayList<>();
...
public static void main(String[] args) {
showWelcomeMessage();
processProgramArgs(args);
loadDataFromStorage();
while (true) {
System.out.print("Enter command: ");
String userCommand = SCANNER.nextLine();
userCommand = userCommand.trim();
showToUser(userCommand);
String feedback = executeCommand(userCommand);
showResultToUser(feedback);
}
}
...
/**
* Show a message to the user
*/
private static void showToUser(String message) {
System.out.println(LINE_PREFIX + m);
}
Some relevant points:
- Similar things should be named similarly (consistency helps readability)
- Use singular names for variables that handle single values
- SLAP: The code of a method should be written as high-level as possible, and at the same level of abstraction
- The first sentence of a method header comment should follow a certain phrasing (refer to coding standard)
- Constant names don't follow camelCase (refer coding standard)
- Indentation should be consistent
[slides]