Full Schedule of Module Activities
Week 11 [Oct 29]
Todo
Admin info to read:
Release as a jar file, release updated user guide, peer-test released products, verify code authorship.
v1.3 Summary of Milestone
| Milestone | Minimum acceptable performance to consider as 'reached' |
|---|---|
| Contributed code to v1.3 | code merged |
| Code collated | as stated |
| v1.3 jar file released properly on GitHub | as stated |
| v1.3 milestone properly wrapped up on GitHub | as stated |
| Documentation updated to match v1.3 | at least the User Guide and the README.adoc is updated |
v1.3 Project Management
You are required to
Steps to use Collate:
- Download
Collate-TUI.jarfrom the Collate Tool project - Annotate your code to indicate who wrote which part of the code (instructions given below)
- Run the Collate tool to collate code written by each person into separate files (instructions given below)
Annotating code to indicate authorship
-
Mark your code with a
//@@author {yourGithubUsername}. Note the double@.
The//@@authortag should appear only at the beginning of the code you wrote. The code up to the next//@@authortag or the end of the file (whichever comes first) will be considered as was written by that author. Here is a sample code file://@@author johndoe method 1 ... method 2 ... //@@author sarahkhoo method 3 ... //@@author johndoe method 4 ... -
If you don't know who wrote the code segment below yours, you may put an empty
//@@author(i.e. no GitHub username) to indicate the end of the code segment you wrote. The author of code below yours can add the GitHub username to the empty tag later. Here is a sample code with an emptyauthortag:method 0 ... //@@author johndoe method 1 ... method 2 ... //@@author method 3 ... method 4 ... -
The author tag syntax varies based on file type e.g. for java, css, fxml. Use the corresponding comment syntax for non-Java files.
Here is an example code from an xml/fxml file.<!-- @@author sereneWong --> <textbox> <label>...</label> <input>...</input> </textbox> ... -
Do not put the
//@@authorinside java header comments as only the content below that tag will be collated.
👎/** * Returns true if ... * @@author johndoe */👍
//@@author johndoe
/**
  * Returns true if ...
  */
What to and what not to annotate
-
Annotate both functional and test code but not documentation files.
-
Annotate only significant size code blocks that can be reviewed on its own e.g., a class, a sequence of methods, a method.
Claiming credit for code blocks smaller than a method is discouraged but allowed. If you do, do it sparingly and only claim meaningful blocks of code such as a block of statements, a loop, or an if-else statement%%.- If an enhancement required you to do tiny changes in many places, there is no need to collate all those tiny changes; you can describe those changes in the Project Portfolio page instead.
- If a code block was touched by more than one person, either let the person who wrote most of it (e.g. more than 80%) take credit for the entire block, or leave it as 'unclaimed' (i.e., no author tags).
- Related to the above point, if you claim a code block as your own, more than 80% of the code in that block should have been written by yourself. For example, no more than 20% of it can be code you reused from somewhere.
- 💡 GitHub has a blame feature and a history feature that can help you determine who wrote a piece of code.
-
Do not try to boost the length of your collated files using dubious means such as duplicating the same code in multiple places. In particular, do not copy-paste test cases to create redundant tests. Even repetitive code blocks within test methods should be extracted out as utility methods to reduce code duplication.
Individual members are responsible for making sure their own collated files contain the correct content.
If you notice a team member claiming credit for code that he/she did not write or use other questionable tactics, you can email us (after the final submission) to let us know. -
If you wrote a significant amount of code that was not used in the final product,
- Create a folder called
{project root}/unused - Move unused files (or copies of files containing unused code) to that folder
- use
//@@author {yourGithubUsername}-unusedto mark unused code in those files (note the suffixunused) e.g.
//@@author johndoe-unused
method 1 ...
method 2 ...
Please put a comment in the code to explain why it was not used.
- Create a folder called
-
If you reused code from elsewhere, mark such code as
//@@author {yourGithubUsername}-reused(note the suffixreused) e.g.//@@author johndoe-reused method 1 ... method 2 ... -
For code generated by the IDE/framework, it should not be annotated as your own.
-
Code you modified in minor ways e.g. adding a parameter. These can be left out of collated code but can be mentioned in the Project Portfolio page if you want to claim credit for them.
Collating the annotated code
You need to put the collated code in the following folders
| Code Type | Folder |
|---|---|
| functional code | collated/functional |
| test code | collated/test |
| unused code | collated/unused |
Refer to Collate Tool's user guide to find how to run the tool over the annotated code.
Given below are DOS sample commands you can put in a batch file and run it to collate the code.
java -jar Collate-TUI.jar collate from src/main to collated/functional include java, fxml, css

java -jar Collate-TUI.jar collate from src/test to collated/test include java

java -jar Collate-TUI.jar collate from unused to collated/unused include java, fxml, css
The output should be something like the structure given below.
collated/
    functional/
        johndoe.md
        sarahkhoo.md
        ravikumar.md
        ravikumarreused.md
    test/
        johndoe.md
        sarahkhoo.md
        ravikumar.md
    unused/
        johndoe.md
-
After running the collate tool, you are recommended to look through the generated .md files to ensure all your code has been extracted correctly.
-
Push the *.md files created to a folder called /collated in your repo.
v1.3 Product
-
As before, move the product towards v2.0.
Submission: Push the code (including the
collatedfolder and files created above) to GitHub.
v1.3 Documentation
v1.3 user guide should be updated to match the current version of the product. Reason: v1.3 will be subjected to a trial acceptance testing session
-
README page: Update to look like a real product (rather than a project for learning SE) if you haven't done so already. In particular,
- Describe the profile of the target user
- Remove irrelevant content such as Learning Outcomes
- Update the
Ui.pngto match the current product
-
User Guide: This document will be used by acceptance testers. Update to match the current version. In particular,
- Clearly indicate which features are not implemented yet e.g. tag those features with a
Coming in v2.0. - For those features already implemented, ensure their descriptions match the exact behavior of the product e.g. replace mockups with actual screenshots
- Clearly indicate which features are not implemented yet e.g. tag those features with a
-
Developer Guide: As before, update if necessary.
-
AboutUs page: Update to reflect current state of roles and responsibilities.
Submission: Must be included in the version tagged v1.3.
v1.3 Demo
- Optional. If you want feedback on your features, you can demo the feature and get feedback from the tutor.
v1.3 Testing
v1.3 is subjected to a round of peer acceptance/system testing.
Objectives:
- To train you to do manual testing, bug reporting, bug
triaging , bug fixing, communicating with users, evaluating products etc. - To help you improve your product before the final submission.
When, where:
- To be done during Lecture 11. Duration: 30 minutes (we'll stop the lecture for a 30 minute block for you do do the testing).
During the session:
- Each student will be assigned a product from another team to test.
- Download the latest jar file from the team's GitHub page. Copy it to an empty folder.
- Test the product based on the user guide. First, acceptance test it from the perspective of the target user profile. If there is any time left, you can switch to system testing mode.
- Post bugs you find in the team's issue tracker.
- Each bug should be a separate issue.
- Even problems in the user guide e.g. lack of explanations can be posted as issues.
- Feel free to post other suggestions for improvements too e.g. ways to improve the command format.
- Do not use the session time to read bug reports your team is receiving.
- Before posting a report/suggestion, check if it is already posted by someone else. If it is, post in the same thread to confirm/support the issue and add your input.
- Use descriptive titles for the issues. Give a good description of the bug/suggestion, including steps required to reproduce.
- 💡 Be diplomatic when reporting bugs or suggesting improvements. For example, instead of criticising the current behavior, simply suggest alternatives to consider.
Grading:
- Considered for participation. In addition, issues you created can be included in your
project portfolio page to show how you contributed to another project. - There is no penalty for bugs reported in your product.
At the end of the project each student is required to submit a Project Portfolio Page.
-
Objective:
- For you to use (e.g. in your resume) as a well-documented data point of your SE experience
- For us to use as a data point to evaluate your,
- contributions to the project
- your documentation skills
-
What to include:
- Main things to include:
- links to collated code
- features you implemented (include relevant extracts from the user guide and the developer guide)
- features you propose to implement in future (include relevant extracts from the user guide and the developer guide if applicable)
Note: the purpose of allowing you to include proposed features is to provide you more flexibility to show your documentation skills. e.g. you can bring in a proposed feature just to give you an opportunity to use a UML diagram type not used by the actual features. - other significant contributions to the project e.g. tweaks to existing features, setting up project tools
- Other things you can include:
- Evidence of helping others e.g. responses you posted in our forum, bugs you reported in other team's products,
- Evidence of technical leadership e.g. offering features for others to reuse, evidence of those features being reused by others
- If you plan to use the PPP in your Resume, you can also include your SE work outside of the module (will not be graded)
- Main things to include:
-
Format:
- Page limit: If you have more content than the limit given below, shorten (or omit some content) so that you do not exceed the page limit. Having too much content in the PPP will be viewed unfavorably during grading. Note: the page limits given below are after converting to PDF format. The actual amount of content you require is actually less than what these numbers suggest because the HTML → PDF conversion adds a lot of spacing around content.
Content Limit Description in point form 0.5-1 Extracts from the User Guide 1-3 Extracts from the Developer Guide 3-6 Total 5-10 - Follow the example in the AddressBook-Level4.
- 💡 You can use the Asciidoc's
includefeature to include sections from the developer guide or the user guide in your PPP. Follow the example in the sample. - ❗️ It is assumed that all contents in the PPP were written primarily by you. If any section is written by someone else e.g. someone else wrote described the feature in the User Guide but you implemented the feature, clearly state that the section was written by someone else (e.g.
Start of Extract [from: User Guide] written by Jane Doe). Reason: Your writing skills will be evaluated based on the PPP
- Page limit: If you have more content than the limit given below, shorten (or omit some content) so that you do not exceed the page limit. Having too much content in the PPP will be viewed unfavorably during grading. Note: the page limits given below are after converting to PDF format. The actual amount of content you require is actually less than what these numbers suggest because the HTML → PDF conversion adds a lot of spacing around content.
Preparation:
- Ensure you have access to a computer that is able to run module projects e.g. has the right Java version.
- Have a good screen grab tool with annotation features so that you can quickly take a screenshot of a bug, annotate it, and post in the issue tracker.
- 💡 You can use Ctrl+V to paste a picture from the clipboard into a text box in GitHub issue tracker.
After the session:
- It is up to you to decide whether you will act on reported issues before the final submission v1.4. For some issues, the correct decision could be to reject or postpone.
- You can post in the issue thread to communicate with the tester e.g. to ask for more info, etc. However, the tester is not obliged to respond.
- 💡 Do not argue with the issue reporter to try to convince that person that your way is correct/better. If at all, you can gently explain the rationale for the current behavior but do not waste time getting involved in long arguments. If you think the suggestion/bug is unreasonable, just thank the reporter for their view and close the issue.
Outcomes
Design
W11.1 Can explain models
W11.1a Can explain models
Design → Modelling → Introduction →
A model is a representation of something else.
A
A class diagram is a diagram drawn using the UML modelling notation.
An example class diagram:
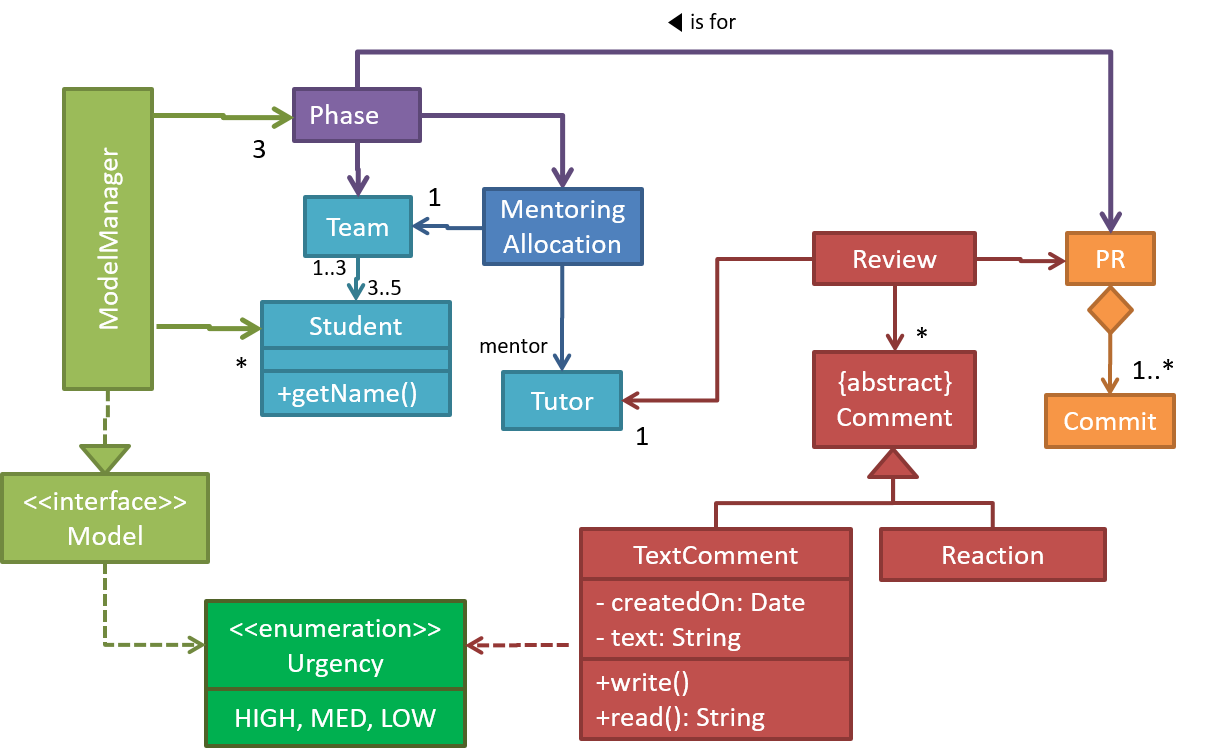
A model provides a simpler view of a complex entity because a model captures only a selected aspect. This omission of some aspects implies models are
Design → Design Fundamentals → Abstraction →
Abstraction is a technique for dealing with complexity. It works by establishing a level of complexity we are interested in, and suppressing the more complex details below that level.
The guiding principle of abstraction is that only details that are relevant to the current perspective or the task at hand needs to be considered. As most programs are written to solve complex problems involving large amounts of intricate details, it is impossible to deal with all these details at the same time. That is where abstraction can help.
Ignoring lower level data items and thinking in terms of bigger entities is called data abstraction.
Within a certain software component, we might deal with a user data type, while ignoring the details contained in the user data item such as name, and date of birth. These details have been ‘abstracted away’ as they do not affect the task of that software component.
Control abstraction abstracts away details of the actual control flow to focus on tasks at a simplified level.
print(“Hello”) is an abstraction of the actual output mechanism within the computer.
Abstraction can be applied repeatedly to obtain progressively higher levels of abstractions.
An example of different levels of data abstraction: a File is a data item that is at a higher level than an array and an array is at a higher level than a bit.
An example of different levels of control abstraction: execute(Game) is at a higher level than print(Char) which is at a higher than an Assembly language instruction MOV.
Abstraction is a general concept that is not limited to just data or control abstractions.
Some more general examples of abstraction:
- An OOP class is an abstraction over related data and behaviors.
- An architecture is a higher-level abstraction of the design of a software.
- Models (e.g., UML models) are abstractions of some aspect of reality.
A class diagram captures the structure of the software design but not the behavior.
Multiple models of the same entity may be needed to capture it fully.
In addition to a class diagram (or even multiple class diagrams), a number of other diagrams may be needed to capture various interesting aspects of the software.
W11.1b Can explain how models are used
Design → Modelling → Introduction →
In software development, models are useful in several ways:
a) To analyze a complex entity related to software development.
Some examples of using models for analysis:
- Models of the problem domain (i.e. the environment in which the software is expected to solve a problem) can be built to aid the understanding of the problem to be solved.
- When planning a software solution, models can be created to figure out how the solution is to be built. An architecture diagram is such a model.
b) To communicate information among stakeholders. Models can be used as a visual aid in discussions and documentations.
Some examples of using models to communicate:
- We can use an
architecture diagram to explain the high-level design of the software to developers. - A business analyst can use a use case diagram to explain to the customer the functionality of the system.
- A class diagram can be reverse-engineered from code so as to help explain the design of a component to a new developer.
An architecture diagram depicts the high-level design of a software.
Some example architecture diagrams:


source: https://commons.wikimedia.org
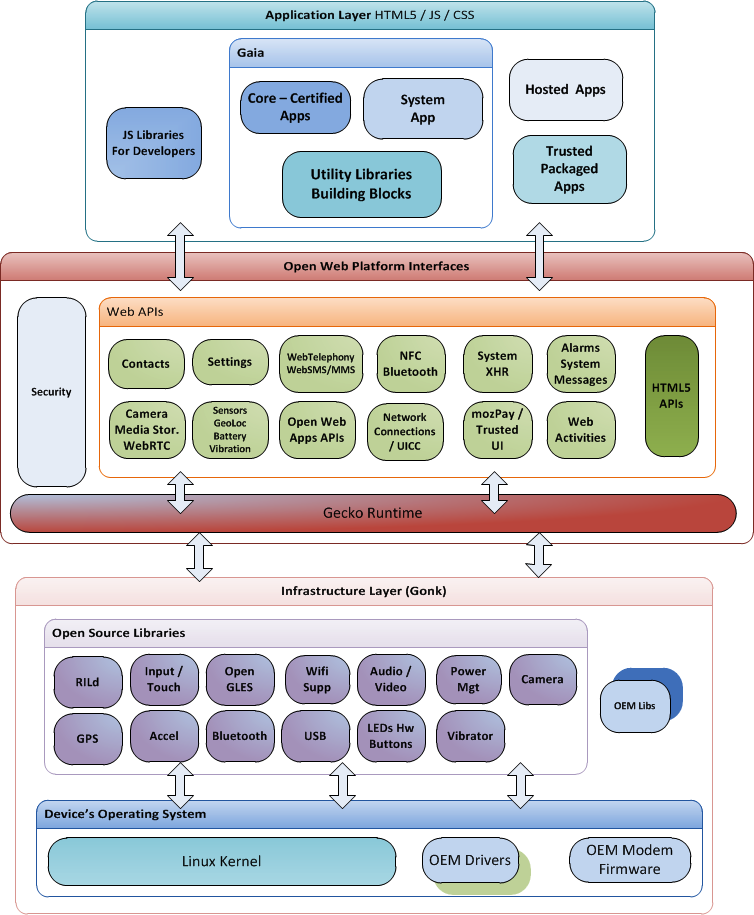
source: https://commons.wikimedia.org

source: https://commons.wikimedia.org
c) As a blueprint for creating software. Models can be used as instructions for building software.
Some examples of using models to as blueprints:
- A senior developer draws a class diagram to propose a design for an OOP software and passes it to a junior programmer to implement.
- A software tool allows users to draw UML models using its interface and the tool automatically generates the code based on the model.
Model-driven development (MDD), also called Model-driven engineering, is an approach to software development that strives to exploit models as blueprints. MDD uses models as primary engineering artifacts when developing software. That is, the system is first created in the form of models. After that, the models are converted to code using code-generation techniques (usually, automated or semi-automated, but can even involve manual translation from model to code). MDD requires the use of a very expressive modeling notation (graphical or otherwise), often specific to a given problem domain. It also requires sophisticated tools to generate code from models and maintain the link between models and the code. One advantage of MDD is that the same model can be used to create software for different platforms and different languages. MDD has a lot of promise, but it is still an emerging technology
Further reading:
- Martin Fowler's view on MDD - TLDR: he is sceptical
- 5 types of Model Driven Software Development - A more optimistic view, although an old article
Choose the correct statements about models.
- a. Models are abstractions.
- b. Models can be used for communication.
- c. Models can be used for analysis of a problem.
- d. Generating models from code is useless.
- e. Models can be used as blueprints for generating code.
(a) (b) (c) (e)
Explanation: Models generated from code can be used for understanding, analysing, and communicating about the code.
Explain how models (e.g. UML diagrams) can be used in a class project.
Can models be useful in evaluating the design quality of a software written by students?
W11.2 Can explain some UML models
W11.2a Can explain object oriented domain models
Design → Modelling → Modelling Structure
The analysis process for identifying objects and object classes is recognized as one of the most difficult areas of object-oriented development. --Ian Sommerville, in the book Software Engineering
Class diagrams can also be used to model objects in the
OO domain model of a snakes and ladders game is given below.
Description: Snakes and ladders game is played by two or more players using a board and a die. The board has 100 squares marked 1 to 100. Each player owns one piece. Players take turns to throw the die and advance their piece by the number of squares they earned from the die throw. The board has a number of snakes. If a player’s piece lands on a square with a snake head, the piece is automatically moved to the square containing the snake’s tail. Similarly, a piece can automatically move from a ladder foot to the ladder top. The player whose piece is the first to reach the 100th square wins.
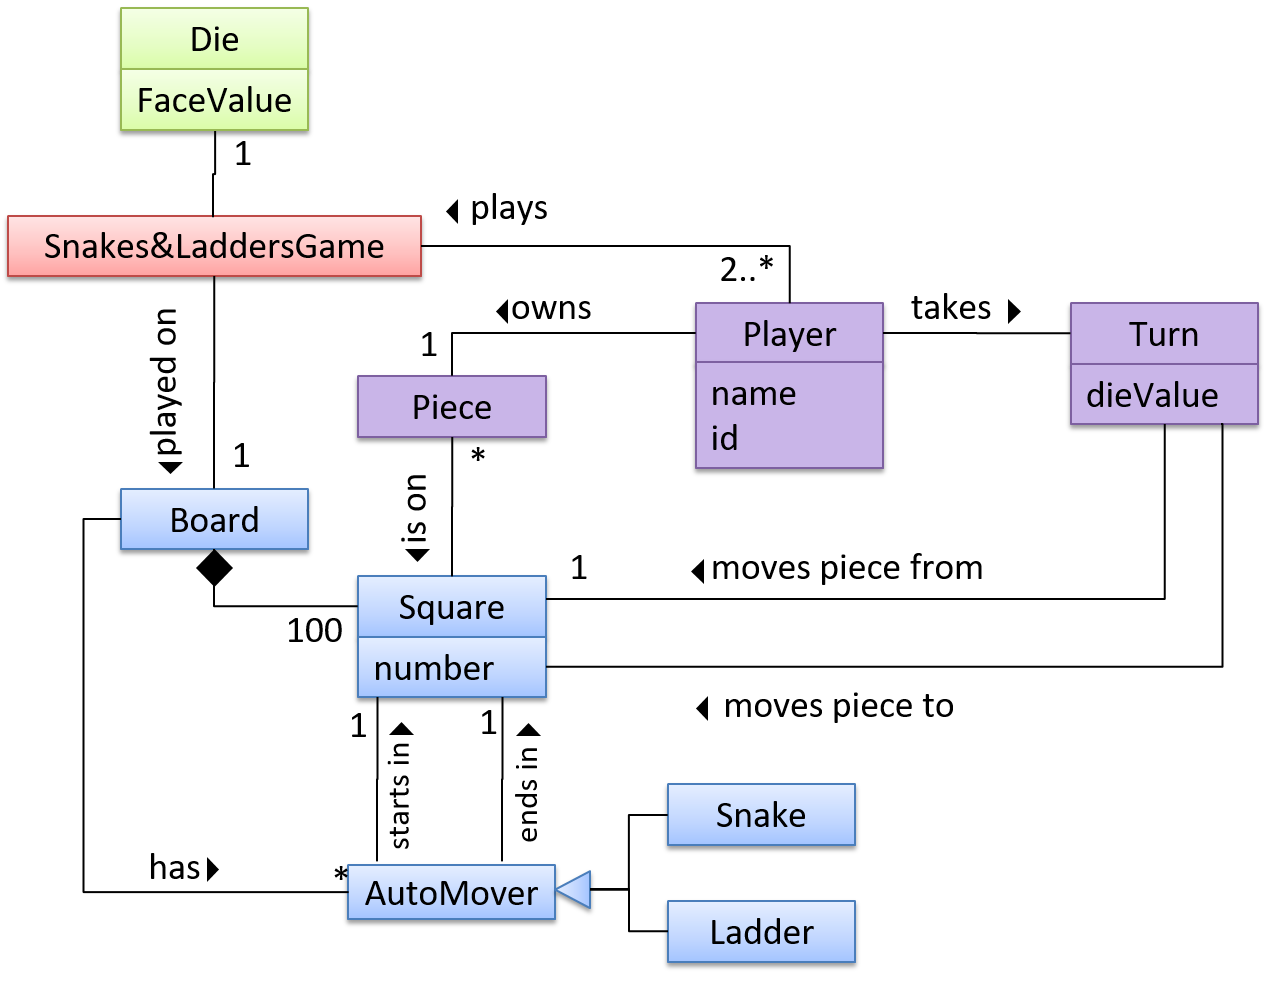
The above OO domain model omits the ladder class for simplicity. It can be included in a similar fashion to the Snake class.
OODMs do not contain solution-specific classes (i.e. classes that are used in the solution domain but do not exist in the problem domain). For example, a class called DatabaseConnection could appear in a class diagram but not usually in an OO domain model because DatabaseConnection is something related to a software solution but not an entity in the problem domain.
OODMs represents the class structure of the problem domain and not their behavior, just like class diagrams. To show behavior, use other diagrams such as sequence diagrams.
OODM notation is similar to class diagram notation but typically omit methods and navigability.
This diagram is,
- a. A class diagram.
- b. An object diagram.
- c. An OO domain model, also known as a conceptual class diagram.
- d. Can be either a class diagram or an OO domain model.
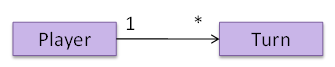
(a)
Explanation: The diagram shows navigability which is not shown in an OO domain model. Hence, it has to be a class diagram.
What is the main difference between a class diagram and and an OO domain model?
(a)
Explanation: Both are UML diagrams, and use the class diagram notation. While it is true that often a class diagram may have more classes and more details, the main difference is that the OO domain model describes the problem domain while the class diagram describes the solution.
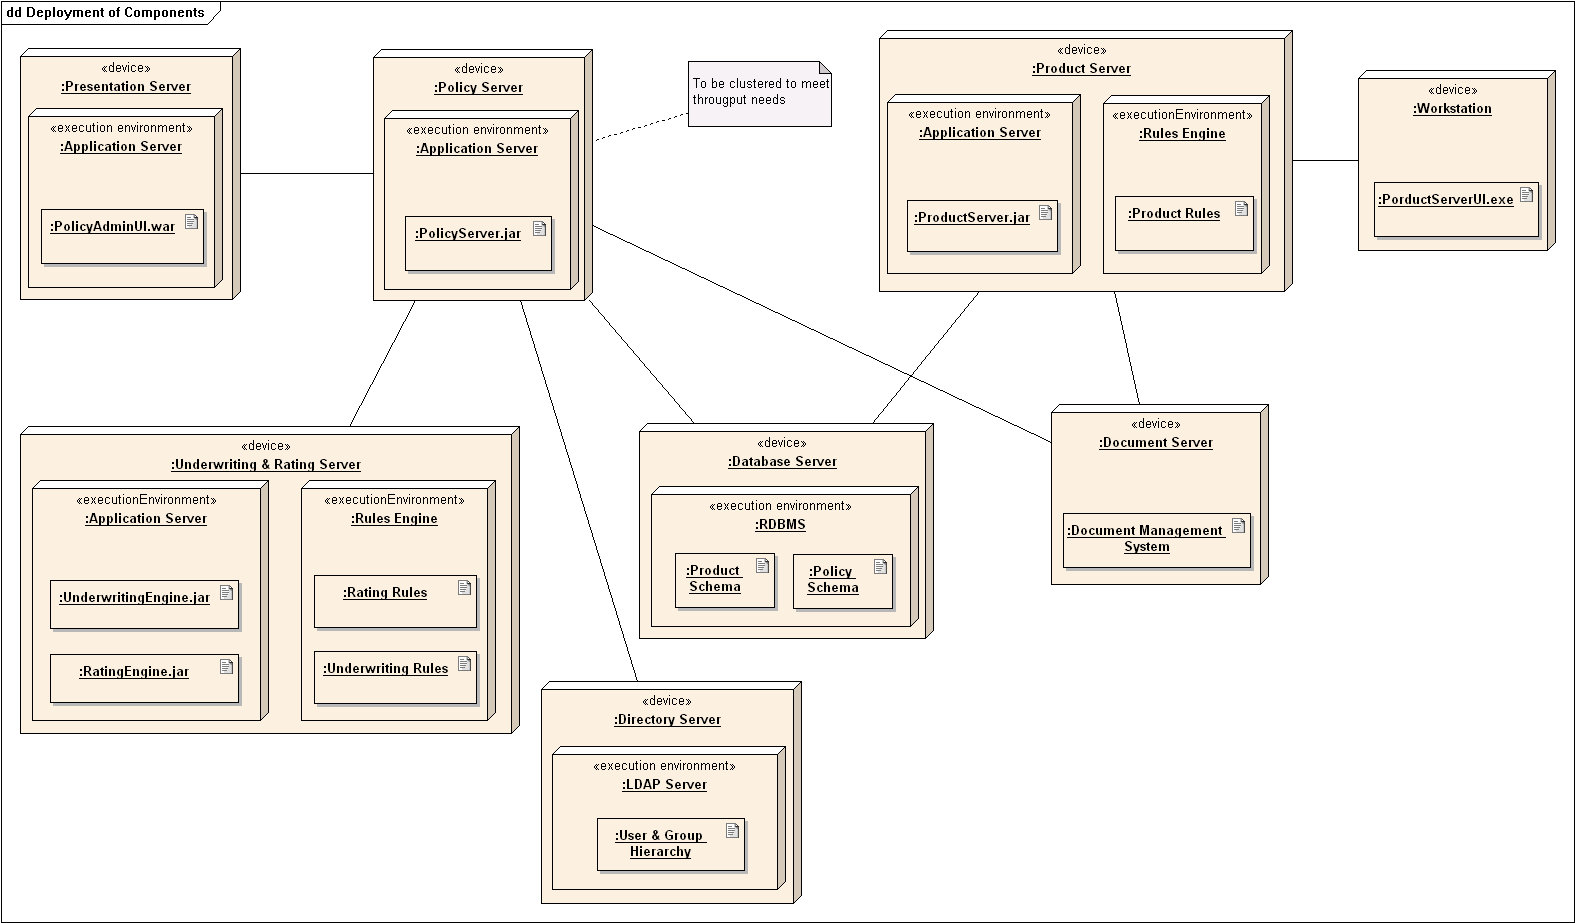
W11.2b Can explain deployment diagrams
Design → Modelling → Modelling Structure
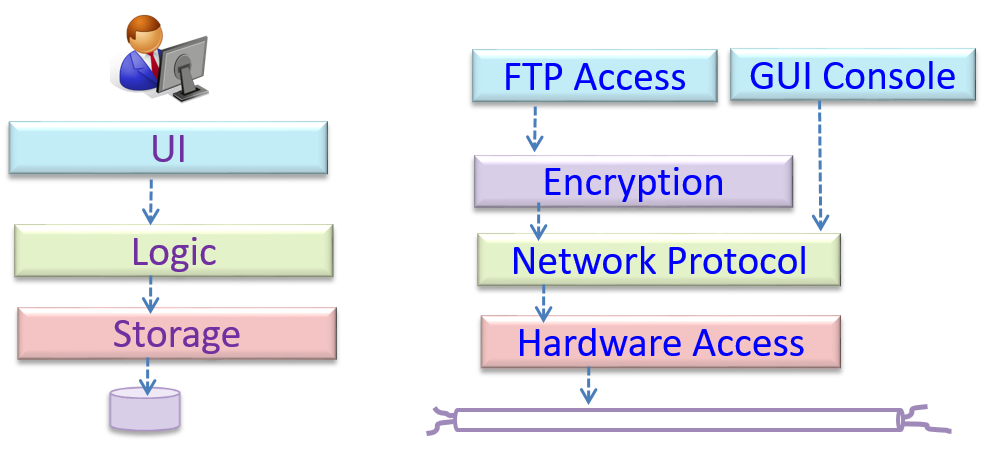
A deployment diagram shows a system's physical layout, revealing which pieces of software run on which pieces of hardware.
An example deployment diagram:
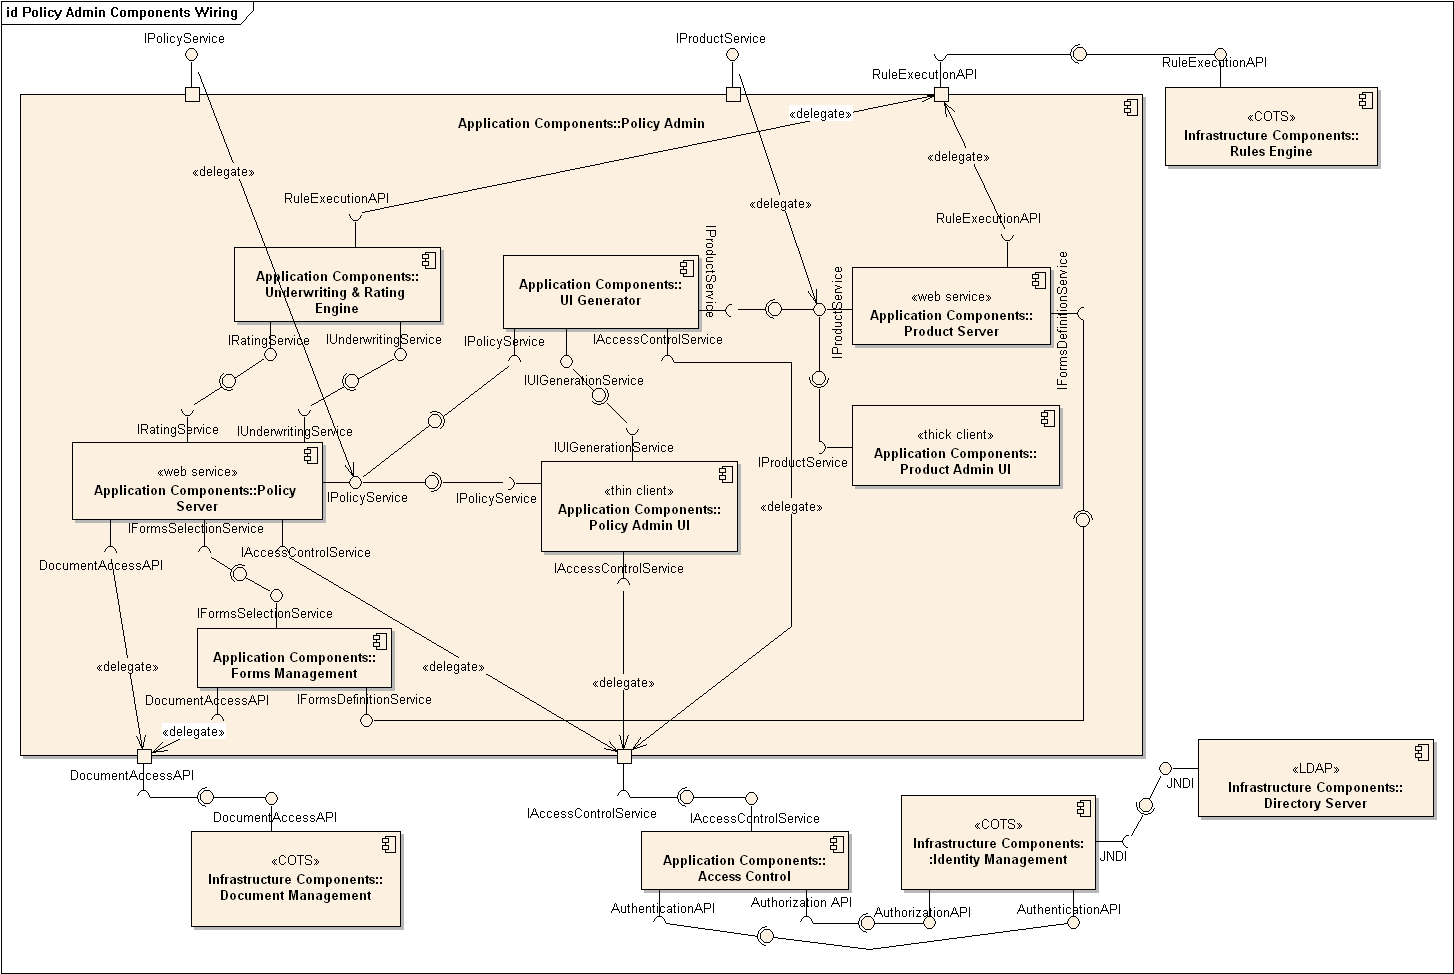
W11.2c Can explain component diagrams
Design → Modelling → Modelling Structure
A component diagram is used to show how a system is divided into components and how they are connected to each other through interfaces.
An example component diagram:
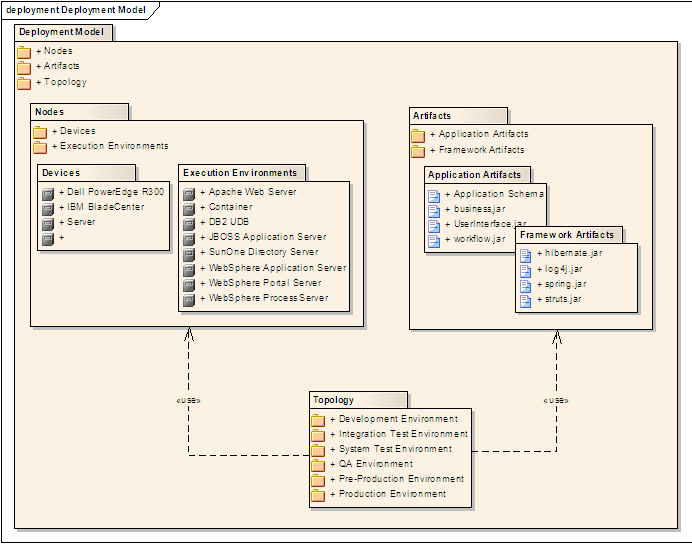
W11.2d Can explain package diagrams
Design → Modelling → Modelling Structure
A package diagram shows packages and their dependencies. A package is a grouping construct for grouping UML elements (classes, use cases, etc.).
Here is an example package diagram:
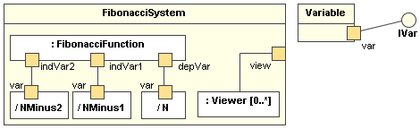
W11.2e Can explain composite structure diagrams
Design → Modelling → Modelling Structure
A composite structure diagram hierarchically decomposes a class into its internal structure.
Here is an example composite structure diagram:
W11.2f Can use basic-level activity diagrams
Design → Modelling → Modelling Behaviors
Software projects often involve workflows. Workflows define the
Some examples in which a certain workflow is relevant to software project:
A software that automates the work of an insurance company needs to take into account the workflow of processing an insurance claim.
The algorithm of a price of code represents the workflow (i.e. the execution flow) of the code.
Which of these sequence of actions is not allowed by the given activity diagram?
- i. start a b c d end
- ii. start a b c d e f g c d end
- iii. start a b c d e g f c d end
- iv. start a b c d g c d end
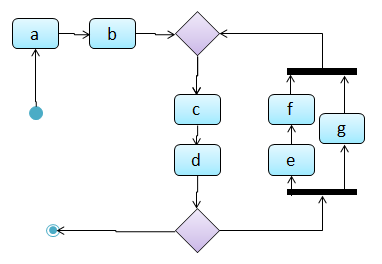
(iv)
Explanation: -e-f- and -g- are parallel paths. Both paths should complete before the execution reaches c again.
Draw an activity diagram to represent the following workflow a burger shop uses when processing an order by a customer.
- First, a cashier takes the order.
- Then, three workers start preparing the order at the same time; one prepares the drinks, one prepares the burgers, and one prepares the desserts.
- In the meantime, the customer pays for the order. If the customer has a voucher, she pays using the voucher; otherwise she pays using cash.
- After paying, the customer collects the food after all three parts of the order are ready.

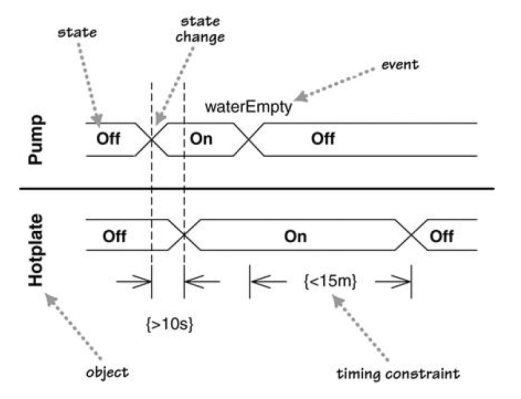
W11.2g Can explain timing diagrams
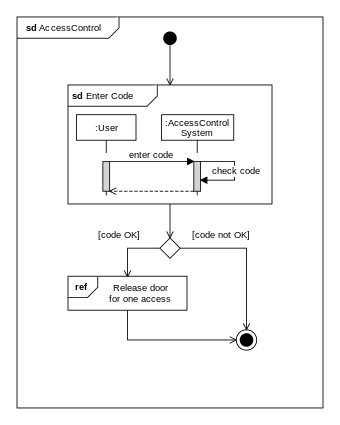
W11.2h Can explain interaction overview diagrams
Design → Modelling → Modelling Behaviors
An Interaction overview diagrams is a combination of activity diagrams and sequence diagrams.
An example:
W11.2i Can explain communication diagrams
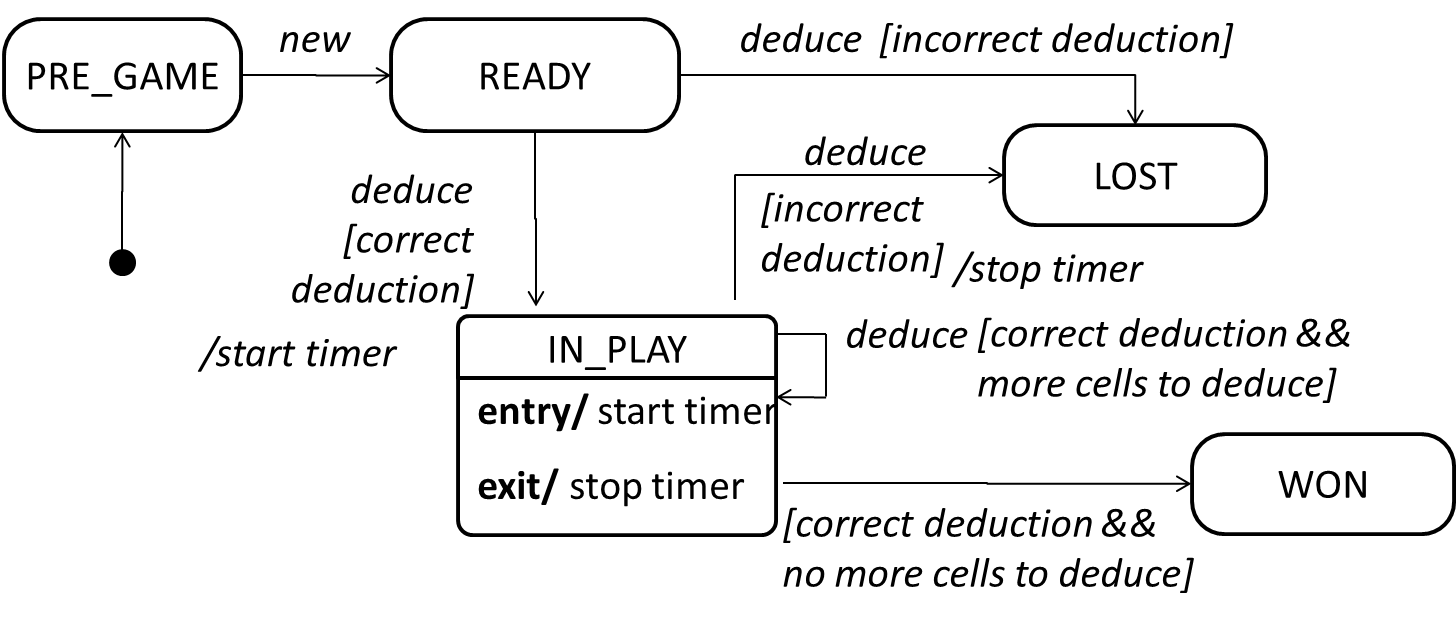
W11.2j Can explain state machine diagrams
Design → Modelling → Modelling Behaviors
A State Machine Diagram models state-dependent behavior.
Consider how a CD player responds when the “eject CD” button is pushed:
- If the CD tray is already open, it does nothing.
- If the CD tray is already in the process of opening (opened half-way), it continues to open the CD tray.
- If the CD tray is closed and the CD is being played, it stops playing and opens the CD tray.
- If the CD tray is closed and CD is not being played, it simply opens the CD tray.
- If the CD tray is already in the process of closing (closed half-way), it waits until the CD tray is fully closed and opens it immediately afterwards.
What this means is that the CD player’s response to pushing the “eject CD” button depends on what it was doing at the time of the event. More generally, the CD player’s response to the event received depends on its internal state. Such a behavior is called a state-dependent behavior.
Often, state-dependent behavior displayed by an object in a system is simple enough that it needs no extra attention; such a behavior can be as simple as a conditional behavior like if x>y, then x=x-y.
Occasionally, objects may exhibit state-dependent behavior that is complex enough such that it needs to be captured into a separate model. Such state-dependent behavior can be modelled using UML state machine diagrams (SMD for short, sometimes also called ‘state charts’, ‘state diagrams’ or ‘state machines’).
An SMD views the life-cycle of an object as consisting of a finite number of states where each state displays a unique behavior pattern. An SMD captures information such as the states an object can be in, during its lifetime, and how the object responds to various events while in each state and how the object transits from one state to another. In contrast to sequence diagrams that capture object behavior one scenario at a time, SMDs capture the object’s behavior over its full life cycle.
An SMD for the Minesweeper game.
Implementation
W11.3 Can explain frameworks, libraries, and platforms
Reuse
W11.3a Can explain software reuse
Implementation → Reuse → Introduction →
Reuse is a major theme in software engineering practices. By reusing tried-and-tested components, the robustness of a new software system can be enhanced while reducing the manpower and time requirement. Reusable components come in many forms; it can be reusing a piece of code, a subsystem, or a whole software.
W11.3b Can explain the costs and benefits of reuse
Implementation → Reuse → Introduction →
While you may be tempted to use many libraries/frameworks/platform that seem to crop up on a regular basis and promise to bring great benefits, note that there are costs associated with reuse. Here are some:
- The reused code may be an overkill (think using a sledgehammer to crack a nut) increasing the size of, or/and degrading the performance of, your software.
- The reused software may not be mature/stable enough to be used in an important product. That means the software can change drastically and rapidly, possibly in ways that break your software.
- Non-mature software has the risk of dying off as fast as they emerged, leaving you with a dependency that is no longer maintained.
- The license of the reused software (or its dependencies) restrict how you can use/develop your software.
- The reused software might have bugs, missing features, or security vulnerabilities that are important to your product but not so important to the maintainers of that software, which means those flaws will not get fixed as fast as you need them to.
- Malicious code can sneak into your product via compromised dependencies.
One of your teammates is proposing to use a recently-released “cool” UI framework for your class project. List the pros and cons of this idea.
Pros
- The potential to create a much better product by reusing the framework.
- Learning a new framework is good for the future job prospects.
Cons
- Learning curve may be steep.
- May not be stable (it was recently released).
- May not allow us to do exactly what we want. While frameworks allow customization, such customization can be limited.
- Performance penalties.
- Might interfere with learning objectives of the module.
Note that having more cons does not mean we should not use this framework. Further investigation is required before we can make a final decision.
Evidence:
Have reused software. Can explain general costs and benefits of the code you have reused.
APIs
W11.3c Can explain APIs
Implementation → Reuse → APIs →
An Application Programming Interface (API) specifies the interface through which other programs can interact with a software component. It is a contract between the component and its clients.
A class has an API (e.g., API of the Java String class, API of the Python str class) which is a collection of public methods that you can invoke to make use of the class.
The GitHub API is a collection of Web request formats GitHub server accepts and the corresponding responses. We can write a program that interacts with GitHub through that API.
When developing large systems, if you define the API of each components early, the development team can develop the components in parallel because the future behavior of the other components are now more predictable.
Choose the correct statements
- a. A software component can have an API.
- b. Any method of a class is part of its API.
- c. Private methods of a class are not part of its API.
- d. The API forms the contract between the component developer and the component user.
- e. Sequence diagrams can be used to show how components interact with each other via APIs.
(a) (c) (d) (e)
Explanation: (b) is incorrect because private methods cannot be a part of the API
Defining component APIs early is useful for developing components in parallel.
True
Explanation: Yes, once we know the precise behavior expected of each component, we can start developing them in parallel.
Evidence:
Know the API of the AddressBook component you are in charge of and the APIs of the other components your component depends on.
Libraries
W11.3d Can explain libraries
Implementation → Reuse → Libraries →
A library is a collection of modular code that is general and can be used by other programs.
Java classes you get with the JDK (such as String, ArrayList, HashMap, etc.) are library classes that are provided in the default Java distribution.
Natty is a Java library that can be used for parsing strings that represent dates e.g. The 31st of April in the year 2008
built-in modules you get with Python (such as csv, random, sys, etc.) are libraries that are provided in the default Python distribution. Classes such as list, str, dict are built-in library classes that you get with Python.
Colorama is a Python library that can be used for colorizing text in a CLI.
Evidence:
Identify libraries used (or potentially usable) in your project.
W11.3e Can make use of a library
Implementation → Reuse → Libraries →
These are the typical steps required to use a library.
- Read the documentation to confirm that its functionality fits your needs
- Check the license to confirm that it allows reuse in the way you plan to reuse it. For example, some libraries might allow non-commercial use only.
- Download the library and make it accessible to your project. Alternatively, you can configure your
dependency management tool to do it for you. - Call the library API from your code where you need to use the library functionality.
Evidence:
Have used libraries (or reused code from elsewhere) in your project.
Frameworks
W11.3f Can explain frameworks
Implementation → Reuse → Frameworks →
The overall structure and execution flow of a specific category of software systems can be very similar. The similarity is an opportunity to reuse at a high scale.
Running example:
IDEs for different programming languages are similar in how they support editing code, organizing project files, debugging, etc.
A software framework is a reusable implementation of a software (or part thereof) providing generic functionality that can be selectively customized to produce a specific application.
Running example:
Eclipse is an IDE framework that can be used to create IDEs for different programming languages.
Some frameworks provide a complete implementation of a default behavior which makes them immediately usable.
Running example:
Eclipse is a fully functional Java IDE out-of-the-box.
A framework facilitates the adaptation and customization of some desired functionality.
Running example:
Eclipse plugin system can be used to create an IDE for different programming languages while reusing most of the existing IDE features of Eclipse. E.g. https://marketplace.eclipse.org/content/pydev-python-ide-eclipse
Some frameworks cover only a specific components or an aspect.
JavaFx a framework for creating Java GUIs. TkInter is a GUI framework for Python.
More examples of frameworks
- Frameworks for Web-based applications: Drupal(PHP), Django(Python), Ruby on Rails (Ruby), Spring (Java)
- Frameworks for testing: JUnit (Java), unittest (Python), Jest (Java Script)
Evidence:
Identify frameworks used (or potentially usable) in your project.
W11.3g Can differentiate between frameworks and libraries
Implementation → Reuse → Frameworks →
Although both frameworks and libraries are reuse mechanisms, there are notable differences:
-
Libraries are meant to be used ‘as is’ while frameworks are meant to be customized/extended. e.g., writing plugins for Eclipse so that it can be used as an IDE for different languages (C++, PHP, etc.), adding modules and themes to Drupal, and adding test cases to JUnit.
-
Your code calls the library code while the framework code calls your code. Frameworks use a technique called inversion of control, aka the “Hollywood principle” (i.e. don’t call us, we’ll call you!). That is, you write code that will be called by the framework, e.g. writing test methods that will be called by the JUnit framework. In the case of libraries, your code calls libraries.
Choose correct statements about software frameworks.
- a. They follow the hollywood principle, otherwise known as ‘inversion of control’
- b. They come with full or partial implementation.
- c. They are more concrete than patterns or principles.
- d. They are often configurable.
- e. They are reuse mechanisms.
- f. They are similar to reusable libraries but bigger.
(a)(b)(c)(d)(e)(f)
Explanation: While both libraries and frameworks are reuse mechanisms, and both more concrete than principles and patterns, libraries differ from frameworks in some key ways. One of them is the ‘inversion of control’ used by frameworks but not libraries. Furthermore, frameworks do not have to be bigger than libraries all the time.
Which one of these are frameworks ?
(a)(b)(c)(d)
Explanation: These are frameworks.
Evidence:
Explain the difference between libraries and frameworks using frameworks and libraries in your project as examples.
Platforms
W11.3h Can explain platforms
Implementation → Reuse → Platforms →
A platform provides a runtime environment for applications. A platform is often bundled with various libraries, tools, frameworks, and technologies in addition to a runtime environment but the defining characteristic of a software platform is the presence of a runtime environment.
Technically, an operating system can be called a platform. For example, Windows PC is a platform for desktop applications while iOS is a platform for mobile apps.
Two well-known examples of platforms are JavaEE and .NET, both of which sit above Operating systems layer, and are used to develop
- JavaEE (Java Enterprise Edition) is both a framework and a platform for writing enterprise applications. The runtime used by the JavaEE applications is the JVM (Java Virtual Machine) that can run on different Operating Systems.
- .NET is a similar platform and a framework. Its runtime is called CLR (Common Language Runtime) and usually used on Windows machines.
Enterprise Application: ‘enterprise applications’ means software applications used at organizations level and therefore has to meet much higher demands (such as in scalability, security, performance, and robustness) than software meant for individual use.
Evidence:
Identify platforms used (or potentially usable) in your project.
W11.4 Can use JAR files
W11.4a Can use JAR files
C++ to Java → Miscellaneous Topics →
Java applications are typically delivered as JAR (short for Java Archive) files. A JAR contains Java classes and other resources (icons, media files, etc.).
An executable JAR file can be launched using the java -jar command.
java -jar foo.jar launches the foo.jar file.
You can delete the Collate-GUI.jar from https://se-edu.github.io/collate/ and run it using the commandjava -jar Collate-GUI.jar command.
The IDE can help you to package your application as a JAR file.
Creating a JAR file in Intellij - A video by Artur Spirin:
This exercise continues from the TaskManager Level 1-11 exercises quoted above.
Package your TaskManager as a JAR file.
Quality Assurance
W11.5 Can explain different types of testing
Unit Testing
W11.5a Can explain unit testing
Quality Assurance → Testing → Unit Testing →
Unit testing : testing individual units (methods, classes, subsystems, ...) to ensure each piece works correctly.
In OOP code, it is common to write one or more unit tests for each public method of a class.
Here are the code skeletons for a Foo class containing two methods and a FooTest class that contains unit tests for those two methods.
class Foo{
    String read(){
        //...
    }

    void write(String input){
        //...
    }

}

class FooTest{

    @Test
    void read(){
        //a unit test for Foo#read() method
    }

    @Test
    void write_emptyInput_exceptionThrown(){
        //a unit tests for Foo#write(String) method
    }

    @Test
    void write_normalInput_writtenCorrectly(){
        //another unit tests for Foo#write(String) method
    }
}
import unittest

class Foo:
  def read(self):
      # ...

  def write(self, input):
      # ...


class FooTest(unittest.TestCase):

  def test_read(sefl):
      # a unit test for read() method

  def test_write_emptyIntput_ignored(self):
      # a unit tests for write(string) method

  def test_write_normalInput_writtenCorrectly(self):
      # another unit tests for write(string) method
Side readings:
- [Web article] The three pillars of unit testing - A short article about what makes a good unit test.
- Learning from Apple’s #gotofail Security Bug - How unit testing (and other good coding practices) could have prevented a major security bug.
Evidence:
Identify some unit tests in AddressBook-Level4 (or your own project).
W11.5b Can use stubs to isolate an SUT from its dependencies
Quality Assurance → Testing → Unit Testing →
A proper unit test requires the unit to be tested in isolation so that bugs in the
If a Logic class depends on a Storage class, unit testing the Logic class requires isolating the Logic class from the Storage class.
Stubs can isolate the
Stub: A stub has the same interface as the component it replaces, but its implementation is so simple that it is unlikely to have any bugs. It mimics the responses of the component, but only for the a limited set of predetermined inputs. That is, it does not know how to respond to any other inputs. Typically, these mimicked responses are hard-coded in the stub rather than computed or retrieved from elsewhere, e.g. from a database.
Consider the code below:
class Logic {
    Storage s;

    Logic(Storage s) {
        this.s = s;
    }

    String getName(int index) {
        return "Name: " + s.getName(index);
    }
}

interface Storage {
    String getName(int index);
}

class DatabaseStorage implements Storage {

    @Override
    public String getName(int index) {
        return readValueFromDatabase(index);
    }

    private String readValueFromDatabase(int index) {
        // retrieve name from the database
    }
}
Normally, you would use the Logic class as follows (not how the Logic object depends on a DatabaseStorage object to perform the getName() operation):
Logic logic = new Logic(new DatabaseStorage());
String name = logic.getName(23);
You can test it like this:
@Test
void getName() {
    Logic logic = new Logic(new DatabaseStorage());
    assertEquals("Name: John", logic.getName(5));
}
However, this logic object being tested is making use of a DataBaseStorage object which means a bug in the DatabaseStorage class can affect the test. Therefore, this test is not testing Logic in isolation from its dependencies and hence it is not a pure unit test.
Here is a stub class you can use in place of DatabaseStorage:
class StorageStub implements Storage {

    @Override
    public String getName(int index) {
        if(index == 5) {
            return "Adam";
        } else {
            throw new UnsupportedOperationException();
        }
    }
}
Note how the stub has the same interface as the real dependency, is so simple that it is unlikely to contain bugs, and is pre-configured to respond with a hard-coded response, presumably, the correct response DatabaseStorage is expected to return for the given test input.
Here is how you can use the stub to write a unit test. This test is not affected by any bugs in the DatabaseStorage class and hence is a pure unit test.
@Test
void getName() {
    Logic logic = new Logic(new StorageStub());
    assertEquals("Name: Adam", logic.getName(5));
}
In addition to Stubs, there are other type of replacements you can use during testing. E.g. Mocks, Fakes, Dummies, Spies.
- Mocks Aren't Stubs by Martin Fowler -- An in-depth article about how Stubs differ from other types of test helpers.
Stubs help us to test a component in isolation from its dependencies.
True
Evidence:
Identify some tests in AddressBook-Level4,
- that can be made pure unit tests by introducing stubs
- that are using stubs to isolate the SUT from its dependencies
Integration Testing
W11.5c Can explain integration testing
Quality Assurance → Testing → Integration Testing →
Integration testing : testing whether different parts of the software work together (i.e. integrates) as expected. Integration tests aim to discover bugs in the 'glue code' related to how components interact with each other. These bugs are often the result of misunderstanding of what the parts are supposed to do vs what the parts are actually doing.
Suppose a class Car users classes Engine and Wheel. If the Car class assumed a Wheel can support 200 mph speed but the actual Wheel can only support 150 mph, it is the integration test that is supposed to uncover this discrepancy.
Evidence:
Explain the difference between unit tests and integration tests.
W11.5d Can use integration testing
Quality Assurance → Testing → Integration Testing →
Integration testing is not simply a repetition of the unit test cases but run using the actual dependencies (instead of the stubs used in unit testing). Instead, integration tests are additional test cases that focus on the interactions between the parts.
Suppose a class Car uses classes Engine and Wheel. Here is how you would go about doing pure integration tests:
a) First, unit test Engine and Wheel.
b) Next, unit test Car in isolation of Engine and Wheel, using stubs for Engine and Wheel.
c) After that, do an integration test for Car using it together with the Engine and Wheel classes to ensure the Car integrates properly with the Engine and the Wheel.
In practice, developers often use a hybrid of unit+integration tests to minimize the need for stubs.
Here's how a hybrid unit+integration approach could be applied to the same example used above:
(a) First, unit test Engine and Wheel.
(b) Next, unit test Car in isolation of Engine and Wheel, using stubs for Engine and Wheel.
(c) After that, do an integration test for Car using it together with the Engine and Wheel classes to ensure the Car integrates properly with the Engine and the Wheel. This step should include test cases that are meant to test the unit Car (i.e. test cases used in the step (b) of the example above) as well as test cases that are meant to test the integration of Car with Wheel and Engine (i.e. pure integration test cases used of the step (c) in the example above).
💡 Note that you no longer need stubs for Engine and Wheel. The downside is that Car is never tested in isolation of its dependencies. Given that its dependencies are already unit tested, the risk of bugs in Engine and Wheel affecting the testing of Car can be considered minimal.
Evidence:
Use tests from AddressBook-Level4 to illustrate the difference between unit testings and integration testing. Hint: good examples seedu.address.storage.StorageManagerTest,seedu.address.logic.commands.AddCommandTest,seedu.address.logic.commands.AddCommandIntegrationTest
System Testing
W11.5e Can explain system testing
Quality Assurance → Testing → System Testing →
System testing: take the whole system and test it against the system specification.
System testing is typically done by a testing team (also called a QA team).
System test cases are based on the specified external behavior of the system. Sometimes, system tests go beyond the bounds defined in the specification. This is useful when testing that the system fails 'gracefully' having pushed beyond its limits.
Suppose the SUT is a browser supposedly capable of handling web pages containing up to 5000 characters. Given below is a test case to test if the SUT fails gracefully if pushed beyond its limits.
Test case: load a web page that is too big
* Input: load a web page containing more than 5000 characters.
* Expected behavior: abort the loading of the page and show a meaningful error message.
This test case would fail if the browser attempted to load the large file anyway and crashed.
System testing includes testing against non-functional requirements too. Here are some examples.
- Performance testing – to ensure the system responds quickly.
- Load testing (also called stress testing or scalability testing) – to ensure the system can work under heavy load.
- Security testing – to test how secure the system is.
- Compatibility testing, interoperability testing – to check whether the system can work with other systems.
- Usability testing – to test how easy it is to use the system.
- Portability testing – to test whether the system works on different platforms.
Evidence:
Explain what system tests are. Give examples from your own project.
Acceptance Testing
W11.5f Can explain acceptance testing
Quality Assurance → Testing → Acceptance Testing →
Acceptance testing (aka User Acceptance Testing (UAT)): test the delivered system to ensure it meets the user requirements.
Acceptance tests give an assurance to the customer that the system does what it is intended to do. Acceptance test cases are often defined at the beginning of the project, usually based on the use case specification. Successful completion of UAT is often a prerequisite to the project sign-off.
Evidence:
Explain what acceptance tests are. Explain how acceptance testing of your project will be done.
W11.5g Can explain the differences between system testing and acceptance testing
Quality Assurance → Testing → Acceptance Testing →
Acceptance testing comes after system testing. Similar to system testing, acceptance testing involves testing the whole system.
Some differences between system testing and acceptance testing:
| System Testing | Acceptance Testing |
|---|---|
| Done against the system specification | Done against the requirements specification |
| Done by testers of the project team | Done by a team that represents the customer |
| Done on the development environment or a test bed | Done on the deployment site or on a close simulation of the deployment site |
| Both negative and positive test cases | More focus on positive test cases |
Note: negative test cases: cases where the SUT is not expected to work normally e.g. incorrect inputs; positive test cases: cases where the SUT is expected to work normally
Requirement Specification vs System Specification
The requirement specification need not be the same as the system specification. Some example differences:
| Requirements Specification | System Specification |
|---|---|
| limited to how the system behaves in normal working conditions | can also include details on how it will fail gracefully when pushed beyond limits, how to recover, etc. specification |
| written in terms of problems that need to be solved (e.g. provide a method to locate an email quickly) | written in terms of how the system solve those problems (e.g. explain the email search feature) |
| specifies the interface available for intended end-users | could contain additional APIs not available for end-users (for the use of developers/testers) |
However, in many cases one document serves as both a requirement specification and a system specification.
Passing system tests does not necessarily mean passing acceptance testing. Some examples:
- The system might work on the testbed environments but might not work the same way in the deployment environment, due to subtle differences between the two environments.
- The system might conform to the system specification but could fail to solve the problem it was supposed to solve for the user, due to flaws in the system design.
Choose the correct statements about system testing and acceptance testing.
- a. Both system testing and acceptance testing typically involve the whole system.
- b. System testing is typically more extensive than acceptance testing.
- c. System testing can include testing for non-functional qualities.
- d. Acceptance testing typically has more user involvement than system testing.
- e. In smaller projects, the developers may do system testing as well, in addition to developer testing.
- f. If system testing is adequately done, we need not do acceptance testing.
(a)(b)(c)(d)(e)(f)
Explanation:
(b) is correct because system testing can aim to cover all specified behaviors and can even go beyond the system specification. Therefore, system testing is typically more extensive than acceptance testing.
(f) is incorrect because it is possible for a system to pass system tests but fail acceptance tests.
Evidence:
Explain the difference between system tests and acceptance tests. Explain why both are needed.
Alpha/Beta Testing
W11.5h Can explain alpha and beta testing
Quality Assurance → Testing → Alpha/Beta Testing →
Alpha testing is performed by the users, under controlled conditions set by the software development team.
Beta testing is performed by a selected subset of target users of the system in their natural work setting.
An open beta release is the release of not-yet-production-quality-but-almost-there software to the general population. For example, Google’s Gmail was in 'beta' for many years before the label was finally removed.
Evidence:
Explain alpha and beta testing. How can you do alpha and beta testing in your project?
W11.6 Can use intermediate-level testing techniques
W11.6a Can explain testability
Quality Assurance → Testing → Introduction →
Testability is an indication of how easy it is to test an SUT. As testability depends a lot on the design and implementation. You should try to increase the testability when you design and implement a software. The higher the testability, the easier it is to achieve a better quality software.
W11.6b Can use intermediate features of JUnit
Tools → JUnit →
Some intermediate JUnit techniques that may be useful:
- It is possible for a JUnit test case to verify if the SUT throws the right exception.
- JUnit Rules are a way to add additional behavior to a test. e.g. to make a test case use a temporary folder for storing files needed for (or generated by) the test.
- It is possible to write methods thar are automatically run before/after a test method/class. These are useful to do pre/post cleanups for example.
- Testing private methods is possible, although not always necessray
Evidence:
Use the mentioned features in the project.
W11.7 Can explain some QA techniques complementary to testing
W11.7a Can explain software quality assurance
Quality Assurance → Quality Assurance → Introduction →
W11.7b Can explain validation and verification
Quality Assurance → Quality Assurance → Introduction →
Quality Assurance = Validation + Verification
QA involves checking two aspects:
- Validation: are we building the right system i.e., are the requirements correct?
- Verification: are we building the system right i.e., are the requirements implemented correctly?
Whether something belongs under validation or verification is not that important. What is more important is both are done, instead of limiting to verification (i.e., remember that the requirements can be wrong too).
Choose the correct statements about validation and verification.
- a. Validation: Are we building the right product?, Verification: Are we building the product right?
- b. It is very important to clearly distinguish between validation and verification.
- c. The important thing about validation and verification is to remember to pay adequate attention to both.
- d. Developer-testing is more about verification than validation.
- e. QA covers both validation and verification.
- f. A system crash is more likely to be a verification failure than a validation failure.
(a)(b)(c)(d)(e)(f)
Explanation:
Whether something belongs under validation or verification is not that important. What is more important is that we do both.
Developer testing is more about bugs in code, rather than bugs in the requirements.
In QA, system testing is more about verification (does the system follow the specification?) and acceptance testings is more about validation (does the system solve the user’s problem?).
A system crash is more likely to be a bug in the code, not in the requirements.
Evidence:
Explain validations and verification with concrete examples from the project.
W11.7c Can explain code reviews
Quality Assurance → Quality Assurance → Code Reviews →
Code review is the systematic examination code with the intention of finding where the code can be improved.
Reviews can be done in various forms. Some examples below:
-
In
pair programming - As pair programming involves two programmers working on the same code at the same time, there is an implicit review of the code by the other member of the pair.
Pair Programming:
Pair programming is an agile software development technique in which two programmers work together at one workstation. One, the driver, writes code while the other, the observer or navigator, reviews each line of code as it is typed in. The two programmers switch roles frequently. [source: Wikipedia]

A good introduction to pair programming:
-
Pull Request reviews
- Project Management Platforms such as GitHub and BitBucket allows the new code to be proposed as Pull Requests and provides the ability for others to review the code in the PR.
-
Formal inspections
-
Inspections involve a group of people systematically examining a project artifacts to discover defects. Members of the inspection team play various roles during the process, such as:
- the author - the creator of the artifact
- the moderator - the planner and executor of the inspection meeting
- the secretary - the recorder of the findings of the inspection
- the inspector/reviewer - the one who inspects/reviews the artifact.
-
Advantages of code reviews over testing:
- It can detect functionality defects as well as other problems such as coding standard violations.
- Can verify non-code artifacts and incomplete code
- Do not require test drivers or stubs.
Disadvantages:
- It is a manual process and therefore, error prone.
Evidence:
Review PRs in the project.
W11.7d Can explain static analysis
Quality Assurance → Quality Assurance → Static Analysis →
Static analysis: Static analysis is the analysis of code without actually executing the code.
Static analysis of code can find useful information such unused variables, unhandled exceptions, style errors, and statistics. Most modern IDEs come with some inbuilt static analysis capabilities. For example, an IDE can highlight unused variables as you type the code into the editor.
Higher-end static analyzer tools can perform for more complex analysis such as locating potential bugs, memory leaks, inefficient code structures etc.
Some example static analyzer for Java:
Linters are a subset of static analyzers that specifically aim to locate areas where the code can be made 'cleaner'.
Evidence:
Explain how static analysis is used in the project.
W11.7e Can explain formal verification
Quality Assurance → Quality Assurance → Formal Verification →
Formal verification uses mathematical techniques to prove the correctness of a program.
by Eric Hehner
Advantages:
- Formal verification can be used to prove the absence of errors. In contrast, testing can only prove the presence of error, not their absence.
Disadvantages:
- It only proves the compliance with the specification, but not the actual utility of the software.
- It requires highly specialized notations and knowledge which makes it an expensive technique to administer. Therefore, formal verifications are more commonly used in safety-critical software such as flight control systems.
Testing cannot prove the absence of errors. It can only prove the presence of errors. However, formal methods can prove the absence of errors.
True
Explanation: While using formal methods is more expensive than testing, it indeed can prove the correctness of a piece of software conclusively, in certain contexts. Getting such proof via testing requires exhaustive testing, which is not practical to do in most cases.
🅿️ Project
W11.8 Package the app as a JAR file
Extract from the Admin Info page:
Tutorial 11
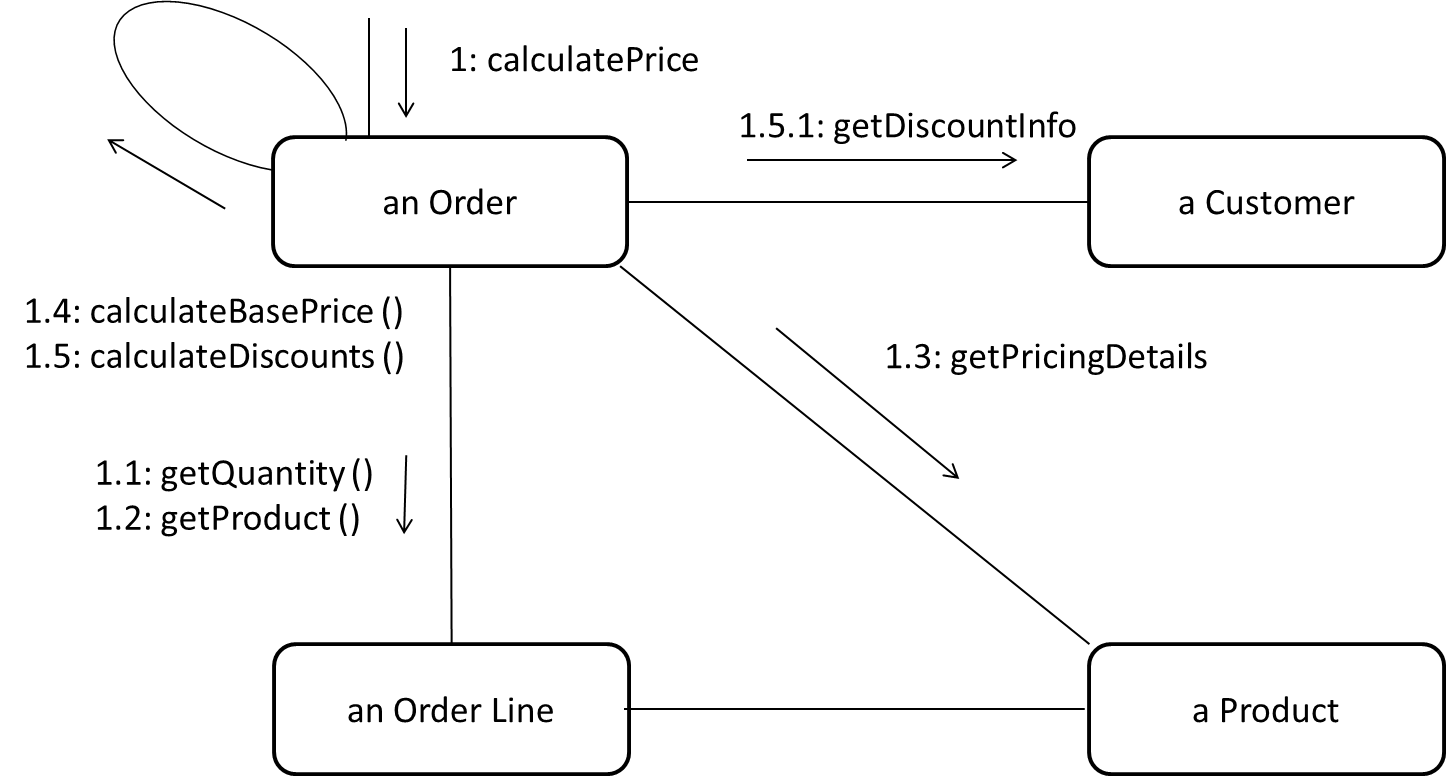
W10.1a Can draw intermediate-level sequence diagrams
Design → Modelling → Modelling Behaviors
What’s going on here?
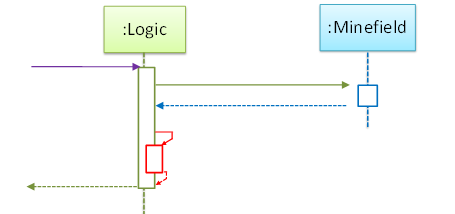
- a.
Logicobject is executing a parallel thread. - b.
Logicobject is executing a loop. - c.
Logicobject is creating anotherLogicinstance. - d. One of
Logicobject’s methods is calling another of its methods. - e.
Minefieldobject is calling a method ofLogic.
(d)
Explain the interactions depicted in this sequence diagram.
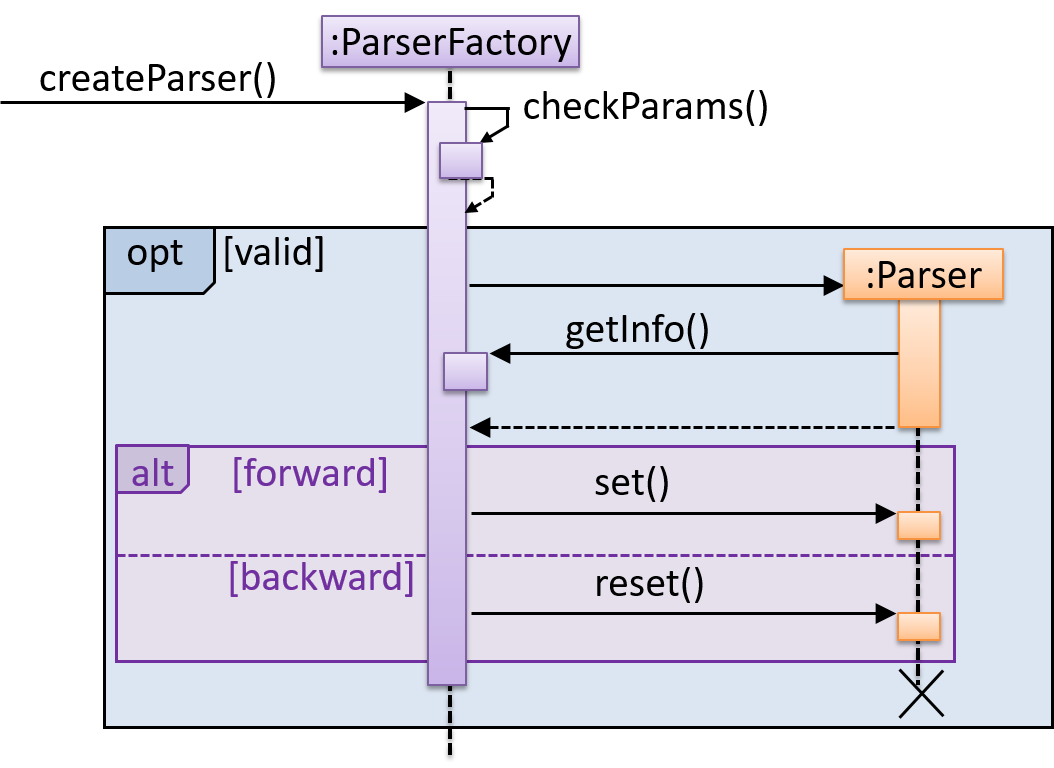
First, the createParser() method of an existing ParserFactory object is called. Then, ...
Draw a sequence diagram to represent this code snippet.
if (isFirstPage) {
    new Quote().print();
}
The Quote class:
class Quote{

    String q;

    Quote(){
        q = generate();
    }

    String generate(){
        // ...
    }

    void print(){
        System.out.println(q);
    }

}
- Show
new Quote().print();as two method calls. - As the created Quote object is not assigned to a variable, it can be considered as 'deleted' soon after its
print()method is called.
Evidence:
Explain the interactions depicted in this sequence diagram.
First, the createParser() method of an existing ParserFactory object is called. Then, ...
W10.2a Can explain separation of concerns principle
Supplmentary → Principles →
Separation of Concerns Principle (SoC): To achieve better modularity, separate the code into distinct sections, such that each section addresses a separate concern. -- Proposed by Edsger W. Dijkstra
A concern in this context is a set of information that affects the code of a computer program.
Examples for concerns:
- A specific feature, such as the code related to
add employeefeature - A specific aspect, such as the code related to
persistenceorsecurity - A specific entity, such as the code related to the
Employeeentity
Applying
If the code related to persistence is separated from the code related to security, a change to how the data are persisted will not need changes to how the security is implemented.
This principle can be applied at the class level, as well as on higher levels.
The
This principle should lead to higher
Design → Design Fundamentals → Coupling →
Coupling is a measure of the degree of dependence between components, classes, methods, etc. Low coupling indicates that a component is less dependent on other components. High coupling (aka tight coupling or strong coupling) is discouraged due to the following disadvantages:
- Maintenance is harder because a change in one module could cause changes in other modules coupled to it (i.e. a ripple effect).
- Integration is harder because multiple components coupled with each other have to be integrated at the same time.
- Testing and reuse of the module is harder due to its dependence on other modules.
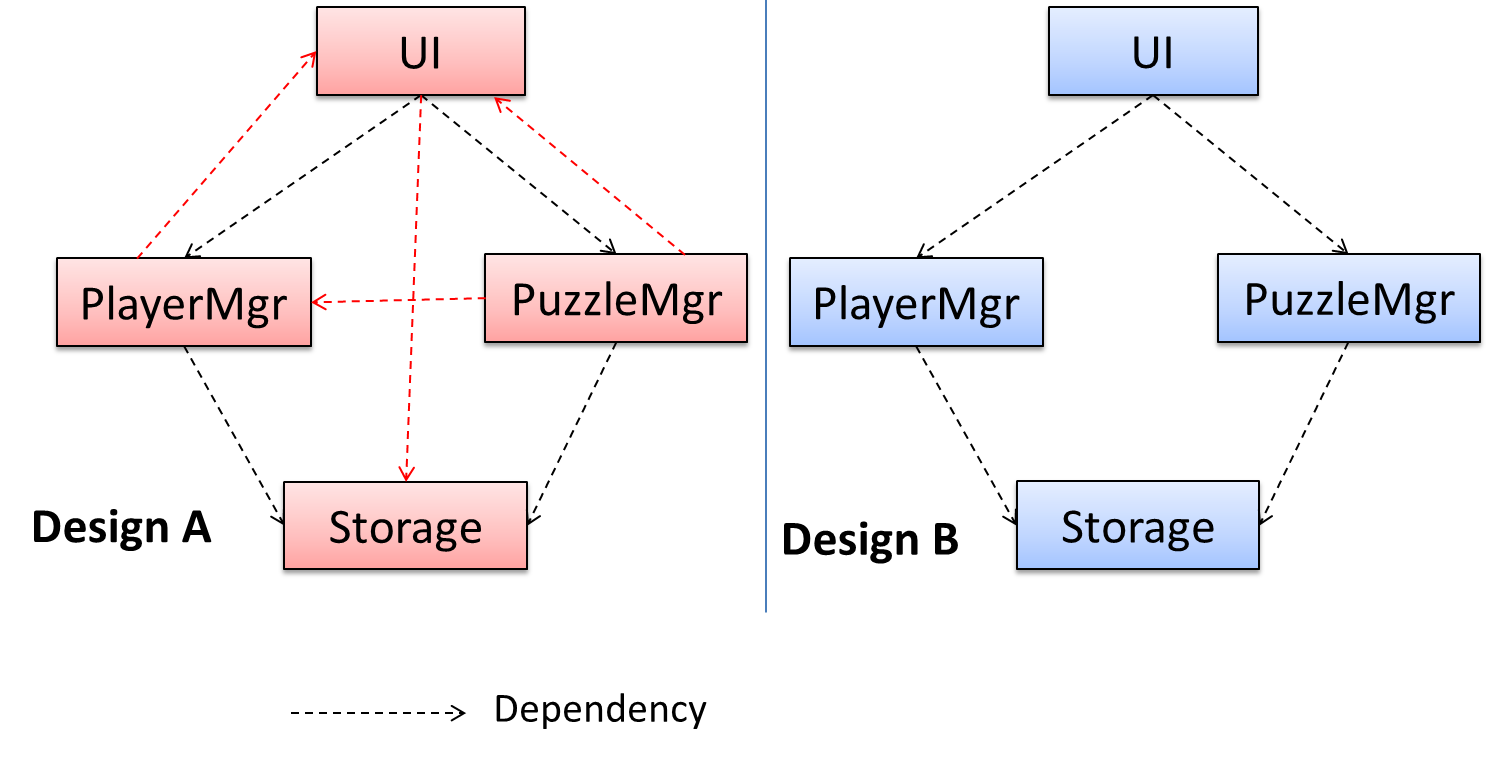
In the example below, design A appears to have a more coupling between the components than design B.
Discuss the coupling levels of alternative designs x and y.
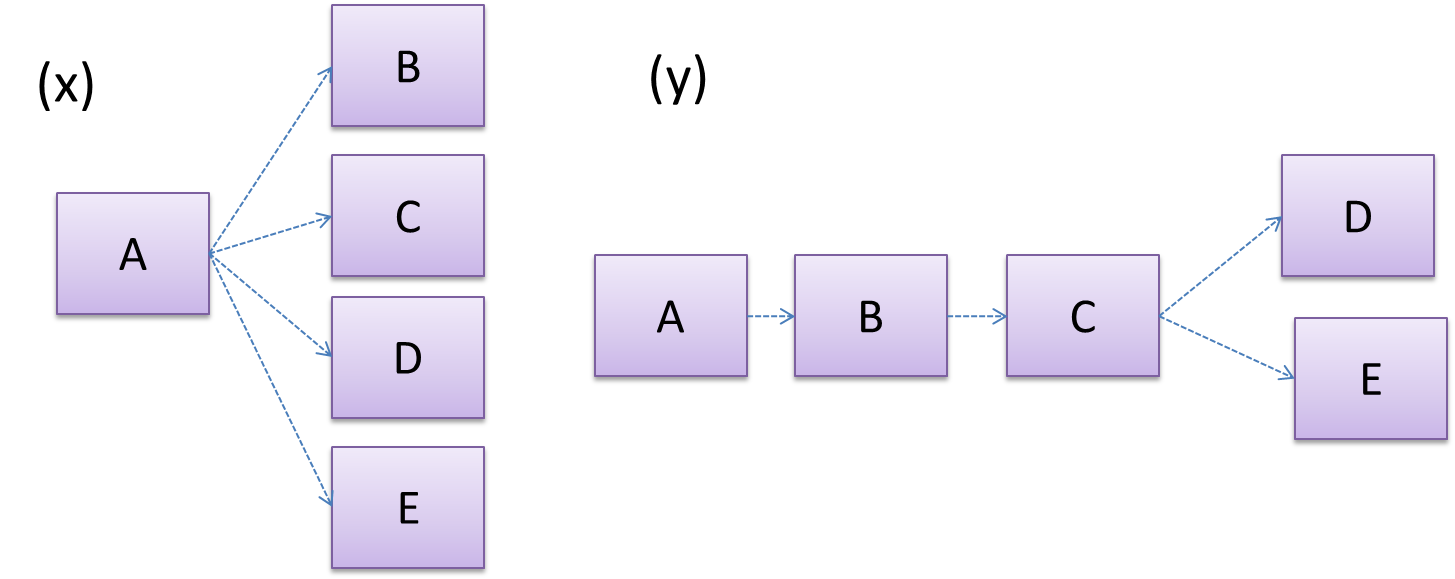
Overall coupling levels in x and y seem to be similar (neither has more dependencies than the other). (Note that the number of dependency links is not a definitive measure of the level of coupling. Some links may be stronger than the others.). However, in x, A is highly-coupled to the rest of the system while B, C, D, and E are standalone (do not depend on anything else). In y, no component is as highly-coupled as A of x. However, only D and E are standalone.
Explain the link (if any) between regressions and coupling.
When the system is highly-coupled, the risk of regressions is higher too e.g. when component A is modified, all components ‘coupled’ to component A risk ‘unintended behavioral changes’.
Discuss the relationship between coupling and
Coupling decreases testability because if the
Choose the correct statements.
- a. As coupling increases, testability decreases.
- b. As coupling increases, the risk of regression increases.
- c. As coupling increases, the value of automated regression testing increases.
- d. As coupling increases, integration becomes easier as everything is connected together.
- e. As coupling increases, maintainability decreases.
(a)(b)(c)(d)(e)
Explanation: High coupling means either more components require to be integrated at once in a big-bang fashion (increasing the risk of things going wrong) or more drivers and stubs are required when integrating incrementally.
Design → Design Fundamentals → Cohesion →
Cohesion is a measure of how strongly-related and focused the various responsibilities of a component are. A highly-cohesive component keeps related functionalities together while keeping out all other unrelated things.
Higher cohesion is better. Disadvantages of low cohesion (aka weak cohesion):
- Lowers the understandability of modules as it is difficult to express module functionalities at a higher level.
- Lowers maintainability because a module can be modified due to unrelated causes (reason: the module contains code unrelated to each other) or many many modules may need to be modified to achieve a small change in behavior (reason: because the code realated to that change is not localized to a single module).
- Lowers reusability of modules because they do not represent logical units of functionality.
“Only the GUI class should interact with the user. The GUI class should only concern itself with user interactions”. This statement follows from,
- a. A software design should promote separation of concerns in a design.
- b. A software design should increase cohesion of its components.
- c. A software design should follow single responsibility principle.
(a)(b)(c)
Explanation: By making ‘user interaction’ GUI class’ sole responsibility, we increase its cohesion. This is also in line with separation of concerns (i.e., we separated the concern of user interaction) and single responsibility principle (GUI class has only one responsibility).
Evidence:
Explain SoC with examples from AddressBook-Level4 (or your own project).
W10.2b Can explain single responsibility principle
Supplmentary → Principles →
Single Responsibility Principle (SRP): A class should have one, and only one, reason to change. -- Robert C. Martin
If a class has only one responsibility, it needs to change only when there is a change to that responsibility.
Consider a TextUi class that does parsing of the user commands as well as interacting with the user. That class needs to change when the formatting of the UI changes as well as when the syntax of the user command changes. Hence, such a class does not follow the SRP.
Gather together the things that change for the same reasons. Separate those things that change for different reasons. ―Agile Software Development, Principles, Patterns, and Practices by Robert C. Martin
- An explanation of the SRP from www.oodesign.com
- Another explanation (more detailed) by Patkos Csaba
- A book chapter on SRP - A book chapter on SRP, written by the father of the principle itself Robert C Martin.
Evidence:
Acceptable: Evidence of having used SRP in some project.
Suggested: Do the exercise in [Addressbook-Level2: LO-SRP]
null
W10.2c Can explain Liskov Substitution Principle
Supplmentary → Principles →
Liskov Substitution Principle (LSP): Derived classes must be substitutable for their base classes. -- proposed by Barbara Liskov
LSP sounds same as
Paradigms → Object Oriented Programming → Inheritance →
Every instance of a subclass is an instance of the superclass, but not vice-versa. As a result, inheritance allows substitutability : the ability to substitute a child class object where a parent class object is expected.
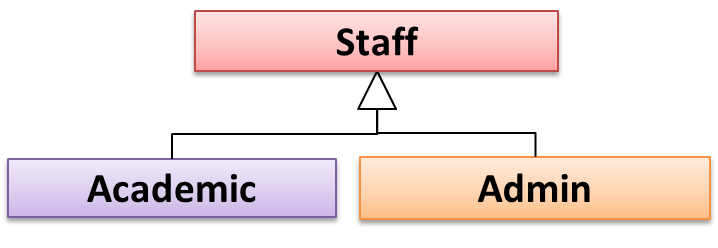
an Academic is an instance of a Staff, but a Staff is not necessarily an instance of an Academic. i.e. wherever an object of the superclass is expected, it can be substituted by an object of any of its subclasses.
The following code is valid because an AcademicStaff object is substitutable as a Staff object.
Staff staff = new AcademicStaff (); // OK
But the following code is not valid because staff is declared as a Staff type and therefore its value may or may not be of type AcademicStaff, which is the type expected by variable academicStaff.
Staff staff;
...
AcademicStaff academicStaff = staff; // Not OK
Suppose the Payroll class depends on the adjustMySalary(int percent) method of the Staff class. Furthermore, the Staff class states that the adjustMySalary method will work for all positive percent values. Both Admin and Academic classes override the adjustMySalary method.
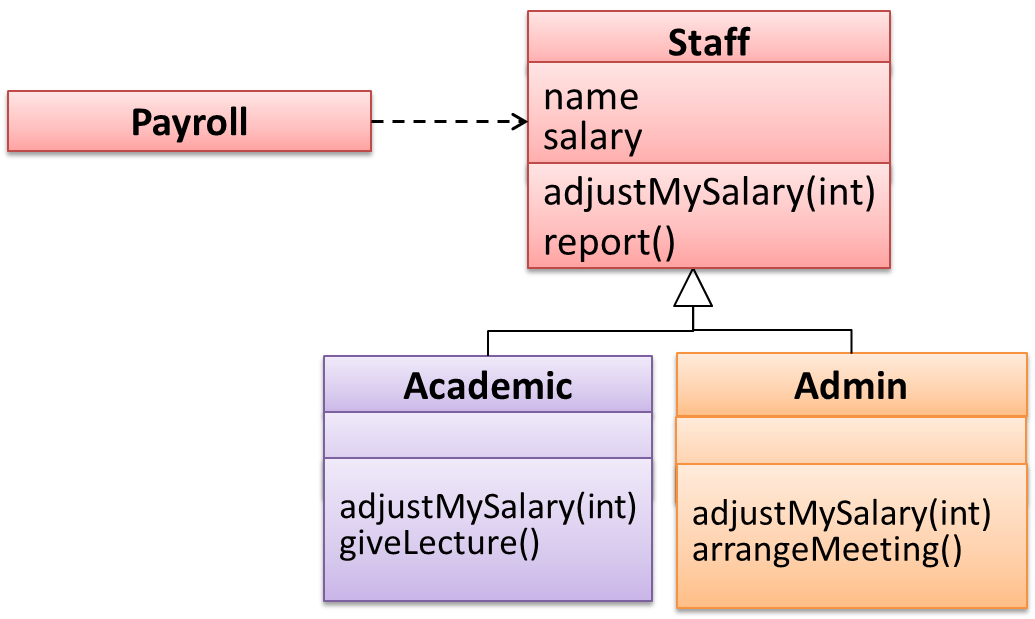
Now consider the following:
Admin#adjustMySalarymethod works for both negative and positive percent values.Academic#adjustMySalarymethod works for percent values1..100only.
In the above scenario,
Adminclass follows LSP because it fulfillsPayroll’s expectation ofStaffobjects (i.e. it works for all positive values). SubstitutingAdminobjects for Staff objects will not break thePayrollclass functionality.Academicclass violates LSP because it will not work for percent values over100as expected by thePayrollclass. SubstitutingAcademicobjects forStaffobjects can potentially break thePayrollclass functionality.
The Rectangle#resize() can take any integers for height and width. This contract is violated by the subclass Square#resize() because it does not accept a height that is different from the width.
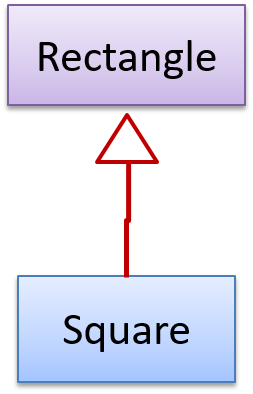
class Rectangle {
    ...
    /** sets the size to given height and width*/
    void resize(int height, int width){
        ...
    }
}


class Square extends Rectangle {

    @Override
    void resize(int height, int width){
        if (height != width) {
            //error
       }
    }
}
Now consider the following method that is written to work with the Rectangle class.
void makeSameSize(Rectangle original, Rectangle toResize){
    toResize.resize(original.getHeight(), original.getWidth());
}
This code will fail if it is called as maekSameSize(new Rectangle(12,8), new Square(4, 4)) That is, Square class is not substitutable for the Rectangle class.
If a subclass imposes more restrictive conditions than its parent class, it violates Liskov Substitution Principle.
True.
Explanation: If the subclass is more restrictive than the parent class, code that worked with the parent class may not work with the child class. Hence, the substitutability does not exist and LSP has been violated.
Evidence:
Give an example from the project where LSP is followed. Explain what kind of a change to that code will violate LSP e.g. Here, the superclass X and the subclass Y follow LSP. But if we change X in this way, or Y in this way, it will no longer follow LSP
W10.2d Can explain open-closed principle (OCP)
Supplmentary → Principles →
The Open-Close Principle aims to make a code entity easy to adapt and reuse without needing to modify the code entity itself.
Open-Closed Principle (OCP): A module should be open for extension but closed for modification. That is, modules should be written so that they can be extended, without requiring them to be modified. -- proposed by Bertrand Meyer
In object-oriented programming, OCP can be achieved in various ways. This often requires separating the specification (i.e. interface) of a module from its implementation.
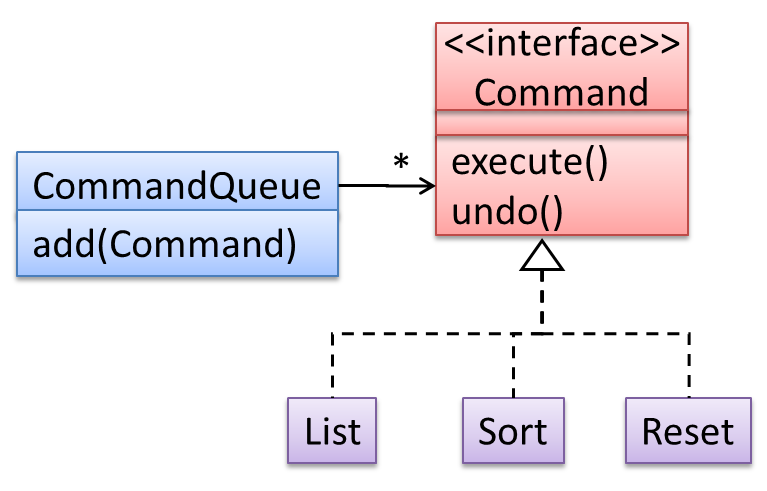
In the design given below, the behavior of the CommandQueue class can be altered by adding more concrete Command subclasses. For example, by including a Delete class alongside List, Sort, and Reset, the CommandQueue can now perform delete commands without modifying its code at all. That is, its behavior was extended without having to modify its code. Hence, it was open to extensions, but closed to modification.
The behavior of a Java generic class can be altered by passing it a different class as a parameter. In the code below, the ArrayList class behaves as a container of Students in one instance and as a container of Admin objects in the other instance, without having to change its code. That is, the behavior of the ArrayList class is extended without modifying its code.
ArrayList students = new ArrayList< Student >();
ArrayList admins = new ArrayList< Admin >();
Which of these is closest to the meaning of the open-closed principle?
(a)
Explanation: Please refer the handout for the definition of OCP.
Evidence:
Identify where OCP is applied (or applicable) in AddressBook-Level4 (or your own project).
W10.2e Can explain the Law of Demeter
Supplmentary → Principles →
Law of Demeter (LoD):
- An object should have limited knowledge of another object.
- An object should only interact with objects that are closely related to it.
Also known as
- Don’t talk to strangers.
- Principle of least knowledge
More concretely, a method m of an object O should invoke only the methods of the following kinds of objects:
- The object
Oitself - Objects passed as parameters of
m - Objects created/instantiated in
m(directly or indirectly) - Objects from the
direct association of O
The following code fragment violates LoD due to the reason: while b is a ‘friend’ of foo (because it receives it as a parameter), g is a ‘friend of a friend’ (which should be considered a ‘stranger’), and g.doSomething() is analogous to ‘talking to a stranger’.
void foo(Bar b) {
    Goo g = b.getGoo();
    g.doSomething();
}
LoD aims to prevent objects navigating internal structures of other objects.
An analogy for LoD can be drawn from Facebook. If Facebook followed LoD, you would not be allowed to see posts of friends of friends, unless they are your friends as well. If Jake is your friend and Adam is Jake’s friend, you should not be allowed to see Adam’s posts unless Adam is a friend of yours as well.
Explain the Law of Demeter using code examples. You are to make up your own code examples. Take Minesweeper as the basis for your code examples.
Let us take the Logic class as an example. Assume that it has the following operation.
setMinefield(Minefiled mf):void
Consider the following that can happen inside this operation.
mf.init();: this does not violate LoD since LoD allows calling operations of parameters received.mf.getCell(1,3).clear();: //this violates LoD becauseLogicis handlingCellobjects deep insideMinefield. Instead, it should bemf.clearCellAt(1,3);timer.start();: //this does not violate LoD becausetimerappears to be an internal component (i.e. a variable) ofLogicitself.Cell c = new Cell();c.init();: // this does not violate LoD becausecwas created inside the operation.
This violates Law of Demeter.
void foo(Bar b) {
    Goo g =  new Goo();
    g.doSomething();
}
False
Explanation: The line g.doSomething() does not violate LoD because it is OK to invoke methods of objects created within a method.
Pick the odd one out.
- a. Law of Demeter.
- b. Don’t add people to a late project.
- c. Don’t talk to strangers.
- d. Principle of least knowledge.
- e. Coupling.
(b)
Explanation: Law of Demeter, which aims to reduce coupling, is also known as ‘Don’t talk to strangers’ and ‘Principle of least knowledge’.
Evidence:
Identify places where LoD is followed/violated in your project.
W10.3b Can use logging
Implementation → Error Handling → Logging →
Most programming environments come with logging systems that allow sophisticated forms of logging. They have features such as the ability to enable and disable logging easily or to change the logging
This sample Java code uses Java’s default logging mechanism.
First, import the relevant Java package:
import java.util.logging.*;
Next, create a Logger:
private static Logger logger = Logger.getLogger("Foo");
Now, you can use the Logger object to log information. Note the use of WARNING so that log messages specified as INFO level (which is a lower level than WARNING) will not be written to the log file at all.
// log a message at INFO level
logger.log(Level.INFO, "going to start processing");
//...
processInput();
if(error){
    //log a message at WARNING level
    logger.log(Level.WARNING, "processing error", ex);
}
//...
logger.log(Level.INFO, "end of processing");
Tutorials:
- Java Logging API - Tutorial -- A tutorial by Lars Vogella
- Java Logging Tutorial -- An alternative tutorial by Jakob Jenkov
- A video tutorial by SimplyCoded:
Best Practices:
- 10 Tips for Proper Application Logging -- by Tomasz Nurkiewicz
- What each logging level means -- conventions recommended by Apache Project
Evidence:
Use of logging in the code you have written in the module project or elsewhere.
W10.3d Can use assertions
Implementation → Error Handling → Assertions →
Use the assert keyword to define assertions.
This assertion will fail with the message x should be 0 if x is not 0 at this point.
x = getX();
assert x == 0 : "x should be 0";
...
Assertions can be disabled without modifying the code.
java -enableassertions HelloWorld (or java -ea HelloWorld) will run HelloWorld with assertions enabled while java -disableassertions HelloWorld will run it without verifying assertions.
Java disables assertions by default. This could create a situation where you think all assertions are being verified as true while in fact they are not being verified at all. Therefore, remember to enable assertions when you run the program if you want them to be in effect.
💡 Enable assertions in Intellij (how?) and get an assertion to fail temporarily (e.g. insert an assert false into the code temporarily) to confirm assertions are being verified.
Java assert vs JUnit assertions: They are similar in purpose but JUnit assertions are more powerful and customized for testing. In addition, JUnit assertions are not disabled by default. We recommend you use JUnit assertions in test code and Java assert in functional code.
Tutorials:
- Java Assertions -- a simple tutorial from javatpoint.com
- Programming with Assertions (first half) -- a more detailed tutorial from Oracle
Best practices:
- Programming with Assertions (second half) -- from Oracle (also listed above as a tutorial) contains some best practices towards the end of the article.
Evidence:
Explain assertions in AddressBook-Level4 code.
W10.3e Can use assertions optimally
Implementation → Error Handling → Assertions →
It is recommended that assertions be used liberally in the code. Their impact on performance is considered low and worth the additional safety they provide.
Do not use assertions to do work because assertions can be disabled. If not, your program will stop working when assertions are not enabled.
The code below will not invoke the writeFile() method when assertions are disabled. If that method is performing some work that is necessary for your program, your program will not work correctly when assertions are disabled.
...
assert writeFile() : "File writing is supposed to return true";
Assertions are suitable for verifying assumptions about Internal Invariants, Control-Flow Invariants, Preconditions, Postconditions, and Class Invariants. Refer to [Programming with Assertions (second half)] to learn more.
Exceptions and assertions are two complementary ways of handling errors in software but they serve different purposes. Therefore, both assertions and exceptions should be used in code.
- The raising of an exception indicates an unusual condition created by the user (e.g. user inputs an unacceptable input) or the environment (e.g., a file needed for the program is missing).
- An assertion failure indicates the programmer made a mistake in the code (e.g., a null value is returned from a method that is not supposed to return null under any circumstances).
A Calculator program crashes with an ‘assertion failure’ message when you try to find the square root of a negative number.
(c)
Explanation: An assertion failure indicates a bug in the code. (b) is not acceptable because of the word "terminated". The application should not fail at all for this input. But it could have used an exception to handle the situation internally.
Which statements are correct?
- a. Use assertions to indicate the programmer messed up; Use exceptions to indicate the user or the environment messed up.
- b. Use exceptions to indicate the programmer messed up; Use assertions to indicate the user or the environment messed up.
(a)
Evidence:
Give an example from the AddressBook-Level4 code where an exception is used and explain why an assertion is not suitable for that situation. Similarly, explain why an exception is not suitable for a place where AddressBook Level4 uses an assertion.
W10.4a Can use Java8 streams
Tools → Java →
Java 8 introduced a number of new features (e.g. Lambdas, Streams) that are not trivial to learn but also extremely useful to know.
Here is an overview of new Java 8 features . (written by Benjamin Winterberg)
Tutorials:
- Java 8 Tutorial -- from tutorialspoint.com. 💡 Also provides a way to try out code online
- Tutorials from Oracle: [Lambdas][Streams]
A video tutorial by well-known Java coach Venkat Subramaniam
Evidence:
Any code that you have written using (can be toy examples) Java 8 features.
W10.5a Can use JavaFX to build a simple GUI
Tools → Java →
Adapted (with permissions) from Marco Jakob's JavaFX 8 tutorial.
JavaFx 9 Tutorial - Part 1: Scene Builder
Introduction
This tutorial will teach you how to create a new JavaFX application in IntelliJ, and to use the SceneBuilder to create a layouts for your application.
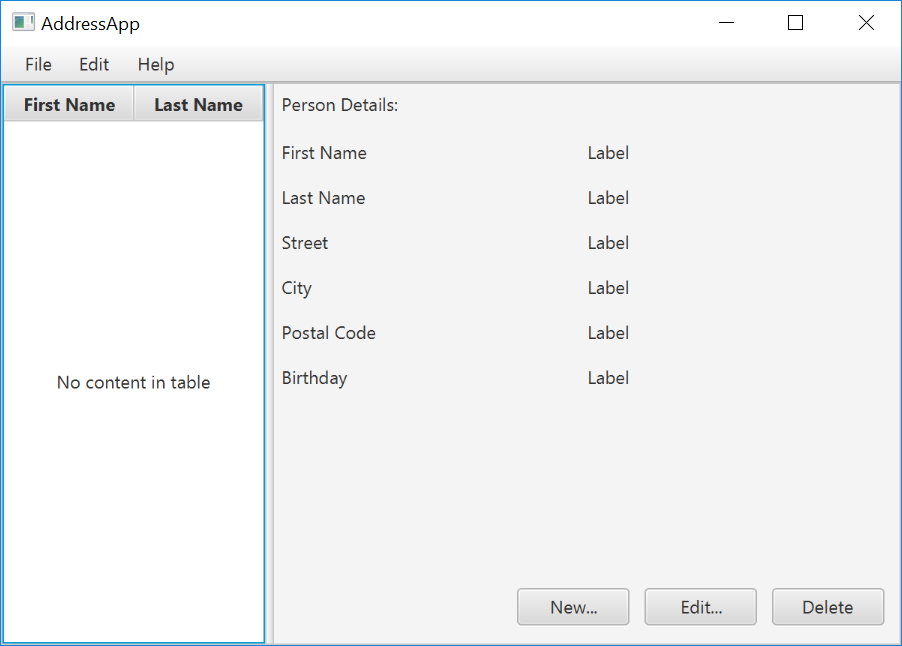
Prerequisites
- Latest Java JDK 9 (includes JavaFX 9)
- IntelliJ (2018.2 or later)
- SceneBuilder 8 (provided by Gluon as Oracle no longer ships the tool in binary form)
Do remember the installation path to SceneBuilder 8 as we will need it to configure IntelliJ in a later step.
IntelliJ Configurations
If this is the first time using IntelliJ, you need to tell IntelliJ where to find JDK 9 and SceneBuilder.
Configuring JDK 9
- On the Welcome screen, press
Configure→Project Default→Project Structure.
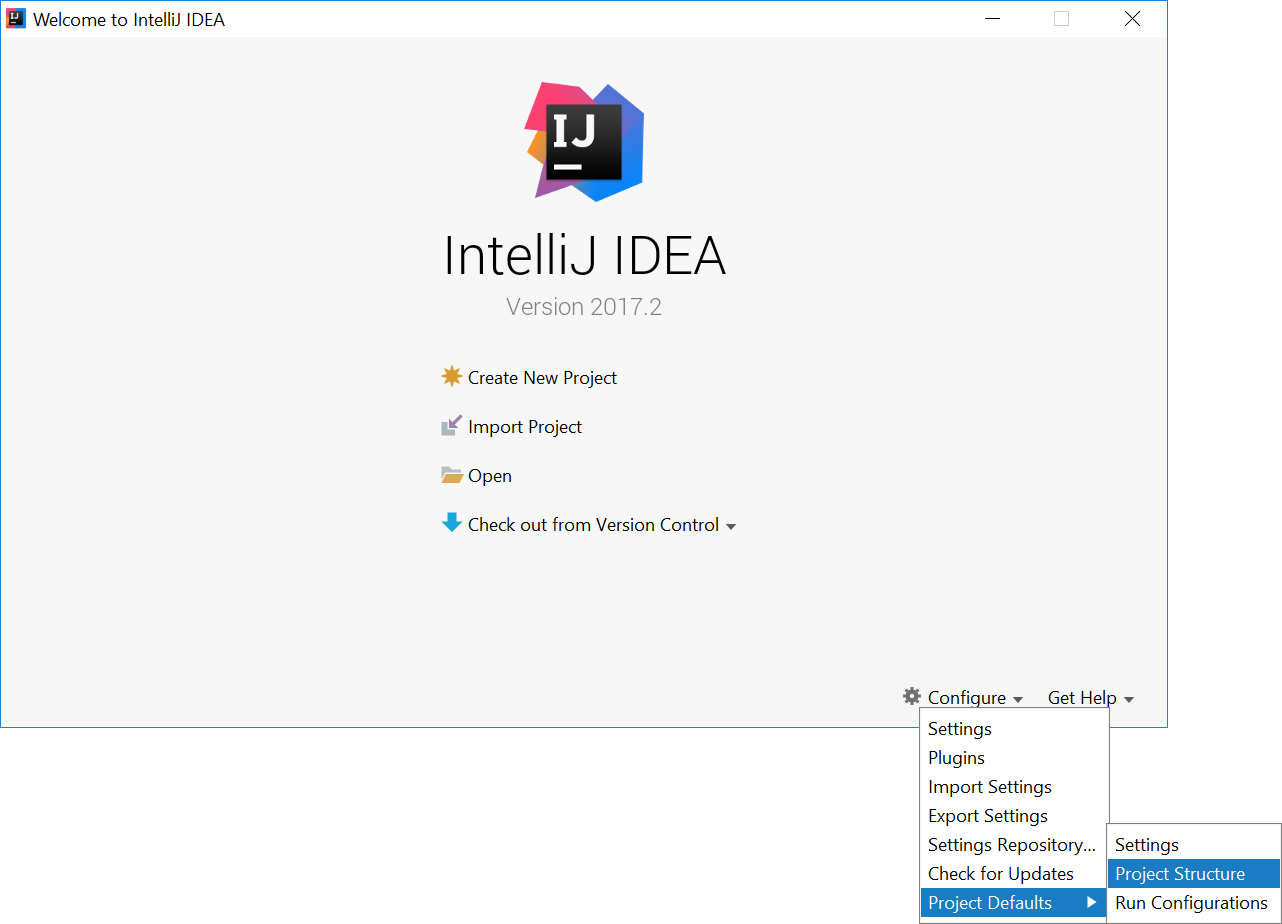
- If you already have a project open, go to the Welcome screen by going to
File→Close Project.
- Under
Project SDK:, pressNew...→JDK. - Select the directory that you install JDK on, and press
OK. - Under
Project language level:, select9 - Modules, private methods in interfaces etc..
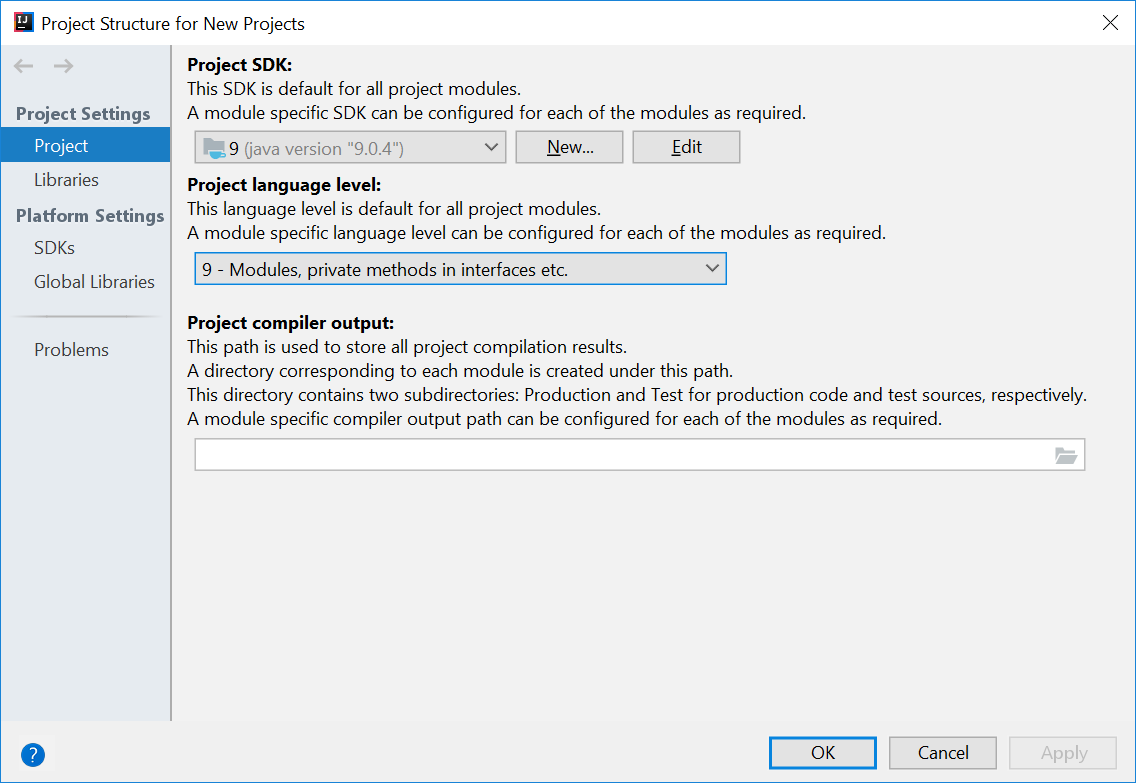
- Press
OKagain.
Configuring Scene Builder
- On the Welcome screen, press
Configure→Settings. - On the left hand side, select
Languages & Frameworks→JavaFX - Under
Path to SceneBuilder:, select the path to where SceneBuilder is installed (e.g.C:\Users\Admin\AppData\Local\SceneBuilder\SceneBuilder.exeon Windows)
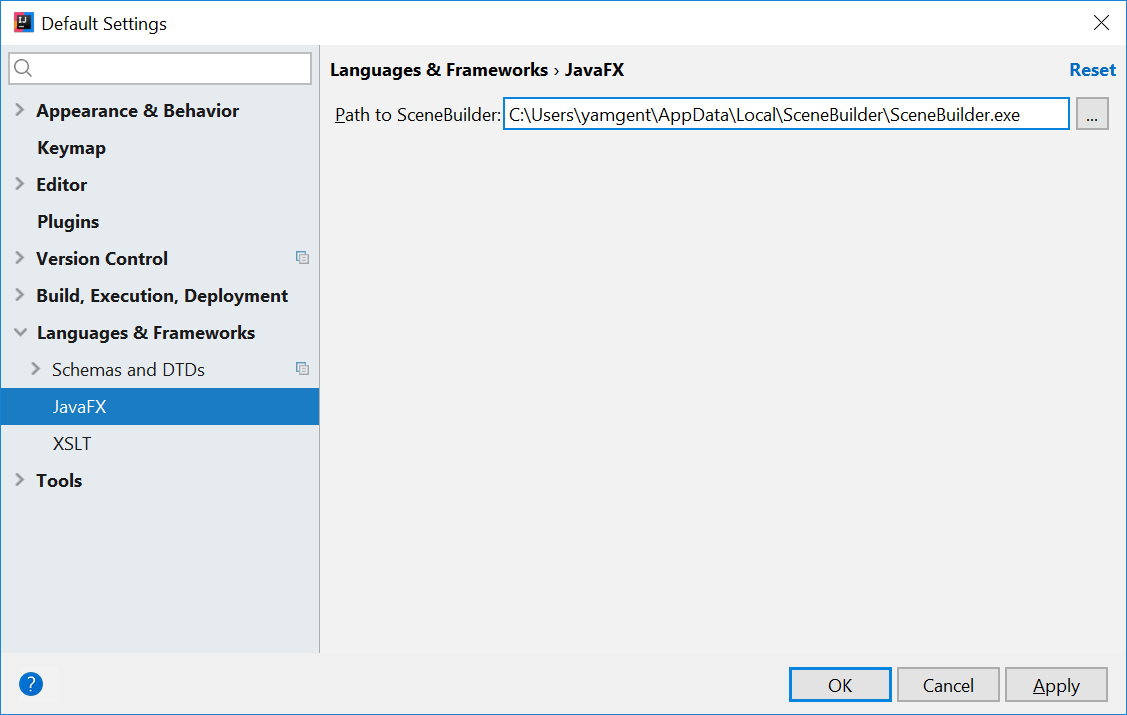
The JavaDocs will come in handy when writing your own JavaFX applications:
Additionally, Oracle also has a tutorial on JavaFX if you are interested.
Create a new JavaFX Project
- On the Welcome screen, press
Create New Project.
- If you already have a project, you can create a new project by going
File→New→Project....
- On the left side, select
JavaFX. Make sure that the Project SDK is set to9andJavaFX Applicationis selected.
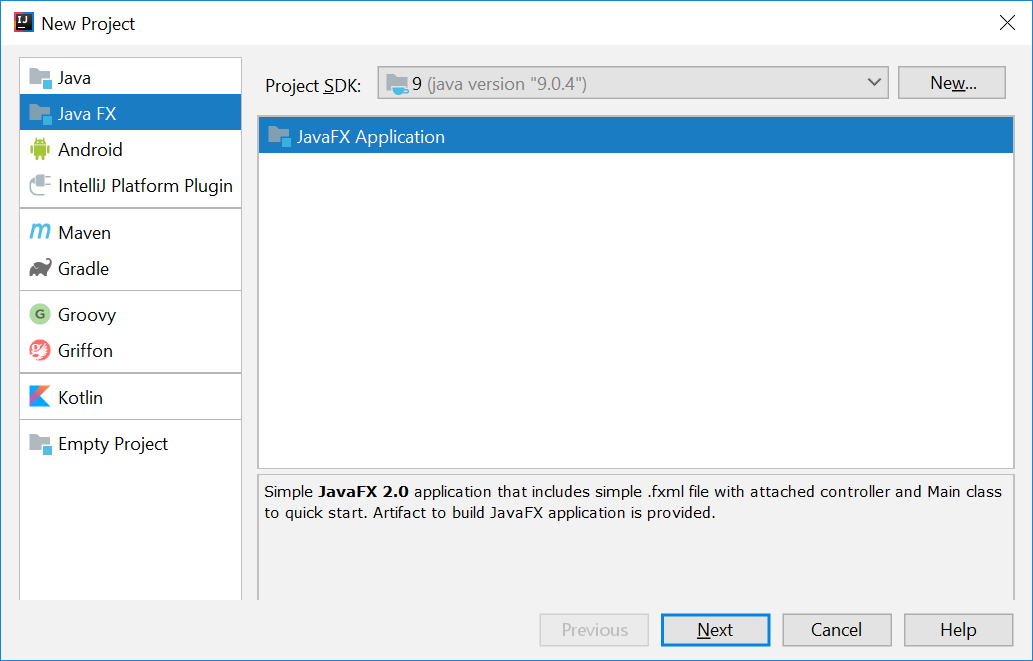
- Press
Next. - Give a name for the application (e.g.
AddressApp), and specify a suitable location. - Press
Finish. If prompted to create a new directory, just pressOK.
Remove the sample package and its content. We will manually create our own package and resources in our tutorial.
We will also have to set up the IDE further, so that warnings and errors show up correctly when working with Java 9:
- Go to the menu
File→Project Structure. - Under
Project language level:, ensure that9 - Modules, private methods in interfaces etc.is selected.
Create the Packages
In We will create a package for each of the component. Ensure that your Project pane is open (Alt+1). Right click on the src folder, and select New → Package:
seedu.address- contains the controller classes (i.e. the part that deals with the business logic)seedu.address.model- contains the model classes (i.e. the part that deals with data)seedu.address.view- contains the views (i.e. the part that deals with presenting the data to the user)
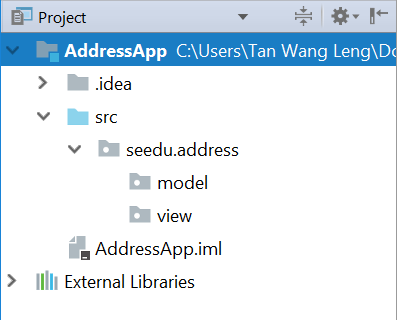
In subsequent tutorials, our view package will also contain some controllers that are directly related to a single view. We will call them view-controllers.
Create the FXML Layout File
There are two ways to create the UI:
- Use FXML, which is an XML format.
- Programmatically create the interface in Java.
We will use FXML for most parts, so that we can separate the view and controller from each other. Furthermore, we are able to use the Scene Builder tool to edit our FXML file. That means we will not have to directly work with XML.
Right click on the view package, and press New → FXML file. For the file name, type PersonOverview.fxml.
Design with Scene Builder
Right-click on PersonOverview.fxml and choose Open with Scene Builder. Now you should see the Scene Builder with just an AnchorPane (visible under Hierarchy on the left).
If IntelliJ prompts for a location of the SceneBuilder executable, make sure to point to where you install SceneBuilder.
- Select the
Anchor Panein your Hierarchy, and adjust the size under Layout (right side). (Pref Width: 600, Pref Height: 300)
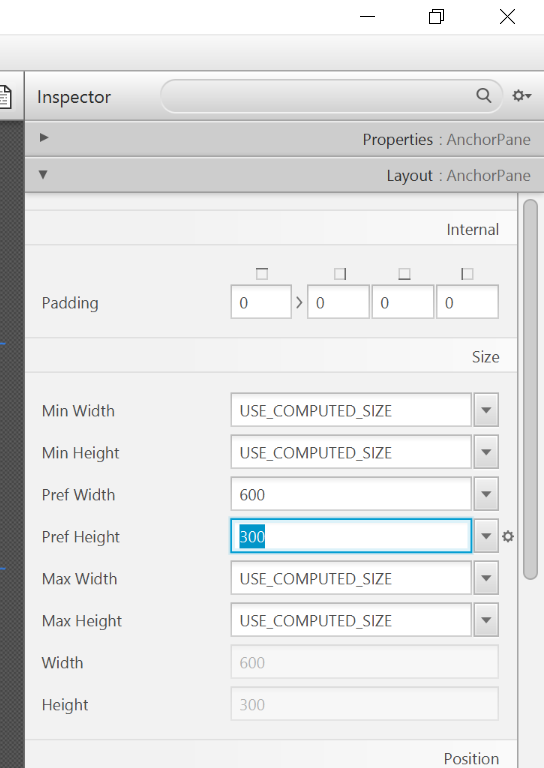
- Add a
Split Pane (horizontal)(underContainers) by dragging it from the Library into the main area. Right-click theSplit Panein the Hierarchy view and selectFit to Parent.
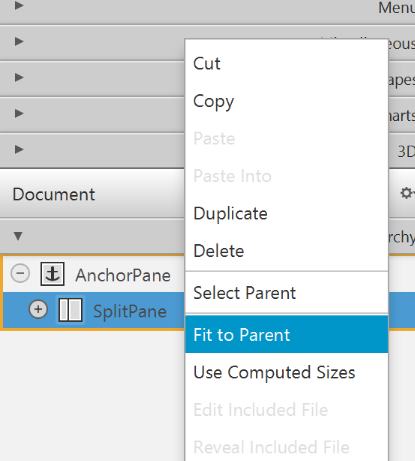
- Drag a
TableView(underControlsin Library view) into the left side of theSplitPane. Select theTableView(not a Column) and set the following layout constraints in the Inspector to theTableView. Inside anAnchorPaneyou can always set anchors to the four borders (see this page for more information on Layouts).
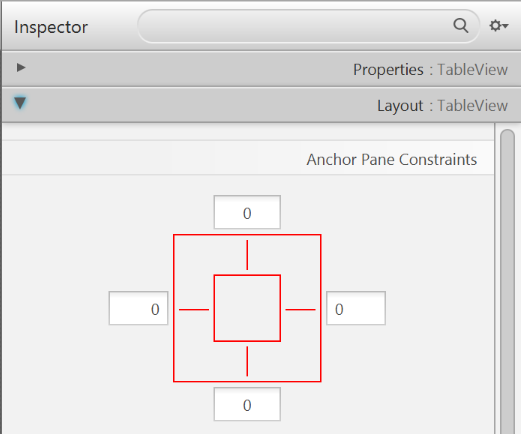
-
Go to the menu
Preview→Show Preview in Windowto see whether the layout configuration is done correctly. Try resizing the window. TheTableViewshould resize together with the window as it is anchored to the borders. -
Change the column text (under Properties) to "First Name" and "Last Name".
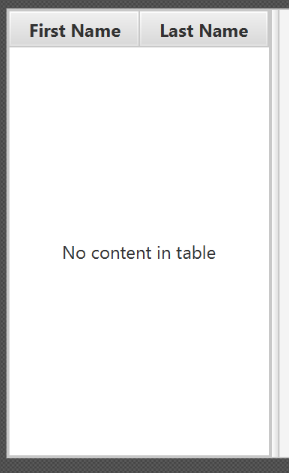
- Select the
TableViewand chooseconstrainted-resizefor the 'Column Resize Policy'. This ensures that the columns will always fill up the entire available space.
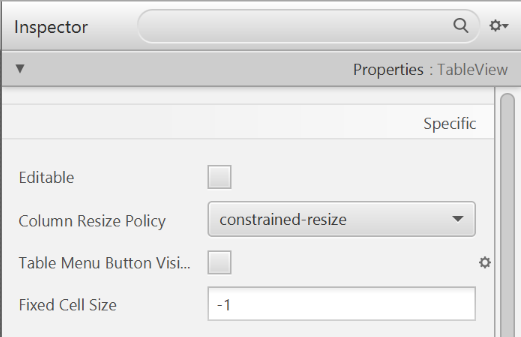
- Add a
Labelon the right side with the text "Person Details:". Adjust the layout using anchors (Top: 5, Left: 5. Right: Blank, Bottom: Blank).
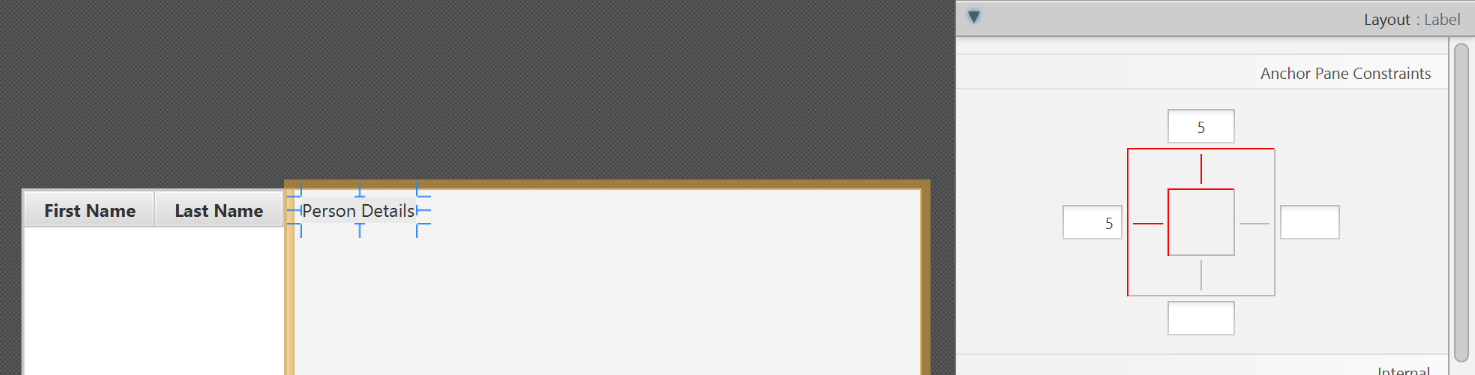
You can use the Search Bar at the top of Library/Inspector to find the respective controls/properties.
- Add a
GridPaneon the right side. Select it, and adjust its layout using anchors (Top: 30, Left: 5, Right: 5, Bottom: Blank).
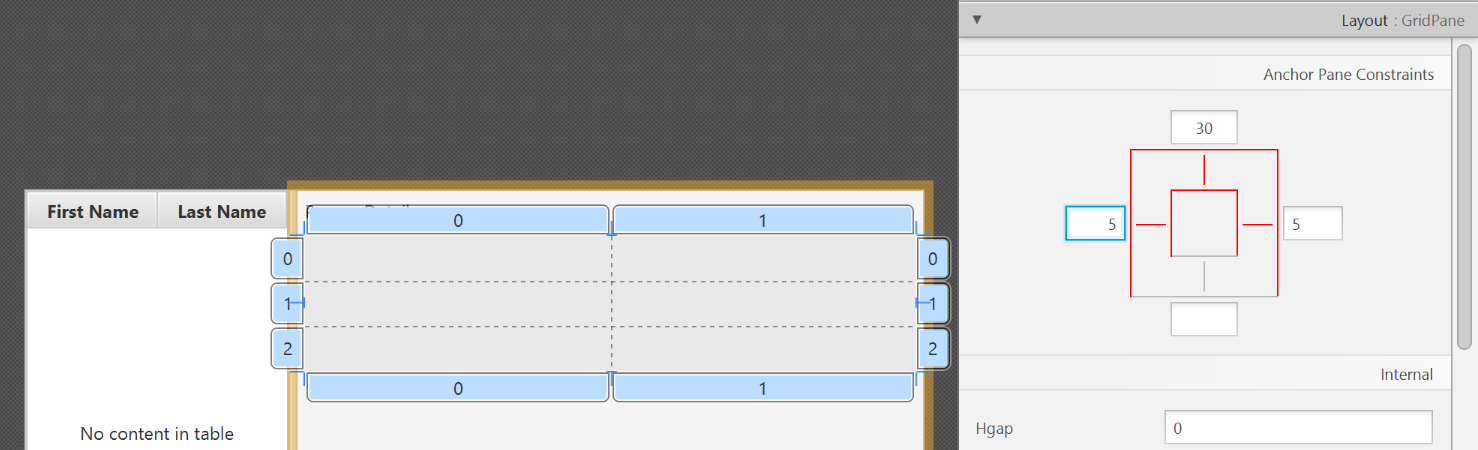
- Add the following labels to the cells, such that the grid is of this form:
| First Name | Label |
|---|---|
| Last Name | Label |
| Street | Label |
| City | Label |
| Postal Code | Label |
| Birthday | Label |
To add a row to the GridPane, select an existing row number, right click the row number and choose "Add Row Below".
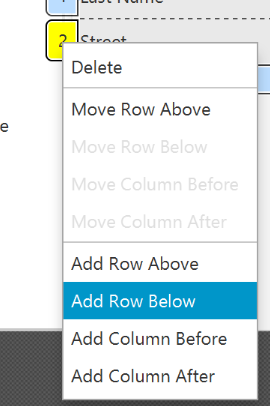
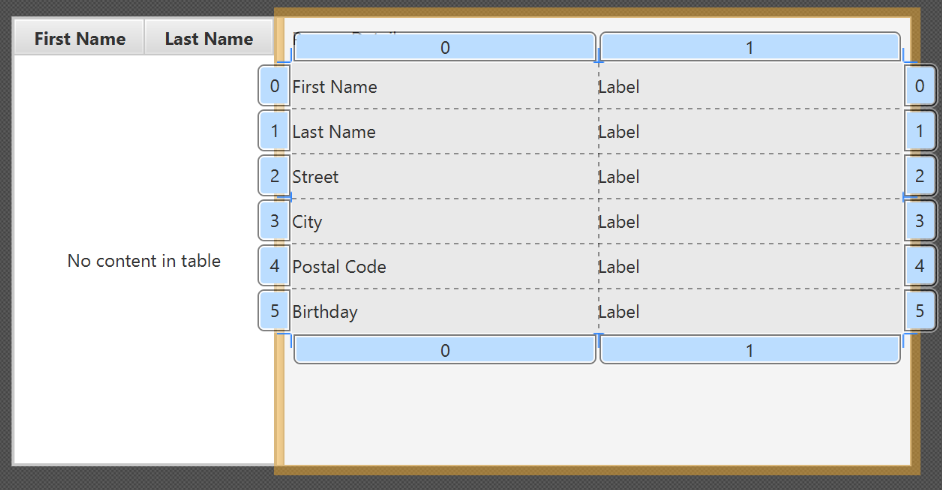
- Add a
ButtonBarat the bottom. Add three buttons to the bar ("New...", "Edit...","Delete"). Adjust the anchors so that it stays at the bottom right (Top: Blank, Left: Blank, Right: 10, Bottom: 5).
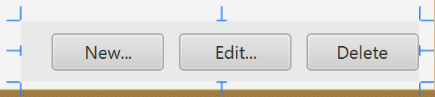
- Now you should see something like the following. Use the
Previewmenu to test its resizing behaviour.
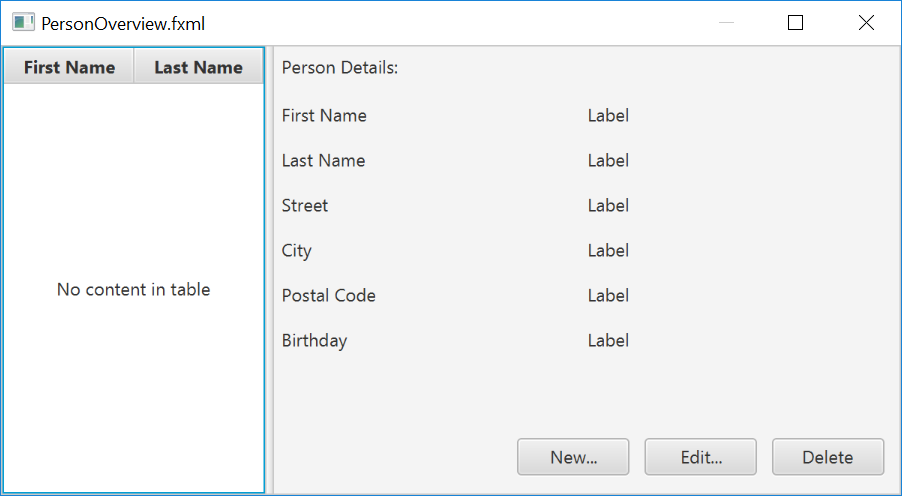
- Save the
.fxmlfile.
Create the Main Application
The PersonOverview.fxml that we just created only contains the content of our entire application. We need another FXML for our root layout, which will contain a menu bar and wraps PersonOverview.fxml.
- Inside IntelliJ, right click on the
viewpackage, and pressNew→FXML file. For the file name, typeRootLayout.fxml. - Right-click on
RootLayout.fxmland chooseOpen with Scene Builder. - Delete the
AnchorPane. We will use another pane for our root layout.
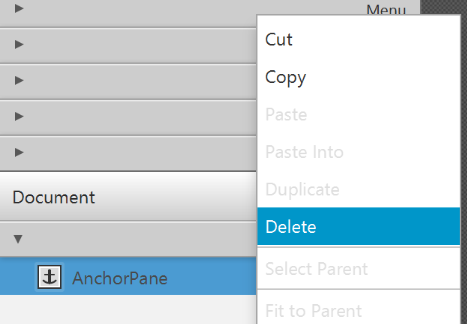
- Add
BorderPaneby dragging it from the Library view into the main area.
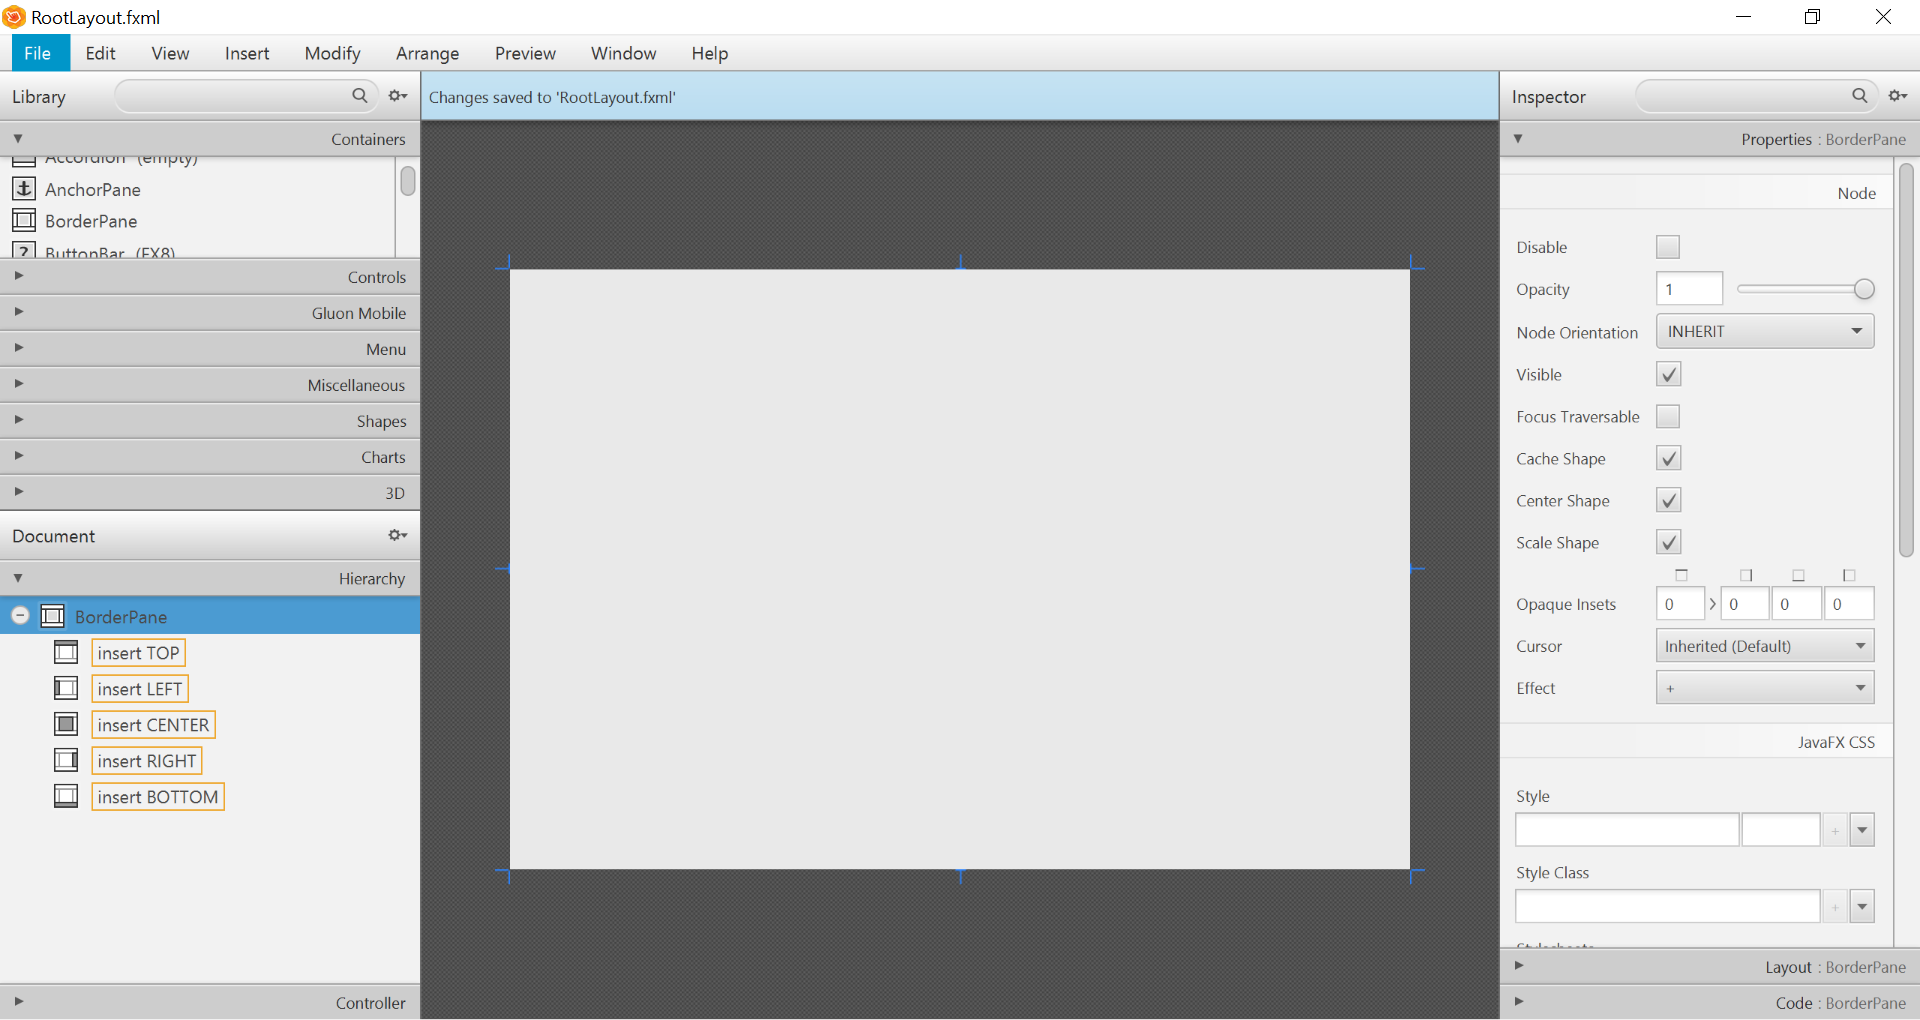
- Resize the
BorderPane(Pref Width: 600, Pref Height: 400)
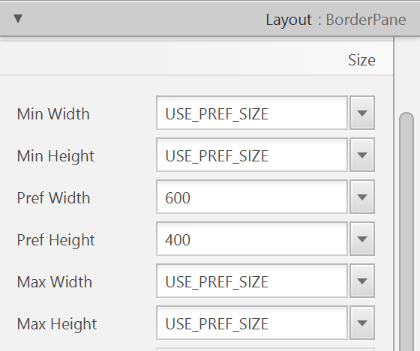
- Add a
MenuBarinto theinsert TOPslot. We will not implement menu functionality for now.

The JavaFX Main Class
Now, we need to create the main Java class that starts up our application with the RootLayout.fxml and adds the PersonOverview.fxml in the center.
Right-click on your seedu.address package, and choose New → JavaFXApplication. For the class name, type MainApp.
The generated MainApp.java class extends from Application and contains two methods. This is the basic structure that we need to start a JavaFX Application. The most important part for us is the start(Stage primaryStage) method. It is automatically called when the application is launch() from within the main() method.
As you see, the start(...) method receives a Stage as parameter. The following graphic illustrates the structure of every JavaFX application:
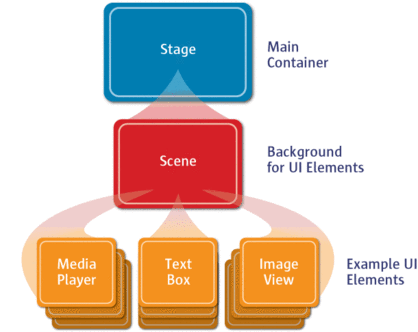
Image Source: http://www.oracle.com
It's like a theater play: The Stage is the main container which is usually a Window with a border and the typical minimize, maximize and close buttons. Inside the Stage you add a Scene which can, of course, be switched out by another Scene. Inside the Scene the actual JavaFX nodes like AnchorPane, TextBox, etc. are added.
See this page for more info on working with the JavaFX Scene Graph.
Open MainApp.java and replace the code with the following:
MainApp.java
package seedu.address;

import java.io.IOException;

import javafx.application.Application;
import javafx.fxml.FXMLLoader;
import javafx.scene.Scene;
import javafx.scene.layout.AnchorPane;
import javafx.scene.layout.BorderPane;
import javafx.stage.Stage;

public class MainApp extends Application {
    private Stage primaryStage;
    private BorderPane rootLayout;

    @Override
    public void start(Stage primaryStage) {
        this.primaryStage = primaryStage;
        this.primaryStage.setTitle("AddressApp");

        initRootLayout();

        showPersonOverview();
    }

    /**
     * Initializes the root layout.
     */
    public void initRootLayout() {
        try {
            // Load root layout from fxml file.
            FXMLLoader loader = new FXMLLoader();
            loader.setLocation(MainApp.class.getResource("view/RootLayout.fxml"));
            rootLayout = loader.load();

            // Show the scene containing the root layout.
            Scene scene = new Scene(rootLayout);
            primaryStage.setScene(scene);
            primaryStage.show();
        } catch (IOException e) {
            e.printStackTrace();
        }
    }

    /**
     * Shows the person overview inside the root layout.
     */
    public void showPersonOverview() {
        try {
            // Load person overview.
            FXMLLoader loader = new FXMLLoader();
            loader.setLocation(MainApp.class.getResource("view/PersonOverview.fxml"));
            AnchorPane personOverview = loader.load();

            // Set person overview into the center of root layout.
            rootLayout.setCenter(personOverview);
        } catch (IOException e) {
            e.printStackTrace();
        }
    }

    /**
     * Returns the main stage.
     */
    public Stage getPrimaryStage() {
        return primaryStage;
    }

    public static void main(String[] args) {
        launch(args);
    }
}
The various comments should give you some hints about what's going on.
Importing JavaFx 9
JavaFx 9 is a separate module from Java 9. We must ensure that the modules are imported correctly.
Notice that IntellJ will complain about the imported modules "not being in the module graph":
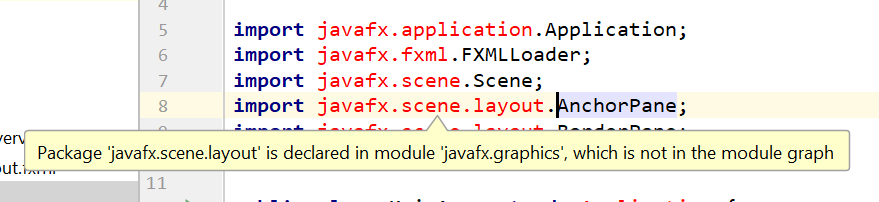
To fix this:
- Ensure that your Project pane is open (Alt+1). Right click on the
srcfolder, and selectNew→module-info.java: - Add the following
requiresandexportsin order to import and export the modules correctly:
module AddressApp {
    requires javafx.graphics;
    requires javafx.fxml;
    requires javafx.controls;

    exports seedu.address;
}
Running the Application
If you run the application now (right click MainApp.java and select Run MainApp.main()), you should see something like this:
Possible Issues
If JavaFx fails to load PersonOverview.fxml, you might get the following error message:
javafx.fxml.LoadException:
/.../AddressApp/out/production/AddressApp/seedu/address/view/PersonOverview.fxml:15
To solve this issue, open PersonOverview.fxml normally in IntelliJ and ensure that there is no such attribute around:
fx:controller="seedu.address.view.PersonOverview"
JavaFx 9 tutorial - Part 2: Model and TableView
Introduction
In this tutorial, we will create the other parts of the application (mainly the model and the controller). We will also use ObservableList and *Property to bind our list of new model's Persons, and their individual details, to the view, with the controller as the "middleman".
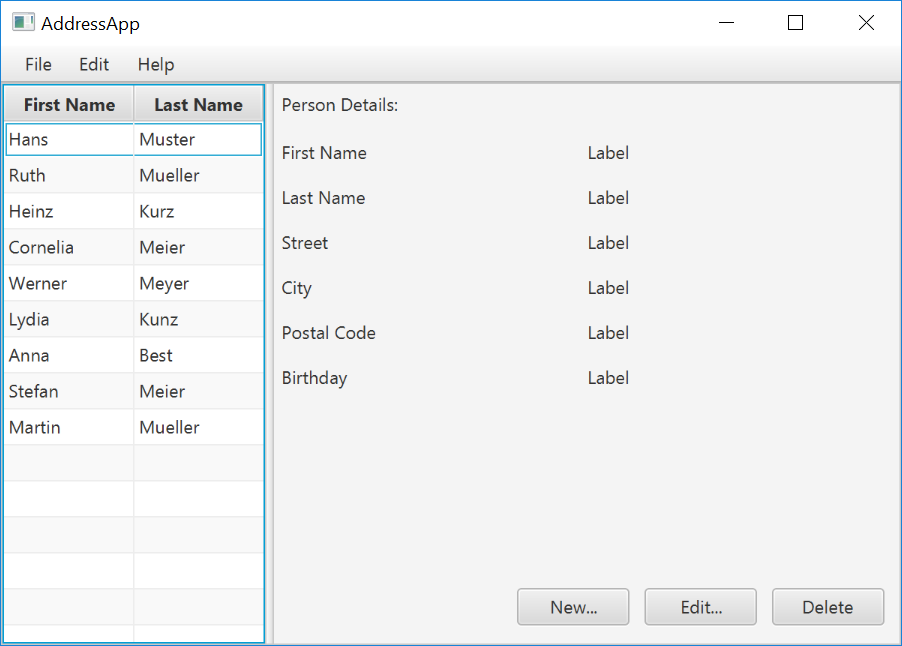
Create the Model class
We need a model class in order to hold information about the people in our address book. Add a new class to the model package (seedu.address.model) called Person. The Person class will encapsulate the details of an individual person such as name, address and birthday. Add the following code to the class. The JavaFX specifics will be explained after the code snippet.
Person.java
package seedu.address.model;

import java.time.LocalDate;

import javafx.beans.property.IntegerProperty;
import javafx.beans.property.ObjectProperty;
import javafx.beans.property.SimpleIntegerProperty;
import javafx.beans.property.SimpleObjectProperty;
import javafx.beans.property.SimpleStringProperty;
import javafx.beans.property.StringProperty;

/**
 * Model class for a Person.
 */
public class Person {

    private final StringProperty firstName;
    private final StringProperty lastName;
    private final StringProperty street;
    private final IntegerProperty postalCode;
    private final StringProperty city;
    private final ObjectProperty< LocalDate > birthday;

    /**
     * Default constructor.
     */
    public Person() {
        this(null, null);
    }

    /**
     * Constructor with some initial data.
     */
    public Person(String firstName, String lastName) {
        this.firstName = new SimpleStringProperty(firstName);
        this.lastName = new SimpleStringProperty(lastName);

        // Some initial dummy data, just for convenient testing.
        this.street = new SimpleStringProperty("some street");
        this.postalCode = new SimpleIntegerProperty(1234);
        this.city = new SimpleStringProperty("some city");
        this.birthday = new SimpleObjectProperty< LocalDate >(LocalDate.of(1999, 2, 21));
    }

    public String getFirstName() {
        return firstName.get();
    }

    public void setFirstName(String firstName) {
        this.firstName.set(firstName);
    }

    public StringProperty firstNameProperty() {
        return firstName;
    }

    public String getLastName() {
        return lastName.get();
    }

    public void setLastName(String lastName) {
        this.lastName.set(lastName);
    }

    public StringProperty lastNameProperty() {
        return lastName;
    }

    public String getStreet() {
        return street.get();
    }

    public void setStreet(String street) {
        this.street.set(street);
    }

    public StringProperty streetProperty() {
        return street;
    }

    public int getPostalCode() {
        return postalCode.get();
    }

    public void setPostalCode(int postalCode) {
        this.postalCode.set(postalCode);
    }

    public IntegerProperty postalCodeProperty() {
        return postalCode;
    }

    public String getCity() {
        return city.get();
    }

    public void setCity(String city) {
        this.city.set(city);
    }

    public StringProperty cityProperty() {
        return city;
    }

    public LocalDate getBirthday() {
        return birthday.get();
    }

    public void setBirthday(LocalDate birthday) {
        this.birthday.set(birthday);
    }

    public ObjectProperty< LocalDate > birthdayProperty() {
        return birthday;
    }
}
Explanations
- With JavaFX, it is common to use
*Propertyfor all fields of a model class. APropertyallows us, for example, to automatically be notified when thelastNameor any other variable is changed. This helps us keep the view in sync with the data. - To learn more about
*Property, refer to Using JavaFX Properties and Binding LocalDate, the type that we are using forbirthday, is part of the new Date and Time API since JDK 8
A List of Persons
The main data that our application manages is simply a bunch of persons. Let's create a list of Person objects inside the MainApp class. All other controller classes will later get access to that central list inside the MainApp.
ObservableList
We are working with JavaFX view classes that need to be informed about any changes made to the list of persons. This is important, since otherwise the view would not be in sync with the data. For this purpose, JavaFX introduces some new Collection classes.
Among all these collections, we need the ObservableList. To create a new ObservableList, add the following code at the beginning of the MainApp class. We'll also add a constructor that creates some sample data and a public getter method:
MainApp.java
// ... AFTER THE OTHER VARIABLES ...

/**
* The data as an observable list of {@link Person}.
*/
private ObservableList< Person > personData = FXCollections.observableArrayList();

    /**
     * Constructor
     */
    public MainApp() {
        // Add some sample data
        personData.add(new Person("Hans", "Muster"));
        personData.add(new Person("Ruth", "Mueller"));
        personData.add(new Person("Heinz", "Kurz"));
        personData.add(new Person("Cornelia", "Meier"));
        personData.add(new Person("Werner", "Meyer"));
        personData.add(new Person("Lydia", "Kunz"));
        personData.add(new Person("Anna", "Best"));
        personData.add(new Person("Stefan", "Meier"));
        personData.add(new Person("Martin", "Mueller"));
    }

    /**
     * Returns the data as an observable list of {@link Person}.
     */
    public ObservableList< Person > getPersonData() {
        return personData;
    }

    // ... THE REST OF THE CLASS ...
The PersonOverviewController
We have our model and view. Let's get our data into our table. We'll need a controller for our PersonOverview.fxml to act as a "middleman" for the model and view.
Create a normal Java class inside the view package called PersonOverviewController.
Note: We must put the class inside the same package as PersonOverview.fxml, otherwise the SceneBuilder won't be able to find it.
We will add some instance variables that give us access to the table and the labels inside the view. The fields and some methods have a special @FXML annotation. This is necessary in order for the .fxml file to have access to private fields and private methods. After we have everything set up in the .fxml file, the application will automatically fill the variables when the .fxml file is loaded.
So let's add the following code:
Note: Remember to always use the javafx imports, NOT awt or swing.
PersonOverviewController.java
package seedu.address.view;

import javafx.fxml.FXML;
import javafx.scene.control.Label;
import javafx.scene.control.TableColumn;
import javafx.scene.control.TableView;
import seedu.address.MainApp;
import seedu.address.model.Person;

public class PersonOverviewController {
    @FXML
    private TableView< Person> personTable;
    @FXML
    private TableColumn< Person, String> firstNameColumn;
    @FXML
    private TableColumn< Person, String> lastNameColumn;

    @FXML
    private Label firstNameLabel;
    @FXML
    private Label lastNameLabel;
    @FXML
    private Label streetLabel;
    @FXML
    private Label postalCodeLabel;
    @FXML
    private Label cityLabel;
    @FXML
    private Label birthdayLabel;

    // Reference to the main application.
    private MainApp mainApp;

    /**
     * The constructor. It is called before the initialize() method.
     */
    public PersonOverviewController() {
    }

    /**
     * Initializes the controller class. This method is automatically called
     * after the fxml file has been loaded.
     */
    @FXML
    private void initialize() {
        // Initialize the person table with the two columns.
        firstNameColumn.setCellValueFactory(cellData -> cellData.getValue().firstNameProperty());
        lastNameColumn.setCellValueFactory(cellData -> cellData.getValue().lastNameProperty());
    }

    /**
     * Is called by the main application to give a reference back to itself.
     */
    public void setMainApp(MainApp mainApp) {
        this.mainApp = mainApp;

        // Add observable list data to the table
        personTable.setItems(mainApp.getPersonData());
    }
}
Explanations
- All fields and methods where the
.fxmlfile needs access must be annotated with@FXML.- Actually, only if they are private, but it's better to have them private and mark them with the annotation!
- The
initialize()method is automatically called after the.fxmlfile has been loaded. At this time, all the FXML fields should have been initialized already. - The
setCellValueFactory(...)that we set on the table colums are used to determine which field inside thePersonobjects should be used for the particular column. The arrow->indicates that we're using a Java 8 feature called Lambdas. (Another option would be to use aPropertyValueFactory, but this is not type-safe).
Note:
We're only using StringProperty values for our table columns in this example. When you want to use IntegerProperty or DoubleProperty, the setCellValueFactory(...) must have an additional asObject():
myIntegerColumn.setCellValueFactory(cellData ->
    cellData.getValue().myIntegerProperty().asObject());
This is necessary because of a bad design decision of JavaFX (see this discussion for more details).
Connecting MainApp with the PersonOverviewController
The setMainApp(...) method must be called by the MainApp class. This gives us a way to access the MainApp object and get the list of Persons and other things. Add the following three lines to showPersonOverview() the method:
MainApp.java - additional lines to add to showPersonOverview() method
// (.... root layout statement goes here ....)

// Give the controller access to the main app.
    PersonOverviewController controller = loader.getController();
    controller.setMainApp(this);

// (.... catch statement goes here ....)
Your showPersonOverview() method in MainApp should now look like this:
MainApp.java - new showPersonOverview() method
/**
* Shows the person overview inside the root layout.
*/
public void showPersonOverview() {
    try {
        // Load person overview.
        FXMLLoader loader = new FXMLLoader();
        loader.setLocation(MainApp.class.getResource("view/PersonOverview.fxml"));
        AnchorPane personOverview = loader.load();

        // Set person overview into the center of root layout.
        rootLayout.setCenter(personOverview);

        // Give the controller access to the main app.
        PersonOverviewController controller = loader.getController();
        controller.setMainApp(this);
    } catch (IOException e) {
        e.printStackTrace();
    }
}
Hook the View to the controller
We're almost there! But one thing is missing: We haven't told our PersonOverview.fxml file which controller to use, and which element should match to which field inside the controller.
- Open
PersonOverview.fxmlwith the SceneBuilder. - Open the Controller group on the left side (just below Hierarchy), and select the
seedu.address.view.PersonOverviewControlleras the controller class.
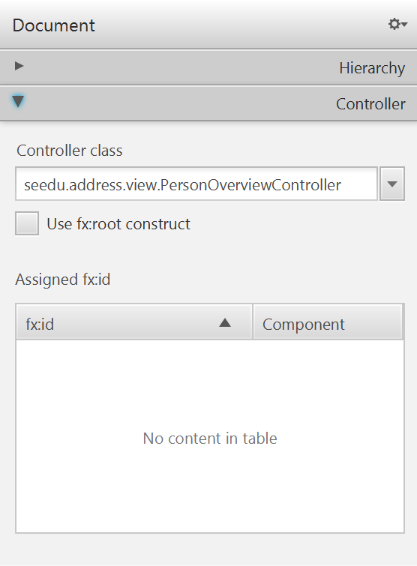
- Select the
TableViewin the Hierarchy group. - In the Inspector view, under the Code group, set 'fx:id' to
personTable.
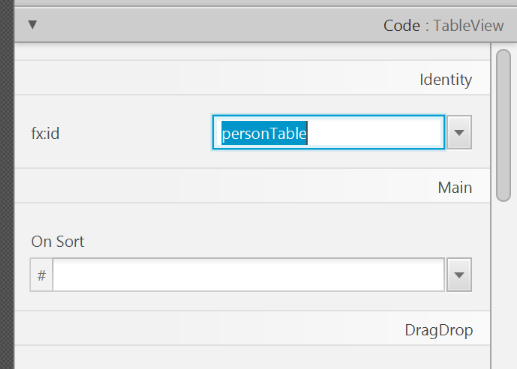
- Do the same for the table columns. Select
firstNameColumnandlastNameColumnfor the 'fx:id' respectively. - For each label in the second column of the grid pane, choose the corresponding 'fx:id'.
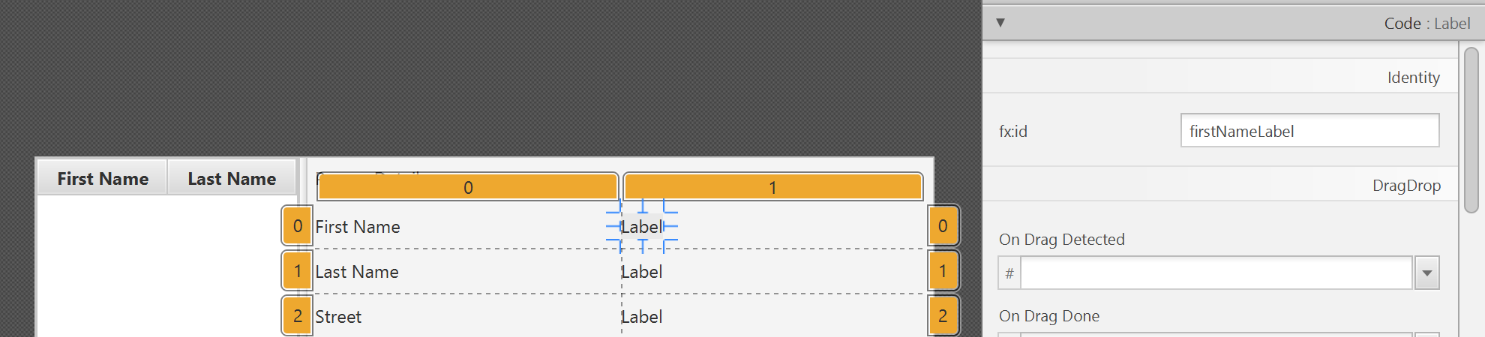
- Save the
.fxmlfile.
Opening up the PersonOverviewController to JavaFx
If you try and run the application now, you will encounter the following error:
javafx.fxml.LoadException: ...

...

Caused by: java.lang.IllegalAccessException: class javafx.fxml.FXMLLoader$ValueElement (in module javafx.fxml) cannot access class seedu.address.view.PersonOverviewController (in module AddressApp) because module AddressApp does not export seedu.address.view to module javafx.fxml
This is because JavaFx is unable to access our PersonOverviewController class.
To fix this, add this line of code to src/module-info.java:
module AddressApp {
    ...

    opens seedu.address.view;
}
The file should now look something like this:
module-info.java
module AddressApp {
    requires javafx.graphics;
    requires javafx.fxml;
    requires javafx.controls;

    exports seedu.address;
    opens seedu.address.view;
}
Start the Application
When you start your application now, you should see something like this:
Congratulations! The application now shows the list of Persons in the view!
You may notice that selecting a person in the TableView does nothing to the labels at the right side. That is because the user interaction portion has not been programmed yet, which we will cover in the next part of the tutorial.
Evidence:
Any code that you have written using JavaFX.
W10.6a Can explain milestones
Project Management → Project Planning →
A milestone is the end of a stage which indicates a significant progress. We should take into account dependencies and priorities when deciding on the features to be delivered at a certain milestone.
Each intermediate product release is a milestone.
In some projects, it is not practical to have a very detailed plan for the whole project due to the uncertainty and unavailability of required information. In such cases, we can use a high-level plan for the whole project and a detailed plan for the next few milestones.
Milestones for the Minesweeper project, iteration 1
| Day | Milestones |
|---|---|
| Day 1 | Architecture skeleton completed |
| Day 3 | ‘new game’ feature implemented |
| Day 4 | ‘new game’ feature tested |
Evidence:
Identify milestones of your class project.
W10.6b Can explain buffers
Project Management → Project Planning →
A buffer is a time set aside to absorb any unforeseen delays. It is very important to include buffers in a software project schedule because effort/time estimations for software development is notoriously hard. However, do not inflate task estimates to create hidden buffers; have explicit buffers instead. Reason: With explicit buffers it is easier to detect incorrect effort estimates which can serve as a feedback to improve future effort estimates.
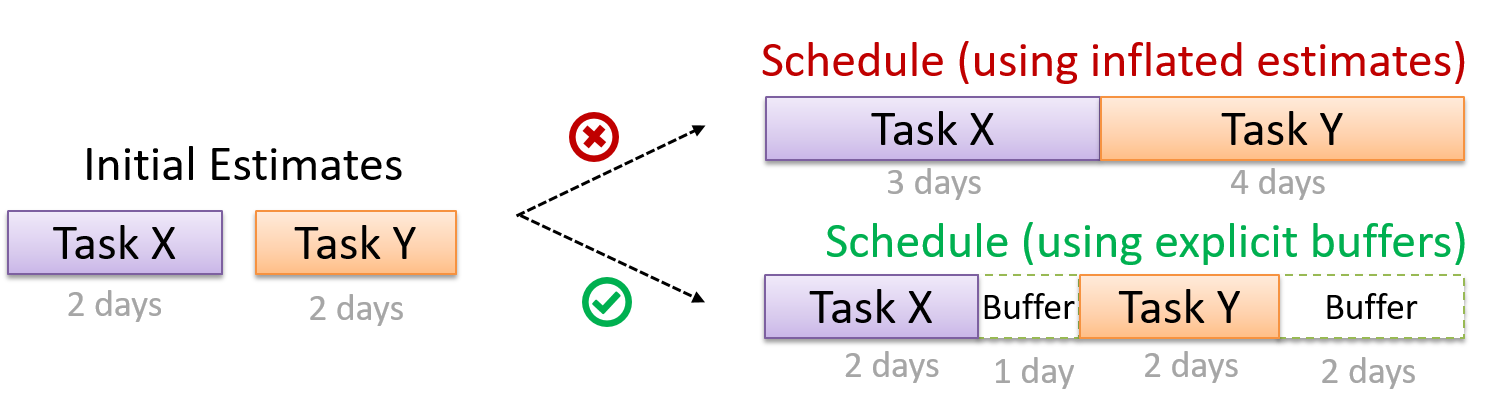
Evidence:
Explain how buffers can be used in your class project.
W10.6c Can explain issue trackers
Project Management → Project Planning →
Keeping track of project tasks (who is doing what, which tasks are ongoing, which tasks are done etc.) is an essential part of project management. In small projects it may be possible to track tasks using simple tools as online spreadsheets or general-purpose/light-weight tasks tracking tools such as Trello. Bigger projects need more sophisticated task tracking tools.
Issue trackers (sometimes called bug trackers) are commonly used to track task assignment and progress. Most online project management software such as GitHub, SourceForge, and BitBucket come with an integrated issue tracker.
A screenshot from the Jira Issue tracker software (Jira is part of the BitBucket project management tool suite):
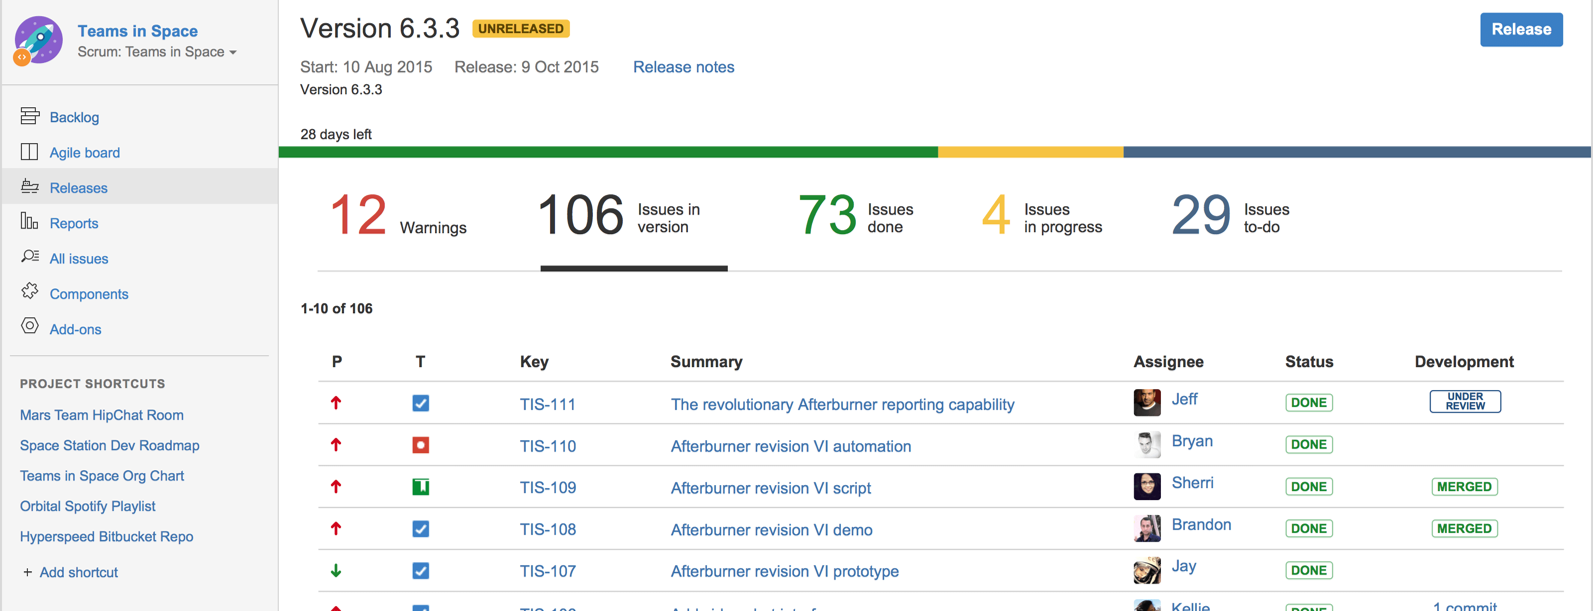
Evidence:
Explain the role of GitHub issue tracker can play in your project.
W10.6d Can explain work breakdown structures
Project Management → Project Planning →
A Work Breakdown Structure (WBS) depicts information about tasks and their details in terms of subtasks. When managing projects it is useful to divide the total work into smaller, well-defined units. Relatively complex tasks can be further split into subtasks. In complex projects a WBS can also include prerequisite tasks and effort estimates for each task.
The high level tasks for a single iteration of a small project could look like the following:
| Task ID | Task | Estimated Effort | Prerequisite Task |
|---|---|---|---|
| A | Analysis | 1 man day | - |
| B | Design | 2 man day | A |
| C | Implementation | 4.5 man day | B |
| D | Testing | 1 man day | C |
| E | Planning for next version | 1 man day | D |
The effort is traditionally measured in man hour/day/month i.e. work that can be done by one person in one hour/day/month. The Task ID is a label for easy reference to a task. Simple labeling is suitable for a small project, while a more informative labeling system can be adopted for bigger projects.
An example WBS for a project for developing a game.
| Task ID | Task | Estimated Effort | Prerequisite Task |
|---|---|---|---|
| A | High level design | 1 man day | - |
| B |
Detail design
|
2 man day
|
A |
| C |
Implementation
|
4.5 man day
|
|
| D | System Testing | 1 man day | C |
| E | Planning for next version | 1 man day | D |
All tasks should be well-defined. In particular, it should be clear as to when the task will be considered done.
Some examples of ill-defined tasks and their better-defined counterparts:
| Bad | Better |
|---|---|
| more coding | implement component X |
| do research on UI testing | find a suitable tool for testing the UI |
Which one these project tasks is not well-defined?
(c)
Explanation: ‘More testing’ is not well-defined. How much is ‘more’? ‘Test the delete functionality’ is a better-defined task.
Evidence:
Break down the project into well-defined tasks and records them in the issue tracker.
W10.7 Mid-project check point
Extract from the Admin Info page:
Week 10: mid-project checkpoint
Deadline: week 10 lecture
Marks: 10, if you show a satisfactory level in the items below
- Create a GitHub account. Create a repository under your account and push our code to it.
- Demo the current state of the project to prof during the week 10 lecture session. There should be some working features at this point.
- Submit interim project documents (handover a hard copy during lecture 10 or upload to IVLE before lecture 10). The document should contain,
- URL of your GitHub repo
- Some representative user stories for the product
- A class diagram to match your code (scans of hand-drawn diagrams are acceptable too)
- At least one object diagram illustrating the state of your program at some point
W10.8 Can use assertions
Extract from the Admin Info page:
After the mid-project checkpoint,
- Enhance your project (TaskManager or otherwise) as explained in the exercise below:
This exercise continues from the TaskManager Level 1-10 exercises quoted above.
Add some assertions (i.e., Java asserts, not JUnit assertions) to your code.
Lecture 11
[slides]