Week 4 [Sep 3]
Todo
Admin info to read:
Policy on plagiarism
We encourage sharing, but you should share with everyone in the class, not just a selected group. That is,
- You are not allowed to share individual assignments with classmates directly.
- You are not allowed to share project-related things with other teams directly.
You can even reuse each other's work subject to the 'reuse policy' given below.
If you submit code (or adopt ideas) taken from elsewhere, you need to comply with our reuse policy.
Detection:
- Detecting plagiarism in code is quite easy. You are not fooling anyone by reordering code or renaming methods/variables.
- As all your work is publicly visible on GitHub, sooner or later somebody will notice the plagiarism.
Penalties:
- For submissions not affecting marks: We make a record of cases of plagiarism but we do not take further action. Such plagiarism does not disadvantage other students. Therefore, we prefer to spend all available resources on helping honest students to do better rather than to chase after dishonest students. If you think you gain something by plagiarizing, go ahead and do it. It's your choice and it's your loss.
- For the final project/exam: Any case of claiming others' work as yours will be reported to the university for disciplinary action.
Policy on reuse
Reuse is encouraged. However, note that reuse has its own costs (such as the learning curve, additional complexity, usage restrictions, and unknown bugs). Furthermore, you will not be given credit for work done by others. Rather, you will be given credit for using work done by others.
- You are allowed to reuse work from your classmates, subject to following conditions:
- The work has been published by us or the authors.
- You clearly give credit to the original author(s).
- You are allowed to reuse work from external sources, subject to following conditions:
- The work comes from a source of 'good standing' (such as an established open source project). This means you cannot reuse code written by an outside 'friend'.
- You clearly give credit to the original author. Acknowledge use of third party resources clearly e.g. in the welcome message, splash screen (if any) or under the 'about' menu. If you are open about reuse, you are less likely to get into trouble if you unintentionally reused something copyrighted.
- You do not violate the license under which the work has been released. Please do not use 3rd-party images/audio in your software unless they have been specifically released to be used freely. Just because you found it in the Internet does not mean it is free for reuse.
- Always get permission from us before you reuse third-party libraries. Please post your 'request to use 3rd party library' in our GitHub forum. That way, the whole class get to see what libraries are being used by others.
Giving credit for reused work
Given below are how to give credit for things you reuse from elsewhere. These requirements are specific to this module i.e., not applicable outside the module (outside the module you should follow the rules specified by your employer and the license of the reused work)
If you used a third party library:
- Mention in the
README.adoc(under the Acknowledgements section) - mention in the
Project Portfolio Page if the library has a significant relevance to the features you implemented
If you reused code snippets found on the Internet e.g. from StackOverflow answers or
referred code in another software or
referred project code by current/past student:
- If you read the code to understand the approach and implemented it yourself, mention it as a comment
Example://Solution below adapted from https://stackoverflow.com/a/16252290 {Your implmentation of the reused solution here ...} - If you copy-pasted a non-trivial code block (possibly with minor modifications renaming, layout changes, changes to comments, etc.), also mark the code block as reused code (using
Collate Tool Syntax )
Format://@@author {yourGithubUsername}-reused //{Info about the source...} {Reused code (possibly with minor modifications) here ...} //@@authorpersons = getList() //@@author johndoe-reused //Reused from https://stackoverflow.com/a/34646172 with minor modifications Collections.sort(persons, new Comparator<CustomData>() { @Override public int compare(CustomData lhs, CustomData rhs) { return lhs.customInt > rhs.customInt ? -1 : (lhs.customInt < rhs.customInt) ? 1 : 0; } }); //@@author return persons;
Steps to use Collate:
- Download
Collate-TUI.jarfrom the Collate Tool project - Annotate your code to indicate who wrote which part of the code (instructions given below)
- Run the Collate tool to collate code written by each person into separate files (instructions given below)
Annotating code to indicate authorship
-
Mark your code with a
//@@author {yourGithubUsername}. Note the double@.
The//@@authortag should appear only at the beginning of the code you wrote. The code up to the next//@@authortag or the end of the file (whichever comes first) will be considered as was written by that author. Here is a sample code file://@@author johndoe method 1 ... method 2 ... //@@author sarahkhoo method 3 ... //@@author johndoe method 4 ... -
If you don't know who wrote the code segment below yours, you may put an empty
//@@author(i.e. no GitHub username) to indicate the end of the code segment you wrote. The author of code below yours can add the GitHub username to the empty tag later. Here is a sample code with an emptyauthortag:method 0 ... //@@author johndoe method 1 ... method 2 ... //@@author method 3 ... method 4 ... -
The author tag syntax varies based on file type e.g. for java, css, fxml. Use the corresponding comment syntax for non-Java files.
Here is an example code from an xml/fxml file.<!-- @@author sereneWong --> <textbox> <label>...</label> <input>...</input> </textbox> ... -
Do not put the
//@@authorinside java header comments as only the content below that tag will be collated.
👎/** * Returns true if ... * @@author johndoe */👍
//@@author johndoe
/**
  * Returns true if ...
  */
What to and what not to annotate
-
Annotate both functional and test code but not documentation files.
-
Annotate only significant size code blocks that can be reviewed on its own e.g., a class, a sequence of methods, a method.
Claiming credit for code blocks smaller than a method is discouraged but allowed. If you do, do it sparingly and only claim meaningful blocks of code such as a block of statements, a loop, or an if-else statement%%.- If an enhancement required you to do tiny changes in many places, there is no need to collate all those tiny changes; you can describe those changes in the Project Portfolio page instead.
- If a code block was touched by more than one person, either let the person who wrote most of it (e.g. more than 80%) take credit for the entire block, or leave it as 'unclaimed' (i.e., no author tags).
- Related to the above point, if you claim a code block as your own, more than 80% of the code in that block should have been written by yourself. For example, no more than 20% of it can be code you reused from somewhere.
- 💡 GitHub has a blame feature and a history feature that can help you determine who wrote a piece of code.
-
Do not try to boost the length of your collated files using dubious means such as duplicating the same code in multiple places. In particular, do not copy-paste test cases to create redundant tests. Even repetitive code blocks within test methods should be extracted out as utility methods to reduce code duplication.
Individual members are responsible for making sure their own collated files contain the correct content.
If you notice a team member claiming credit for code that he/she did not write or use other questionable tactics, you can email us (after the final submission) to let us know. -
If you wrote a significant amount of code that was not used in the final product,
- Create a folder called
{project root}/unused - Move unused files (or copies of files containing unused code) to that folder
- use
//@@author {yourGithubUsername}-unusedto mark unused code in those files (note the suffixunused) e.g.
//@@author johndoe-unused
method 1 ...
method 2 ...
Please put a comment in the code to explain why it was not used.
- Create a folder called
-
If you reused code from elsewhere, mark such code as
//@@author {yourGithubUsername}-reused(note the suffixreused) e.g.//@@author johndoe-reused method 1 ... method 2 ... -
For code generated by the IDE/framework, it should not be annotated as your own.
-
Code you modified in minor ways e.g. adding a parameter. These can be left out of collated code but can be mentioned in the Project Portfolio page if you want to claim credit for them.
Collating the annotated code
You need to put the collated code in the following folders
| Code Type | Folder |
|---|---|
| functional code | collated/functional |
| test code | collated/test |
| unused code | collated/unused |
Refer to Collate Tool's user guide to find how to run the tool over the annotated code.
Given below are DOS sample commands you can put in a batch file and run it to collate the code.
java -jar Collate-TUI.jar collate from src/main to collated/functional include java, fxml, css

java -jar Collate-TUI.jar collate from src/test to collated/test include java

java -jar Collate-TUI.jar collate from unused to collated/unused include java, fxml, css
The output should be something like the structure given below.
collated/
    functional/
        johndoe.md
        sarahkhoo.md
        ravikumar.md
        ravikumarreused.md
    test/
        johndoe.md
        sarahkhoo.md
        ravikumar.md
    unused/
        johndoe.md
-
After running the collate tool, you are recommended to look through the generated .md files to ensure all your code has been extracted correctly.
-
Push the *.md files created to a folder called /collated in your repo.
At the end of the project each student is required to submit a Project Portfolio Page.
-
Objective:
- For you to use (e.g. in your resume) as a well-documented data point of your SE experience
- For us to use as a data point to evaluate your,
- contributions to the project
- your documentation skills
-
What to include:
- Main things to include:
- links to collated code
- features you implemented (include relevant extracts from the user guide and the developer guide)
- features you propose to implement in future (include relevant extracts from the user guide and the developer guide if applicable)
Note: the purpose of allowing you to include proposed features is to provide you more flexibility to show your documentation skills. e.g. you can bring in a proposed feature just to give you an opportunity to use a UML diagram type not used by the actual features. - other significant contributions to the project e.g. tweaks to existing features, setting up project tools
- Other things you can include:
- Evidence of helping others e.g. responses you posted in our forum, bugs you reported in other team's products,
- Evidence of technical leadership e.g. offering features for others to reuse, evidence of those features being reused by others
- If you plan to use the PPP in your Resume, you can also include your SE work outside of the module (will not be graded)
- Main things to include:
-
Format:
- Page limit: If you have more content than the limit given below, shorten (or omit some content) so that you do not exceed the page limit. Having too much content in the PPP will be viewed unfavorably during grading. Note: the page limits given below are after converting to PDF format. The actual amount of content you require is actually less than what these numbers suggest because the HTML → PDF conversion adds a lot of spacing around content.
Content Limit Description in point form 0.5-1 Extracts from the User Guide 1-3 Extracts from the Developer Guide 3-6 Total 5-10 - Follow the example in the AddressBook-Level4.
- 💡 You can use the Asciidoc's
includefeature to include sections from the developer guide or the user guide in your PPP. Follow the example in the sample. - ❗️ It is assumed that all contents in the PPP were written primarily by you. If any section is written by someone else e.g. someone else wrote described the feature in the User Guide but you implemented the feature, clearly state that the section was written by someone else (e.g.
Start of Extract [from: User Guide] written by Jane Doe). Reason: Your writing skills will be evaluated based on the PPP
- Page limit: If you have more content than the limit given below, shorten (or omit some content) so that you do not exceed the page limit. Having too much content in the PPP will be viewed unfavorably during grading. Note: the page limits given below are after converting to PDF format. The actual amount of content you require is actually less than what these numbers suggest because the HTML → PDF conversion adds a lot of spacing around content.
Policy on help from outsiders
In general, you are not allowed to involve outsiders in your project except your team members and the teaching team. However, It is OK to give your product to others for the purpose of getting voluntary user feedback. It is also OK to learn from others as long as they don't do your project work themselves.
There is no midterm.
The final exam has two parts:
- Part 1: MCQ questions (1 hour, 20 marks)
- Part 2: Essay questions (1 hour, 20 marks)
Both papers will be given to you at the start but you need to answer Part 1 first (i.e. MCQ paper). It will be collected 1 hour after the exam start time (even if arrived late for the exam). You are free to start part 2 early if you finish Part 1 early.
Final Exam: Part 1 (MCQ)
Each MCQ question gives you a statement to evaluate.
An example statement
Testing is a Q&A activity
Unless stated otherwise, the meaning of answer options are
A: Agree. If the question has multiple statements, agree with all of them.
B: Disagree. If the question has multiple statements, disagree with at least one of them
C, D, E: Not used
Number of questions: 50
Note that you have slightly more than ½ minute for each question, which means you need to go through the questions fairly quickly.
Given the fast pace required by the paper, to be fair to all students, you will not be allowed to clarify doubts about questions (in Part 1) by talking to invigilators.
- If a question is not clear, you can circle the question number and write your doubt in the exam paper, near the unclear question.
- If your doubt is justified (e.g. there is a typo in the question) or if many students found the question to be unclear, the examiner may decide to omit that question from grading.
Questions in Part 1 are confidential. You are not allowed to reveal Part 1 content to anyone after the exam. All pages of the assessment paper are to be returned at the end of the exam.
Some questions will use underlines or highlighting to draw your attention to a specific part of the question. That is because those parts are highly relevant to the answer and we don’t want you to miss the relevance of that part.
Consider the statement below:
Technique ABC can be used to generate more test cases.
The word can is underlined because the decision you need to make is whether the ABC can or cannot be used to generate more test cases; the decision is not whether ABC can be used to generate more or better test cases.
Some questions have tags e.g., the question below has a tag JAVA. These tags provide additional context about the question. In the example below, the tag indicates that the code given in the question is Java code.
The paper is open-book: you may bring any printed or written materials to the exam in hard copy format. However, given the fast pace required by Part 1, you will not have time left to refer notes during that part of the exam.
💡 Mark the OCR form as you go, rather than planning to transfer your answers to the OCR form near the end. Reason: Given there are 50 questions, it will be hard to estimate how much time you need to mass-transfer all answers to OCR forms.
💡 Write the answer in the exam paper as well as marking it in the OCR form. Reason: It will reduce the chance of missing a question. Furthermore, in case you missed a question, it will help you correct the OCR form quickly.
💡 We have tried to avoid deliberately misleading/tricky questions. If a question seems to take a very long time to figure out, you are probably over-thinking it.
You will be given a practice exam paper to familiarize yourself with this slightly unusual exam format.
Final Exam: Part 2 (Essay)
Unlike in part 1, you can ask invigilators for clarifications if you found a question to be unclear in part 2.
Yes, you may use pencils when answering part 2.
What if I don’t carry around a laptop?
If you do not have a laptop or prefer not to bring the laptop, it is up to you to show your work to the tutor in some way (e.g. by connecting to your home PC remotely), without requiring extra time/effort from the tutor or team members.
Reason: As you enjoy the benefits of not bring the laptop; you (not others) should bear the cost too.
Policy on publishing submissions
The source code are publicly available and are available for reuse by others without any restrictions.
Is publishing submissions unfair to the team? We don't think so. If you were the first to think of something your peers are willing to adopt later, that means you are already ahead of them and they are unlikely to earn more marks by adopting your ideas.
Outcomes
OOP + Java
W4.1 Can use polymorphism
W4.1a Can explain OOP polymorphism
Paradigms → Object Oriented Programming → Polymorphism →
Polymorphism:
The ability of different objects to respond, each in its own way, to identical messages is called polymorphism. -- Object-Oriented Programming with Objective-C, Apple
Polymorphism allows you to write code targeting superclass objects, use that code on subclass objects, and achieve possibly different results based on the actual class of the object.
Assume classes Cat and Dog are both subclasses of the Animal class. You can write code targeting Animal objects and use that code on Cat and Dog objects, achieving possibly different results based on whether it is a Cat object or a Dog object. Some examples:
- Declare an array of type
Animaland still be able to storeDogandCatobjects in it. - Define a method that takes an
Animalobject as a parameter and yet be able to passDogandCatobjects to it. - Call a method on a
Dogor aCatobject as if it is anAnimalobject (i.e., without knowing whether it is aDogobject or aCatobject) and get a different response from it based on its actual class e.g., call theAnimalclass' methodspeak()on objectaand get aMeowas the return value ifais aCatobject andWoofif it is aDogobject.
Polymorphism literally means "ability to take many forms".
W4.1b Can explain substitutability
Paradigms → Object Oriented Programming → Inheritance →
Every instance of a subclass is an instance of the superclass, but not vice-versa. As a result, inheritance allows substitutability : the ability to substitute a child class object where a parent class object is expected.
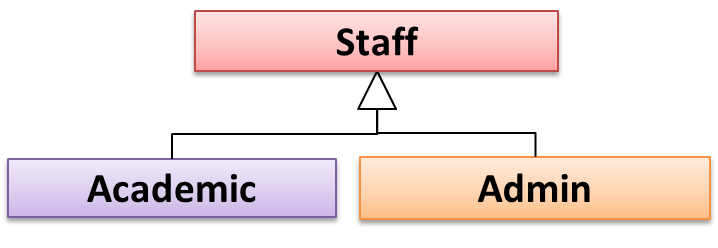
an Academic is an instance of a Staff, but a Staff is not necessarily an instance of an Academic. i.e. wherever an object of the superclass is expected, it can be substituted by an object of any of its subclasses.
The following code is valid because an AcademicStaff object is substitutable as a Staff object.
Staff staff = new AcademicStaff (); // OK
But the following code is not valid because staff is declared as a Staff type and therefore its value may or may not be of type AcademicStaff, which is the type expected by variable academicStaff.
Staff staff;
...
AcademicStaff academicStaff = staff; // Not OK
W4.1c Can explain dynamic and static binding
Paradigms → Object Oriented Programming → Inheritance →
Dynamic Binding (
Paradigms → Object Oriented Programming → Inheritance →
Method overriding is when a sub-class changes the behavior inherited from the parent class by re-implementing the method. Overridden methods have the same name, same type signature, and same return type.
Consider the following case of EvaluationReport class inheriting the Report class:
Report methods |
EvaluationReport methods |
Overrides? |
|---|---|---|
print() |
print() |
Yes |
write(String) |
write(String) |
Yes |
read():String |
read(int):String |
No. Reason: the two methods have different signatures; This is a case of |
Paradigms → Object Oriented Programming → Inheritance →
Method overloading is when there are multiple methods with the same name but different type signatures. Overloading is used to indicate that multiple operations do similar things but take different parameters.
Type Signature: The type signature of an operation is the type sequence of the parameters. The return type and parameter names are not part of the type signature. However, the parameter order is significant.
| Method | Type Signature |
|---|---|
int add(int X, int Y) |
(int, int) |
void add(int A, int B) |
(int, int) |
void m(int X, double Y) |
(int, double) |
void m(double X, int Y) |
(double, int) |
In the case below, the calculate method is overloaded because the two methods have the same name but different type signatures (String) and (int)
calculate(String): voidcalculate(int): void
Which of these methods override another method? A is the parent class. B inherits A.
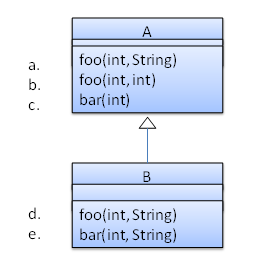
- a
- b
- c
- d
- e
d
Explanation: Method overriding requires a method in a child class to use the same method name and same parameter sequence used by one of its ancestors
Consider the code below. The declared type of s is Staff and it appears as if the adjustSalary(int) operation of the Staff class is invoked.
void adjustSalary(int byPercent) {
    for (Staff s: staff) {
        s.adjustSalary(byPercent);
    }
}
However, at runtime s can receive an object of any subclass of Staff. That means the adjustSalary(int) operation of the actual subclass object will be called. If the subclass does not override that operation, the operation defined in the superclass (in this case, Staff class) will be called.
Static binding (aka early binding): When a method call is resolved at compile time.
In contrast,
Paradigms → Object Oriented Programming → Inheritance →
Method overloading is when there are multiple methods with the same name but different type signatures. Overloading is used to indicate that multiple operations do similar things but take different parameters.
Type Signature: The type signature of an operation is the type sequence of the parameters. The return type and parameter names are not part of the type signature. However, the parameter order is significant.
| Method | Type Signature |
|---|---|
int add(int X, int Y) |
(int, int) |
void add(int A, int B) |
(int, int) |
void m(int X, double Y) |
(int, double) |
void m(double X, int Y) |
(double, int) |
In the case below, the calculate method is overloaded because the two methods have the same name but different type signatures (String) and (int)
calculate(String): voidcalculate(int): void
Note how the constructor is overloaded in the class below. The method call new Account() is bound to the first constructor at compile time.
class Account {

    Account () {
        // Signature: ()
        ...
    }

    Account (String name, String number, double balance) {
        // Signature: (String, String, double)
        ...
    }
}
Similarly, the calcuateGrade method is overloaded in the code below and a method call calculateGrade("A1213232") is bound to the second implementation, at compile time.
void calculateGrade (int[] averages) { ... }
void calculateGrade (String matric) { ... }
W4.1d Can explain how substitutability operation overriding, and dynamic binding relates to polymorphism
Paradigms → Object Oriented Programming → Polymorphism →
Three concepts combine to achieve polymorphism: substitutability, operation overriding, and dynamic binding.
- Substitutability: Because of substitutability, you can write code that expects object of a parent class and yet use that code with objects of child classes. That is how polymorphism is able to treat objects of different types as one type.
- Overriding: To get polymorphic behavior from an operation, the operation in the superclass needs to be overridden in each of the subclasses. That is how overriding allows objects of different subclasses to display different behaviors in response to the same method call.
- Dynamic binding: Calls to overridden methods are bound to the implementation of the actual object's class dynamically during the runtime. That is how the polymorphic code can call the method of the parent class and yet execute the implementation of the child class.
Which one of these is least related to how OO programs achieve polymorphism?
(c)
Explanation: Operation overriding is the one that is related, not operation overloading.
Evidence:
Explain how substitutability operation overriding, and dynamic binding relates to polymorphism using a new example (i.e., without using examples given in the textbook).
W4.1e Can use polymorphism in Java
C++ to Java → Inheritance →
Java is a strongly-typed language which means the code works with only the object types that it targets.
The following code PetShelter keeps a list of Cat objects and make them speak. The code will not work with any other type, for example, Dog objects.
public class PetShelter {
    private static Cat[] cats = new Cat[]{
            new Cat("Mittens"),
            new Cat("Snowball")};

    public static void main(String[] args) {
        for (Cat c: cats){
            System.out.println(c.speak());
        }
    }
}
Mittens: Meow
Snowball: Meow
public class Cat {
    public Cat(String name) {
        super(name);
    }

    public String speak() {
        return name + ": Meow";
    }
}
This strong-typing can lead to unnecessary verbosity caused by repetitive similar code that do similar things with different object types.
If the PetShelter is to keep both cats and dogs, you'll need two arrays and two loops:
public class PetShelter {
    private static Cat[] cats = new Cat[]{
            new Cat("Mittens"),
            new Cat("Snowball")};
    private static Dog[] dogs = new Dog[]{
            new Dog("Spot")};

    public static void main(String[] args) {
        for (Cat c: cats){
            System.out.println(c.speak());
        }
        for(Dog d: dogs){
            System.out.println(d.speak());
        }
    }
}
Mittens: Meow
Snowball: Meow
Spot: Woof
public class Dog {
    public Dog(String name) {
        super(name);
    }

    public String speak() {
        return name + ": Woof";
    }
}
A better way is to take advantage of polymorphism to write code that targets a superclass but works with any subclass objects.
The PetShelter2 use one data structure to keep both types of animals and one loop to make them speak. The code targets the Animal superclass (assuming Cat and Dog inherits from the Animal class) instead of repeating the code for each animal type.
public class PetShelter2 {
    private static Animal[] animals = new Animal[]{
            new Cat("Mittens"),
            new Cat("Snowball"),
            new Dog("Spot")};

    public static void main(String[] args) {
        for (Animal a: animals){
            System.out.println(a.speak());
        }
    }
}
Mittens: Meow
Snowball: Meow
Spot: Woof
public class Animal {

    protected String name;

    public Animal(String name){
        this.name = name;
    }
    public String speak(){
        return name;
    }
}
public class Cat extends Animal {
    public Cat(String name) {
        super(name);
    }

    @Override
    public String speak() {
        return name + ": Meow";
    }
}
public class Dog extends Animal {
    public Dog(String name) {
        super(name);
    }

    @Override
    public String speak() {
        return name + ": Woof";
    }
}
Explanation: Because Java supports polymorphism, you can store both Cat and Dog objects in an array of Animal objects. Similarly, you can call the speak method on any Animal object (as done in the loop) and yet get different behavior from Cat objects and Dog objects.
💡 Suggestion: try to add an Animal object (e.g., new Animal("Unnamed")) to the animals array and see what happens.
Polymorphic code is better in several ways:
- It is shorter.
- It is simpler.
- It is more flexible (in the above example, the
mainmethod will work even if we add more animal types).
The Main class below keeps a list of Circle and Rectangle objects and prints the area (as an int value) of each shape when requested.
Add the missing variables/methods to the code below so that it produces the output given.
public class Main {
    //TODO add your methods here

    public static void main(String[] args) {
        addShape(new Circle(5));
        addShape(new Rectangle(3, 4));
        addShape(new Circle(10));
        printAreas();
        addShape(new Rectangle(4, 4));
        printAreas();
    }
}
78
12
314
78
12
314
16
Circle class and Rectangle class is given below but you'll need to add a parent class Shape:
public class Circle {

    private int radius;

    public Circle(int radius) {
        this.radius = radius;
    }

    public int area() {
        return (int)(Math.PI * radius * radius);
    }
}
public class Rectangle {
    private int height;
    private int width;

    public Rectangle(int height, int width){
        this.height = height;
        this.width = width;
    }

    public int area() {
        return height * width;
    }
}
💡 You may use an array of size 100 to store the shapes.
public class Main {
    private static Shape[] shapes = new Shape[100];
    private static int shapeCount = 0;

    public static void addShape(Shape s){
        shapes[shapeCount] = s;
        shapeCount++;
    }

    // ...

}
This exercise continues from the TaskManager Level1 exercise quoted above.
Enhance your TaskManager program in the following ways.
A. Add support for two types of tasks:
- ToDo : a task to do someday
- Deadline: a task to be done by a specific deadline
Both types keeps an internal flag to indicate if the task is done. The flag is initially set to false.
Here is an example output:
Welcome to TaskManager-Level2!
Your task? todo submit report
Tasks in the list: 1
Your task? deadline write report /by this Friday 4pm
Tasks in the list: 2
Your task? todo read textbook
Tasks in the list: 3
Your task? deadline return textbook /by Sunday
Tasks in the list: 4
Your task? print
Tasks:
[1] description: submit report
is done? No
[2] description: write report
is done? No
do by: this Friday 4pm
[3] description: read textbook
is done? No
[4] description: return textbook
is done? No
do by: Sunday
Your task? exit
Bye!
Changes to the behavior:
addtask description: adds thetask descriptionto the task listtodotask description: adds to the task list a todo task with the giventask descriptiondeadlinetask description /by deadline description: adds to the task list a deadline task with the giventask descriptionand with thedeadline description
Suggestion:
- Make the
Todoclass inherit fromTaskclass, and makeDeadlinetask inherit fromTodoclass. - Use polymorphism to store both types of tasks in an array of
Tasktype and use one loop to print both types of tasks.
B. Add support for
Quality Assurance → Testing → Test Automation →
A simple way to semi-automate testing of a CLI(Command Line Interface) app is by using input/output re-direction.
- First, we feed the app with a sequence of test inputs that is stored in a file while redirecting the output to another file.
- Next, we compare the actual output file with another file containing the expected output.
Let us assume we are testing a CLI app called AddressBook. Here are the detailed steps:
-
Store the test input in the text file
input.txt.add Valid Name p/12345 valid@email.butNoPrefix add Valid Name 12345 e/valid@email.butPhonePrefixMissing -
Store the output we expect from the SUT in another text file
expected.txt.Command: || [add Valid Name p/12345 valid@email.butNoPrefix] Invalid command format: add Command: || [add Valid Name 12345 e/valid@email.butPhonePrefixMissing] Invalid command format: add -
Run the program as given below, which will redirect the text in
input.txtas the input toAddressBookand similarly, will redirect the output of AddressBook to a text fileoutput.txt. Note that this does not require any code changes toAddressBook.java AddressBook < input.txt > output.txt-
💡 The way to run a CLI program differs based on the language.
e.g., In Python, assuming the code is inAddressBook.pyfile, use the command
python AddressBook.py < input.txt > output.txt -
💡 If you are using Windows, use a normal command window to run the app, not a Power Shell window.
More on the >operator and the<operator. tangentialA CLI program takes input from the keyboard and outputs to the console. That is because those two are default input and output streams, respectively. But you can change that behavior using
<and>operators. For example, if you runAddressBookin a command window, the output will be shown in the console, but if you run it like this,java AddressBook > output.txtthe Operating System then creates a file
output.txtand stores the output in that file instead of displaying it in the console. No file I/O coding is required. Similarly, adding< input.txt(or any other filename) makes the OS redirect the contents of the file as input to the program, as if the user typed the content of the file one line at a time.Resources:
-
-
Next, we compare
output.txtwith theexpected.txt. This can be done using a utility such as WindowsFC(i.e. File Compare) command, Unixdiffcommand, or a GUI tool such as WinMerge.FC output.txt expected.txt
Note that the above technique is only suitable when testing CLI apps, and only if the exact output can be predetermined. If the output varies from one run to the other (e.g. it contains a time stamp), this technique will not work. In those cases we need more sophisticated ways of automating tests.
CLI App: An application that has a Command Line Interface. i.e. user interacts with the app by typing in commands.
import java.util.Scanner;

public class Main {
    static Scanner in = new Scanner(System.in);
    static Task[] tasks = new Task[100];
    static int taskCount = 0;

    public static void main(String[] args) {
        printWelcome();
        String line;

        boolean isExit = false;
        while (!isExit) {
            line = getInput();
            String command = line.split(" ")[0];
            switch (command) {
                case "exit":
                case "":
                    isExit = true;
                    break;
                case "todo":
                    addTodo(line);
                    break;
                case "deadline":
                    addDeadline(line);
                    break;
                case "print":
                    printTasks();
                    break;
                default:
                    printError();
            }
        }
        exit();

    }

    private static void addTodo(String line) {
        tasks[taskCount] = new Todo(line.substring("todo".length()).trim());
        taskCount++;
        System.out.println("Tasks in the list: " + taskCount);
    }

  // ...

    private static void printTasks() {
        System.out.println("Tasks:");
        for (int i = 0; i < taskCount; i++) {
            System.out.println("[" + (i + 1) + "] " + tasks[i]);
        }
    }
}
Evidence:
To be able to do exercises such as these:
The Main class below keeps a list of Circle and Rectangle objects and prints the area (as an int value) of each shape when requested.
Add the missing variables/methods to the code below so that it produces the output given.
public class Main {
    //TODO add your methods here

    public static void main(String[] args) {
        addShape(new Circle(5));
        addShape(new Rectangle(3, 4));
        addShape(new Circle(10));
        printAreas();
        addShape(new Rectangle(4, 4));
        printAreas();
    }
}
78
12
314
78
12
314
16
Circle class and Rectangle class is given below but you'll need to add a parent class Shape:
public class Circle {

    private int radius;

    public Circle(int radius) {
        this.radius = radius;
    }

    public int area() {
        return (int)(Math.PI * radius * radius);
    }
}
public class Rectangle {
    private int height;
    private int width;

    public Rectangle(int height, int width){
        this.height = height;
        this.width = width;
    }

    public int area() {
        return height * width;
    }
}
💡 You may use an array of size 100 to store the shapes.
public class Main {
    private static Shape[] shapes = new Shape[100];
    private static int shapeCount = 0;

    public static void addShape(Shape s){
        shapes[shapeCount] = s;
        shapeCount++;
    }

    // ...

}
W4.2 Can use Abstract Classes
W4.2a Can implement abstract classes
Paradigms → Object Oriented Programming → Inheritance →
Abstract Class: A class declared as an abstract class cannot be instantiated, but they can be subclassed.
You can use declare a class as abstract when a class is merely a representation of commonalities among its subclasses in which case it does not make sense to instantiate objects of that class.
The Animal class that exist as a generalization of its subclasses Cat, Dog, Horse, Tiger etc. can be declared as abstract because it does not make sense to instantiate an Animal object.
Abstract Method: An abstract method is a method signature without a method implementation.
The move method of the Animal class is likely to be an abstract method as it is not possible to implement a move method at the Animal class level to fit all subclasses because each animal type can move in a different way.
A class that has an abstract method becomes an abstract class because the class definition is incomplete (due to the missing method body) and it is not possible to create objects using an incomplete class definition.
Even a class that does not have any abstract methods can be declared as an abstract class.
W4.2b Can use abstract classes and methods
C++ to Java → Inheritance →
In Java, an abstract method is declared with the keyword abstract and given without an implementation. If a class includes abstract methods, then the class itself must be declared abstract.
The speak method in this Animal class is abstract. Note how the method signature ends with a semicolon and there is no method body. This makes sense as the implementation of the speak method depends on the type of the animal and it is meaningless to provide a common implementation for all animal types.
public abstract class Animal {

    protected String name;

    public Animal(String name){
        this.name = name;
    }
    public abstract String speak();
}
As one method of the class is abstract, the class itself is abstract.
An abstract class is declared with the keyword abstract. Abstract classes can be used as reference type but cannot be instantiated.
This Account class has been declared as abstract although it does not have any abstract methods. Attempting to instantiate Account objects will result in a compile error.
public abstract class Account {

    int number;

    void close(){
        //...
    }
}
Account a; OK to use as a type
a = new Account(); Compile error!
When an abstract class is subclassed, the subclass should provides implementations for all of the abstract methods in its superclass or else the subclass must also be declared abstract.
The Feline class below inherits from the abstract class Animal but it does not provide an implementation for the abstract method speak. As a result, the Feline class needs to be abstract too.
public abstract class Feline extends Animal {
    public Feline(String name) {
        super(name);
    }

}
The DomesticCat class inherits the abstract Feline class and provides the implementation for the abstract method speak. As a result, it need not be declared abstract.
public class DomesticCat extends Feline {
    public DomesticCat(String name) {
        super(name);
    }

    @Override
    public String speak() {
        return "Meow";
    }
}
Animal a = new Feline("Mittens"); Compile error! Feline is abstract.
Animal a = new DomesticCat("Mittens"); OK. DomesticCat can be instantiated and assigned to a variable of Animal type (the assignment is allowed by polymorphism).
The Main class below keeps a list of Circle and Rectangle objects and prints the area (as an int value) of each shape when requested.
public class Main {
    private static Shape[] shapes = new Shape[100];
    private static int shapeCount = 0;

    public static void addShape(Shape s){
        shapes[shapeCount] = s;
        shapeCount++;
    }

    public static void printAreas(){
        for (int i = 0; i < shapeCount; i++){
            shapes[i].print();
        }
    }

    public static void main(String[] args) {
        addShape(new Circle(5));
        addShape(new Rectangle(3, 4));
        addShape(new Circle(10));
        addShape(new Rectangle(4, 4));
        printAreas();
    }
}
Circle of area 78
Rectangle of area 12
Circle of area 314
Rectangle of area 16
Circle class and Rectangle class is given below:
public class Circle extends Shape {

    private int radius;

    public Circle(int radius) {
        this.radius = radius;
    }

    @Override
    public int area() {
        return (int)(Math.PI * radius * radius);
    }

    @Override
    public void print() {
        System.out.println("Circle of area " + area());
    }
}
public class Rectangle extends Shape {
    private int height;
    private int width;

    public Rectangle(int height, int width){
        this.height = height;
        this.width = width;
    }

    @Override
    public int area() {
        return height * width;
    }

    @Override
    public void print() {
        System.out.println("Rectangle of area " + area());
    }
}
Add the missing Shape class as an abstract class with two abstract methods.
public abstract class Shape {

    public abstract int area();
    // ...
}
Choose the correct statements about Java abstract classes and
- a. A concrete class can contain an abstract method.
- b. An abstract class can contain concrete methods.
- c. An abstract class need not contain any concrete methods.
- d. An abstract class cannot be instantiated.
(b)(c)(d)
Explanation: A concrete class cannot contain even a single abstract method.
Evidence:
To be able to do exercises such as these:
The Main class below keeps a list of Circle and Rectangle objects and prints the area (as an int value) of each shape when requested.
public class Main {
    private static Shape[] shapes = new Shape[100];
    private static int shapeCount = 0;

    public static void addShape(Shape s){
        shapes[shapeCount] = s;
        shapeCount++;
    }

    public static void printAreas(){
        for (int i = 0; i < shapeCount; i++){
            shapes[i].print();
        }
    }

    public static void main(String[] args) {
        addShape(new Circle(5));
        addShape(new Rectangle(3, 4));
        addShape(new Circle(10));
        addShape(new Rectangle(4, 4));
        printAreas();
    }
}
Circle of area 78
Rectangle of area 12
Circle of area 314
Rectangle of area 16
Circle class and Rectangle class is given below:
public class Circle extends Shape {

    private int radius;

    public Circle(int radius) {
        this.radius = radius;
    }

    @Override
    public int area() {
        return (int)(Math.PI * radius * radius);
    }

    @Override
    public void print() {
        System.out.println("Circle of area " + area());
    }
}
public class Rectangle extends Shape {
    private int height;
    private int width;

    public Rectangle(int height, int width){
        this.height = height;
        this.width = width;
    }

    @Override
    public int area() {
        return height * width;
    }

    @Override
    public void print() {
        System.out.println("Rectangle of area " + area());
    }
}
Add the missing Shape class as an abstract class with two abstract methods.
public abstract class Shape {

    public abstract int area();
    // ...
}
W4.3 Can use Interfaces
W4.3a Can explain interfaces
Paradigms → Object Oriented Programming → Inheritance →
An interface is a behavior specification i.e. a collection of
There are a number of situations in software engineering when it is important for disparate groups of programmers to agree to a "contract" that spells out how their software interacts. Each group should be able to write their code without any knowledge of how the other group's code is written. Generally speaking, interfaces are such contracts. --Oracle Docs on Java
Suppose SalariedStaff is an interface that contains two methods setSalary(int) and getSalary(). AcademicStaff can declare itself as implementing the SalariedStaff interface, which means the AcademicStaff class must implement all the methods specified by the SalariedStaff interface i.e., setSalary(int) and getSalary().
A class implementing an interface results in an is-a relationship, just like in class inheritance.
In the example above, AcademicStaff is a SalariedStaff. An AcademicStaff object can be used anywhere a SalariedStaff object is expected e.g. SalariedStaff ss = new AcademicStaff().
W4.3b Can use interfaces in Java
C++ to Java → Inheritance →
The text given in this section borrows some explanations and code examples from the -- Java Tutorial.
In Java, an interface is a reference type, similar to a class, mainly containing method signatures. Defining an interface is similar to creating a new class except it uses the keyword interface in place of class.
Here is an interface named DrivableVehicle that defines methods needed to drive a vehicle.
public interface DrivableVehicle {
    void turn(Direction direction);
    void changeLanes(Direction direction);
    void signalTurn(Direction direction, boolean signalOn);
    // more method signatures
}
Note that the method signatures have no braces and are terminated with a semicolon.
Interfaces cannot be instantiated—they can only be implemented by classes. When an instantiable class implements an interface, indicated by the keyword implements, it provides a method body for each of the methods declared in the interface.
Here is how a class CarModelX can implement the DrivableVehicle interface.
public class CarModelX implements DrivableVehicle {

    @Override
    public void turn(Direction direction) {
       // implementation
    }

    // implementation of other methods
}
An interface can be used as a type e.g., DrivableVechile dv = new CarModelX();.
Interfaces can inherit from other interfaces using the extends keyword, similar to a class inheriting another.
Here is an interface named SelfDrivableVehicle that inherits the DrivableVehicle interface.
public interface SelfDrivableVehicle extends DrivableVehicle {
   void goToAutoPilotMode();
}
Note that the method signatures have no braces and are terminated with a semicolon.
Furthermore, Java allows multiple inheritance among interfaces. A Java interface can inherit multiple other interfaces. A Java class can implement multiple interfaces (and inherit from one class).
The design below is allowed by Java. In case you are not familiar with UML notation used: solid lines indicate normal inheritance; dashed lines indicate interface inheritance; the triangle points to the parent.
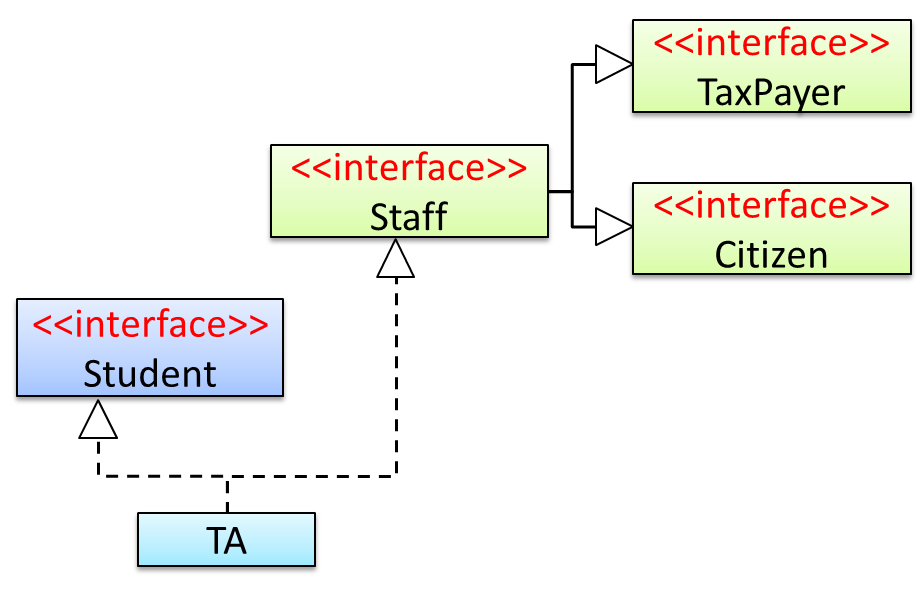
Staffinterface inherits (note the solid lines) the interfacesTaxPayerandCitizen.TAclass implements bothStudentinterface and theStaffinterface.- Because of point 1 above,
TAclass has to implement all methods in the interfacesTaxPayerandCitizen. - Because of points 1,2,3, a
TAis aStaff, is aTaxPayerand is aCitizen.
Interfaces can also contain
C++ to Java → Miscellaneous Topics →
Java does not directly support constants. The convention is to use a static final variable where a constant is needed. The static modifier causes the variable to be available without instantiating an object. The final modifier causes the variable to be unchangeable. Java constants are normally declared in ALL CAPS separated by underscores.
Here is an example of a constant named MAX_BALANCE which can be accessed as Account.MAX_BALANCE.
public class Account{

  public static final double MAX_BALANCE = 1000000.0;

}
Math.PI is an example constant that comes with Java.
This example adds a constant MAX_SPEED and a static method isSpeedAllowed to the interface DrivableVehicle.
public interface DrivableVehicle {

    int MAX_SPEED = 150;

    static boolean isSpeedAllowed(int speed){
        return speed <= MAX_SPEED;
    }

    void turn(Direction direction);
    void changeLanes(Direction direction);
    void signalTurn(Direction direction, boolean signalOn);
    // more method signatures
}
Interfaces can contain default method implementations and nested types. They are not covered here.
The Main class below passes a list of Printable objects (i.e., objects that implement the Printable interface) for another method to be printed.
public class Main {

    public static void printObjects(Printable[] items) {
        for (Printable p : items) {
            p.print();
        }
    }

    public static void main(String[] args) {
        Printable[] printableItems = new Printable[]{
                new Circle(5),
                new Rectangle(3, 4),
                new Person("James Cook")};

        printObjects(printableItems);
    }
}
Circle of area 78
Rectangle of area 12
Person of name James Cook
Classes Shape, Circle, and Rectangle are given below:
public abstract class Shape {

    public abstract int area();
}
public class Circle extends Shape implements Printable {

    private int radius;

    public Circle(int radius) {
        this.radius = radius;
    }

    @Override
    public int area() {
        return (int)(Math.PI * radius * radius);
    }

    @Override
    public void print() {
        System.out.println("Circle of area " + area());
    }
}
public class Rectangle extends Shape implements Printable {
    private int height;
    private int width;

    public Rectangle(int height, int width){
        this.height = height;
        this.width = width;
    }

    @Override
    public int area() {
        return height * width;
    }

    @Override
    public void print() {
        System.out.println("Rectangle of area " + area());
    }
}
Add the missing Printable interface. Add the missing methods of the Person class given below.
public class Person implements Printable {

    private String name;

    // todo: add missing methods
}
public interface Printable {
    //...
}
Evidence:
To be able to do exercises such as these:
The Main class below passes a list of Printable objects (i.e., objects that implement the Printable interface) for another method to be printed.
public class Main {

    public static void printObjects(Printable[] items) {
        for (Printable p : items) {
            p.print();
        }
    }

    public static void main(String[] args) {
        Printable[] printableItems = new Printable[]{
                new Circle(5),
                new Rectangle(3, 4),
                new Person("James Cook")};

        printObjects(printableItems);
    }
}
Circle of area 78
Rectangle of area 12
Person of name James Cook
Classes Shape, Circle, and Rectangle are given below:
public abstract class Shape {

    public abstract int area();
}
public class Circle extends Shape implements Printable {

    private int radius;

    public Circle(int radius) {
        this.radius = radius;
    }

    @Override
    public int area() {
        return (int)(Math.PI * radius * radius);
    }

    @Override
    public void print() {
        System.out.println("Circle of area " + area());
    }
}
public class Rectangle extends Shape implements Printable {
    private int height;
    private int width;

    public Rectangle(int height, int width){
        this.height = height;
        this.width = width;
    }

    @Override
    public int area() {
        return height * width;
    }

    @Override
    public void print() {
        System.out.println("Rectangle of area " + area());
    }
}
Add the missing Printable interface. Add the missing methods of the Person class given below.
public class Person implements Printable {

    private String name;

    // todo: add missing methods
}
public interface Printable {
    //...
}
Implementation
W4.4 Can do exception handling in code
W4.4a Can explain error handling
Implementation → Error Handling → Introduction →
Well-written applications include error-handling code that allows them to recover gracefully from unexpected errors. When an error occurs, the application may need to request user intervention, or it may be able to recover on its own. In extreme cases, the application may log the user off or shut down the system. --Microsoft
W4.4b Can explain exceptions
Implementation → Error Handling → Exceptions →
Exceptions are used to deal with 'unusual' but not entirely unexpected situations that the program might encounter at run time.
Exception:
The term exception is shorthand for the phrase "exceptional event." An exception is an event, which occurs during the execution of a program, that disrupts the normal flow of the program's instructions. –- Java Tutorial (Oracle Inc.)
Examples:
- A network connection encounters a timeout due to a slow server.
- The code tries to read a file from the hard disk but the file is corrupted and cannot be read.
W4.4c Can explain how exception handling is done typically
Implementation → Error Handling → Exceptions →
Most languages allow code that encountered an "exceptional" situation to encapsulate details of the situation in an Exception object and throw/raise that object so that another piece of code can catch it and deal with it. This is especially useful when the code that encountered the unusual situation does not know how to deal with it.
The extract below from the -- Java Tutorial (with slight adaptations) explains how exceptions are typically handled.
When an error occurs at some point in the execution, the code being executed creates an exception object and hands it off to the runtime system. The exception object contains information about the error, including its type and the state of the program when the error occurred. Creating an exception object and handing it to the runtime system is called throwing an exception.
After a method throws an exception, the runtime system attempts to find something to handle it in the
The exception handler chosen is said to catch the exception. If the runtime system exhaustively searches all the methods on the call stack without finding an appropriate exception handler, the program terminates.
Advantages of exception handling in this way:
- The ability to propagate error information through the call stack.
- The separation of code that deals with 'unusual' situations from the code that does the 'usual' work.
Which are benefits of exceptions?
- a. Exceptions allow us to separate normal code from error handling code.
- b. Exceptions can prevent problems that happen in the environment.
- c. Exceptions allow us to handle in one location an error raised in another location.
(a) (c)
Explanation: Exceptions cannot prevent problems in the environment. They can only be used to handle and recover from such problems.
W4.4d Can explain Java Exceptions
C++ to Java → Exceptions →
Given below is an extract from the -- Java Tutorial, with some adaptations.
There are three basic categories of exceptions In Java:
- Checked exceptions: exceptional conditions that a well-written application should anticipate and recover from. All exceptions are checked exceptions, except for
Error,RuntimeException, and their subclasses.
Suppose an application prompts a user for an input file name, then opens the file by passing the name to the constructor for java.io.FileReader. Normally, the user provides the name of an existing, readable file, so the construction of the FileReader object succeeds, and the execution of the application proceeds normally. But sometimes the user supplies the name of a nonexistent file, and the constructor throws java.io.FileNotFoundException. A well-written program will catch this exception and notify the user of the mistake, possibly prompting for a corrected file name.
- Errors: exceptional conditions that are external to the application, and that the application usually cannot anticipate or recover from. Errors are those exceptions indicated by
Errorand its subclasses.
Suppose that an application successfully opens a file for input, but is unable to read the file because of a hardware or system malfunction. The unsuccessful read will throw java.io.IOError. An application might choose to catch this exception, in order to notify the user of the problem — but it also might make sense for the program to print a stack trace and exit.
- Runtime exceptions: conditions that are internal to the application, and that the application usually cannot anticipate or recover from. Runtime exceptions are those indicated by
RuntimeExceptionand its subclasses. These usually indicate programming bugs, such as logic errors or improper use of an API.
Consider the application described previously that passes a file name to the constructor for FileReader. If a logic error causes a null to be passed to the constructor, the constructor will throw NullPointerException. The application can catch this exception, but it probably makes more sense to eliminate the bug that caused the exception to occur.
Errors and runtime exceptions are collectively known as unchecked exceptions.
W4.4e Can use Java Exceptions
C++ to Java → Exceptions →
The content below uses extracts from the -- Java Tutorial, with some adaptations.
A program can catch exceptions by using a combination of the try, catch blocks.
- The
tryblock identifies a block of code in which an exception can occur. - The
catchblock identifies a block of code, known as an exception handler, that can handle a particular type of exception.
The writeList() method below calls a method process() that can cause two type of exceptions. It uses a try-catch construct to deal with each exception.
public void writeList() {
    print("starting method");
    try {
        print("starting process");
        process();
        print("finishing process");

    } catch (IndexOutOfBoundsException e) {
        print("caught IOOBE");

    } catch (IOException e) {
        print("caught IOE");

    }
    print("finishing method");
}
Some possible outputs:
| No exceptions | IOException |
IndexOutOfBoundsException |
|---|---|---|
| starting method starting process finishing process finishing method |
starting method starting process caught IOE finishing method |
starting method starting process caught IOOBE finishing method |
You can use a finally block to specify code that is guaranteed to execute with or without the exception. This is the right place to close files, recover resources, and otherwise clean up after the code enclosed in the try block.
The writeList() method below has a finally block:
public void writeList() {
    print("starting method");
    try {
        print("starting process");
        process();
        print("finishing process");

    } catch (IndexOutOfBoundsException e) {
        print("caught IOOBE");

    } catch (IOException e) {
        print("caught IOE");

    } finally {
        // clean up
        print("cleaning up");
    }
    print("finishing method");
}
Some possible outputs:
| No exceptions | IOException |
IndexOutOfBoundsException |
|---|---|---|
| starting method starting process finishing process cleaning up finishing method |
starting method starting process caught IOE cleaning up finishing method |
starting method starting process caught IOOBE cleaning up finishing method |
-
The
trystatement should contain at least onecatchblock or a finally block and may have multiplecatchblocks. -
The class of the exception object indicates the type of exception thrown. The exception object can contain further information about the error, including an error message.
You can use the throw statement to throw an exception. The throw statement requires a
Here's an example of a throw statement.
if (size == 0) {
    throw new EmptyStackException();
}
In Java, Checked exceptions are subject to the Catch or Specify Requirement: code that might throw checked exceptions must be enclosed by either of the following:
- A
trystatement that catches the exception. Thetrymust provide a handler for the exception. - A method that specifies that it can throw the exception. The method must provide a
throwsclause that lists the exception.
Unchecked exceptions are not required to follow to the Catch or Specify Requirement but you can apply the requirement to them too.
Here's an example of a method specifying that it throws certain checked exceptions:
public void writeList() throws IOException, IndexOutOfBoundsException {
    print("starting method");
    process();
    print("finishing method");
}
Some possible outputs:
| No exceptions | IOException |
IndexOutOfBoundsException |
|---|---|---|
| starting method finishing method |
starting method |
starting method |
Java comes with a collection of built-in exception classes that you can use. When they are not enough, it is possible to create your own exception classes.
The Main class below parses a string descriptor of a rectangle of the format "WIDTHxHEIGHT" e.g., "3x4" and prints the area of the rectangle.
public class Main {

    public static void printArea(String descriptor){
        //TODO: modify the code below
        System.out.println(descriptor + "=" + calculateArea(descriptor));
    }

    private static int calculateArea(String descriptor) {
        //TODO: modify the code below
        String[] dimensions = descriptor.split("x");
        return Integer.parseInt(dimensions[0]) * Integer.parseInt(dimensions[1]);
    }

    public static void main(String[] args) {
        printArea("3x4");
        printArea("5x5");
    }
}
3x4=12
5x5=25
-
Update the code of
printAreato print an error message ifWIDTHand/orHEIGHTare not numbers e.g.,"Ax4"
💡calculateAreawill throw the unchecked exceptionNumberFormatExceptionif the code tries to parse a non-number to an integer. -
Update the code of
printAreato print an error message if the descriptor is missingWIDTHand/orHEIGHTe.g.,"x4"
💡calculateAreawill throw the unchecked exceptionIndexOutOfBoundsExceptionif one or both dimensions are missing. -
Update the code of
calculateAreato throw the checked exceptionIllegalShapeExceptionif there are more than 2 dimensions e.g.,"5x4x3"and update theprintAreato print an error message for those cases. Here is the code for theIllegalShapeException.java
public class IllegalShapeException extends Exception {
  //no other code needed
}
Here is the expected behavior after you have done the above changes:
public class Main {

    //...

    public static void main(String[] args) {
        printArea("3x4");
        printArea("3xy");
        printArea("3x");
        printArea("3");
        printArea("3x4x5");
    }
}
3x4=12
WIDTH or HEIGHT is not a number: 3xy
WIDTH or HEIGHT is missing: 3x
WIDTH or HEIGHT is missing: 3
Too many dimensions: 3x4x5
public class Main {

    public static void printArea(String descriptor){
        try {
            System.out.println(descriptor + "=" + calculateArea(descriptor));
        } catch (NumberFormatException e) {
            System.out.println("WIDTH or HEIGHT is not a number: " + descriptor);
        } // add more catch blocks here
    }

    private static int calculateArea(String descriptor) throws IllegalShapeException {
        String[] dimensions = descriptor.split("x");

        //throw IllegalShapeException here if dimensions.length > 2

        return Integer.parseInt(dimensions[0]) * Integer.parseInt(dimensions[1]);
    }


}
This exercise continues from the TaskManager Level 1-2 exercises quoted above.
Enhance the TaskManager to print an error message if a command is missing parts. Use exceptions so that error detection and printing of error message happen at different places of code and the error information is passed between the two places using an Exception object.
Here is an example output:
Welcome to TaskManager-Level3!
Your task? todo
Error: Empty description for TODO
Your task? todo read book
Tasks in the list: 1
Your task? print
Tasks:
[1] description: read book
is done? No
Your task?
Suggested approach:
- Create a
TaskManagerExceptionclass that inherits theExceptionclass. Override the constructor that takes aStringparameter so that you can specify the error information when you create aTaskManagerExceptionobject. - Throw a new
TaskManagerExceptionobject when you detect some necessary information is missing in the command. - Catch that exception somewhere else and print the message inside the exception object.
public class TaskManagerException extends Exception{
    public TaskManagerException(String message) {
        super(message);
    }
}
    public static void main(String[] args) {
        // ...
        while (!isExit) {
            try {
                line = getInput();
                String command = line.split(" ")[0];
                switch (command) {
                    case "todo":
                        addTodo(line);
                        break;
                    // ...
                }
            } catch (TaskManagerException e) {
                printError(e.getMessage());
            }
        }
        // ...

    }

    private static void addTodo(String line) throws TaskManagerException {
        String description = line.substring("todo".length()).trim();
        if (description.isEmpty()){
            throw new TaskManagerException("Empty description for TODO");
        }
        // ...
    }
Evidence:
To be able to do exercises such as these:
The Main class below parses a string descriptor of a rectangle of the format "WIDTHxHEIGHT" e.g., "3x4" and prints the area of the rectangle.
public class Main {

    public static void printArea(String descriptor){
        //TODO: modify the code below
        System.out.println(descriptor + "=" + calculateArea(descriptor));
    }

    private static int calculateArea(String descriptor) {
        //TODO: modify the code below
        String[] dimensions = descriptor.split("x");
        return Integer.parseInt(dimensions[0]) * Integer.parseInt(dimensions[1]);
    }

    public static void main(String[] args) {
        printArea("3x4");
        printArea("5x5");
    }
}
3x4=12
5x5=25
-
Update the code of
printAreato print an error message ifWIDTHand/orHEIGHTare not numbers e.g.,"Ax4"
💡calculateAreawill throw the unchecked exceptionNumberFormatExceptionif the code tries to parse a non-number to an integer. -
Update the code of
printAreato print an error message if the descriptor is missingWIDTHand/orHEIGHTe.g.,"x4"
💡calculateAreawill throw the unchecked exceptionIndexOutOfBoundsExceptionif one or both dimensions are missing. -
Update the code of
calculateAreato throw the checked exceptionIllegalShapeExceptionif there are more than 2 dimensions e.g.,"5x4x3"and update theprintAreato print an error message for those cases. Here is the code for theIllegalShapeException.java
public class IllegalShapeException extends Exception {
  //no other code needed
}
Here is the expected behavior after you have done the above changes:
public class Main {

    //...

    public static void main(String[] args) {
        printArea("3x4");
        printArea("3xy");
        printArea("3x");
        printArea("3");
        printArea("3x4x5");
    }
}
3x4=12
WIDTH or HEIGHT is not a number: 3xy
WIDTH or HEIGHT is missing: 3x
WIDTH or HEIGHT is missing: 3
Too many dimensions: 3x4x5
public class Main {

    public static void printArea(String descriptor){
        try {
            System.out.println(descriptor + "=" + calculateArea(descriptor));
        } catch (NumberFormatException e) {
            System.out.println("WIDTH or HEIGHT is not a number: " + descriptor);
        } // add more catch blocks here
    }

    private static int calculateArea(String descriptor) throws IllegalShapeException {
        String[] dimensions = descriptor.split("x");

        //throw IllegalShapeException here if dimensions.length > 2

        return Integer.parseInt(dimensions[0]) * Integer.parseInt(dimensions[1]);
    }


}
W4.4f Can avoid using exceptions to control normal workflow
W4.5 Can refactor code at a basic level
W4.5a Can explain refactoring
Implementation → Refactoring →
The first version of the code you write may not be of production quality. It is OK to first concentrate on making the code work, rather than worry over the quality of the code, as long as you improve the quality later. This process of improving a program's internal structure in small steps without modifying its external behavior is called refactoring.
- Refactoring is not rewriting: Discarding poorly-written code entirely and re-writing it from scratch is not refactoring because refactoring needs to be done in small steps.
- Refactoring is not bug fixing: By definition, refactoring is different from bug fixing or any other modifications that alter the external behavior (e.g. adding a feature) of the component in concern.
💡 Improving code structure can have many secondary benefits: e.g.
- hidden bugs become easier to spot
- improve performance (sometimes, simpler code runs faster than complex code because simpler code is easier for the compiler to optimize).
Given below are two common refactorings (
- Java: http://refactoring.com/catalog/ - This is a list of common refactorings, maintained by Martin Fowler, a leading authority on refactoring. He is also the author of the ‘bestseller’ on refactoring: Refactoring: Improving the Design of Existing Code
- Python: https://refactoring.guru/refactoring/catalog -- A catalog of refactorings applicable to Python code.
Refactoring Name: Consolidate Duplicate Conditional Fragments
Situation: The same fragment of code is in all branches of a conditional expression.
Method: Move it outside of the expression.
Example:
|
→ |
|
|
→ |
|
Refactoring Name: Extract Method
Situation: You have a code fragment that can be grouped together.
Method: Turn the fragment into a method whose name explains the purpose of the method.
Example:
void printOwing() {
    printBanner();

    //print details
    System.out.println("name:	" + name);
    System.out.println("amount	" + getOutstanding());
}
void printOwing() {
    printBanner();
    printDetails(getOutstanding());
}

void printDetails (double outstanding) {
    System.out.println("name:	" + name);
    System.out.println("amount	" + outstanding);
}
def print_owing():
    print_banner()

    //print details
    print("name:	" + name)
    print("amount	" + get_outstanding())
def print_owing():
    print_banner()
    print_details(get_outstanding())

def print_details(amount):
    print("name:	" + name)
    print("amount	" + amount)
💡 Some IDEs have built in support for basic refactorings such as automatically renaming a variable/method/class in all places it has been used.
Refactoring, even if done with the aid of an IDE, may still result in regressions. Therefore, each small refactoring should be followed by regression testing.
Choose the correct statements
- a. Refactoring can improve understandability
- b. Refactoring can uncover bugs
- c. Refactoring can result in better performance
- d. Refactoring can change the number of methods/classes
a, b, c, d
Explanation:
- (a, b, c) Although the primary aim of refactoring is to improve internal code structure, there are other secondary benefits.
- (d) Some refactorings result in adding/removing methods/classes.
Do you agree with the following statement? Justify your answer.
Statement: Whenever we refactor code to fix bugs, we need not do regression testing if the bug fix was minor.
There are two flaws in the given statement.
DISAGREE.
- Even a minor change can have major repercussions on the system. We MUST do regression testing after each change, no matter how minor it is.
- Fixing bugs is technically not refactoring.
Explain what is refactoring and why it is not the same as rewriting, bug fixing, or adding features.
Evidence:
Explain what is refactoring and why it is not the same as rewriting, bug fixing, or adding features.
W4.5b Can use automated refactoring features of the IDE
Tools → Intellij IDEA →
This video explains how to automate the 'Extract parameter' refactoring using Intellij IDEA. Most other refactorings available works similarly. i.e. select the code to refactor → find the refactoring in the context menu or use the keyboard shortcut.
Here's another video explaining how to change a method signature as part of refactoring.
- Introduction to Refactoring (in Intellij IDEA) : An article on refactorings available in Intellij IDEA.
Evidence:
Have done some automated refactoring in the IDE.
W4.5c Can apply some basic refactoring
Implementation → Refactoring →
Given below are some more commonly used refactorings. A more comprehensive list is available at
- Java: http://refactoring.com/catalog/ - This is a list of common refactorings, maintained by Martin Fowler, a leading authority on refactoring. He is also the author of the ‘bestseller’ on refactoring: Refactoring: Improving the Design of Existing Code
- Python: https://refactoring.guru/refactoring/catalog -- A catalog of refactorings applicable to Python code.
Evidence:
Have done some refactorings in some code you wrote e.g., your TaskManager code
W4.5d Can decide when to apply a given refactoring
Implementation → Refactoring →
We know that it is important to refactor frequently so as to avoid the accumulation of ‘messy’ code which might get out of control. But how much refactoring is too much refactoring? It is too much refactoring when the benefits no longer justify the cost. The costs and the benefits depend on the context. That is why some refactorings are ‘opposites’ of each other (e.g. extract method vs inline method).
‘Extract method’ and ‘Inline method’ refactorings
a
Evidence:
Give an example from any project (e.g. your TaskManager code) where a refactoring can be applied but you decide against it because it is not worth it.
🅿️ Project
W4.6 Project preparation: Can use basic inheritance in a small project
Enhance your TaskManager program as explained in the exercise below:
This exercise continues from the TaskManager Level1 exercise quoted above.
Enhance your TaskManager program in the following ways.
A. Add support for two types of tasks:
- ToDo : a task to do someday
- Deadline: a task to be done by a specific deadline
Both types keeps an internal flag to indicate if the task is done. The flag is initially set to false.
Here is an example output:
Welcome to TaskManager-Level2!
Your task? todo submit report
Tasks in the list: 1
Your task? deadline write report /by this Friday 4pm
Tasks in the list: 2
Your task? todo read textbook
Tasks in the list: 3
Your task? deadline return textbook /by Sunday
Tasks in the list: 4
Your task? print
Tasks:
[1] description: submit report
is done? No
[2] description: write report
is done? No
do by: this Friday 4pm
[3] description: read textbook
is done? No
[4] description: return textbook
is done? No
do by: Sunday
Your task? exit
Bye!
Changes to the behavior:
addtask description: adds thetask descriptionto the task listtodotask description: adds to the task list a todo task with the giventask descriptiondeadlinetask description /by deadline description: adds to the task list a deadline task with the giventask descriptionand with thedeadline description
Suggestion:
- Make the
Todoclass inherit fromTaskclass, and makeDeadlinetask inherit fromTodoclass. - Use polymorphism to store both types of tasks in an array of
Tasktype and use one loop to print both types of tasks.
B. Add support for
Quality Assurance → Testing → Test Automation →
A simple way to semi-automate testing of a CLI(Command Line Interface) app is by using input/output re-direction.
- First, we feed the app with a sequence of test inputs that is stored in a file while redirecting the output to another file.
- Next, we compare the actual output file with another file containing the expected output.
Let us assume we are testing a CLI app called AddressBook. Here are the detailed steps:
-
Store the test input in the text file
input.txt.add Valid Name p/12345 valid@email.butNoPrefix add Valid Name 12345 e/valid@email.butPhonePrefixMissing -
Store the output we expect from the SUT in another text file
expected.txt.Command: || [add Valid Name p/12345 valid@email.butNoPrefix] Invalid command format: add Command: || [add Valid Name 12345 e/valid@email.butPhonePrefixMissing] Invalid command format: add -
Run the program as given below, which will redirect the text in
input.txtas the input toAddressBookand similarly, will redirect the output of AddressBook to a text fileoutput.txt. Note that this does not require any code changes toAddressBook.java AddressBook < input.txt > output.txt-
💡 The way to run a CLI program differs based on the language.
e.g., In Python, assuming the code is inAddressBook.pyfile, use the command
python AddressBook.py < input.txt > output.txt -
💡 If you are using Windows, use a normal command window to run the app, not a Power Shell window.
More on the >operator and the<operator. tangentialA CLI program takes input from the keyboard and outputs to the console. That is because those two are default input and output streams, respectively. But you can change that behavior using
<and>operators. For example, if you runAddressBookin a command window, the output will be shown in the console, but if you run it like this,java AddressBook > output.txtthe Operating System then creates a file
output.txtand stores the output in that file instead of displaying it in the console. No file I/O coding is required. Similarly, adding< input.txt(or any other filename) makes the OS redirect the contents of the file as input to the program, as if the user typed the content of the file one line at a time.Resources:
-
-
Next, we compare
output.txtwith theexpected.txt. This can be done using a utility such as WindowsFC(i.e. File Compare) command, Unixdiffcommand, or a GUI tool such as WinMerge.FC output.txt expected.txt
Note that the above technique is only suitable when testing CLI apps, and only if the exact output can be predetermined. If the output varies from one run to the other (e.g. it contains a time stamp), this technique will not work. In those cases we need more sophisticated ways of automating tests.
CLI App: An application that has a Command Line Interface. i.e. user interacts with the app by typing in commands.
import java.util.Scanner;

public class Main {
    static Scanner in = new Scanner(System.in);
    static Task[] tasks = new Task[100];
    static int taskCount = 0;

    public static void main(String[] args) {
        printWelcome();
        String line;

        boolean isExit = false;
        while (!isExit) {
            line = getInput();
            String command = line.split(" ")[0];
            switch (command) {
                case "exit":
                case "":
                    isExit = true;
                    break;
                case "todo":
                    addTodo(line);
                    break;
                case "deadline":
                    addDeadline(line);
                    break;
                case "print":
                    printTasks();
                    break;
                default:
                    printError();
            }
        }
        exit();

    }

    private static void addTodo(String line) {
        tasks[taskCount] = new Todo(line.substring("todo".length()).trim());
        taskCount++;
        System.out.println("Tasks in the list: " + taskCount);
    }

  // ...

    private static void printTasks() {
        System.out.println("Tasks:");
        for (int i = 0; i < taskCount; i++) {
            System.out.println("[" + (i + 1) + "] " + tasks[i]);
        }
    }
}
Tutorial 4
W3.1b Can use the String class
C++ to Java → Some Useful Classes →
String is a built-in Java class that you
Any class in the java.lang package can be used without importing.
Find characters of a string
Strings provide a method named charAt, which extracts a character. It returns a char, a primitive type that stores an individual character (as opposed to strings of them).
String fruit = "banana";
char letter = fruit.charAt(0);
The argument 0 means that we want the letter at position 0. Like array indexes, string indexes start at 0, so the character assigned to letter is 'b'.
You can convert a string to an array of characters using the toCharArray method.
char[] fruitChars = fruit.toCharArray()
Change a string to upper/lower case
Strings provide methods, toUpperCase and toLowerCase, that convert from uppercase to lowercase and back.
After these statements run, upperName refers to the string "ALAN TURING" but name still refers to "Alan Turing".
String name = "Alan Turing";
String upperName = name.toUpperCase();
System.out.println(name);
System.out.println(upperName);
Alan Turing
ALAN TURING
Note that a string method cannot change the string object on which the method is invoked, because strings are toUpperCase on a string "abc", you get a new string object "ABC" as the return value rather than the string "abc" being changed to "ABC". As a result, for such string methods that seemingly modify the string but actually return a new string instead e.g., toLowerCase, invoking the method has no effect if you don’t assign the return value to a variable.
String s = "Ada";
s.toUpperCase(); // no effect
s = s.toUpperCase(); // the correct way
Replacing parts of a string
Another useful method is replace, which finds and replaces instances of one string within another.
This example replaces "Computer Science" with "CS".
String text = "Computer Science is fun!";
text = text.replace("Computer Science", "CS");
System.out.println(text);
CS is fun!
Accessing substrings
The substring method returns a new string that copies letters from an existing string, starting at the given index.
"banana".substring(0)"banana""banana".substring(2)"nana""banana".substring(6)""
If it’s invoked with two arguments, they are treated as a start and end index:
"banana".substring(0, 3)"ban""banana".substring(2, 5)"nan""banana".substring(6, 6)""
Searching within strings
The indexOf method searches for a single character (or a substring) in a string and returns the index of the first occurrence. The method returns -1 if there are no occurrences.
"banana".indexOf('a')1"banana".indexOf('a', 2)3searches for'a', starting from position 2"banana".indexOf('x')-1"banana".indexOf("nan")2searches for the substring"nan"
Comparing Strings
To compare two strings, it may be tempting to use the == and != operators.
String name1 = "Alan Turing";
String name2 = "Ada Lovelace";
if (name1 == name2) {                 // wrong!
    System.out.println("The names are the same.");
}
This code compiles and runs, and most of the time it gets the answer right. But it is not correct, and sometimes it gets the answer wrong. The problem is that the == operator checks whether the two variables refer to the same object (by comparing the references). If you give it two different strings that contain the same letters, it yields false.
The right way to compare strings is with the equals method.
This example invokes equals on name1 and passes name2 as an argument. The equals method returns true if the strings contain the same characters; otherwise it returns false.
if (name1.equals(name2)) {
    System.out.println("The names are the same.");
}
If the strings differ, we can use compareTo to see which comes first in alphabetical order. The return value from compareTo is the difference between the first characters in the strings that differ. If the strings are equal, their difference is zero. If the first string (the one on which the method is invoked) comes first in the alphabet, the difference is negative. Otherwise, the difference is positive.
In this example, compareTo returns positive 8, because the second letter of "Ada" comes before the second letter of "Alan" by 8 letters.
int diff = name1.compareTo(name2);
if (diff == 0) {
    System.out.println("The names are the same.");
} else if (diff < 0) {
    System.out.println("name1 comes before name2.");
} else if (diff > 0) {
    System.out.println("name2 comes before name1.");
}
Both equals and compareTo are case-sensitive. The uppercase letters come before the lowercase letters, so "Ada" comes before "ada". To check if two strings are similar irrespective of the differences in case, you can use the equalsIgnoreCase method.
String s1 = "Apple";
String s2 = "apple";
System.out.println(s1.equals(s2)); //false
System.out.println(s1.equalsIgnoreCase(s2)); //true
Some more comparison-related String methods:
contains: checks if one string is a sub-string of the other e.g.,SnappleandappstartsWith: checks if one string has the other as a substring at the beginning e.g.,AppleandAppendsWith: checks if one string has the other as a substring at the end e.g.,Crabandab
Printing special characters (line breaks, tabs, ...)
You can embed a special character e.g., line break, tab, backspace, etc. in a string using an escape sequence.
| Escape sequence | meaning |
|---|---|
\n |
newline character |
\t |
tab character |
\b |
backspace character |
\f |
form feed character |
\r |
carriage return character |
\" |
" (double quote) character |
\' |
' (single quote) character |
\\ |
\ (back slash) character |
\uDDDD |
character from the Unicode character set, by specifying the Unicode as four hex digits in the place of DDDD |
An example of using escape sequences to printing some special characters.
System.out.println("First line\nSecond \"line\"");
First line
Second "line"
💡 As the behavior of the \n depends on the platform, the recommended way to print a line break is using the System.lineSeparator() as it works the same in all platforms.
Using System.lineSeparator() to print a line break.
System.out.println("First line" + System.lineSeparator() + "Second line");
First line
Second line
String formatting
Sometimes programs need to create strings that are formatted a certain way. String.format takes a format specifier followed by a sequence of values and returns a new string formatted as specified.
The following method returns a time string in 12-hour format. The format specifier \%02d means “two digit integer padded with zeros”, so timeString(19, 5) returns the string "07:05 PM".
public static String timeString(int hour, int minute) {
    String ampm;
    if (hour < 12) {
        ampm = "AM";
        if (hour == 0) {
            hour = 12;  // midnight
        }
    } else {
        ampm = "PM";
        hour = hour - 12;
    }
    return String.format("%02d:%02d %s", hour, minute, ampm); // returns "07:05 PM"
}
Implement the printPrice method in the code below to produce the given output. Its behavior:
- The parameter
itemis a string in the formatname--$pricei.e., a name and a price of an item separated using a--e.g.,banana--$3/50 - It prints the
NAME: pricewhere the name is in upper case. The price does not have a$sign and has.in place of the/
e.g.,banana--$3/50BANANA: 3.50 - The
namepart of the input can have trailing/leading spaces which should be omitted from the output.
e.g.,banana --$3/50BANANA: 3.50
💡 Do a Web search to find how to remove leading/trailing spaces. Suggested search terms java string remove leading trailing spaces
public class Main {


    public static void printPrice(String item) {
        // TODO: add your code here

    }

    public static void main(String[] args) {
        printPrice("sandwich  --$4/50");
        printPrice("  soda --$10/00");
        printPrice("  fries --$0/50");
    }
}
SANDWICH: 4.50
SODA: 10.00
FRIES: 0.50
Partial solution:
public static void printPrice(String item) {
    int dividerPosition = item.indexOf("--");
    String itemName = item.substring(0, dividerPosition);
    //...
    System.out.println(itemName.trim().toUpperCase() + ...);

}
Evidence:
To be able to do exercises such as these:
Implement the printPrice method in the code below to produce the given output. Its behavior:
- The parameter
itemis a string in the formatname--$pricei.e., a name and a price of an item separated using a--e.g.,banana--$3/50 - It prints the
NAME: pricewhere the name is in upper case. The price does not have a$sign and has.in place of the/
e.g.,banana--$3/50BANANA: 3.50 - The
namepart of the input can have trailing/leading spaces which should be omitted from the output.
e.g.,banana --$3/50BANANA: 3.50
💡 Do a Web search to find how to remove leading/trailing spaces. Suggested search terms java string remove leading trailing spaces
public class Main {


    public static void printPrice(String item) {
        // TODO: add your code here

    }

    public static void main(String[] args) {
        printPrice("sandwich  --$4/50");
        printPrice("  soda --$10/00");
        printPrice("  fries --$0/50");
    }
}
SANDWICH: 4.50
SODA: 10.00
FRIES: 0.50
Partial solution:
public static void printPrice(String item) {
    int dividerPosition = item.indexOf("--");
    String itemName = item.substring(0, dividerPosition);
    //...
    System.out.println(itemName.trim().toUpperCase() + ...);

}
W3.1c Can use wrapper classes for primitive
C++ to Java → Some Useful Classes →
Primitive values (like int, double, and char) do not provide methods.
For example, you can’t call equals on an int:
int i = 5;
System.out.println(i.equals(5));  // compiler error
But for each primitive type, there is a corresponding class in the Java library, called a wrapper class. The wrapper class for char is called Character; for int it’s called Integer. Other wrapper classes include Boolean, Long, and Double. They are in the java.lang package, so you can use them without importing them.
Double d = new Double(2.5);
int i = d.intValue();
System.out.println(d);
System.out.println(i);
2.5
2
Each wrapper class defines constants MIN_VALUE and MAX_VALUE. Because these constants are available in wrapper classes, you don’t have to remember them, and you don’t have to include them in your programs.
Accessing max and min values for integers:
System.out.println(Integer.MIN_VALUE + " : " + Integer.MAX_VALUE);
-2147483648 : 2147483647
Wrapper classes provide methods for converting strings to other types. In this context, parse means something like “read and translate”. Integer.parseInt converts a string to (you guessed it) an integer. The other wrapper classes provide similar methods, like Double.parseDouble and Boolean.parseBoolean.
Integer.parseInt("12345") 1234
Wrapper classes also provide toString, which returns a string representation of a value.
Integer.toString(12345) "1234"
Implement the printTotalScore method in the code below to produce the given output. Its behavior:
valuesis an array of strings, each string representing an integer e.g.,["5", "-1"]- The method prints the total of the numbers represented by the strings in the array
["5", "-1"]4
public class Main {

    public static void printTotalScore(String[] values){
        // TODO: add your code here
    }

    public static void main(String[] args) {
        printTotalScore(new String[]{});
        printTotalScore(new String[]{"0", "124", "-15"});
    }
}
0
109
💡 You can use the Integer.parseInt() method to convert a String to the equivalent int value.
Partial solution:
public static void printTotalScore(String[] values){
    int total = 0;
    for (String value: values){
        // convert the value to an int and add to the total
    }
    System.out.println(total);
}
Evidence:
To be able to do exercises such as these:
Implement the printTotalScore method in the code below to produce the given output. Its behavior:
valuesis an array of strings, each string representing an integer e.g.,["5", "-1"]- The method prints the total of the numbers represented by the strings in the array
["5", "-1"]4
public class Main {

    public static void printTotalScore(String[] values){
        // TODO: add your code here
    }

    public static void main(String[] args) {
        printTotalScore(new String[]{});
        printTotalScore(new String[]{"0", "124", "-15"});
    }
}
0
109
💡 You can use the Integer.parseInt() method to convert a String to the equivalent int value.
Partial solution:
public static void printTotalScore(String[] values){
    int total = 0;
    for (String value: values){
        // convert the value to an int and add to the total
    }
    System.out.println(total);
}
W3.1d Can use the Arrays class
C++ to Java → Some Useful Classes →
java.util.Arrays provides methods for working with arrays. One of them, toString, returns a string representation of an array. It also provides a copyOf that copies an array.
Using Arrays.copyOf and Arrays.toString:
int[] a = new int[]{1,2,3,4};

int[] b = Arrays.copyOf(a, 3); // copy first three elements
System.out.println(Arrays.toString(b));

int[] c = Arrays.copyOf(a, a.length); // copy all elements
System.out.println(Arrays.toString(c));
[1, 2, 3]
[1, 2, 3, 4]
Implement the following two methods in the code below to produce the given output.
filterEmailsfilterEmails(String[] items): String[]itemsis an array of strings each of which may be an email address or some other random string- Returns a
String[]containing email addresses that were initems. Any string containing@is considered as an email.
["aaa@bbb", "xyz"]["aaa@bbb"]
printItems(String[] items)- Prints
itemsin the standard array format. e.g.,["aaa", "bbb"][aaa, bbb]
- Prints
import java.util.Arrays;

public class Main {
    public static String[] filterEmails(String[] items){
        // TODO: add your code here
    }

    public static void printItems(String[] items){
        // TODO: add your code here
    }

    public static void main(String[] args) {
        printItems(filterEmails(new String[]{}));
        printItems(filterEmails(new String[]{"abc"}));
        printItems(filterEmails(new String[]{"adam@example.com", "aab", "john@example.com", "some@"}));
        printItems(filterEmails(new String[]{"xyz", "@bee.com", "aab"}));
    }
}
[]
[]
[adam@example.com, john@example.com, some@]
[@bee.com]
filterEmailsfilterEmails(String[] items): String[]- create a new array (say
emails) of the same size asitems - go through the elements in the
itemsand add toemailsif the element contains@(you can use thecontainsmethod of theStringclass here) - Use
Arrays.copyOfmethod to return the filled part ofemails.
- create a new array (say
printItems(String[] items)- 💡 You can use the
Arrays.toString()method for this.
- 💡 You can use the
public static String[] filterEmails(String[] items){
    String[] results = new String[items.length];
    int matchCount = 0;
    for(String item: items){
        if (item.contains("@")){
           //...
        }
    }
    return Arrays.copyOf(results, matchCount);
}

public static void printItems(String[] items){
    System.out.println(Arrays.toString(items));
}
Evidence:
To be able to do exercises such as these:
Implement the following two methods in the code below to produce the given output.
filterEmailsfilterEmails(String[] items): String[]itemsis an array of strings each of which may be an email address or some other random string- Returns a
String[]containing email addresses that were initems. Any string containing@is considered as an email.
["aaa@bbb", "xyz"]["aaa@bbb"]
printItems(String[] items)- Prints
itemsin the standard array format. e.g.,["aaa", "bbb"][aaa, bbb]
- Prints
import java.util.Arrays;

public class Main {
    public static String[] filterEmails(String[] items){
        // TODO: add your code here
    }

    public static void printItems(String[] items){
        // TODO: add your code here
    }

    public static void main(String[] args) {
        printItems(filterEmails(new String[]{}));
        printItems(filterEmails(new String[]{"abc"}));
        printItems(filterEmails(new String[]{"adam@example.com", "aab", "john@example.com", "some@"}));
        printItems(filterEmails(new String[]{"xyz", "@bee.com", "aab"}));
    }
}
[]
[]
[adam@example.com, john@example.com, some@]
[@bee.com]
filterEmailsfilterEmails(String[] items): String[]- create a new array (say
emails) of the same size asitems - go through the elements in the
itemsand add toemailsif the element contains@(you can use thecontainsmethod of theStringclass here) - Use
Arrays.copyOfmethod to return the filled part ofemails.
- create a new array (say
printItems(String[] items)- 💡 You can use the
Arrays.toString()method for this.
- 💡 You can use the
public static String[] filterEmails(String[] items){
    String[] results = new String[items.length];
    int matchCount = 0;
    for(String item: items){
        if (item.contains("@")){
           //...
        }
    }
    return Arrays.copyOf(results, matchCount);
}

public static void printItems(String[] items){
    System.out.println(Arrays.toString(items));
}
W3.1e Can use the Scanner class
C++ to Java → Some Useful Classes →
Scanner is a class that provides methods for inputting words, numbers, and other data. Scanner provides a method called nextLine that reads a line of input from the keyboard and returns a String. The following example reads two lines and repeats them back to the user:
import java.util.Scanner;

public class Echo {

    public static void main(String[] args) {
        String line;
        Scanner in = new Scanner(System.in);

        System.out.print("Type something: ");
        line = in.nextLine();
        System.out.println("You said: " + line);

        System.out.print("Type something else: ");
        line = in.nextLine();
        System.out.println("You also said: " + line);
    }
}
Scanner class normally reads inputs as strings but it can read in a specific type of input too.
The code below uses the nextInt method of the Scanner class to read an input as an integer.
Scanner in = new Scanner(System.in);

System.out.print("What is your age? ");
int age = in.nextInt();
in.nextLine();  // read the newline character the user enters following the integer
System.out.print("What is your name? ");
String name = in.nextLine();
System.out.printf("Hello %s, age %d\n", name, age);
💡 Note the use of printf method for formatting the output.
Write a program to ask the user for a description of overseas expenses (presumably, the user has just returned from an overseas trip) and calculate the total in local currency.
- The conversion rate from overseas currency to local currency : overseas
$1.0= local$1.70 - The user can describe expenses is in free form text, as one line. The program takes all amounts mentioned in the format
$amounte.g.,$1.50
Here is one example output:
Your expenses while overseas?beer $4.50 books $3.00 $5.00 for food, that's all
Expenses in overseas currency:[$4.50, $3.00, $5.00]
Total in local currency: $21.25
Here is another:
Your expenses while overseas?nothing. I lived off my friends all the time.
Expenses in overseas currency:[]
Total in local currency: $0.00
One more:
Your expenses while overseas? Just $10
Expenses in overseas currency:[$10]
Total in local currency: $17.00
Here's the skeleton code to use as the starting point:
public class Main {

    // You can add more methods here

    public static void main(String[] args) {
        String line;
        Scanner in = new Scanner(System.in);

        System.out.print("Your expenses while overseas?");
       // TODO: add your code here
    }
}
💡 You can use the split method of the String class to convert a sentence into an array of words. e.g.,
String sentence = "hello my dear";
String[] words = sentence.split(" "); // split using the space as the delimiter
System.out.println(Arrays.toString(words));
[hello, my, dear]
💡 You can use String.format("%.2f", doubleValue) to format doubleValue to two decimal points.
e.g., String.format("%.2f", 1.3334) 1.33
import java.util.Arrays;
import java.util.Scanner;

public class Main {

    public static String[] filterAmounts(String sentence) {
        String[] words = sentence.split(" ");
        String[] result = new String[words.length];
        int wordCount = 0;
        for (String word : words) {
            if (word.startsWith("$")) {
                result[wordCount] = word;
                wordCount++;
            }
        }
        return Arrays.copyOf(result, wordCount);
    }

    public static void main(String[] args) {
        String line;
        Scanner in = new Scanner(System.in);

        System.out.print("Your expenses while overseas?");
        line = in.nextLine();

        String[] amounts = filterAmounts(line);
        System.out.println("Expenses in overseas currency:" + Arrays.toString(amounts));
        double total = 0;
        for (String amount : amounts) {
            // convert amount to double, multiply by currency conversion rate, and add to total
        }
        System.out.println("Total in local currency: $" + String.format("%.2f", total));

    }
}
This is a good time to put together some of the topics you have learned so far to create something useful. In this exercise you will write a small TaskManager program that can store a list of tasks.
- It is a
CLI program. - In this version, the task list is not saved to the disk i.e., the task list does not persist between multiple runs of the program
Here is an example output:
Welcome to TaskManager-Level1!
Your task? add submit report
Tasks in the list: 1
Your task? add return library book
Tasks in the list: 2
Your task? add remind boss about meeting
Tasks in the list: 3
Your task? xyz
Unknown command! please try again
Your task? print
[1] submit report
[2] return library book
[3] remind boss about meeting
Your task? add set up meeting with boss
Tasks in the list: 4
Your task? print
[1] submit report
[2] return library book
[3] remind boss about meeting
[4] set up meeting with boss
Your task? exit
Bye!
Summary of behavior:
- Task Manager prompts for user input with the message
Your task? addtask description: adds thetask descriptionto the task listprint: prints the tasks added so farexitor empty input: terminates the program
If you are new to programming, we recommend you to build the program in small steps, as follows:
- Write a program that reads any user input, prints it back to the user, and exits.
- Update the program to do the above in a loop until user types
exit. - Add greetings printed at the start and the end.
- If the first word is not
addorexit, print an error message. Suggestion: use aswitchstatement to choose between multiple actions. - Create a
Taskclass to represent tasks and add anTask[]to store tasks. - If the first word of the user input is
add, add the whole line (no need to omit the first word) to the task list. - Update the code in the previous step to omit the word
addfrom the task description. - Add support for the
printcommand. - Add support for terminating if the user input is empty
- and so on ...
import java.util.Scanner;

public class Main {
    static Scanner in = new Scanner(System.in);
    static Task[] tasks = new Task[100];
    static int count = 0;  // to keep track of number of tasks in the list

    public static void main(String[] args) {
        printWelcome();
        String line;
        boolean isExit = false;
        while (!isExit) {
            line = getInput();
            String command = line.split(" ")[0]; //extract the first word of the user input
            switch (command) {
                case "exit":
                case "": // exit if user input is empty
                    isExit = true;
                    break;
                case "add":
                    // todo: add code here
                default:
                    printError();
            }
        }
        exit();

    }

    private static void printWelcome() {
        System.out.println("Welcome to TaskManager-Level1!");
    }

    private static void printTasks() {
        for (int i = 0; i < count; i++) {
            System.out.println("[" + (i + 1) + "] " + tasks[i].getDescription());
        }
    }

    // todo: add missing methods
}
Evidence:
To be able to do exercises such as these:
Write a program to ask the user for a description of overseas expenses (presumably, the user has just returned from an overseas trip) and calculate the total in local currency.
- The conversion rate from overseas currency to local currency : overseas
$1.0= local$1.70 - The user can describe expenses is in free form text, as one line. The program takes all amounts mentioned in the format
$amounte.g.,$1.50
Here is one example output:
Your expenses while overseas?beer $4.50 books $3.00 $5.00 for food, that's all
Expenses in overseas currency:[$4.50, $3.00, $5.00]
Total in local currency: $21.25
Here is another:
Your expenses while overseas?nothing. I lived off my friends all the time.
Expenses in overseas currency:[]
Total in local currency: $0.00
One more:
Your expenses while overseas? Just $10
Expenses in overseas currency:[$10]
Total in local currency: $17.00
Here's the skeleton code to use as the starting point:
public class Main {

    // You can add more methods here

    public static void main(String[] args) {
        String line;
        Scanner in = new Scanner(System.in);

        System.out.print("Your expenses while overseas?");
       // TODO: add your code here
    }
}
💡 You can use the split method of the String class to convert a sentence into an array of words. e.g.,
String sentence = "hello my dear";
String[] words = sentence.split(" "); // split using the space as the delimiter
System.out.println(Arrays.toString(words));
[hello, my, dear]
💡 You can use String.format("%.2f", doubleValue) to format doubleValue to two decimal points.
e.g., String.format("%.2f", 1.3334) 1.33
import java.util.Arrays;
import java.util.Scanner;

public class Main {

    public static String[] filterAmounts(String sentence) {
        String[] words = sentence.split(" ");
        String[] result = new String[words.length];
        int wordCount = 0;
        for (String word : words) {
            if (word.startsWith("$")) {
                result[wordCount] = word;
                wordCount++;
            }
        }
        return Arrays.copyOf(result, wordCount);
    }

    public static void main(String[] args) {
        String line;
        Scanner in = new Scanner(System.in);

        System.out.print("Your expenses while overseas?");
        line = in.nextLine();

        String[] amounts = filterAmounts(line);
        System.out.println("Expenses in overseas currency:" + Arrays.toString(amounts));
        double total = 0;
        for (String amount : amounts) {
            // convert amount to double, multiply by currency conversion rate, and add to total
        }
        System.out.println("Total in local currency: $" + String.format("%.2f", total));

    }
}
This is a good time to put together some of the topics you have learned so far to create something useful. In this exercise you will write a small TaskManager program that can store a list of tasks.
- It is a
CLI program. - In this version, the task list is not saved to the disk i.e., the task list does not persist between multiple runs of the program
Here is an example output:
Welcome to TaskManager-Level1!
Your task? add submit report
Tasks in the list: 1
Your task? add return library book
Tasks in the list: 2
Your task? add remind boss about meeting
Tasks in the list: 3
Your task? xyz
Unknown command! please try again
Your task? print
[1] submit report
[2] return library book
[3] remind boss about meeting
Your task? add set up meeting with boss
Tasks in the list: 4
Your task? print
[1] submit report
[2] return library book
[3] remind boss about meeting
[4] set up meeting with boss
Your task? exit
Bye!
Summary of behavior:
- Task Manager prompts for user input with the message
Your task? addtask description: adds thetask descriptionto the task listprint: prints the tasks added so farexitor empty input: terminates the program
If you are new to programming, we recommend you to build the program in small steps, as follows:
- Write a program that reads any user input, prints it back to the user, and exits.
- Update the program to do the above in a loop until user types
exit. - Add greetings printed at the start and the end.
- If the first word is not
addorexit, print an error message. Suggestion: use aswitchstatement to choose between multiple actions. - Create a
Taskclass to represent tasks and add anTask[]to store tasks. - If the first word of the user input is
add, add the whole line (no need to omit the first word) to the task list. - Update the code in the previous step to omit the word
addfrom the task description. - Add support for the
printcommand. - Add support for terminating if the user input is empty
- and so on ...
import java.util.Scanner;

public class Main {
    static Scanner in = new Scanner(System.in);
    static Task[] tasks = new Task[100];
    static int count = 0;  // to keep track of number of tasks in the list

    public static void main(String[] args) {
        printWelcome();
        String line;
        boolean isExit = false;
        while (!isExit) {
            line = getInput();
            String command = line.split(" ")[0]; //extract the first word of the user input
            switch (command) {
                case "exit":
                case "": // exit if user input is empty
                    isExit = true;
                    break;
                case "add":
                    // todo: add code here
                default:
                    printError();
            }
        }
        exit();

    }

    private static void printWelcome() {
        System.out.println("Welcome to TaskManager-Level1!");
    }

    private static void printTasks() {
        for (int i = 0; i < count; i++) {
            System.out.println("[" + (i + 1) + "] " + tasks[i].getDescription());
        }
    }

    // todo: add missing methods
}
W3.2d Can use basic inheritance
C++ to Java → Inheritance →
Given below is an extract from the -- Java Tutorial, with slight adaptations.
A class that is derived from another class is called a subclass (also a derived class, extended class, or child class). The class from which the subclass is derived is called a superclass (also a base class or a parent class).
A subclass inherits all the members (fields, methods, and nested classes) from its superclass. Constructors are not members, so they are not inherited by subclasses, but the constructor of the superclass can be invoked from the subclass.
Every class has one and only one direct superclass (single inheritance), except the Object class, which has no superclass, . In the absence of any other explicit superclass, every class is implicitly a subclass of Object. Classes can be derived from classes that are derived from classes that are derived from classes, and so on, and ultimately derived from the topmost class, Object. Such a class is said to be descended from all the classes in the inheritance chain stretching back to Object. Java does not support multiple inheritance among classes.
The java.lang.Object class defines and implements behavior common to all classes—including the ones that you write. In the Java platform, many classes derive directly from Object, other classes derive from some of those classes, and so on, forming a hierarchy of classes.
The keyword extends indicates one class inheriting from another.
Here is the sample code for a possible implementation of a Bicycle class and a MountainBike class that is a subclass of the Bicycle:
public class Bicycle {

    public int gear;
    public int speed;

    public Bicycle(int startSpeed, int startGear) {
        gear = startGear;
        speed = startSpeed;
    }

    public void setGear(int newValue) {
        gear = newValue;
    }

    public void applyBrake(int decrement) {
        speed -= decrement;
    }

    public void speedUp(int increment) {
        speed += increment;
    }

}
public class MountainBike extends Bicycle {

    // the MountainBike subclass adds one field
    public int seatHeight;

    // the MountainBike subclass has one constructor
    public MountainBike(int startHeight, int startSpeed, int startGear) {
        super(startSpeed, startGear);
        seatHeight = startHeight;
    }

    // the MountainBike subclass adds one method
    public void setHeight(int newValue) {
        seatHeight = newValue;
    }
}
A subclass inherits all the fields and methods of the superclass. In the example above, MountainBike inherits all the fields and methods of Bicycle and adds the field seatHeight and a method to set it.
Accessing Superclass Members
If your method overrides one of its superclass's methods, you can invoke the overridden method through the use of the keyword super. You can also use super to refer to a
Consider this class, Superclass and a subclass, called Subclass, that overrides printMethod():
public class Superclass {

    public void printMethod() {
        System.out.println("Printed in Superclass.");
    }
}
public class Subclass extends Superclass {

    // overrides printMethod in Superclass
    public void printMethod() {
        super.printMethod();
        System.out.println("Printed in Subclass");
    }
    public static void main(String[] args) {
        Subclass s = new Subclass();
        s.printMethod();
    }
}
Printed in Superclass.
Printed in Subclass
Within Subclass, the simple name printMethod() refers to the one declared in Subclass, which overrides the one in Superclass. So, to refer to printMethod() inherited from Superclass, Subclass must use a qualified name, using super as shown. Compiling and executing Subclass prints the following:
Subclass Constructors
A subclass constructor can invoke the superclass constructor. Invocation of a superclass constructor must be the first line in the subclass constructor.
The syntax for calling a superclass constructor is super() (which invokes the no-argument constructor of the superclass) or super(parameter list) (to invoke the superclass constructor with a matching parameter list).
The following example illustrates how to use the super keyword to invoke a superclass's constructor. Recall from the Bicycle example that MountainBike is a subclass of Bicycle. Here is the MountainBike (subclass) constructor that calls the superclass constructor and then adds initialization code of its own:
public MountainBike(int startHeight, int startSpeed, int startGear) {
    super(startSpeed, startGear);
    seatHeight = startHeight;
}
Note: If a constructor does not explicitly invoke a superclass constructor, the Java compiler automatically inserts a call to the no-argument constructor of the superclass. If the superclass does not have a no-argument constructor, you will get a compile-time error. Object does have such a constructor, so if Object is the only superclass, there is no problem.
Access Modifiers (simplified)
Access level modifiers determine whether other classes can use a particular field or invoke a particular method. Given below is a simplified version of Java access modifiers, assuming you have not yet started placing your classes in different packages i.e., all classes are places in the root level. A full explanation of access modifiers is given in a later topic.
There are two levels of access control:
-
At the class level:
public: the class is visible to all other classes- no modifier: same as
public
-
At the member level:
public: the class is visible to all other classes- no modifier: same as
public protected: same aspublicprivate: the member can only be accessed in its own class
Background: Suppose we are creating a software to manage various tasks a person has to do. Two types of such tasks are,
- Todos: i.e., things that needs to be done some day e.g., 'Read the book Lord of the Rings'
- Deadlines: i.e., things to be done by a specific date/time e.g., 'Read the text book by Nov 25th'
The Task class is given below:
public class Task {
    protected String description;

    public Task(String description) {
        this.description = description;
    }

    public String getDescription() {
        return description;
    }
}
- Write a
Todoclass that inherits from theTaskclass.- It should have an additional
booleanfieldisDoneto indicate whether the todo is done or not done. - It should have a
isDone()method to access theisDonefield and asetDone(boolean)method to set theisDonefield.
- It should have an additional
- Write a
Deadlineclass that inherits from theTodoclass that you implemented in the previous step. It should have,- an additional
Stringfieldbyto store the details of when the task to be done e.g.,Jan 25th 5pm - a
getBy()method to access the value of thebyfield, and a correspondingsetBy(String)method. - a constructor of the form
Deadline(String description, String by)
- an additional
The expected behavior of the two classes is as follows:
public class Main {
    public static void main(String[] args) {
        // create a todo task and print details
        Todo t = new Todo("Read a good book");
        System.out.println(t.getDescription());
        System.out.println(t.isDone());

        // change todo fields and print again
        t.setDone(true);
        System.out.println(t.isDone());

        // create a deadline task and print details
        Deadline d = new Deadline("Read textbook", "Nov 16");
        System.out.println(d.getDescription());
        System.out.println(d.isDone());
        System.out.println(d.getBy());

        // change deadline details and print again
        d.setDone(true);
        d.setBy("Postponed to Nov 18th");
        System.out.println(d.isDone());
        System.out.println(d.getBy());
    }
}
Read a good book
false
true
Read textbook
false
Nov 16
true
Postponed to Nov 18th
Todo class is given below. You can follow a similar approach for the Deadline class.
public class Todo extends Task {
    protected boolean isDone;

    public Todo(String description) {
        super(description);
        isDone = false;
    }
}
Evidence:
To be able to do exercises such as these:
Background: Suppose we are creating a software to manage various tasks a person has to do. Two types of such tasks are,
- Todos: i.e., things that needs to be done some day e.g., 'Read the book Lord of the Rings'
- Deadlines: i.e., things to be done by a specific date/time e.g., 'Read the text book by Nov 25th'
The Task class is given below:
public class Task {
    protected String description;

    public Task(String description) {
        this.description = description;
    }

    public String getDescription() {
        return description;
    }
}
- Write a
Todoclass that inherits from theTaskclass.- It should have an additional
booleanfieldisDoneto indicate whether the todo is done or not done. - It should have a
isDone()method to access theisDonefield and asetDone(boolean)method to set theisDonefield.
- It should have an additional
- Write a
Deadlineclass that inherits from theTodoclass that you implemented in the previous step. It should have,- an additional
Stringfieldbyto store the details of when the task to be done e.g.,Jan 25th 5pm - a
getBy()method to access the value of thebyfield, and a correspondingsetBy(String)method. - a constructor of the form
Deadline(String description, String by)
- an additional
The expected behavior of the two classes is as follows:
public class Main {
    public static void main(String[] args) {
        // create a todo task and print details
        Todo t = new Todo("Read a good book");
        System.out.println(t.getDescription());
        System.out.println(t.isDone());

        // change todo fields and print again
        t.setDone(true);
        System.out.println(t.isDone());

        // create a deadline task and print details
        Deadline d = new Deadline("Read textbook", "Nov 16");
        System.out.println(d.getDescription());
        System.out.println(d.isDone());
        System.out.println(d.getBy());

        // change deadline details and print again
        d.setDone(true);
        d.setBy("Postponed to Nov 18th");
        System.out.println(d.isDone());
        System.out.println(d.getBy());
    }
}
Read a good book
false
true
Read textbook
false
Nov 16
true
Postponed to Nov 18th
Todo class is given below. You can follow a similar approach for the Deadline class.
public class Todo extends Task {
    protected boolean isDone;

    public Todo(String description) {
        super(description);
        isDone = false;
    }
}
W3.2e Can use Object class
C++ to Java → Inheritance →
As you know, all Java objects inherit from the Object class. Let us look at some of the useful methods in the Object class that can be used by other classes.
The toString method
Every class inherits a toString method from the Object class that is used by Java to get a string representation of the object e.g., for printing. By default it simply returns the type of the object and its address (in hexadecimal).
Suppose you defined a class called Time, to represent a moment in time. If you create a Time object and display it with println:
class Time {
    int hours;
    int minutes;
    int seconds;

    Time(int hours, int minutes, int seconds) {
        this.hours = hours;
        this.minutes = minutes;
        this.seconds = seconds;
    }
}
 Time t = new Time(5, 20, 13);
 System.out.println(t);
Time@80cc7c0 (the address part can vary)
You can override the toString method in your classes to provide a more meaningful string representation of the objects of that class.
Here's an example of overriding the toString method of the Time class:
class Time{

   //...

   @Override
   public String toString() {
       return String.format("%02d:%02d:%02d\n", this.hours, this.minutes, this.seconds);
   }
}
 Time t = new Time(5, 20, 13);
 System.out.println(t);
05:20:13
💡 @Override is an optional annotation you can use to indicate that the method is overriding a method from the parent class.
The equals method
There are two ways to check whether values are equal: the == operator and the equals method. With objects you can use either one, but they are not the same.
- The
==operator checks whether objects are identical; that is, whether they are the same object. - The
equalsmethod checks whether they are equivalent; that is, whether they have the same value.
The definition of identity is always the same, so the == operator always does the same thing.
Consider the following variables:
Time time1 = new Time(9, 30, 0);
Time time2 = time1;
Time time3 = new Time(9, 30, 0);
- The assignment operator copies references, so
time1andtime2refer to the same object. Because they are identical,time1 == time2istrue. - But
time1andtime3refer to different objects. Because they are not identical,time1 == time3isfalse.
By default, the equals method inherited from the Object class does the same thing as ==. As the definition of equivalence is different for different classes, you can override the equals method to define your own criteria for equivalence of objects of your class.
Here's how you can override the equals method of the Time class to provide an equals method that considers two Time objects equivalent as long as they represent the same time of the day:
public class Time {
    int hours;
    int minutes;
    int seconds;

    // ...

    @Override
    public boolean equals(Object o) {
        Time other = (Time) o;
        return this.hours == other.hours
                && this.minutes == other.minutes
                && this.seconds == other.seconds;
    }
}
Time t1 = new Time(5, 20, 13);
Time t2 = new Time(5, 20, 13);
System.out.println(t1 == t2);
System.out.println(t1.equals(t2));
false
true
Note that a proper equals method implementation is more complex than the example above. See the article How to Implement Java’s equals Method Correctly by Nicolai Parlog for a detailed explanation before you implement your own equals method.
Suppose you have the following classes Task, Todo, Deadline:
public class Task {
    protected String description;

    public Task(String description) {
        this.description = description;
    }

    public String getDescription() {
        return description;
    }
}
public class Todo extends Task {
    protected boolean isDone;

    public Todo(String description) {
        super(description);
        isDone = false;
    }

    public void setDone(boolean done) {
        isDone = done;
    }

    public boolean isDone() {
        return isDone;
    }
}
public class Deadline extends Todo {

    protected String by;

    public Deadline(String description, String by) {
        super(description);
        this.by = by;
    }

    public void setBy(String by) {
        this.by = by;
    }

    public String getBy() {
        return by;
    }
}
Override the toString method of the three classes to produce the following behavior.
public class Main {
    public static void main(String[] args) {
        // create a todo task and print it
        Todo t = new Todo("Read a good book");
        System.out.println(t);

        // change todo fields and print again
        t.setDone(true);
        System.out.println(t);

        // create a deadline task and print it
        Deadline d = new Deadline("Read textbook", "Nov 16");
        System.out.println(d);

        // change deadline details and print again
        d.setDone(true);
        d.setBy("Postponed to Nov 18th");
        System.out.println(d);
    }
}
description: Read a good book
is done? No
description: Read a good book
is done? Yes
description: Read textbook
is done? No
do by: Nov 16
description: Read textbook
is done? Yes
do by: Postponed to Nov 18th
💡 You can use the super.toString from the subclass to invoke the behavior of the method you are overriding. This is useful here because the overriding method is simply adding onto the behavior of the overridden method.
toString() method of Task class and Todo class are given below. You can follow a similar approach for the Deadline class.
public class Task {
    // ...

    @Override
    public String toString() {
        return "description: " + description;
    }
}
public class Todo extends Task {
    // ...

    @Override
    public String toString() {
        String status = null;
        if (isDone){
            status = "Yes";
        } else {
            status = "No";
        }
        return super.toString() + System.lineSeparator() + "is done? " + status;
    }
}
Evidence:
To be able to do exercises such as these:
Suppose you have the following classes Task, Todo, Deadline:
public class Task {
    protected String description;

    public Task(String description) {
        this.description = description;
    }

    public String getDescription() {
        return description;
    }
}
public class Todo extends Task {
    protected boolean isDone;

    public Todo(String description) {
        super(description);
        isDone = false;
    }

    public void setDone(boolean done) {
        isDone = done;
    }

    public boolean isDone() {
        return isDone;
    }
}
public class Deadline extends Todo {

    protected String by;

    public Deadline(String description, String by) {
        super(description);
        this.by = by;
    }

    public void setBy(String by) {
        this.by = by;
    }

    public String getBy() {
        return by;
    }
}
Override the toString method of the three classes to produce the following behavior.
public class Main {
    public static void main(String[] args) {
        // create a todo task and print it
        Todo t = new Todo("Read a good book");
        System.out.println(t);

        // change todo fields and print again
        t.setDone(true);
        System.out.println(t);

        // create a deadline task and print it
        Deadline d = new Deadline("Read textbook", "Nov 16");
        System.out.println(d);

        // change deadline details and print again
        d.setDone(true);
        d.setBy("Postponed to Nov 18th");
        System.out.println(d);
    }
}
description: Read a good book
is done? No
description: Read a good book
is done? Yes
description: Read textbook
is done? No
do by: Nov 16
description: Read textbook
is done? Yes
do by: Postponed to Nov 18th
💡 You can use the super.toString from the subclass to invoke the behavior of the method you are overriding. This is useful here because the overriding method is simply adding onto the behavior of the overridden method.
toString() method of Task class and Todo class are given below. You can follow a similar approach for the Deadline class.
public class Task {
    // ...

    @Override
    public String toString() {
        return "description: " + description;
    }
}
public class Todo extends Task {
    // ...

    @Override
    public String toString() {
        String status = null;
        if (isDone){
            status = "Yes";
        } else {
            status = "No";
        }
        return super.toString() + System.lineSeparator() + "is done? " + status;
    }
}
W3.4a Can explain testing
Quality Assurance → Testing → Introduction →
Testing: Testing is operating a system or component under specified conditions, observing or recording the results, and making an evaluation of some aspect of the system or component. –- source: IEEE
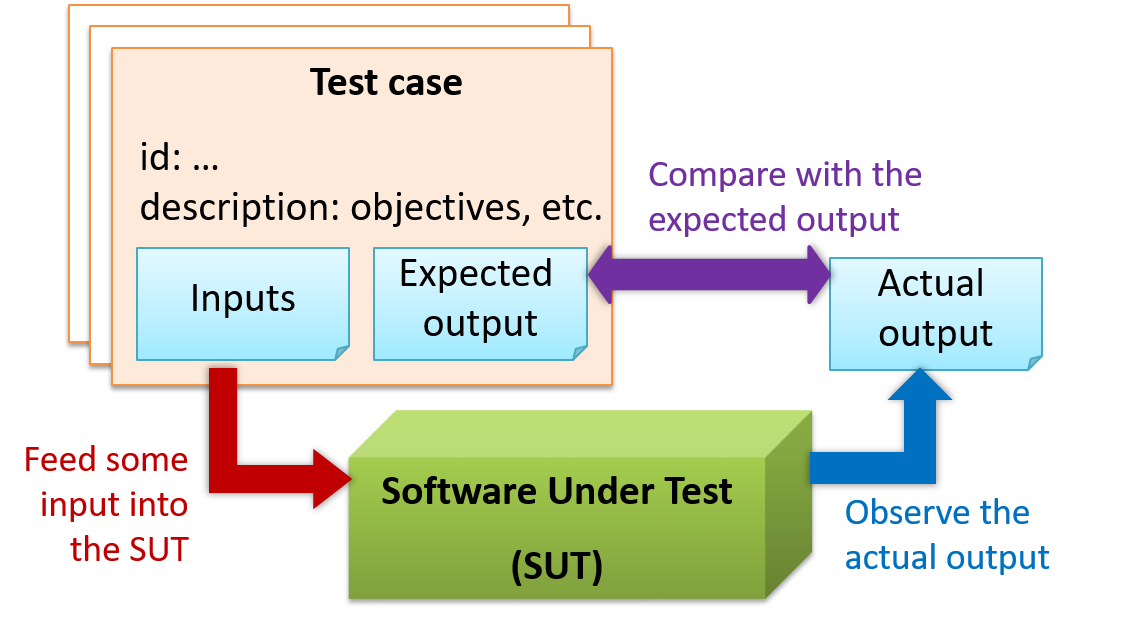
When testing, we execute a set of test cases. A test case specifies how to perform a test. At a minimum, it specifies the input to the software under test (SUT) and the expected behavior.
Example: A minimal test case for testing a browser:
- Input – Start the browser using a blank page (vertical scrollbar disabled). Then, load
longfile.htmllocated in thetest datafolder. - Expected behavior – The scrollbar should be automatically enabled upon loading
longfile.html.
Test cases can be determined based on the specification, reviewing similar existing systems, or comparing to the past behavior of the SUT.
A more elaborate test case can have other details such as those given below.
- A unique identifier : e.g. TC0034-a
- A descriptive name: e.g. vertical scrollbar activation for long web pages
- Objectives: e.g. to check whether the vertical scrollbar is correctly activated when a long web page is loaded to the browser
- Classification information: e.g. priority - medium, category - UI features
- Cleanup, if any: e.g. empty the browser cache.
For each test case we do the following:
- Feed the input to the SUT
- Observe the actual output
- Compare actual output with the expected output
A test case failure is a mismatch between the expected behavior and the actual behavior. A failure is caused by a defect (or a bug).
Example: In the browser example above, a test case failure is implied if the scrollbar remains disabled after loading longfile.html. The defect/bug causing that failure could be an uninitialized variable.
Here is another definition of testing:
Software testing consists of the dynamic verification that a program provides expected behaviors on a finite set of test cases, suitably selected from the usually infinite execution domain. -– source: Software Engineering Book of Knowledge V3
Some things to note (indicated by keywords in the above definition):
- Dynamic: Testing involves executing the software. It is not by examining the code statically.
- Finite: In most non-trivial cases there are potentially infinite test scenarios but resource constraints dictate that we can test only a finite number of scenarios.
- Selected: In most cases it is not possible to test all scenarios. That means we need to select what scenarios to test.
- Expected: Testing requires some knowledge of how the software is expected to behave.
Explain how the concepts of testing, test case, test failure, and defect are related to each other.
Evidence:
Explain how the concepts of testing, test case, test failure, and defect are related to each other.
W3.4b Can explain regression testing
Quality Assurance → Testing → Regression Testing →
When we modify a system, the modification may result in some unintended and undesirable effects on the system. Such an effect is called a regression.
Regression testing is re-testing the software to detect regressions. Note that to detect regressions, we need to retest all related components, even if they were tested before.
Regression testing is more effective when it is done frequently, after each small change. However, doing so can be prohibitively expensive if testing is done manually. Hence, regression testing is more practical when it is automated.
Regression testing is the automated re-testing of a software after it has been modified.
c.
Explanation: Regression testing need not be automated but automation is highly recommended.
Explain why and when you would do regression testing in a software project.
Evidence:
Explain why and when you would do regression testing in a software project.
W3.4d Can semi-automate testing of CLIs
Quality Assurance → Testing → Test Automation →
A simple way to semi-automate testing of a CLI(Command Line Interface) app is by using input/output re-direction.
- First, we feed the app with a sequence of test inputs that is stored in a file while redirecting the output to another file.
- Next, we compare the actual output file with another file containing the expected output.
Let us assume we are testing a CLI app called AddressBook. Here are the detailed steps:
-
Store the test input in the text file
input.txt.add Valid Name p/12345 valid@email.butNoPrefix add Valid Name 12345 e/valid@email.butPhonePrefixMissing -
Store the output we expect from the SUT in another text file
expected.txt.Command: || [add Valid Name p/12345 valid@email.butNoPrefix] Invalid command format: add Command: || [add Valid Name 12345 e/valid@email.butPhonePrefixMissing] Invalid command format: add -
Run the program as given below, which will redirect the text in
input.txtas the input toAddressBookand similarly, will redirect the output of AddressBook to a text fileoutput.txt. Note that this does not require any code changes toAddressBook.java AddressBook < input.txt > output.txt-
💡 The way to run a CLI program differs based on the language.
e.g., In Python, assuming the code is inAddressBook.pyfile, use the command
python AddressBook.py < input.txt > output.txt -
💡 If you are using Windows, use a normal command window to run the app, not a Power Shell window.
More on the >operator and the<operator. tangentialA CLI program takes input from the keyboard and outputs to the console. That is because those two are default input and output streams, respectively. But you can change that behavior using
<and>operators. For example, if you runAddressBookin a command window, the output will be shown in the console, but if you run it like this,java AddressBook > output.txtthe Operating System then creates a file
output.txtand stores the output in that file instead of displaying it in the console. No file I/O coding is required. Similarly, adding< input.txt(or any other filename) makes the OS redirect the contents of the file as input to the program, as if the user typed the content of the file one line at a time.Resources:
-
-
Next, we compare
output.txtwith theexpected.txt. This can be done using a utility such as WindowsFC(i.e. File Compare) command, Unixdiffcommand, or a GUI tool such as WinMerge.FC output.txt expected.txt
Note that the above technique is only suitable when testing CLI apps, and only if the exact output can be predetermined. If the output varies from one run to the other (e.g. it contains a time stamp), this technique will not work. In those cases we need more sophisticated ways of automating tests.
CLI App: An application that has a Command Line Interface. i.e. user interacts with the app by typing in commands.
Evidence:
Use this technique to test any program you have written.
W3.5 Project preparation: Can write a small program from scratch
Ensure that you are able to do this exercise based on your current Java knowledge. There is no need to do the exercise if you have prior programming experience and you are confident of being able to do it. But if you are new to programming, we highly recommend you to attempt this exercise and get help from the prof if you are unable to complete it.
We recommend you to do this exercise on your own computer rather than on repl.it.
This is a good time to put together some of the topics you have learned so far to create something useful. In this exercise you will write a small TaskManager program that can store a list of tasks.
- It is a
CLI program. - In this version, the task list is not saved to the disk i.e., the task list does not persist between multiple runs of the program
Here is an example output:
Welcome to TaskManager-Level1!
Your task? add submit report
Tasks in the list: 1
Your task? add return library book
Tasks in the list: 2
Your task? add remind boss about meeting
Tasks in the list: 3
Your task? xyz
Unknown command! please try again
Your task? print
[1] submit report
[2] return library book
[3] remind boss about meeting
Your task? add set up meeting with boss
Tasks in the list: 4
Your task? print
[1] submit report
[2] return library book
[3] remind boss about meeting
[4] set up meeting with boss
Your task? exit
Bye!
Summary of behavior:
- Task Manager prompts for user input with the message
Your task? addtask description: adds thetask descriptionto the task listprint: prints the tasks added so farexitor empty input: terminates the program
If you are new to programming, we recommend you to build the program in small steps, as follows:
- Write a program that reads any user input, prints it back to the user, and exits.
- Update the program to do the above in a loop until user types
exit. - Add greetings printed at the start and the end.
- If the first word is not
addorexit, print an error message. Suggestion: use aswitchstatement to choose between multiple actions. - Create a
Taskclass to represent tasks and add anTask[]to store tasks. - If the first word of the user input is
add, add the whole line (no need to omit the first word) to the task list. - Update the code in the previous step to omit the word
addfrom the task description. - Add support for the
printcommand. - Add support for terminating if the user input is empty
- and so on ...
import java.util.Scanner;

public class Main {
    static Scanner in = new Scanner(System.in);
    static Task[] tasks = new Task[100];
    static int count = 0;  // to keep track of number of tasks in the list

    public static void main(String[] args) {
        printWelcome();
        String line;
        boolean isExit = false;
        while (!isExit) {
            line = getInput();
            String command = line.split(" ")[0]; //extract the first word of the user input
            switch (command) {
                case "exit":
                case "": // exit if user input is empty
                    isExit = true;
                    break;
                case "add":
                    // todo: add code here
                default:
                    printError();
            }
        }
        exit();

    }

    private static void printWelcome() {
        System.out.println("Welcome to TaskManager-Level1!");
    }

    private static void printTasks() {
        for (int i = 0; i < count; i++) {
            System.out.println("[" + (i + 1) + "] " + tasks[i].getDescription());
        }
    }

    // todo: add missing methods
}
Lecture 4
Questions to discuss during the lecture:
Assume you are writing a CLI program called CityConnect for storing and querying distances between cities. The behavior is as follows:
Welcome to CityConnect!

Enter command: addroute Clementi BuonaVista 12
Route from Clementi to BuonaVista with distance 12km added

Enter command: getdistance Clementi BuonaVista
Distance from Clementi to BuonaVista is 12

Enter command: getdistance Clementi JurongWest
No route exists from Clementi to JurongWest!

Enter command: addroute Clementi JurongWest 24
Route from Clementi to JurongWest with distance 24km added

Enter command: getdistance Clementi JurongWest
Distance from Clementi to JurongWest is 24

Enter command: exit
What classes would you have in your code if you write your program based on the OOP paradigm?
One class you can have is Route
[slides]