Week 5 [Sep 10]
Todo
Admin info to read:
Policy on project work distribution
As most of the work is graded individually, it is OK to do less or more than equal share in your project team.
Related: [Admin: Project: Scope]
Policy on email response time
Normally, the prof will respond within 24 hours if it was an email sent to the prof or a forum post directed at the prof. If you don't get a response within that time, please feel free to remind the prof. It is likely that the prof did not notice your post or the email got stuck somewhere.
Similarly we expect you to check email regularly and respond to emails written to you personally (not mass email) promptly.
Not responding to a personal email is a major breach of professional etiquette (and general civility). Imagine how pissed off you would be if you met the prof along the corridor, said 'Hi prof, good morning' and the prof walked away without saying anything back. Not responding to a personal email is just as bad. Always take a few seconds to at least acknowledge such emails. It doesn't take long to type "Noted. Thanks" and hit 'send'.
The promptness of a reply is even more important when the email is requesting you for something that you cannot provide. Imagine you wrote to the prof requesting a reference letter and the prof did not respond at all because he/she did not want to give you one; You'll be quite frustrated because you wouldn't know whether to look for another prof or wait longer for a response. Saying 'No' is fine and in fact a necessary part of professional life; but saying nothing is not acceptable. If you didn't reply, the sender will not even know whether you received the email.
Why so much bean counting?
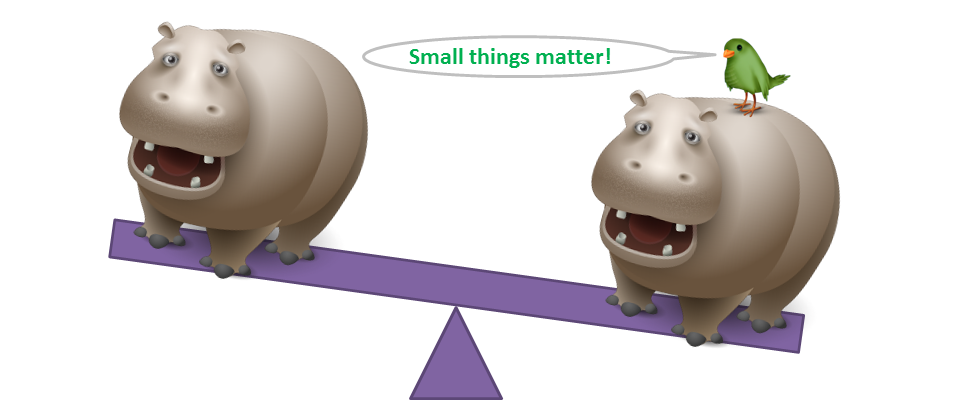
Sometimes, small things matter in big ways. e.g., all other things being equal, a job may be offered to the candidate who has the neater looking CV although both have the same qualifications. This may be unfair, but that's how the world works. Students forget this harsh reality when they are in the protected environment of the school and tend to get sloppy with their work habits. That is why we reward all positive behavior, even small ones (e.g., following precise submission instructions, arriving on time etc.).
But unlike the real world, we are forgiving. That is why you can still earn full 10 marks of the participation marks even if you miss a few things here and there.
Related article: This Is The Personality Trait That Most Often Predicts Success (this is why we reward things like punctuality).
Outcomes
Java
W5.1 Can use casting in Java
W5.1a Can use Java casting
C++ to Java → Miscellaneous Topics →
Casting is the action of converting from one type to another. You can use the (newType) syntax to cast a value to a new type.
When you cast a primitive value to another type, there may be a loss of precision.
The code below cast a double value to an int value and cast it back to a double. Note the loss of precision.
double d = 5.3;
System.out.println("Before casting to an int: " + d);
int i = (int)d; // cast d to an int
System.out.println("After casting to an int: " + i);
d = (double)i; // cast i back to a double
System.out.println("After casting back a double: " + d);
Before casting to an int: 5.3
After casting to an int: 5
After casting back a double: 5.0
Downcasting is when you cast an object reference from a superclass to a subclass.
Assume the following class hierarchy:
class Animal{
    void speak(){
        System.out.println("I'm an animal");
    }
}

class Cat extends Animal{
    @Override
    void speak() {
        System.out.println("I'm a Cat");
    }
}

class DomesticCat extends Cat{
    @Override
    void speak() {
        System.out.println("I'm a DomesticCat");
    }
}
The foo method below downcasts an Animal object to its subclasses.
public static void foo(Animal a){
    a.speak();
    Cat c = (Cat)a; // downcast a to a Cat
    c.speak();
    DomesticCat dc = (DomesticCat)a; // downcast a to a DomesticCat
    dc.speak();
}
Upcasting is when you cast an object reference from a subclass to a superclass. However, upcasting is done automatically by the compiler even if you do not specify it explicitly.
This example upcasts a Cat object to its superclass Animal:
Cat c = new Cat();
Animal a1 = (Animal)c; //upcasting c to the Animal class
Animal a2 = c; //upcasting is implicit
Note that due to polymorphism, the behavior of the object will reflect the actual type of the object irrespective of the type of the variable holding a reference to it.
The call to the speak() method in the code below always executes the speak() method of the DomesticCat class because the actual type of the object remains DomesticCat although the reference to it is being downcast/upcast to various other types.
Animal a = new DomesticCat(); //implicit upcast
a.speak();
Cat c = (Cat)a; //downcast
c.speak();
DomesticCat dc = (DomesticCat)a; //downcast
dc.speak();
I'm a DomesticCat
I'm a DomesticCat
I'm a DomesticCat
Casting to an incompatible type can result in a ClassCastException at runtime.
This code will cause a ClassCastException:
Object o = new Animal();
Integer x = (Integer)o;
Exception in thread "main" java.lang.ClassCastException: misc.casting.Animal cannot be cast to java.lang.Integer
	at misc.casting.CastingExamples.main(CastingExamples.java:14)
You can use the instanceof operator to check if a cast is safe to perform.
This code checks if the object a is an instance of the Cat class before casting it to a Cat.
Cat c;
if (a instanceof Cat){
    c = (Cat)a;
}
W5.2 Can use Generics in Java
W5.2a Can explain Java Generics
C++ to Java → Generics →
Given below is an extract from the -- Java Tutorial, with some adaptations.
You can use polymorphism to write code that can work with multiple types, but that approach has some shortcomings.
Consider the following Box class. It can be used only for storing Integer objects.
public class BoxForIntegers {
    private Integer x;

    public void set(Integer x) {
        this.x = x;
    }
    public Integer get() {
        return x;
    }
}
To store String objects, another similar class is needed, resulting in the duplication of the entire class. As you can see, if you need to store many different types of objects, you could end up writing many similar classes.
public class BoxForString {
    private String x;

    public void set(String x) {
        this.x = x;
    }
    public String get() {
        return x;
    }
}
One solution for this problem is to use polymorphism i.e., write the Box class to store Object objects.
public class Box {
    private Object x;

    public void set(Object x) {
        this.x = x;
    }
    public Object get() {
        return x;
    }
}
The problem with this solution is, since its methods accept or return an Object, you are free to pass in whatever you want, provided that it is not one of the primitive types. There is no way to verify, at compile time, how the class is used. One part of the code may place an Integer in the box and expect to get Integers out of it, while another part of the code may mistakenly pass in a String, resulting in a runtime error.
Generics enable types (classes and interfaces) to be parameters when defining classes, interfaces and methods. Much like the more familiar formal parameters used in method declarations, type parameters provide a way for you to re-use the same code with different inputs. The difference is that the inputs to formal parameters are values, while the inputs to type parameters are types.
A generic Box class allows you to define what type of elements will be put in the Box. For example, you can instantiate a Box object to keep Integer elements so that any attempt to put a non-Integer object in that Box object will result in a compile error.
W5.2b Can use Java Generics
C++ to Java → Generics →
This section includes extract from the -- Java Tutorial, with some adaptations.
The definition of a generic class includes a type parameter section, delimited by angle brackets (<>). It specifies the type parameters (also called type variables) T1, T2, ..., and Tn. A generic class is defined with the following format:
class name<T1, T2, ..., Tn> { /* ... */ }
Here is a generic Box class. The class declaration Box<T> introduces the type variable, T, which is also used inside the class to refer to the same type.
Using Object as the type:
public class Box {
    private Object x;

    public void set(Object x) {
        this.x = x;
    }

    public Object get() {
        return x;
    }
}
A generic Box using type parameter T:
public class Box<T> {
    private T x;

    public void set(T x) {
        this.x = x;
    }

    public T get() {
        return x;
    }
}
As you can see, all occurrences of Object are replaced by T.
To reference the generic Box class from within your code, you must perform a generic type invocation, which replaces T with some concrete value, such as Integer. It is similar to an ordinary method invocation, but instead of passing an argument to a method, you are passing a type argument enclosed within angle brackets — e.g., <Integer> or <String, Integer> — to the generic class itself. Note that in some cases you can omit the type parameter i.e., <> if the type parameter can be inferred from the context.
Using the generic Box class to store Integer objects:
Box<Integer> integerBox;
integerBox = new Box<>(); // type parameter omitted as it can be inferred
integerBox.set(Integer.valueOf(4));
Integer i = integerBox.get(); // returns an Integer
Box<Integer> integerBox;simply declares thatintegerBoxwill hold a reference to a "Box of Integer", which is howBox<Integer>is read.integerBox = new Box<>();instantiates aBox<Integer>class. Note the<>(an empty pair of angle brackets, also called the diamond operator) between the class name and the parenthesis.
The compiler is able to check for type errors when using generic code.
The code below will fail because it creates a Box<String> and then tries to pass Double objects into it.
Box<String> stringBox = new Box<>();
stringBox.set(Double.valueOf(5.0)); //compile error!
A generic class can have multiple type parameters.
The generic OrderedPair class, which implements the generic Pair interface:
public interface Pair<K, V> {
    public K getKey();
    public V getValue();
}
public class OrderedPair<K, V> implements Pair<K, V> {

    private K key;
    private V value;

    public OrderedPair(K key, V value) {
        this.key = key;
        this.value = value;
    }

    public K getKey()	{ return key; }
    public V getValue() { return value; }
}
The following statements create two instantiations of the OrderedPair class:
Pair<String, Integer> p1 = new OrderedPair<>("Even", 8);
Pair<String, String>  p2 = new OrderedPair<>("hello", "world");
The code, new OrderedPair<String, Integer>, instantiates K as a String and V as an Integer. Therefore, the parameter types of OrderedPair's constructor are String and Integer, respectively.
A type variable can be any non-primitive type you specify: any class type, any interface type, any array type, or even another type variable.
By convention, type parameter names are single, uppercase letters. The most commonly used type parameter names are:
E- Element (used extensively by the Java Collections Framework)K- KeyN- NumberT- TypeV- ValueS,U,Vetc. - 2nd, 3rd, 4th types
W5.3 Can use Collections in Java
W5.3a Can explain the Collections framework
C++ to Java → Collections →
This section uses extracts from the -- Java Tutorial, with some adaptations.
A collection — sometimes called a container — is simply an object that groups multiple elements into a single unit. Collections are used to store, retrieve, manipulate, and communicate aggregate data.
Typically, collections represent data items that form a natural group, such as a poker hand (a collection of cards), a mail folder (a collection of letters), or a telephone directory (a mapping of names to phone numbers).
The collections framework is a unified architecture for representing and manipulating collections. It contains the following:
-
Interfaces: These are abstract data types that represent collections. Interfaces allow collections to be manipulated independently of the details of their representation.
Example: theList<E>interface can be used to manipulate list-like collections which may be implemented in different ways such asArrayList<E>orLinkedList<E>. -
Implementations: These are the concrete implementations of the collection interfaces. In essence, they are reusable data structures.
Example: theArrayList<E>class implements theList<E>interface while theHashMap<K, V>class implements theMap<K, V>interface. -
Algorithms: These are the methods that perform useful computations, such as searching and sorting, on objects that implement collection interfaces. The algorithms are said to be polymorphic: that is, the same method can be used on many different implementations of the appropriate collection interface.
Example: thesort(List<E>)method can sort a collection that implements theList<E>interface.
A well-known example of collections frameworks is the C++ Standard Template Library (STL). Although both are collections frameworks and the syntax look similar, note that there are important philosophical and implementation differences between the two.
The following list describes the core collection interfaces:
-
Collection— the root of the collection hierarchy. A collection represents a group of objects known as its elements. The Collection interface is the least common denominator that all collections implement and is used to pass collections around and to manipulate them when maximum generality is desired. Some types of collections allow duplicate elements, and others do not. Some are ordered and others are unordered. The Java platform doesn't provide any direct implementations of this interface but provides implementations of more specific subinterfaces, such asSetandList. Also see theCollectionAPI. -
Set— a collection that cannot contain duplicate elements. This interface models the mathematical set abstraction and is used to represent sets, such as the cards comprising a poker hand, the courses making up a student's schedule, or the processes running on a machine. Also see theSetAPI. -
List— an ordered collection (sometimes called a sequence).Lists can contain duplicate elements. The user of aListgenerally has precise control over where in the list each element is inserted and can access elements by their integer index (position). Also see theListAPI. -
Queue— a collection used to hold multiple elements prior to processing. Besides basicCollectionoperations, aQueueprovides additional insertion, extraction, and inspection operations. Also see theQueueAPI. -
Map— an object that maps keys to values. AMapcannot contain duplicate keys; each key can map to at most one value. Also see theMapAPI. -
Others:
Deque,SortedSet,SortedMap
W5.3b Can use the ArrayList class
C++ to Java → Collections →
The ArrayList class is a resizable-array implementation of the List interface. Unlike a normal array, an ArrayList can grow in size as you add more items to it. The example below illustrate some of the useful methods of the ArrayList class using an ArrayList of String objects.
import java.util.ArrayList;

public class ArrayListDemo {

    public static void main(String args[]) {
        ArrayList<String> items = new ArrayList<>();

        System.out.println("Before adding any items:" + items);

        items.add("Apple");
        items.add("Box");
        items.add("Cup");
        items.add("Dart");
        print("After adding four items: " + items);

        items.remove("Box"); // remove item "Box"
        print("After removing Box: " + items);

        items.add(1, "Banana"); // add "Banana" at index 1
        print("After adding Banana: " + items);

        items.add("Egg"); // add "Egg", will be added to the end
        items.add("Cup"); // add another "Cup"
        print("After adding Egg: " + items);

        print("Number of items: " + items.size());

        print("Index of Cup: " + items.indexOf("Cup"));
        print("Index of Zebra: " + items.indexOf("Zebra"));

        print("Item at index 3 is: " + items.get(2));

        print("Do we have a Box?: " + items.contains("Box"));
        print("Do we have an Apple?: " + items.contains("Apple"));

        items.clear();
        print("After clearing: " + items);
    }

    private static void print(String text) {
        System.out.println(text);
    }
}
Before adding any items:[]
After adding four items: [Apple, Box, Cup, Dart]
After removing Box: [Apple, Cup, Dart]
After adding Banana: [Apple, Banana, Cup, Dart]
After adding Egg: [Apple, Banana, Cup, Dart, Egg, Cup]
Number of items: 6
Index of Cup: 2
Index of Zebra: -1
Item at index 3 is: Cup
Do we have a Box?: false
Do we have an Apple?: true
After clearing: []
Add the missing methods to the class given below so that it produces the output given.
💡 Use an ArrayList to store the numbers.
public class Main {

    //TODO: add your methods here

    public static void main(String[] args) {
        System.out.println("Adding numbers to the list");
        addNumber(3);
        addNumber(8);
        addNumber(24);
        System.out.println("The total is: " + getTotal());
        System.out.println("8 in the list : " + isFound(8) );
        System.out.println("5 in the list : " + isFound(5) );
        removeNumber(8);
        System.out.println("The total is: " + getTotal());
    }

}
Adding numbers to the list
[3]
[3, 8]
[3, 8, 24]
The total is: 35
8 in the list : true
5 in the list : false
[3, 24]
The total is: 27
Partial solution:
import java.util.ArrayList;

public class Main {
    private static ArrayList<Integer> numbers = new ArrayList<>();

    private static void addNumber(int i) {
        numbers.add(Integer.valueOf(i));
        System.out.println(numbers);
    }

    // ...

}
This exercise continues from the TaskManager Level 1-3 exercises quoted above.
Enhance the TaskManager in the following ways:
- Use a suitable Collection class to store tasks, instead of using an array.
- Introduce a
done ncommand to mark the task at indexnas done.
Here is an example output:
Welcome to TaskManager-Level4!
Your task? todo read book
Tasks in the list: 1
Your task? deadline return book /by Friday
Tasks in the list: 2
Your task? print
Tasks:
[1] description: read book
is done? No
[2] description: return book
is done? No
do by: Friday
Your task? done 1
Tasks in the list: 2
Your task? print
Tasks:
[1] description: read book
is done? Yes
[2] description: return book
is done? No
do by: Friday
Your task?
Suggestions:
- Move the
isDonevariable to theTaskclass and provide asetDone(boolean)method.
public class Task {
    protected String description;
    protected boolean isDone;

    // ...

    public void setDone(boolean isDone){
        this.isDone = isDone;
    }
}
import java.util.ArrayList;
import java.util.List;
import java.util.Scanner;

public class Main {
    static Scanner in = new Scanner(System.in);
    static List<Task> tasks = new ArrayList<>();

    public static void main(String[] args) {
        // ...
    }

    private static void addTodo(String line) throws TaskManagerException {
        //...
        tasks.add(new Todo(description));
        //...
    }

    private static void markAsDone(String line) {
        int index = Integer.parseInt(line.substring("done".length()).trim());
        tasks.get(index - 1).setDone(true);
        System.out.println("Tasks in the list: " + tasks.size());
    }

    private static void printTasks() {
        // ...
        for (int i = 0; i < tasks.size(); i++) {
            System.out.println("[" + (i + 1) + "] " + tasks.get(i));
        }
    }
}
Evidence:
To be able to do exercises such as these:
Add the missing methods to the class given below so that it produces the output given.
💡 Use an ArrayList to store the numbers.
public class Main {

    //TODO: add your methods here

    public static void main(String[] args) {
        System.out.println("Adding numbers to the list");
        addNumber(3);
        addNumber(8);
        addNumber(24);
        System.out.println("The total is: " + getTotal());
        System.out.println("8 in the list : " + isFound(8) );
        System.out.println("5 in the list : " + isFound(5) );
        removeNumber(8);
        System.out.println("The total is: " + getTotal());
    }

}
Adding numbers to the list
[3]
[3, 8]
[3, 8, 24]
The total is: 35
8 in the list : true
5 in the list : false
[3, 24]
The total is: 27
Partial solution:
import java.util.ArrayList;

public class Main {
    private static ArrayList<Integer> numbers = new ArrayList<>();

    private static void addNumber(int i) {
        numbers.add(Integer.valueOf(i));
        System.out.println(numbers);
    }

    // ...

}
W5.3c Can use the HashMap class
C++ to Java → Collections →
HashMap is an implementation of the Map interface. It allows you to store a collection of key-value pairs. The example below illustrates how to use a HashMap<String, Point> to maintain a list of coordinates and their identifiers e.g., the identifier x1 is used to identify the point 0,0 where x1 is the key and 0,0 is the value.
import java.awt.Point;
import java.util.HashMap;
import java.util.Map;

public class HashMapDemo {
    public static void main(String[] args) {
        HashMap<String, Point> points = new HashMap<>();

        // put the key-value pairs in the HashMap
        points.put("x1", new Point(0, 0));
        points.put("x2", new Point(0, 5));
        points.put("x3", new Point(5, 5));
        points.put("x4", new Point(5, 0));

        // retrieve a value for a key using the get method
        print("Coordinates of x1: " + pointAsString(points.get("x1")));

        // check if a key or a value exists
        print("Key x1 exists? " + points.containsKey("x1"));
        print("Key x1 exists? " + points.containsKey("y1"));
        print("Value (0,0) exists? " + points.containsValue(new Point(0, 0)));
        print("Value (1,2) exists? " + points.containsValue(new Point(1, 2)));

        // update the value of a key to a new value
        points.put("x1", new Point(-1,-1));

        // iterate over the entries
        for (Map.Entry<String, Point> entry : points.entrySet()) {
            print(entry.getKey() + " = " + pointAsString(entry.getValue()));
        }

        print("Number of keys: " + points.size());
        points.clear();
        print("Number of keys after clearing: " + points.size());

    }

    public static String pointAsString(Point p) {
        return "[" + p.x + "," + p.y + "]";
    }

    public static void print(String s) {
        System.out.println(s);
    }
}
Coordinates of x1: [0,0]
Key x1 exists? true
Key x1 exists? false
Value (0,0) exists? true
Value (1,2) exists? false
x1 = [-1,-1]
x2 = [0,5]
x3 = [5,5]
x4 = [5,0]
Number of keys: 4
Number of keys after clearing: 0
The class given below keeps track of how many people signup to attend an event on each day of the week. Add the missing methods so that it produces the output given.
💡 Use an HashMap to store the number of entries for each day.
public class Main {
    private static HashMap<String, Integer> roster = new HashMap<>();

    //TODO: add your methods here

    public static void main(String[] args) {
        addToRoster("Monday"); // i.e., one person signed up for Monday
        addToRoster("Wednesday"); // i.e., one person signed up for Wednesday
        addToRoster("Wednesday"); // i.e., another person signed up for Wednesday
        addToRoster("Friday");
        addToRoster("Monday");
        printRoster();
    }

}
Monday => 2
Friday => 1
Wednesday => 2
Partial solution:
import java.util.HashMap;
import java.util.Map;

public class Main {
    private static HashMap<String, Integer> roster = new HashMap<>();

    private static void addToRoster(String day) {
        if (roster.containsKey(day)){
            Integer newValue = Integer.valueOf(roster.get(day).intValue() + 1);
            roster.put(day, newValue);
        } else {
            roster.put(day, Integer.valueOf(1));
        }
    }

    // ...
}
Evidence:
To be able to do exercises such as these:
The class given below keeps track of how many people signup to attend an event on each day of the week. Add the missing methods so that it produces the output given.
💡 Use an HashMap to store the number of entries for each day.
public class Main {
    private static HashMap<String, Integer> roster = new HashMap<>();

    //TODO: add your methods here

    public static void main(String[] args) {
        addToRoster("Monday"); // i.e., one person signed up for Monday
        addToRoster("Wednesday"); // i.e., one person signed up for Wednesday
        addToRoster("Wednesday"); // i.e., another person signed up for Wednesday
        addToRoster("Friday");
        addToRoster("Monday");
        printRoster();
    }

}
Monday => 2
Friday => 1
Wednesday => 2
Partial solution:
import java.util.HashMap;
import java.util.Map;

public class Main {
    private static HashMap<String, Integer> roster = new HashMap<>();

    private static void addToRoster(String day) {
        if (roster.containsKey(day)){
            Integer newValue = Integer.valueOf(roster.get(day).intValue() + 1);
            roster.put(day, newValue);
        } else {
            roster.put(day, Integer.valueOf(1));
        }
    }

    // ...
}
Design
W5.4 Can use basic object/class structures
W5.4a Can explain structure modelling of OO solutions
Design → Modelling → Modelling Structure
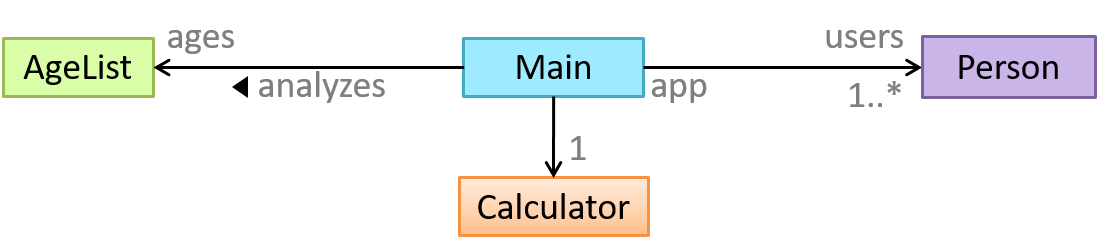
An OO solution is basically a network of objects interacting with each other. Therefore, it is useful to be able to model how the relevant objects are 'networked' together inside a software i.e. how the objects are connected together.
Given below is an illustration of some objects and how they are connected together. Note: the diagram uses an ad-hoc notation.
Note that these object structures within the same software can change over time.
Given below is how the object structure in the previous example could have looked like at a different time.
However, object structures do not change at random; they change based on a set of rules, as was decided by the designer of that software. Those rules that object structures need to follow can be illustrated as a class structure i.e. a structure that exists among the relevant classes.
Here is a class structure (drawn using an ad-hoc notation) that matches the object structures given in the previous two examples. For example, note how this class structure does not allow any connection between Genre objects and Author objects, a rule followed by the two object structures above.

UML Object Diagrams are used to model object structures and UML Class Diagrams are used to model class structures of an OO solution.
Here is an object diagram for the above example:
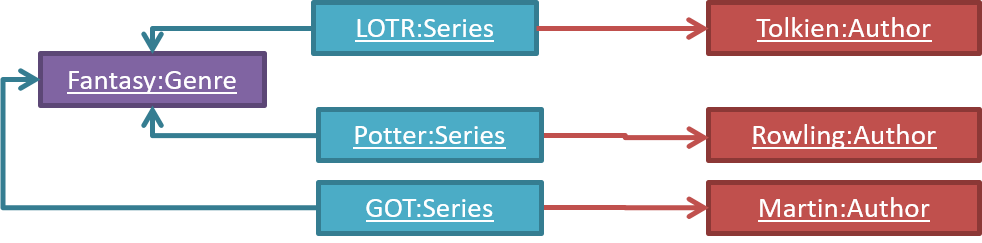
And here is the class diagram for it:

W5.4b Can use basic-level class diagrams
Design → Modelling → Modelling Structure
Classes form the basis of class diagrams.
Associations are the main connections among the classes in a class diagram.
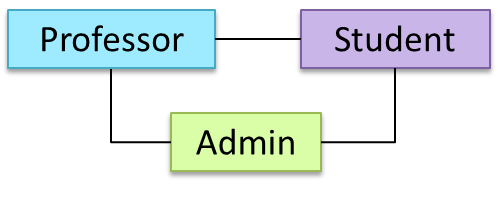
The most basic class diagram is a bunch of classes with some solid lines among them to represent associations, such as this one.
An example class diagram showing associations between classes.

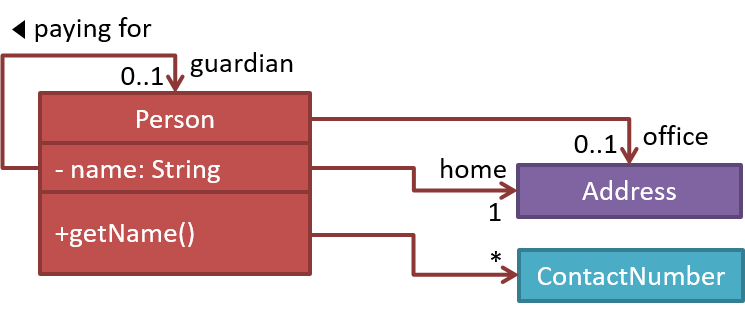
In addition, associations can show additional decorations such as association labels, association roles, multiplicity and navigability to add more information to a class diagram.
Here is the same class diagram shown earlier but with some additional information included:
Which association notatations are shown in this diagram?

- a. association labels
- b. association roles
- c. association multiplicity
- d. class names
(a) (b) (c) (d)
Explanation: '1’ is a multiplicity, ‘mentored by’ is a label, and ‘mentor’ is a role.
Explain the associations, navigabilities, and multiplicities in the class diagram below:
Draw a class diagram for the code below. Show the attributes, methods, associations, navigabilities, and multiplicities in the class diagram below:
class Box {
    private Item[] parts = new Item[10];
    private Item spareItem;
    private Lid lid; // lid of this box
    private Box outerBox;

    public void open(){
        //...
    }
}
class Item {
    public static int totalItems;
}
class Lid {
    Box box; // the box for which this is the lid
}
Evidence:
Explain the associations, navigabilities, and multiplicities in the class diagram below:
Draw a class diagram for the code below. Show the attributes, methods, associations, navigabilities, and multiplicities in the class diagram below:
class Box {
    private Item[] parts = new Item[10];
    private Item spareItem;
    private Lid lid; // lid of this box
    private Box outerBox;

    public void open(){
        //...
    }
}
class Item {
    public static int totalItems;
}
class Lid {
    Box box; // the box for which this is the lid
}
W5.4c Can use basic object diagrams
Design → Modelling → Modelling Structure
Object diagrams can be used to complement class diagrams. For example, you can use object diagrams to model different object structures that can result from a design represented by a given class diagram.
This question is based on the following question from another topic:
Draw a class diagram for the code below. Show the attributes, methods, associations, navigabilities, and multiplicities in the class diagram below:
class Box {
    private Item[] parts = new Item[10];
    private Item spareItem;
    private Lid lid; // lid of this box
    private Box outerBox;

    public void open(){
        //...
    }
}
class Item {
    public static int totalItems;
}
class Lid {
    Box box; // the box for which this is the lid
}
Draw an object diagram to match the code. Include objects of all three classes in your object diagram.
Evidence:
Suppose we wrote a program to follow the class structure given in this class diagram:
Draw object diagrams to represent the object structures after each of these steps below. Assume that we are trying to minimize the number of total objects.
i.e. apply step 1 → [diagram 1] → apply step 2 on diagram 1 → [diagram 2] and so on.
-
There are no persons.
-
Alfredis the Guardian ofBruce. -
Bruce's contact number is the same asAlfred's. -
Alfredis also the guardian of another person. That person listsAlfreds home address as his home address as well as office address. -
Alfredhas a an office address atWayne Industriesbuilding which is different from his home address (i.e.Bat Cave).
After step 2, the diagram should be like this:

This question is based on the following question from another topic:
Draw a class diagram for the code below. Show the attributes, methods, associations, navigabilities, and multiplicities in the class diagram below:
class Box {
    private Item[] parts = new Item[10];
    private Item spareItem;
    private Lid lid; // lid of this box
    private Box outerBox;

    public void open(){
        //...
    }
}
class Item {
    public static int totalItems;
}
class Lid {
    Box box; // the box for which this is the lid
}
Draw an object diagram to match the code. Include objects of all three classes in your object diagram.
W5.4d Can distinguish between class diagrams and object diagrams
Tools → UML →
Compared to the notation for a class diagrams, object diagrams differ in the following ways:
- Shows objects instead of classes:
- Instance name may be shown
- There is a
:before the class name - Instance and class names are underlined
- Methods are omitted
- Multiplicities are omitted
Furthermore, multiple object diagrams can correspond to a single class diagram.
Both object diagrams are derived from the same class diagram shown earlier. In other words, each of these object diagrams shows ‘an instance of’ the same class diagram.
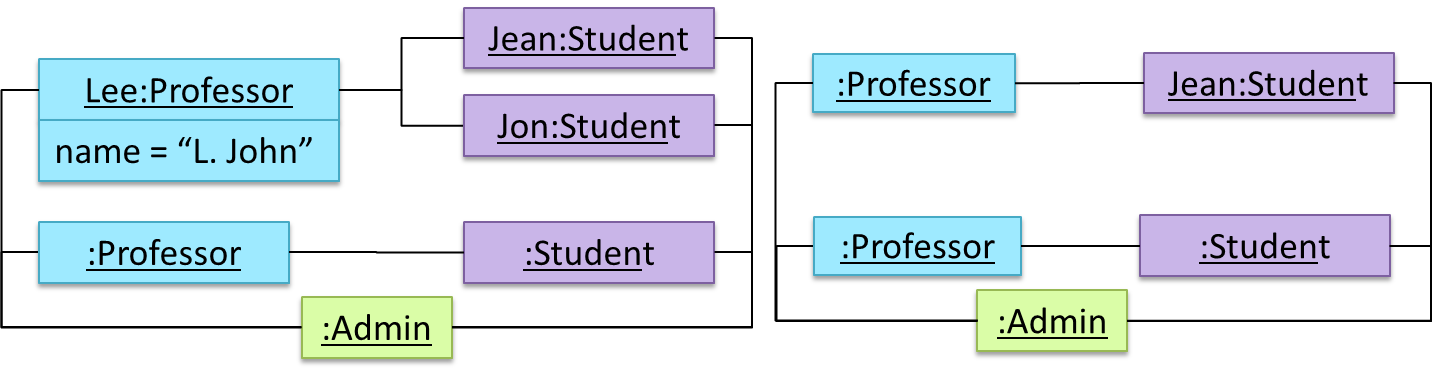
Which of these class diagrams match the given object diagram?
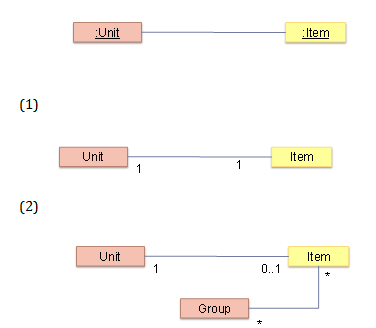
- a
- b
(a) (b)
Explanation: Both class diagrams allow one Unit object to be linked to one Item object.
🅿️ Project
W5.5 Project preparation: Can use exceptions and collections in a small project
Enhance your TaskManager program as explained in the exercise below:
This exercise continues from the TaskManager Level 1-2 exercises quoted above.
Enhance the TaskManager to print an error message if a command is missing parts. Use exceptions so that error detection and printing of error message happen at different places of code and the error information is passed between the two places using an Exception object.
Here is an example output:
Welcome to TaskManager-Level3!
Your task? todo
Error: Empty description for TODO
Your task? todo read book
Tasks in the list: 1
Your task? print
Tasks:
[1] description: read book
is done? No
Your task?
Suggested approach:
- Create a
TaskManagerExceptionclass that inherits theExceptionclass. Override the constructor that takes aStringparameter so that you can specify the error information when you create aTaskManagerExceptionobject. - Throw a new
TaskManagerExceptionobject when you detect some necessary information is missing in the command. - Catch that exception somewhere else and print the message inside the exception object.
public class TaskManagerException extends Exception{
    public TaskManagerException(String message) {
        super(message);
    }
}
    public static void main(String[] args) {
        // ...
        while (!isExit) {
            try {
                line = getInput();
                String command = line.split(" ")[0];
                switch (command) {
                    case "todo":
                        addTodo(line);
                        break;
                    // ...
                }
            } catch (TaskManagerException e) {
                printError(e.getMessage());
            }
        }
        // ...

    }

    private static void addTodo(String line) throws TaskManagerException {
        String description = line.substring("todo".length()).trim();
        if (description.isEmpty()){
            throw new TaskManagerException("Empty description for TODO");
        }
        // ...
    }
This exercise continues from the TaskManager Level 1-3 exercises quoted above.
Enhance the TaskManager in the following ways:
- Use a suitable Collection class to store tasks, instead of using an array.
- Introduce a
done ncommand to mark the task at indexnas done.
Here is an example output:
Welcome to TaskManager-Level4!
Your task? todo read book
Tasks in the list: 1
Your task? deadline return book /by Friday
Tasks in the list: 2
Your task? print
Tasks:
[1] description: read book
is done? No
[2] description: return book
is done? No
do by: Friday
Your task? done 1
Tasks in the list: 2
Your task? print
Tasks:
[1] description: read book
is done? Yes
[2] description: return book
is done? No
do by: Friday
Your task?
Suggestions:
- Move the
isDonevariable to theTaskclass and provide asetDone(boolean)method.
public class Task {
    protected String description;
    protected boolean isDone;

    // ...

    public void setDone(boolean isDone){
        this.isDone = isDone;
    }
}
import java.util.ArrayList;
import java.util.List;
import java.util.Scanner;

public class Main {
    static Scanner in = new Scanner(System.in);
    static List<Task> tasks = new ArrayList<>();

    public static void main(String[] args) {
        // ...
    }

    private static void addTodo(String line) throws TaskManagerException {
        //...
        tasks.add(new Todo(description));
        //...
    }

    private static void markAsDone(String line) {
        int index = Integer.parseInt(line.substring("done".length()).trim());
        tasks.get(index - 1).setDone(true);
        System.out.println("Tasks in the list: " + tasks.size());
    }

    private static void printTasks() {
        // ...
        for (int i = 0; i < tasks.size(); i++) {
            System.out.println("[" + (i + 1) + "] " + tasks.get(i));
        }
    }
}
Tutorial 5
W4.1d Can explain how substitutability operation overriding, and dynamic binding relates to polymorphism
Paradigms → Object Oriented Programming → Polymorphism →
Three concepts combine to achieve polymorphism: substitutability, operation overriding, and dynamic binding.
- Substitutability: Because of substitutability, you can write code that expects object of a parent class and yet use that code with objects of child classes. That is how polymorphism is able to treat objects of different types as one type.
- Overriding: To get polymorphic behavior from an operation, the operation in the superclass needs to be overridden in each of the subclasses. That is how overriding allows objects of different subclasses to display different behaviors in response to the same method call.
- Dynamic binding: Calls to overridden methods are bound to the implementation of the actual object's class dynamically during the runtime. That is how the polymorphic code can call the method of the parent class and yet execute the implementation of the child class.
Which one of these is least related to how OO programs achieve polymorphism?
(c)
Explanation: Operation overriding is the one that is related, not operation overloading.
Evidence:
Explain how substitutability operation overriding, and dynamic binding relates to polymorphism using a new example (i.e., without using examples given in the textbook).
W4.1e Can use polymorphism in Java
C++ to Java → Inheritance →
Java is a strongly-typed language which means the code works with only the object types that it targets.
The following code PetShelter keeps a list of Cat objects and make them speak. The code will not work with any other type, for example, Dog objects.
public class PetShelter {
    private static Cat[] cats = new Cat[]{
            new Cat("Mittens"),
            new Cat("Snowball")};

    public static void main(String[] args) {
        for (Cat c: cats){
            System.out.println(c.speak());
        }
    }
}
Mittens: Meow
Snowball: Meow
public class Cat {
    public Cat(String name) {
        super(name);
    }

    public String speak() {
        return name + ": Meow";
    }
}
This strong-typing can lead to unnecessary verbosity caused by repetitive similar code that do similar things with different object types.
If the PetShelter is to keep both cats and dogs, you'll need two arrays and two loops:
public class PetShelter {
    private static Cat[] cats = new Cat[]{
            new Cat("Mittens"),
            new Cat("Snowball")};
    private static Dog[] dogs = new Dog[]{
            new Dog("Spot")};

    public static void main(String[] args) {
        for (Cat c: cats){
            System.out.println(c.speak());
        }
        for(Dog d: dogs){
            System.out.println(d.speak());
        }
    }
}
Mittens: Meow
Snowball: Meow
Spot: Woof
public class Dog {
    public Dog(String name) {
        super(name);
    }

    public String speak() {
        return name + ": Woof";
    }
}
A better way is to take advantage of polymorphism to write code that targets a superclass but works with any subclass objects.
The PetShelter2 use one data structure to keep both types of animals and one loop to make them speak. The code targets the Animal superclass (assuming Cat and Dog inherits from the Animal class) instead of repeating the code for each animal type.
public class PetShelter2 {
    private static Animal[] animals = new Animal[]{
            new Cat("Mittens"),
            new Cat("Snowball"),
            new Dog("Spot")};

    public static void main(String[] args) {
        for (Animal a: animals){
            System.out.println(a.speak());
        }
    }
}
Mittens: Meow
Snowball: Meow
Spot: Woof
public class Animal {

    protected String name;

    public Animal(String name){
        this.name = name;
    }
    public String speak(){
        return name;
    }
}
public class Cat extends Animal {
    public Cat(String name) {
        super(name);
    }

    @Override
    public String speak() {
        return name + ": Meow";
    }
}
public class Dog extends Animal {
    public Dog(String name) {
        super(name);
    }

    @Override
    public String speak() {
        return name + ": Woof";
    }
}
Explanation: Because Java supports polymorphism, you can store both Cat and Dog objects in an array of Animal objects. Similarly, you can call the speak method on any Animal object (as done in the loop) and yet get different behavior from Cat objects and Dog objects.
💡 Suggestion: try to add an Animal object (e.g., new Animal("Unnamed")) to the animals array and see what happens.
Polymorphic code is better in several ways:
- It is shorter.
- It is simpler.
- It is more flexible (in the above example, the
mainmethod will work even if we add more animal types).
The Main class below keeps a list of Circle and Rectangle objects and prints the area (as an int value) of each shape when requested.
Add the missing variables/methods to the code below so that it produces the output given.
public class Main {
    //TODO add your methods here

    public static void main(String[] args) {
        addShape(new Circle(5));
        addShape(new Rectangle(3, 4));
        addShape(new Circle(10));
        printAreas();
        addShape(new Rectangle(4, 4));
        printAreas();
    }
}
78
12
314
78
12
314
16
Circle class and Rectangle class is given below but you'll need to add a parent class Shape:
public class Circle {

    private int radius;

    public Circle(int radius) {
        this.radius = radius;
    }

    public int area() {
        return (int)(Math.PI * radius * radius);
    }
}
public class Rectangle {
    private int height;
    private int width;

    public Rectangle(int height, int width){
        this.height = height;
        this.width = width;
    }

    public int area() {
        return height * width;
    }
}
💡 You may use an array of size 100 to store the shapes.
public class Main {
    private static Shape[] shapes = new Shape[100];
    private static int shapeCount = 0;

    public static void addShape(Shape s){
        shapes[shapeCount] = s;
        shapeCount++;
    }

    // ...

}
This exercise continues from the TaskManager Level1 exercise quoted above.
Enhance your TaskManager program in the following ways.
A. Add support for two types of tasks:
- ToDo : a task to do someday
- Deadline: a task to be done by a specific deadline
Both types keeps an internal flag to indicate if the task is done. The flag is initially set to false.
Here is an example output:
Welcome to TaskManager-Level2!
Your task? todo submit report
Tasks in the list: 1
Your task? deadline write report /by this Friday 4pm
Tasks in the list: 2
Your task? todo read textbook
Tasks in the list: 3
Your task? deadline return textbook /by Sunday
Tasks in the list: 4
Your task? print
Tasks:
[1] description: submit report
is done? No
[2] description: write report
is done? No
do by: this Friday 4pm
[3] description: read textbook
is done? No
[4] description: return textbook
is done? No
do by: Sunday
Your task? exit
Bye!
Changes to the behavior:
addtask description: adds thetask descriptionto the task listtodotask description: adds to the task list a todo task with the giventask descriptiondeadlinetask description /by deadline description: adds to the task list a deadline task with the giventask descriptionand with thedeadline description
Suggestion:
- Make the
Todoclass inherit fromTaskclass, and makeDeadlinetask inherit fromTodoclass. - Use polymorphism to store both types of tasks in an array of
Tasktype and use one loop to print both types of tasks.
B. Add support for
Quality Assurance → Testing → Test Automation →
A simple way to semi-automate testing of a CLI(Command Line Interface) app is by using input/output re-direction.
- First, we feed the app with a sequence of test inputs that is stored in a file while redirecting the output to another file.
- Next, we compare the actual output file with another file containing the expected output.
Let us assume we are testing a CLI app called AddressBook. Here are the detailed steps:
-
Store the test input in the text file
input.txt.add Valid Name p/12345 valid@email.butNoPrefix add Valid Name 12345 e/valid@email.butPhonePrefixMissing -
Store the output we expect from the SUT in another text file
expected.txt.Command: || [add Valid Name p/12345 valid@email.butNoPrefix] Invalid command format: add Command: || [add Valid Name 12345 e/valid@email.butPhonePrefixMissing] Invalid command format: add -
Run the program as given below, which will redirect the text in
input.txtas the input toAddressBookand similarly, will redirect the output of AddressBook to a text fileoutput.txt. Note that this does not require any code changes toAddressBook.java AddressBook < input.txt > output.txt-
💡 The way to run a CLI program differs based on the language.
e.g., In Python, assuming the code is inAddressBook.pyfile, use the command
python AddressBook.py < input.txt > output.txt -
💡 If you are using Windows, use a normal command window to run the app, not a Power Shell window.
More on the >operator and the<operator. tangentialA CLI program takes input from the keyboard and outputs to the console. That is because those two are default input and output streams, respectively. But you can change that behavior using
<and>operators. For example, if you runAddressBookin a command window, the output will be shown in the console, but if you run it like this,java AddressBook > output.txtthe Operating System then creates a file
output.txtand stores the output in that file instead of displaying it in the console. No file I/O coding is required. Similarly, adding< input.txt(or any other filename) makes the OS redirect the contents of the file as input to the program, as if the user typed the content of the file one line at a time.Resources:
-
-
Next, we compare
output.txtwith theexpected.txt. This can be done using a utility such as WindowsFC(i.e. File Compare) command, Unixdiffcommand, or a GUI tool such as WinMerge.FC output.txt expected.txt
Note that the above technique is only suitable when testing CLI apps, and only if the exact output can be predetermined. If the output varies from one run to the other (e.g. it contains a time stamp), this technique will not work. In those cases we need more sophisticated ways of automating tests.
CLI App: An application that has a Command Line Interface. i.e. user interacts with the app by typing in commands.
import java.util.Scanner;

public class Main {
    static Scanner in = new Scanner(System.in);
    static Task[] tasks = new Task[100];
    static int taskCount = 0;

    public static void main(String[] args) {
        printWelcome();
        String line;

        boolean isExit = false;
        while (!isExit) {
            line = getInput();
            String command = line.split(" ")[0];
            switch (command) {
                case "exit":
                case "":
                    isExit = true;
                    break;
                case "todo":
                    addTodo(line);
                    break;
                case "deadline":
                    addDeadline(line);
                    break;
                case "print":
                    printTasks();
                    break;
                default:
                    printError();
            }
        }
        exit();

    }

    private static void addTodo(String line) {
        tasks[taskCount] = new Todo(line.substring("todo".length()).trim());
        taskCount++;
        System.out.println("Tasks in the list: " + taskCount);
    }

  // ...

    private static void printTasks() {
        System.out.println("Tasks:");
        for (int i = 0; i < taskCount; i++) {
            System.out.println("[" + (i + 1) + "] " + tasks[i]);
        }
    }
}
Evidence:
To be able to do exercises such as these:
The Main class below keeps a list of Circle and Rectangle objects and prints the area (as an int value) of each shape when requested.
Add the missing variables/methods to the code below so that it produces the output given.
public class Main {
    //TODO add your methods here

    public static void main(String[] args) {
        addShape(new Circle(5));
        addShape(new Rectangle(3, 4));
        addShape(new Circle(10));
        printAreas();
        addShape(new Rectangle(4, 4));
        printAreas();
    }
}
78
12
314
78
12
314
16
Circle class and Rectangle class is given below but you'll need to add a parent class Shape:
public class Circle {

    private int radius;

    public Circle(int radius) {
        this.radius = radius;
    }

    public int area() {
        return (int)(Math.PI * radius * radius);
    }
}
public class Rectangle {
    private int height;
    private int width;

    public Rectangle(int height, int width){
        this.height = height;
        this.width = width;
    }

    public int area() {
        return height * width;
    }
}
💡 You may use an array of size 100 to store the shapes.
public class Main {
    private static Shape[] shapes = new Shape[100];
    private static int shapeCount = 0;

    public static void addShape(Shape s){
        shapes[shapeCount] = s;
        shapeCount++;
    }

    // ...

}
W4.2b Can use abstract classes and methods
C++ to Java → Inheritance →
In Java, an abstract method is declared with the keyword abstract and given without an implementation. If a class includes abstract methods, then the class itself must be declared abstract.
The speak method in this Animal class is abstract. Note how the method signature ends with a semicolon and there is no method body. This makes sense as the implementation of the speak method depends on the type of the animal and it is meaningless to provide a common implementation for all animal types.
public abstract class Animal {

    protected String name;

    public Animal(String name){
        this.name = name;
    }
    public abstract String speak();
}
As one method of the class is abstract, the class itself is abstract.
An abstract class is declared with the keyword abstract. Abstract classes can be used as reference type but cannot be instantiated.
This Account class has been declared as abstract although it does not have any abstract methods. Attempting to instantiate Account objects will result in a compile error.
public abstract class Account {

    int number;

    void close(){
        //...
    }
}
Account a; OK to use as a type
a = new Account(); Compile error!
When an abstract class is subclassed, the subclass should provides implementations for all of the abstract methods in its superclass or else the subclass must also be declared abstract.
The Feline class below inherits from the abstract class Animal but it does not provide an implementation for the abstract method speak. As a result, the Feline class needs to be abstract too.
public abstract class Feline extends Animal {
    public Feline(String name) {
        super(name);
    }

}
The DomesticCat class inherits the abstract Feline class and provides the implementation for the abstract method speak. As a result, it need not be declared abstract.
public class DomesticCat extends Feline {
    public DomesticCat(String name) {
        super(name);
    }

    @Override
    public String speak() {
        return "Meow";
    }
}
Animal a = new Feline("Mittens"); Compile error! Feline is abstract.
Animal a = new DomesticCat("Mittens"); OK. DomesticCat can be instantiated and assigned to a variable of Animal type (the assignment is allowed by polymorphism).
The Main class below keeps a list of Circle and Rectangle objects and prints the area (as an int value) of each shape when requested.
public class Main {
    private static Shape[] shapes = new Shape[100];
    private static int shapeCount = 0;

    public static void addShape(Shape s){
        shapes[shapeCount] = s;
        shapeCount++;
    }

    public static void printAreas(){
        for (int i = 0; i < shapeCount; i++){
            shapes[i].print();
        }
    }

    public static void main(String[] args) {
        addShape(new Circle(5));
        addShape(new Rectangle(3, 4));
        addShape(new Circle(10));
        addShape(new Rectangle(4, 4));
        printAreas();
    }
}
Circle of area 78
Rectangle of area 12
Circle of area 314
Rectangle of area 16
Circle class and Rectangle class is given below:
public class Circle extends Shape {

    private int radius;

    public Circle(int radius) {
        this.radius = radius;
    }

    @Override
    public int area() {
        return (int)(Math.PI * radius * radius);
    }

    @Override
    public void print() {
        System.out.println("Circle of area " + area());
    }
}
public class Rectangle extends Shape {
    private int height;
    private int width;

    public Rectangle(int height, int width){
        this.height = height;
        this.width = width;
    }

    @Override
    public int area() {
        return height * width;
    }

    @Override
    public void print() {
        System.out.println("Rectangle of area " + area());
    }
}
Add the missing Shape class as an abstract class with two abstract methods.
public abstract class Shape {

    public abstract int area();
    // ...
}
Choose the correct statements about Java abstract classes and
- a. A concrete class can contain an abstract method.
- b. An abstract class can contain concrete methods.
- c. An abstract class need not contain any concrete methods.
- d. An abstract class cannot be instantiated.
(b)(c)(d)
Explanation: A concrete class cannot contain even a single abstract method.
Evidence:
To be able to do exercises such as these:
The Main class below keeps a list of Circle and Rectangle objects and prints the area (as an int value) of each shape when requested.
public class Main {
    private static Shape[] shapes = new Shape[100];
    private static int shapeCount = 0;

    public static void addShape(Shape s){
        shapes[shapeCount] = s;
        shapeCount++;
    }

    public static void printAreas(){
        for (int i = 0; i < shapeCount; i++){
            shapes[i].print();
        }
    }

    public static void main(String[] args) {
        addShape(new Circle(5));
        addShape(new Rectangle(3, 4));
        addShape(new Circle(10));
        addShape(new Rectangle(4, 4));
        printAreas();
    }
}
Circle of area 78
Rectangle of area 12
Circle of area 314
Rectangle of area 16
Circle class and Rectangle class is given below:
public class Circle extends Shape {

    private int radius;

    public Circle(int radius) {
        this.radius = radius;
    }

    @Override
    public int area() {
        return (int)(Math.PI * radius * radius);
    }

    @Override
    public void print() {
        System.out.println("Circle of area " + area());
    }
}
public class Rectangle extends Shape {
    private int height;
    private int width;

    public Rectangle(int height, int width){
        this.height = height;
        this.width = width;
    }

    @Override
    public int area() {
        return height * width;
    }

    @Override
    public void print() {
        System.out.println("Rectangle of area " + area());
    }
}
Add the missing Shape class as an abstract class with two abstract methods.
public abstract class Shape {

    public abstract int area();
    // ...
}
W4.3b Can use interfaces in Java
C++ to Java → Inheritance →
The text given in this section borrows some explanations and code examples from the -- Java Tutorial.
In Java, an interface is a reference type, similar to a class, mainly containing method signatures. Defining an interface is similar to creating a new class except it uses the keyword interface in place of class.
Here is an interface named DrivableVehicle that defines methods needed to drive a vehicle.
public interface DrivableVehicle {
    void turn(Direction direction);
    void changeLanes(Direction direction);
    void signalTurn(Direction direction, boolean signalOn);
    // more method signatures
}
Note that the method signatures have no braces and are terminated with a semicolon.
Interfaces cannot be instantiated—they can only be implemented by classes. When an instantiable class implements an interface, indicated by the keyword implements, it provides a method body for each of the methods declared in the interface.
Here is how a class CarModelX can implement the DrivableVehicle interface.
public class CarModelX implements DrivableVehicle {

    @Override
    public void turn(Direction direction) {
       // implementation
    }

    // implementation of other methods
}
An interface can be used as a type e.g., DrivableVechile dv = new CarModelX();.
Interfaces can inherit from other interfaces using the extends keyword, similar to a class inheriting another.
Here is an interface named SelfDrivableVehicle that inherits the DrivableVehicle interface.
public interface SelfDrivableVehicle extends DrivableVehicle {
   void goToAutoPilotMode();
}
Note that the method signatures have no braces and are terminated with a semicolon.
Furthermore, Java allows multiple inheritance among interfaces. A Java interface can inherit multiple other interfaces. A Java class can implement multiple interfaces (and inherit from one class).
The design below is allowed by Java. In case you are not familiar with UML notation used: solid lines indicate normal inheritance; dashed lines indicate interface inheritance; the triangle points to the parent.
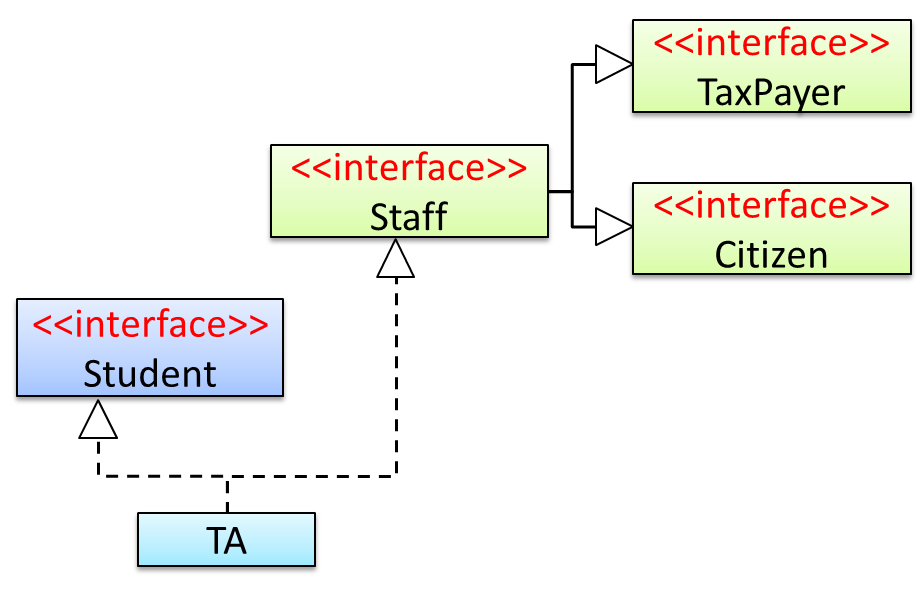
Staffinterface inherits (note the solid lines) the interfacesTaxPayerandCitizen.TAclass implements bothStudentinterface and theStaffinterface.- Because of point 1 above,
TAclass has to implement all methods in the interfacesTaxPayerandCitizen. - Because of points 1,2,3, a
TAis aStaff, is aTaxPayerand is aCitizen.
Interfaces can also contain
C++ to Java → Miscellaneous Topics →
Java does not directly support constants. The convention is to use a static final variable where a constant is needed. The static modifier causes the variable to be available without instantiating an object. The final modifier causes the variable to be unchangeable. Java constants are normally declared in ALL CAPS separated by underscores.
Here is an example of a constant named MAX_BALANCE which can be accessed as Account.MAX_BALANCE.
public class Account{

  public static final double MAX_BALANCE = 1000000.0;

}
Math.PI is an example constant that comes with Java.
This example adds a constant MAX_SPEED and a static method isSpeedAllowed to the interface DrivableVehicle.
public interface DrivableVehicle {

    int MAX_SPEED = 150;

    static boolean isSpeedAllowed(int speed){
        return speed <= MAX_SPEED;
    }

    void turn(Direction direction);
    void changeLanes(Direction direction);
    void signalTurn(Direction direction, boolean signalOn);
    // more method signatures
}
Interfaces can contain default method implementations and nested types. They are not covered here.
The Main class below passes a list of Printable objects (i.e., objects that implement the Printable interface) for another method to be printed.
public class Main {

    public static void printObjects(Printable[] items) {
        for (Printable p : items) {
            p.print();
        }
    }

    public static void main(String[] args) {
        Printable[] printableItems = new Printable[]{
                new Circle(5),
                new Rectangle(3, 4),
                new Person("James Cook")};

        printObjects(printableItems);
    }
}
Circle of area 78
Rectangle of area 12
Person of name James Cook
Classes Shape, Circle, and Rectangle are given below:
public abstract class Shape {

    public abstract int area();
}
public class Circle extends Shape implements Printable {

    private int radius;

    public Circle(int radius) {
        this.radius = radius;
    }

    @Override
    public int area() {
        return (int)(Math.PI * radius * radius);
    }

    @Override
    public void print() {
        System.out.println("Circle of area " + area());
    }
}
public class Rectangle extends Shape implements Printable {
    private int height;
    private int width;

    public Rectangle(int height, int width){
        this.height = height;
        this.width = width;
    }

    @Override
    public int area() {
        return height * width;
    }

    @Override
    public void print() {
        System.out.println("Rectangle of area " + area());
    }
}
Add the missing Printable interface. Add the missing methods of the Person class given below.
public class Person implements Printable {

    private String name;

    // todo: add missing methods
}
public interface Printable {
    //...
}
Evidence:
To be able to do exercises such as these:
The Main class below passes a list of Printable objects (i.e., objects that implement the Printable interface) for another method to be printed.
public class Main {

    public static void printObjects(Printable[] items) {
        for (Printable p : items) {
            p.print();
        }
    }

    public static void main(String[] args) {
        Printable[] printableItems = new Printable[]{
                new Circle(5),
                new Rectangle(3, 4),
                new Person("James Cook")};

        printObjects(printableItems);
    }
}
Circle of area 78
Rectangle of area 12
Person of name James Cook
Classes Shape, Circle, and Rectangle are given below:
public abstract class Shape {

    public abstract int area();
}
public class Circle extends Shape implements Printable {

    private int radius;

    public Circle(int radius) {
        this.radius = radius;
    }

    @Override
    public int area() {
        return (int)(Math.PI * radius * radius);
    }

    @Override
    public void print() {
        System.out.println("Circle of area " + area());
    }
}
public class Rectangle extends Shape implements Printable {
    private int height;
    private int width;

    public Rectangle(int height, int width){
        this.height = height;
        this.width = width;
    }

    @Override
    public int area() {
        return height * width;
    }

    @Override
    public void print() {
        System.out.println("Rectangle of area " + area());
    }
}
Add the missing Printable interface. Add the missing methods of the Person class given below.
public class Person implements Printable {

    private String name;

    // todo: add missing methods
}
public interface Printable {
    //...
}
W4.4e Can use Java Exceptions
C++ to Java → Exceptions →
The content below uses extracts from the -- Java Tutorial, with some adaptations.
A program can catch exceptions by using a combination of the try, catch blocks.
- The
tryblock identifies a block of code in which an exception can occur. - The
catchblock identifies a block of code, known as an exception handler, that can handle a particular type of exception.
The writeList() method below calls a method process() that can cause two type of exceptions. It uses a try-catch construct to deal with each exception.
public void writeList() {
    print("starting method");
    try {
        print("starting process");
        process();
        print("finishing process");

    } catch (IndexOutOfBoundsException e) {
        print("caught IOOBE");

    } catch (IOException e) {
        print("caught IOE");

    }
    print("finishing method");
}
Some possible outputs:
| No exceptions | IOException |
IndexOutOfBoundsException |
|---|---|---|
| starting method starting process finishing process finishing method |
starting method starting process caught IOE finishing method |
starting method starting process caught IOOBE finishing method |
You can use a finally block to specify code that is guaranteed to execute with or without the exception. This is the right place to close files, recover resources, and otherwise clean up after the code enclosed in the try block.
The writeList() method below has a finally block:
public void writeList() {
    print("starting method");
    try {
        print("starting process");
        process();
        print("finishing process");

    } catch (IndexOutOfBoundsException e) {
        print("caught IOOBE");

    } catch (IOException e) {
        print("caught IOE");

    } finally {
        // clean up
        print("cleaning up");
    }
    print("finishing method");
}
Some possible outputs:
| No exceptions | IOException |
IndexOutOfBoundsException |
|---|---|---|
| starting method starting process finishing process cleaning up finishing method |
starting method starting process caught IOE cleaning up finishing method |
starting method starting process caught IOOBE cleaning up finishing method |
-
The
trystatement should contain at least onecatchblock or a finally block and may have multiplecatchblocks. -
The class of the exception object indicates the type of exception thrown. The exception object can contain further information about the error, including an error message.
You can use the throw statement to throw an exception. The throw statement requires a
Here's an example of a throw statement.
if (size == 0) {
    throw new EmptyStackException();
}
In Java, Checked exceptions are subject to the Catch or Specify Requirement: code that might throw checked exceptions must be enclosed by either of the following:
- A
trystatement that catches the exception. Thetrymust provide a handler for the exception. - A method that specifies that it can throw the exception. The method must provide a
throwsclause that lists the exception.
Unchecked exceptions are not required to follow to the Catch or Specify Requirement but you can apply the requirement to them too.
Here's an example of a method specifying that it throws certain checked exceptions:
public void writeList() throws IOException, IndexOutOfBoundsException {
    print("starting method");
    process();
    print("finishing method");
}
Some possible outputs:
| No exceptions | IOException |
IndexOutOfBoundsException |
|---|---|---|
| starting method finishing method |
starting method |
starting method |
Java comes with a collection of built-in exception classes that you can use. When they are not enough, it is possible to create your own exception classes.
The Main class below parses a string descriptor of a rectangle of the format "WIDTHxHEIGHT" e.g., "3x4" and prints the area of the rectangle.
public class Main {

    public static void printArea(String descriptor){
        //TODO: modify the code below
        System.out.println(descriptor + "=" + calculateArea(descriptor));
    }

    private static int calculateArea(String descriptor) {
        //TODO: modify the code below
        String[] dimensions = descriptor.split("x");
        return Integer.parseInt(dimensions[0]) * Integer.parseInt(dimensions[1]);
    }

    public static void main(String[] args) {
        printArea("3x4");
        printArea("5x5");
    }
}
3x4=12
5x5=25
-
Update the code of
printAreato print an error message ifWIDTHand/orHEIGHTare not numbers e.g.,"Ax4"
💡calculateAreawill throw the unchecked exceptionNumberFormatExceptionif the code tries to parse a non-number to an integer. -
Update the code of
printAreato print an error message if the descriptor is missingWIDTHand/orHEIGHTe.g.,"x4"
💡calculateAreawill throw the unchecked exceptionIndexOutOfBoundsExceptionif one or both dimensions are missing. -
Update the code of
calculateAreato throw the checked exceptionIllegalShapeExceptionif there are more than 2 dimensions e.g.,"5x4x3"and update theprintAreato print an error message for those cases. Here is the code for theIllegalShapeException.java
public class IllegalShapeException extends Exception {
  //no other code needed
}
Here is the expected behavior after you have done the above changes:
public class Main {

    //...

    public static void main(String[] args) {
        printArea("3x4");
        printArea("3xy");
        printArea("3x");
        printArea("3");
        printArea("3x4x5");
    }
}
3x4=12
WIDTH or HEIGHT is not a number: 3xy
WIDTH or HEIGHT is missing: 3x
WIDTH or HEIGHT is missing: 3
Too many dimensions: 3x4x5
public class Main {

    public static void printArea(String descriptor){
        try {
            System.out.println(descriptor + "=" + calculateArea(descriptor));
        } catch (NumberFormatException e) {
            System.out.println("WIDTH or HEIGHT is not a number: " + descriptor);
        } // add more catch blocks here
    }

    private static int calculateArea(String descriptor) throws IllegalShapeException {
        String[] dimensions = descriptor.split("x");

        //throw IllegalShapeException here if dimensions.length > 2

        return Integer.parseInt(dimensions[0]) * Integer.parseInt(dimensions[1]);
    }


}
This exercise continues from the TaskManager Level 1-2 exercises quoted above.
Enhance the TaskManager to print an error message if a command is missing parts. Use exceptions so that error detection and printing of error message happen at different places of code and the error information is passed between the two places using an Exception object.
Here is an example output:
Welcome to TaskManager-Level3!
Your task? todo
Error: Empty description for TODO
Your task? todo read book
Tasks in the list: 1
Your task? print
Tasks:
[1] description: read book
is done? No
Your task?
Suggested approach:
- Create a
TaskManagerExceptionclass that inherits theExceptionclass. Override the constructor that takes aStringparameter so that you can specify the error information when you create aTaskManagerExceptionobject. - Throw a new
TaskManagerExceptionobject when you detect some necessary information is missing in the command. - Catch that exception somewhere else and print the message inside the exception object.
public class TaskManagerException extends Exception{
    public TaskManagerException(String message) {
        super(message);
    }
}
    public static void main(String[] args) {
        // ...
        while (!isExit) {
            try {
                line = getInput();
                String command = line.split(" ")[0];
                switch (command) {
                    case "todo":
                        addTodo(line);
                        break;
                    // ...
                }
            } catch (TaskManagerException e) {
                printError(e.getMessage());
            }
        }
        // ...

    }

    private static void addTodo(String line) throws TaskManagerException {
        String description = line.substring("todo".length()).trim();
        if (description.isEmpty()){
            throw new TaskManagerException("Empty description for TODO");
        }
        // ...
    }
Evidence:
To be able to do exercises such as these:
The Main class below parses a string descriptor of a rectangle of the format "WIDTHxHEIGHT" e.g., "3x4" and prints the area of the rectangle.
public class Main {

    public static void printArea(String descriptor){
        //TODO: modify the code below
        System.out.println(descriptor + "=" + calculateArea(descriptor));
    }

    private static int calculateArea(String descriptor) {
        //TODO: modify the code below
        String[] dimensions = descriptor.split("x");
        return Integer.parseInt(dimensions[0]) * Integer.parseInt(dimensions[1]);
    }

    public static void main(String[] args) {
        printArea("3x4");
        printArea("5x5");
    }
}
3x4=12
5x5=25
-
Update the code of
printAreato print an error message ifWIDTHand/orHEIGHTare not numbers e.g.,"Ax4"
💡calculateAreawill throw the unchecked exceptionNumberFormatExceptionif the code tries to parse a non-number to an integer. -
Update the code of
printAreato print an error message if the descriptor is missingWIDTHand/orHEIGHTe.g.,"x4"
💡calculateAreawill throw the unchecked exceptionIndexOutOfBoundsExceptionif one or both dimensions are missing. -
Update the code of
calculateAreato throw the checked exceptionIllegalShapeExceptionif there are more than 2 dimensions e.g.,"5x4x3"and update theprintAreato print an error message for those cases. Here is the code for theIllegalShapeException.java
public class IllegalShapeException extends Exception {
  //no other code needed
}
Here is the expected behavior after you have done the above changes:
public class Main {

    //...

    public static void main(String[] args) {
        printArea("3x4");
        printArea("3xy");
        printArea("3x");
        printArea("3");
        printArea("3x4x5");
    }
}
3x4=12
WIDTH or HEIGHT is not a number: 3xy
WIDTH or HEIGHT is missing: 3x
WIDTH or HEIGHT is missing: 3
Too many dimensions: 3x4x5
public class Main {

    public static void printArea(String descriptor){
        try {
            System.out.println(descriptor + "=" + calculateArea(descriptor));
        } catch (NumberFormatException e) {
            System.out.println("WIDTH or HEIGHT is not a number: " + descriptor);
        } // add more catch blocks here
    }

    private static int calculateArea(String descriptor) throws IllegalShapeException {
        String[] dimensions = descriptor.split("x");

        //throw IllegalShapeException here if dimensions.length > 2

        return Integer.parseInt(dimensions[0]) * Integer.parseInt(dimensions[1]);
    }


}
W4.5a Can explain refactoring
Implementation → Refactoring →
The first version of the code you write may not be of production quality. It is OK to first concentrate on making the code work, rather than worry over the quality of the code, as long as you improve the quality later. This process of improving a program's internal structure in small steps without modifying its external behavior is called refactoring.
- Refactoring is not rewriting: Discarding poorly-written code entirely and re-writing it from scratch is not refactoring because refactoring needs to be done in small steps.
- Refactoring is not bug fixing: By definition, refactoring is different from bug fixing or any other modifications that alter the external behavior (e.g. adding a feature) of the component in concern.
💡 Improving code structure can have many secondary benefits: e.g.
- hidden bugs become easier to spot
- improve performance (sometimes, simpler code runs faster than complex code because simpler code is easier for the compiler to optimize).
Given below are two common refactorings (
- Java: http://refactoring.com/catalog/ - This is a list of common refactorings, maintained by Martin Fowler, a leading authority on refactoring. He is also the author of the ‘bestseller’ on refactoring: Refactoring: Improving the Design of Existing Code
- Python: https://refactoring.guru/refactoring/catalog -- A catalog of refactorings applicable to Python code.
Refactoring Name: Consolidate Duplicate Conditional Fragments
Situation: The same fragment of code is in all branches of a conditional expression.
Method: Move it outside of the expression.
Example:
|
→ |
|
|
→ |
|
Refactoring Name: Extract Method
Situation: You have a code fragment that can be grouped together.
Method: Turn the fragment into a method whose name explains the purpose of the method.
Example:
void printOwing() {
    printBanner();

    //print details
    System.out.println("name:	" + name);
    System.out.println("amount	" + getOutstanding());
}
void printOwing() {
    printBanner();
    printDetails(getOutstanding());
}

void printDetails (double outstanding) {
    System.out.println("name:	" + name);
    System.out.println("amount	" + outstanding);
}
def print_owing():
    print_banner()

    //print details
    print("name:	" + name)
    print("amount	" + get_outstanding())
def print_owing():
    print_banner()
    print_details(get_outstanding())

def print_details(amount):
    print("name:	" + name)
    print("amount	" + amount)
💡 Some IDEs have built in support for basic refactorings such as automatically renaming a variable/method/class in all places it has been used.
Refactoring, even if done with the aid of an IDE, may still result in regressions. Therefore, each small refactoring should be followed by regression testing.
Choose the correct statements
- a. Refactoring can improve understandability
- b. Refactoring can uncover bugs
- c. Refactoring can result in better performance
- d. Refactoring can change the number of methods/classes
a, b, c, d
Explanation:
- (a, b, c) Although the primary aim of refactoring is to improve internal code structure, there are other secondary benefits.
- (d) Some refactorings result in adding/removing methods/classes.
Do you agree with the following statement? Justify your answer.
Statement: Whenever we refactor code to fix bugs, we need not do regression testing if the bug fix was minor.
There are two flaws in the given statement.
DISAGREE.
- Even a minor change can have major repercussions on the system. We MUST do regression testing after each change, no matter how minor it is.
- Fixing bugs is technically not refactoring.
Explain what is refactoring and why it is not the same as rewriting, bug fixing, or adding features.
Evidence:
Explain what is refactoring and why it is not the same as rewriting, bug fixing, or adding features.
W4.5b Can use automated refactoring features of the IDE
Tools → Intellij IDEA →
This video explains how to automate the 'Extract parameter' refactoring using Intellij IDEA. Most other refactorings available works similarly. i.e. select the code to refactor → find the refactoring in the context menu or use the keyboard shortcut.
Here's another video explaining how to change a method signature as part of refactoring.
- Introduction to Refactoring (in Intellij IDEA) : An article on refactorings available in Intellij IDEA.
Evidence:
Have done some automated refactoring in the IDE.
W4.5c Can apply some basic refactoring
Implementation → Refactoring →
Given below are some more commonly used refactorings. A more comprehensive list is available at
- Java: http://refactoring.com/catalog/ - This is a list of common refactorings, maintained by Martin Fowler, a leading authority on refactoring. He is also the author of the ‘bestseller’ on refactoring: Refactoring: Improving the Design of Existing Code
- Python: https://refactoring.guru/refactoring/catalog -- A catalog of refactorings applicable to Python code.
Evidence:
Have done some refactorings in some code you wrote e.g., your TaskManager code
W4.5d Can decide when to apply a given refactoring
Implementation → Refactoring →
We know that it is important to refactor frequently so as to avoid the accumulation of ‘messy’ code which might get out of control. But how much refactoring is too much refactoring? It is too much refactoring when the benefits no longer justify the cost. The costs and the benefits depend on the context. That is why some refactorings are ‘opposites’ of each other (e.g. extract method vs inline method).
‘Extract method’ and ‘Inline method’ refactorings
a
Evidence:
Give an example from any project (e.g. your TaskManager code) where a refactoring can be applied but you decide against it because it is not worth it.
W4.6 Project preparation: Can use basic inheritance in a small project
Enhance your TaskManager program as explained in the exercise below:
This exercise continues from the TaskManager Level1 exercise quoted above.
Enhance your TaskManager program in the following ways.
A. Add support for two types of tasks:
- ToDo : a task to do someday
- Deadline: a task to be done by a specific deadline
Both types keeps an internal flag to indicate if the task is done. The flag is initially set to false.
Here is an example output:
Welcome to TaskManager-Level2!
Your task? todo submit report
Tasks in the list: 1
Your task? deadline write report /by this Friday 4pm
Tasks in the list: 2
Your task? todo read textbook
Tasks in the list: 3
Your task? deadline return textbook /by Sunday
Tasks in the list: 4
Your task? print
Tasks:
[1] description: submit report
is done? No
[2] description: write report
is done? No
do by: this Friday 4pm
[3] description: read textbook
is done? No
[4] description: return textbook
is done? No
do by: Sunday
Your task? exit
Bye!
Changes to the behavior:
addtask description: adds thetask descriptionto the task listtodotask description: adds to the task list a todo task with the giventask descriptiondeadlinetask description /by deadline description: adds to the task list a deadline task with the giventask descriptionand with thedeadline description
Suggestion:
- Make the
Todoclass inherit fromTaskclass, and makeDeadlinetask inherit fromTodoclass. - Use polymorphism to store both types of tasks in an array of
Tasktype and use one loop to print both types of tasks.
B. Add support for
Quality Assurance → Testing → Test Automation →
A simple way to semi-automate testing of a CLI(Command Line Interface) app is by using input/output re-direction.
- First, we feed the app with a sequence of test inputs that is stored in a file while redirecting the output to another file.
- Next, we compare the actual output file with another file containing the expected output.
Let us assume we are testing a CLI app called AddressBook. Here are the detailed steps:
-
Store the test input in the text file
input.txt.add Valid Name p/12345 valid@email.butNoPrefix add Valid Name 12345 e/valid@email.butPhonePrefixMissing -
Store the output we expect from the SUT in another text file
expected.txt.Command: || [add Valid Name p/12345 valid@email.butNoPrefix] Invalid command format: add Command: || [add Valid Name 12345 e/valid@email.butPhonePrefixMissing] Invalid command format: add -
Run the program as given below, which will redirect the text in
input.txtas the input toAddressBookand similarly, will redirect the output of AddressBook to a text fileoutput.txt. Note that this does not require any code changes toAddressBook.java AddressBook < input.txt > output.txt-
💡 The way to run a CLI program differs based on the language.
e.g., In Python, assuming the code is inAddressBook.pyfile, use the command
python AddressBook.py < input.txt > output.txt -
💡 If you are using Windows, use a normal command window to run the app, not a Power Shell window.
More on the >operator and the<operator. tangentialA CLI program takes input from the keyboard and outputs to the console. That is because those two are default input and output streams, respectively. But you can change that behavior using
<and>operators. For example, if you runAddressBookin a command window, the output will be shown in the console, but if you run it like this,java AddressBook > output.txtthe Operating System then creates a file
output.txtand stores the output in that file instead of displaying it in the console. No file I/O coding is required. Similarly, adding< input.txt(or any other filename) makes the OS redirect the contents of the file as input to the program, as if the user typed the content of the file one line at a time.Resources:
-
-
Next, we compare
output.txtwith theexpected.txt. This can be done using a utility such as WindowsFC(i.e. File Compare) command, Unixdiffcommand, or a GUI tool such as WinMerge.FC output.txt expected.txt
Note that the above technique is only suitable when testing CLI apps, and only if the exact output can be predetermined. If the output varies from one run to the other (e.g. it contains a time stamp), this technique will not work. In those cases we need more sophisticated ways of automating tests.
CLI App: An application that has a Command Line Interface. i.e. user interacts with the app by typing in commands.
import java.util.Scanner;

public class Main {
    static Scanner in = new Scanner(System.in);
    static Task[] tasks = new Task[100];
    static int taskCount = 0;

    public static void main(String[] args) {
        printWelcome();
        String line;

        boolean isExit = false;
        while (!isExit) {
            line = getInput();
            String command = line.split(" ")[0];
            switch (command) {
                case "exit":
                case "":
                    isExit = true;
                    break;
                case "todo":
                    addTodo(line);
                    break;
                case "deadline":
                    addDeadline(line);
                    break;
                case "print":
                    printTasks();
                    break;
                default:
                    printError();
            }
        }
        exit();

    }

    private static void addTodo(String line) {
        tasks[taskCount] = new Todo(line.substring("todo".length()).trim());
        taskCount++;
        System.out.println("Tasks in the list: " + taskCount);
    }

  // ...

    private static void printTasks() {
        System.out.println("Tasks:");
        for (int i = 0; i < taskCount; i++) {
            System.out.println("[" + (i + 1) + "] " + tasks[i]);
        }
    }
}
Lecture 5
[slides]