TIC2002 (2018)
  • Schedule
  • Textbook
  • Admin Info
  • Report Bugs
  • Forum
  • Announcements
  • File Submissions
  • Java Coding Standard
  • samplerepo-things
  • Addressbook-level1
  • Addressbook-level2
  • TIC2002 Admin Info


    Module overview

    TIC2002 Introduction to Software Engineering contains roughly a 50-50 balance of theory and practice of SE. It covers the knowledge/skills necessary to do small software projects, and as such, it is a first step towards preparing you to work in bigger SE projects, which will be done in later modules.


    Using this module website

    The Schedule pageSchedule page is your main source of information for TIC2002. You will need to refer to it weekly.

    More details for the upcoming weeks will be added as the weeks progress. In general, information given for more than 1 week into the future should be treated as tentative.

    đź’ˇ For those who don't like the nested style used by this website, we have also provided flat version of the the website. You can switch between the two versions using the top navigation bar of the website.

    Browser Compatibility

    Most of this will work on most mainstream Browsers, but embedded slides are best viewed using Chrome.

    Information Layers

    This book tries to layer information so that readers can decide to omit less important layers if they wish to.

    More important information are in bold or highlighted while less important information are dimmed or in collapsed panels such as the below.

    Less important info

    Less important info

    Less important info

    Tabs indicate alternative formats of the same content (e.g. video vs text). You can choose the one you like and ignore the other tabs.

        Some textual description of X


    Video describing X

    Dotted underlines indicate tool tips (activated by hovering over it) and dashed underlines indicate modal windows (activated by clicking) containing additional information.

    Additional information
    Additional information

    This website uses a star rating system to indicate the priority level of contents.

    Star rating system

    Start with things that are rated one-star and progress to things with more stars. Things rated four stars are optional.

    Star ratings for Learning Outcomes (and textbook sections):

    • One-star LOs : The LOs you need to achieve just to keep up with the module. We recommend you to achieve these LOs if you want to pass the module (i.e. up to a C grade).

    • Two-stars LOs : Can get you up to a B+.

    • Three-stars LOs : Can get you up to an A+.

    • Four-stars LOs : Optional. Not examinable. For your own knowledge.

    • LOs marked with two icons e.g., : , : , : , : are relevant LOs you are expected have achieved in prerequisite modules. They are given for reference only. The number of stars indicate the progression of topics, similar to the star rating system above i.e., one-star prerequisite LOs are the most basic and the most important. four-star pre-requisite LOs can be ignored without affecting CAP.

    Conventions Used

    Shorthand Headings

    Meaning of some shortened headings:

    • What : the meaning of the concept in concern

    • Why : the motivation behind the concept in concern

    • How : the usage of the concept in concern

    • When : the pros and cons of the concept in concern, when to use the concept

    Boxed-Text Styles

    additional info warning positive message important message an error to avoid tip definition

    Meaning of Icons

    tangential : tangential info, can be ignored if not interested
    : direct link to the LO. Ctrl+Click to open the LO in new window/tab.
    : learning outcomes
    : prerequisite learning outcome
    : examples
    : resources
    : exercises
    : printable version
    : preview/more info
    : video
    >_ : a command to be run in a terminal
    : textual description
    : slides
    : output produced by running code
    question without answer
    question with answer

    : tasks to do
    : lecture
    : tutorial
    : evidence you can use to prove you have achieved a learning outcome
    ⏰ : deadline

    Searching for keywords

    Use the search box in the top navigation bar to search for keywords in the website pages. If you cannot find the content related to a keyword, let us know by posting in the website issue tracker so that we can add the missing keyword to our search index.

    Saving as PDF Files

    1. Use Chrome to load the page you want to save as pdf.

    2. Click on the Print option in Chrome’s menu.

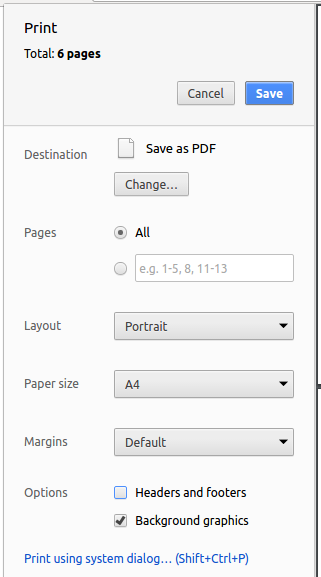
    3. Set the destination to Save as PDF, then click Save to save a copy of the file in PDF format. For best results, use the settings indicated in the screenshot below.

    Printing Textbook Content

    Printer-friendly version (indicated by icon) have been provided for each chapter and the whole book. You can use them for saving as pdf files or printing.

    Making this Website Better

    This website was generated using the MarkBind software developed at NUS. We welcome bug reports, suggestions, and contributions, to be submitted at the website issue tracker. Alternatively, you can email your input to the lecturer.


    Instructors

    Damith Chatura RAJAPAKSE
    Associate Professor, NUS School of Computing
    PhD, Software Engineering, NUS, 2002-2006
    BSc, Computer Science & Engineering, University of Moratuwa, 1996-2001
    damith[at]comp[dot]nus[dot]edu[dot]sg
    COM2-02-57
    651 64359
    https://www.comp.nus.edu.sg/~damithch


    Lectures

    Tuesdays 7.30-9.30pm
    SR10 (COM1-0210)

    Lectures will not be webcast as the venue does not have a webcast facility. Please bring your laptop to the lecture as you will need to be using it for the most part of the lecture.

    Lecture handouts will be uploaded to IVLE before the lecture, usually by midnight of the Sunday before the lecture.

    Lecture slides are not suitable to be used as reference materials as they have been optimized for lecture delivery instead. Slides will be uploaded to IVLE after the lecture, usually by Wednesday.

    đź’ˇ If handouts/slides are not in IVLE by the expected times, please feel free to ping the lecturer.


    Tutorials

    Tuesdays 6.30-7.30pm
    SR10 (COM1-0210)


    Textbook

    This module is supported by a customized online textbook Software Engineering for Self-Directed Learners (TIC2002 edition), integrated into this module website. While it is in a dynamic Web page format, there is a way to save the main text as pdf files. Printer-friendly versions have been provided too.

    Relevant: [Admin Using this Website → Saving as PDF files ]


    Saving as PDF Files

    1. Use Chrome to load the page you want to save as pdf.

    2. Click on the Print option in Chrome’s menu.

    3. Set the destination to Save as PDF, then click Save to save a copy of the file in PDF format. For best results, use the settings indicated in the screenshot below.


    Programming language

    This module uses Java. It assumes you are familiar with C++ basics and provides lessons to help you transition from C++ to Java.


    Project

    For the project you can choose one of these options:

    • Option 1: Enhance the Task Manager app that you worked on during the preparation stage.
    • Option 2: Take the code from Addressbook-level2 and enhance it in some way.
    • Option 3: Propose your own project.

    Can be done individually or in a team of two/three members.

    The project is divided into two phases:

    • Week 1 - 6: Preparation stage i.e., building up your coding skills for the module project
    • Week 7 - 12: Project execution.

    Weeks 1-6: Project preparation

    Ensure that you are able to do this exercise based on your current Java knowledge. There is no need to do the exercise if you have prior programming experience and you are confident of being able to do it. But if you are new to programming, we highly recommend you to attempt this exercise and get help from the prof if you are unable to complete it.

    We recommend you to do this exercise on your own computer rather than on repl.it.

    This is a good time to put together some of the topics you have learned so far to create something useful. In this exercise you will write a small TaskManager program that can store a list of tasks.

    • It is a CLI program.
    • In this version, the task list is not saved to the disk i.e., the task list does not persist between multiple runs of the program

    Here is an example output:

    Welcome to TaskManager-Level1!
    Your task? add submit report
    Tasks in the list: 1
    Your task? add return library book
    Tasks in the list: 2
    Your task? add remind boss about meeting
    Tasks in the list: 3
    Your task? xyz
    Unknown command! please try again
    Your task? print
    [1] submit report
    [2] return library book
    [3] remind boss about meeting
    Your task? add set up meeting with boss
    Tasks in the list: 4
    Your task? print
    [1] submit report
    [2] return library book
    [3] remind boss about meeting
    [4] set up meeting with boss
    Your task? exit
    Bye!
    

    Summary of behavior:

    • Task Manager prompts for user input with the message Your task?
    • add task description: adds the task description to the task list
    • print: prints the tasks added so far
    • exit or empty input: terminates the program

    If you are new to programming, we recommend you to build the program in small steps, as follows:

    1. Write a program that reads any user input, prints it back to the user, and exits.
    2. Update the program to do the above in a loop until user types exit.
    3. Add greetings printed at the start and the end.
    4. If the first word is not add or exit, print an error message. Suggestion: use a switch statement to choose between multiple actions.
    5. Create a Task class to represent tasks and add an Task[] to store tasks.
    6. If the first word of the user input is add, add the whole line (no need to omit the first word) to the task list.
    7. Update the code in the previous step to omit the word add from the task description.
    8. Add support for the print command.
    9. Add support for terminating if the user input is empty
    10. and so on ...
    import java.util.Scanner;
    
    public class Main {
        static Scanner in = new Scanner(System.in);
        static Task[] tasks = new Task[100];
        static int count = 0;  // to keep track of number of tasks in the list
    
        public static void main(String[] args) {
            printWelcome();
            String line;
            boolean isExit = false;
            while (!isExit) {
                line = getInput();
                String command = line.split(" ")[0]; //extract the first word of the user input
                switch (command) {
                    case "exit":
                    case "": // exit if user input is empty
                        isExit = true;
                        break;
                    case "add":
                        // todo: add code here
                    default:
                        printError();
                }
            }
            exit();
    
        }
    
        private static void printWelcome() {
            System.out.println("Welcome to TaskManager-Level1!");
        }
    
        private static void printTasks() {
            for (int i = 0; i < count; i++) {
                System.out.println("[" + (i + 1) + "] " + tasks[i].getDescription());
            }
        }
    
        // todo: add missing methods
    }


    Enhance your TaskManager program as explained in the exercise below:

    This exercise continues from the TaskManager Level1 exercise quoted above.

    Enhance your TaskManager program in the following ways.

    A. Add support for two types of tasks:

    • ToDo : a task to do someday
    • Deadline: a task to be done by a specific deadline

    Both types keeps an internal flag to indicate if the task is done. The flag is initially set to false.

    Here is an example output:

    Welcome to TaskManager-Level2!
    Your task? todo submit report
    Tasks in the list: 1
    Your task? deadline write report /by this Friday 4pm
    Tasks in the list: 2
    Your task? todo read textbook
    Tasks in the list: 3
    Your task? deadline return textbook /by Sunday
    Tasks in the list: 4
    Your task? print
    Tasks:
    [1] description: submit report
        is done? No
    [2] description: write report
        is done? No
    do by: this Friday 4pm
    [3] description: read textbook
        is done? No
    [4] description: return textbook
        is done? No
        do by: Sunday
    Your task? exit
    Bye!

    Changes to the behavior:

    • add task description: adds the task description to the task list
    • todo task description: adds to the task list a todo task with the given task description
    • deadline task description /by deadline description: adds to the task list a deadline task with the given task description and with the deadline description

    Suggestion:

    • Make the Todo class inherit from Task class, and make Deadline task inherit from Todo class.
    • Use polymorphism to store both types of tasks in an array of Task type and use one loop to print both types of tasks.

    B. Add support for semi-automated regression testing using input/output redirection.


    Quality Assurance → Testing → Test Automation →

    Automated Testing of CLI Apps

    A simple way to semi-automate testing of a CLI(Command Line Interface) app is by using input/output re-direction.

    • First, we feed the app with a sequence of test inputs that is stored in a file while redirecting the output to another file.
    • Next, we compare the actual output file with another file containing the expected output.

    Let us assume we are testing a CLI app called AddressBook. Here are the detailed steps:

    1. Store the test input in the text file input.txt.

      add Valid Name p/12345 valid@email.butNoPrefix
      add Valid Name 12345 e/valid@email.butPhonePrefixMissing
      
    2. Store the output we expect from the SUT in another text file expected.txt.

      Command: || [add Valid Name p/12345 valid@email.butNoPrefix]
      Invalid command format: add 
      
      Command: || [add Valid Name 12345 e/valid@email.butPhonePrefixMissing]
      Invalid command format: add 
      
    3. Run the program as given below, which will redirect the text in input.txt as the input to AddressBook and similarly, will redirect the output of AddressBook to a text file output.txt. Note that this does not require any code changes to AddressBook.

      java AddressBook < input.txt > output.txt
      
      • đź’ˇ The way to run a CLI program differs based on the language.
        e.g., In Python, assuming the code is in AddressBook.py file, use the command
        python AddressBook.py < input.txt > output.txt

      • đź’ˇ If you are using Windows, use a normal command window to run the app, not a Power Shell window.

      More on the > operator and the < operator. tangential

      A CLI program takes input from the keyboard and outputs to the console. That is because those two are default input and output streams, respectively. But you can change that behavior using < and > operators. For example, if you run AddressBook in a command window, the output will be shown in the console, but if you run it like this,

      java AddressBook > output.txt 
      

      the Operating System then creates a file output.txt and stores the output in that file instead of displaying it in the console. No file I/O coding is required. Similarly, adding < input.txt (or any other filename) makes the OS redirect the contents of the file as input to the program, as if the user typed the content of the file one line at a time.

      Resources:

    4. Next, we compare output.txt with the expected.txt. This can be done using a utility such as Windows FC (i.e. File Compare) command, Unix diff command, or a GUI tool such as WinMerge.

      FC output.txt expected.txt
      

    Note that the above technique is only suitable when testing CLI apps, and only if the exact output can be predetermined. If the output varies from one run to the other (e.g. it contains a time stamp), this technique will not work. In those cases we need more sophisticated ways of automating tests.

    CLI App: An application that has a Command Line Interface. i.e. user interacts with the app by typing in commands.

    import java.util.Scanner;
    
    public class Main {
        static Scanner in = new Scanner(System.in);
        static Task[] tasks = new Task[100];
        static int taskCount = 0;
    
        public static void main(String[] args) {
            printWelcome();
            String line;
    
            boolean isExit = false;
            while (!isExit) {
                line = getInput();
                String command = line.split(" ")[0];
                switch (command) {
                    case "exit":
                    case "":
                        isExit = true;
                        break;
                    case "todo":
                        addTodo(line);
                        break;
                    case "deadline":
                        addDeadline(line);
                        break;
                    case "print":
                        printTasks();
                        break;
                    default:
                        printError();
                }
            }
            exit();
    
        }
    
        private static void addTodo(String line) {
            tasks[taskCount] = new Todo(line.substring("todo".length()).trim());
            taskCount++;
            System.out.println("Tasks in the list: " + taskCount);
        }
    
      // ...
    
        private static void printTasks() {
            System.out.println("Tasks:");
            for (int i = 0; i < taskCount; i++) {
                System.out.println("[" + (i + 1) + "] " + tasks[i]);
            }
        }
    }
    

    Enhance your TaskManager program as explained in the exercise below:

    This exercise continues from the TaskManager Level 1-2 exercises quoted above.

    Enhance the TaskManager to print an error message if a command is missing parts. Use exceptions so that error detection and printing of error message happen at different places of code and the error information is passed between the two places using an Exception object.

    Here is an example output:

    Welcome to TaskManager-Level3!
    Your task? todo
    Error: Empty description for TODO
    Your task? todo read book
    Tasks in the list: 1
    Your task? print
    Tasks:
    [1] description: read book
    is done? No
    Your task?

    Suggested approach:

    • Create a TaskManagerException class that inherits the Exception class. Override the constructor that takes a String parameter so that you can specify the error information when you create a TaskManagerException object.
    • Throw a new TaskManagerException object when you detect some necessary information is missing in the command.
    • Catch that exception somewhere else and print the message inside the exception object.
    public class TaskManagerException extends Exception{
        public TaskManagerException(String message) {
            super(message);
        }
    }
    
        public static void main(String[] args) {
            // ...
            while (!isExit) {
                try {
                    line = getInput();
                    String command = line.split(" ")[0];
                    switch (command) {
                        case "todo":
                            addTodo(line);
                            break;
                        // ...
                    }
                } catch (TaskManagerException e) {
                    printError(e.getMessage());
                }
            }
            // ...
    
        }
    
        private static void addTodo(String line) throws TaskManagerException {
            String description = line.substring("todo".length()).trim();
            if (description.isEmpty()){
                throw new TaskManagerException("Empty description for TODO");
            }
            // ...
        }
    

    This exercise continues from the TaskManager Level 1-3 exercises quoted above.

    Enhance the TaskManager in the following ways:

    1. Use a suitable Collection class to store tasks, instead of using an array.
    2. Introduce a done n command to mark the task at index n as done.

    Here is an example output:

    Welcome to TaskManager-Level4!
    Your task? todo read book
    Tasks in the list: 1
    Your task? deadline return book /by Friday
    Tasks in the list: 2
    Your task? print
    Tasks:
    [1] description: read book
    is done? No
    [2] description: return book
    is done? No
    do by: Friday
    Your task? done 1
    Tasks in the list: 2
    Your task? print
    Tasks:
    [1] description: read book
    is done? Yes
    [2] description: return book
    is done? No
    do by: Friday
    Your task?

    Suggestions:

    • Move the isDone variable to the Task class and provide a setDone(boolean) method.
    public class Task {
        protected String description;
        protected boolean isDone;
    
        // ...
    
        public void setDone(boolean isDone){
            this.isDone = isDone;
        }
    }
    
    import java.util.ArrayList;
    import java.util.List;
    import java.util.Scanner;
    
    public class Main {
        static Scanner in = new Scanner(System.in);
        static List<Task> tasks = new ArrayList<>();
    
        public static void main(String[] args) {
            // ...
        }
    
        private static void addTodo(String line) throws TaskManagerException {
            //...
            tasks.add(new Todo(description));
            //...
        }
    
        private static void markAsDone(String line) {
            int index = Integer.parseInt(line.substring("done".length()).trim());
            tasks.get(index - 1).setDone(true);
            System.out.println("Tasks in the list: " + tasks.size());
        }
    
        private static void printTasks() {
            // ...
            for (int i = 0; i < tasks.size(); i++) {
                System.out.println("[" + (i + 1) + "] " + tasks.get(i));
            }
        }
    }
    

    Enhance your TaskManager program as explained in the exercise below:

    This exercise continues from the TaskManager Level 1-4 exercises quoted above.

    Enhance the TaskManager to store tasks in a text file between runs:

    1. The text file can follow a format of your choice. For example, each line can represent one task. The attributes can be separated using a suitable delimiter.
      Here is an example format:
      T | 1 | read book
      D | 0 | return book | June 6th
      T | 1 | join sports club
      
      • In the above example | is used as a delimiter, T → Todo, D → Deadline, 1 → task done, 0 → task not done.
      • đź’ˇ If you use | as the delimiter, use split("\\|") to split the line into its parts. split("|") will not work because | has a special meaning when used in this context.
    2. Load all tasks in the text file to the memory (i.e., convert to Task objects) at the start up of TaskManager. You can assume the data are in a predetermined file e.g., data/tasks.txt.
    3. Save all tasks to the text file every time there is a change to the data. Alternatively, you can introduce a new command to save tasks to the text file.

    Here's an example method for loading data from the text file. Use this method at the start of your main method to load the tasks from the text file.

        private static List<Task> getTasksFromFile() {
            List<Task> loadedTasks = new ArrayList<>();
            try {
                List<String> lines = getLines("data/tasks.txt");
                for (String line : lines) {
                    if (line.trim().isEmpty()) { //ignore empty lines
                        continue;
                    }
                    loadedTasks.add(createTask(line)); //convert the line to a task and add to the list
                }
            } catch (FileNotFoundException e) {
                printError("problem encountered while loading data: " + e.getMessage());
            }
            return loadedTasks;
        }
    

    Week 7-9: First stage

    Week 7: Project kick-off

    Deadline for project kickoff: week 7 lecture
    Marks: 5

    1. Show that you are ready to start the project: i.e., a sanity check to ensure you have enough programming skills to start a project
      • If you are new to programming, complete the project preparation exercises i.e., reach TaskManager - Level 5. Demo your TaskManager to prof or email the code to prof.
      • If you have prior programming experience, show/email to prof some code you have written before (at least 200 lines of code) to prove that you are ready to start the project.
    2. Declare project direction and team: Inform prof of the project direction and your team members and get approval to go ahead.
    After the project kickoff
    • if you chose option 1 (i.e., enhancing TaskManager), given below are some further improvements you are recommended to do to your code base, while you are adding other features.
      If you chose option 2 or 3, you should still ensure you have similar enhancements in your code.

    This exercise continues from the TaskManager Level 1-5 exercises quoted above.

    Refactor the TaskManager to have classes such as the below so that your code is more Object-Oriented:

    1. A Parser class containing methods that deals with parsing the user command to extract meaningful details from it. Some example methods:

      • public static getCommandWord(String fullCommand): Returns a the command word i.e., the first word of the given fullCommand
        e.g., Parser.getCommandWord("todo read book") "todo"
      • public static createTodo(String fullCommand): Returns a Todo object to match the fullCommand. Assumption: the fullCommand is for creating a Todo object.
        e.g., Parser.createTodo("todo read book") a Todo object containing the description "read book"
    2. A Storage class that will help to load Tasks from the hard disk and save tasks to the hard disk. Some example usage:

      Storage storage = new Storage("data/tasks.txt");
      List<Task> tasks = storage.load();
      ...
      storage.save(tasks);
      
    3. A Ui class that will be responsible for interacting with the user. Ideally, only this class should interact with the user. Some example usage:

      ui = new Ui();
      ...
      ui.showWelcomeMessage();
      ...
      String fullCommand = ui.readUserCommand();
      

      Note: The Scanner object should be inside the Ui class.

    4. A TaskList class that is responsible for keeping the in-memory task list. Most likely this class will use an ArrayList inside it. Some example usage:

      private TaskList tasks = new TaskList(storage.load());
      ...
      t = Parser.createTodo(fullCommand);
      tasks.addTask(t);
      ...
      String taskListDescription = tasks.getDescription();
      ui.showToUser(taskListDescription);
      
    5. Tweak the main class (you can name it TaskManager) class so that the main method can be simplified as follows:

      public static void main(String[] args) {
          new TaskManager("data/tasks.txt").run();
      }
      

      Note: As a result of the above, you will have to convert most of the static methods in the TaskManager class to non-static methods, which is more OO.

    public class TaskManager {
    
        private Storage storage;
        private TaskList tasks;
        private Ui ui;
    
        public TaskManager(String filePath) {
            ui = new Ui();
            storage = new Storage(filePath);
            try {
                tasks = new TaskList(storage.load());
            } catch (TaskManagerException e) {
                ui.showToUser("Problem reading file. Starting with an empty task list");
                tasks = new TaskList();
            }
        }
    
        public void run() {
            ui.printWelcome();
    
            boolean isExit = false;
            while (!isExit) {
                try {
                    String fullCommand = ui.readUserCommand();
                    String commandWord = Parser.getCommandWord(fullCommand);
                    switch (commandWord) {
                        case "exit":
                        case "":
                        // ...
                    }
                } catch (TaskManagerException e) {
                    ui.printError(e.getMessage());
                }
            }
            exit();
        }
    
        // ...
    
        public static void main(String[] args) {
            new TaskManager("data/tasks.txt").run();
        }
    }
    
    import java.util.Scanner;
    
    public class Ui {
    
        private Scanner in;
    
        public Ui() {
            in = new Scanner(System.in);
        }
    
        public String readUserCommand() {
            System.out.print("Your task? ");
            return in.nextLine().trim();
        }
    
        // ...
    }
    

    This exercise continues from the TaskManager Level 1-6 exercises quoted above.

    Add JUnit tests for some of the methods in your code.

    import org.junit.Test;
    
    import static junit.framework.TestCase.assertEquals;
    
    public class ParserTest {
    
        @Test
        public void getCommandWord(){
            assertEquals("todo", Parser.getCommandWord("todo read book"));
            assertEquals("deadline", Parser.getCommandWord("deadline return book /by next Friday"));
            assertEquals("exit", Parser.getCommandWord("exit"));
            assertEquals("xyz", Parser.getCommandWord("   xyz   ")); // leading and trailing spaces
            // ...
        }
    
        @Test
        public void createTodo() throws TaskManagerException {
            Todo actual = Parser.createTodo("todo read book");
            Todo expected = new Todo("read book");
            assertEquals(expected.toString(), actual.toString());
            //...
        }
    
        // more test methods
    }
    

    Week 8

    • As in the previous week, enhance your project (TaskManager or otherwise) as explained in the exercises below:

    This exercise continues from the TaskManager Level 1-7 exercises quoted above.

    Move the classes in your TaskManager into a package. For example, assuming your name in John Doe, you can move it to a pacakge johndoe.tojava.taskmanager. Optionally, you can add sub-packages too.

    This exercise continues from the TaskManager Level 1-8 exercises quoted above.

    Add javadoc comments to all non-trivial public classes and methods. Follow the format of the minimal javadoc comment examples given below.


    Week 9

    • Enhance your project (TaskManager or otherwise) as explained in the exercise below:

    This exercise continues from the TaskManager Level 1-9 exercises quoted above.

    Ensure the code follows the basic rules (optional to apply intermediate/advanced rules) specified in the provided Java coding standard.


    • Recommended (but not required): Improve the code quality of your code by applying the practices taught in the module.

    Week 10: mid-project checkpoint

    Deadline: week 10 lecture
    Marks: 10, if you show a satisfactory level in the items below

    1. Create a GitHub account. Create a repository under your account and push our code to it.
    2. Demo the current state of the project to prof during the week 10 lecture session. There should be some working features at this point.
    3. Submit interim project documents (handover a hard copy during lecture 10 or upload to IVLE before lecture 10). The document should contain,
      • URL of your GitHub repo
      • Some representative user stories for the product
      • A class diagram to match your code (scans of hand-drawn diagrams are acceptable too)
      • At least one object diagram illustrating the state of your program at some point

    After the mid-project checkpoint,

    • Enhance your project (TaskManager or otherwise) as explained in the exercise below:

    This exercise continues from the TaskManager Level 1-10 exercises quoted above.

    Add some assertions (i.e., Java asserts, not JUnit assertions) to your code.


    Week 11

    • Enhance your project (TaskManager or otherwise) as explained in the exercise below:

    This exercise continues from the TaskManager Level 1-11 exercises quoted above.

    Package your TaskManager as a JAR file.


    Week 13: Submission and demo

    Deadline: Monday of week 13
    Marks: 45 (25 for the product, 20 for the documentation)

    Deliverables:

    • Source code of the working program
      • Submission: zip up the source code and upload to IVLE. The file name should be your name. e.g., JunHao.zip If you manage to create a JAR file, upload it as a separate file, named similarly e.g., JunHao.jar
    • Project documentation: a single pdf or a Word file containing,
      • A Cover Page containing your details and the link to your GitHub repository
      • The link to your repo on GitHub
      • A User Guide: explain how to start and use your product (example).
      • A Developer Guide containing
        • A class diagram to match your code
        • At least one object diagram illustrating the state of your program at some point
        • At least one sequence diagram illustrating an object interaction in your product
        • Some representative user stories, at least enough to cover the functionality of your product
        • Additional instructions for testing the product (if any) i.e., is there any additional steps (such as putting a specific file in a specific location) that one needs to do when testing your product manually?
        • Submission: Upload to IVLE. The file name should be your name e.g., JunHao.pdf
    • Project demo: to be done during week 13 lecture session.
      • Demo schedule will be given closer to the date.
      • When it is your turn, demo the features of your product using the jar file (preferred) or the IDE.
      • The demo should take no more than 8 minutes.

    Tools

    • Git [Required] : For revision control
    • GitHub [Required] : For project hosting
    • Intellij IDEA [Recommended] : The IDE used for programming

    Assessment

    • 60% : Project
    • 40% : Final Exam

    Exam

    There is no midterm.

    The final exam has two parts:

    • Part 1: MCQ questions (1 hour, 20 marks)
    • Part 2: Essay questions (1 hour, 20 marks)

    Both papers will be given to you at the start but you need to answer Part 1 first (i.e. MCQ paper). It will be collected 1 hour after the exam start time (even if arrived late for the exam). You are free to start part 2 early if you finish Part 1 early.

    Final Exam: Part 1 (MCQ)

    Each MCQ question gives you a statement to evaluate.

    An example statement

    Testing is a Q&A activity

    Unless stated otherwise, the meaning of answer options are
    A: Agree. If the question has multiple statements, agree with all of them.
    B: Disagree. If the question has multiple statements, disagree with at least one of them
    C, D, E: Not used

    Number of questions: 50

    Note that you have slightly more than ½ minute for each question, which means you need to go through the questions fairly quickly.

    Given the fast pace required by the paper, to be fair to all students, you will not be allowed to clarify doubts about questions (in Part 1) by talking to invigilators.

    • If a question is not clear, you can circle the question number and write your doubt in the exam paper, near the unclear question.
    • If your doubt is justified (e.g. there is a typo in the question) or if many students found the question to be unclear, the examiner may decide to omit that question from grading.

    Questions in Part 1 are confidential. You are not allowed to reveal Part 1 content to anyone after the exam. All pages of the assessment paper are to be returned at the end of the exam.

    You will be given OCR forms to indicate your answers for Part 1. As each OCR form can accommodate only 50 answers, you will be given 2 OCR forms. **Indicate your student number in both OCR forms**.

    Some questions will use underlines or highlighting to draw your attention to a specific part of the question. That is because those parts are highly relevant to the answer and we don’t want you to miss the relevance of that part.

    Consider the statement below:

    Technique ABC can be used to generate more test cases.

    The word can is underlined because the decision you need to make is whether the ABC can or cannot be used to generate more test cases; the decision is not whether ABC can be used to generate more or better test cases.

    Some questions have tags e.g., the question below has a tag JAVA. These tags provide additional context about the question. In the example below, the tag indicates that the code given in the question is Java code.


    The paper is open-book: you may bring any printed or written materials to the exam in hard copy format. However, given the fast pace required by Part 1, you will not have time left to refer notes during that part of the exam.

    💡 Mark the OCR form as you go, rather than planning to transfer your answers to the OCR form near the end.  Reason: Given there are 50 questions, it will be hard to estimate how much time you need to mass-transfer all answers to OCR forms.

    💡 Write the answer in the exam paper as well as marking it in the OCR form.  Reason: It will reduce the chance of missing a question. Furthermore, in case you missed a question, it will help you correct the OCR form quickly.

    đź’ˇ We have tried to avoid deliberately misleading/tricky questions. If a question seems to take a very long time to figure out, you are probably over-thinking it.

    You will be given a practice exam paper to familiarize yourself with this slightly unusual exam format.

    Final Exam: Part 2 (Essay)

    Unlike in part 1, you can ask invigilators for clarifications if you found a question to be unclear in part 2.

    Yes, you may use pencils when answering part 2.