Week 10 [Oct 22]
Todo
Admin info to read:
Continue to enhance features.
Project Management:
- 💡 As you move the product towards v2.0 in small steps, ensure that each PR that adds an enhancement also updates the relevant parts of documents and tests. That way, your documentation/testing work will not pile up towards the end.
Product:
-
Try to do a
proper product release as described in the Developer Guide. You can name it something likev1.2.1. Reason: You are required to do a proper product release for v1.3. Doing a trial at this point will help you iron out any problems in advance.
Documentation:
- User Guide: Update where the document does not match the current product.
- Developer Guide: Similar to User Guide.
Demo:
- Optional. If you want feedback on your features, you can demo the feature and get feedback from the tutor.
Outcomes
Design
W10.1 Can use intermediate-level sequence diagrams
W10.1a Can draw intermediate-level sequence diagrams
Design → Modelling → Modelling Behaviors
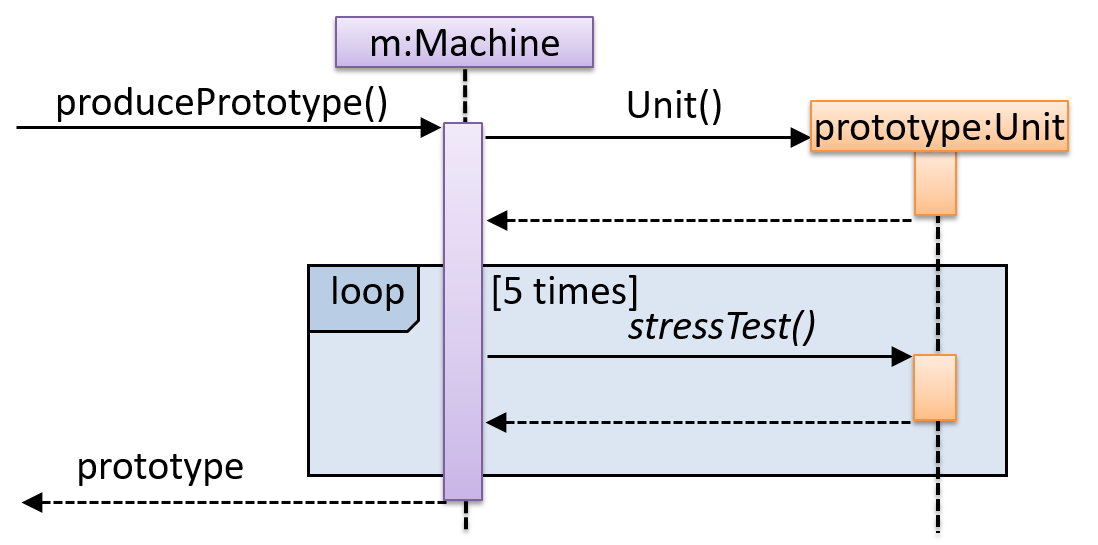
What’s going on here?
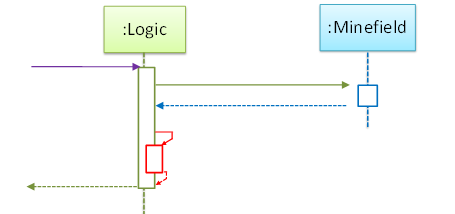
- a.
Logicobject is executing a parallel thread. - b.
Logicobject is executing a loop. - c.
Logicobject is creating anotherLogicinstance. - d. One of
Logicobject’s methods is calling another of its methods. - e.
Minefieldobject is calling a method ofLogic.
(d)
Explain the interactions depicted in this sequence diagram.
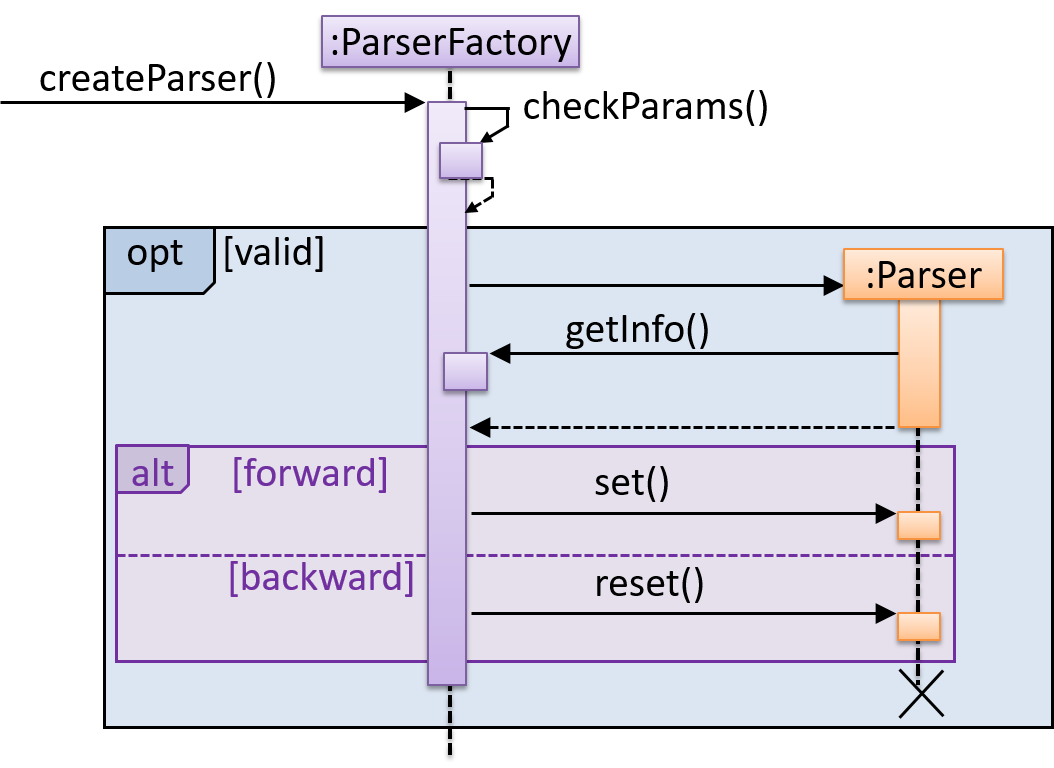
First, the createParser() method of an existing ParserFactory object is called. Then, ...
Draw a sequence diagram to represent this code snippet.
if (isFirstPage) {
    new Quote().print();
}
The Quote class:
class Quote{

    String q;

    Quote(){
        q = generate();
    }

    String generate(){
        // ...
    }

    void print(){
        System.out.println(q);
    }

}
- Show
new Quote().print();as two method calls. - As the created Quote object is not assigned to a variable, it can be considered as 'deleted' soon after its
print()method is called.
Evidence:
Explain the interactions depicted in this sequence diagram.
First, the createParser() method of an existing ParserFactory object is called. Then, ...
W10.2 Can explain some design principles
W10.2a Can explain separation of concerns principle
Supplmentary → Principles →
Separation of Concerns Principle (SoC): To achieve better modularity, separate the code into distinct sections, such that each section addresses a separate concern. -- Proposed by Edsger W. Dijkstra
A concern in this context is a set of information that affects the code of a computer program.
Examples for concerns:
- A specific feature, such as the code related to
add employeefeature - A specific aspect, such as the code related to
persistenceorsecurity - A specific entity, such as the code related to the
Employeeentity
Applying
If the code related to persistence is separated from the code related to security, a change to how the data are persisted will not need changes to how the security is implemented.
This principle can be applied at the class level, as well as on higher levels.
The
This principle should lead to higher
Design → Design Fundamentals → Coupling →
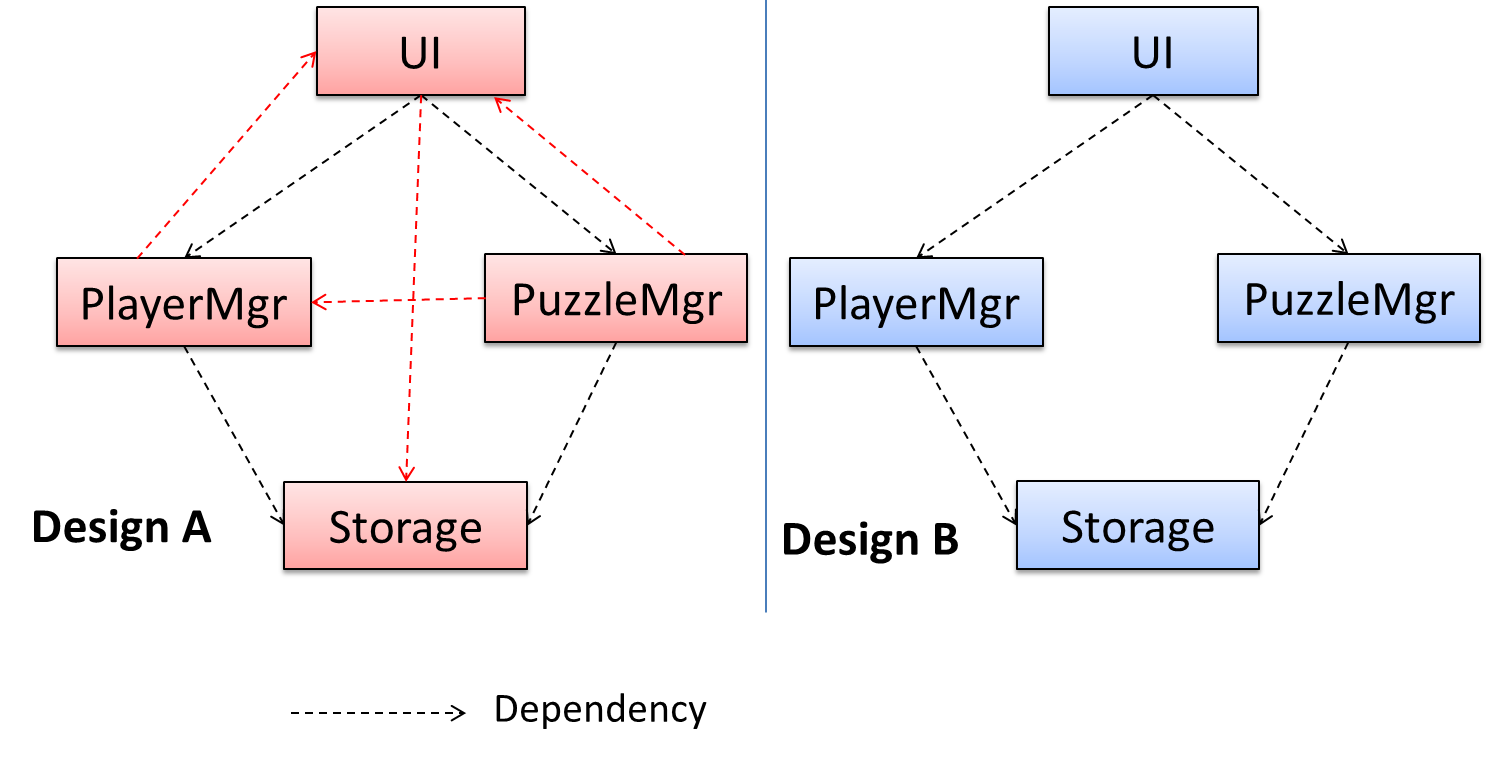
Coupling is a measure of the degree of dependence between components, classes, methods, etc. Low coupling indicates that a component is less dependent on other components. High coupling (aka tight coupling or strong coupling) is discouraged due to the following disadvantages:
- Maintenance is harder because a change in one module could cause changes in other modules coupled to it (i.e. a ripple effect).
- Integration is harder because multiple components coupled with each other have to be integrated at the same time.
- Testing and reuse of the module is harder due to its dependence on other modules.
In the example below, design A appears to have a more coupling between the components than design B.
Discuss the coupling levels of alternative designs x and y.
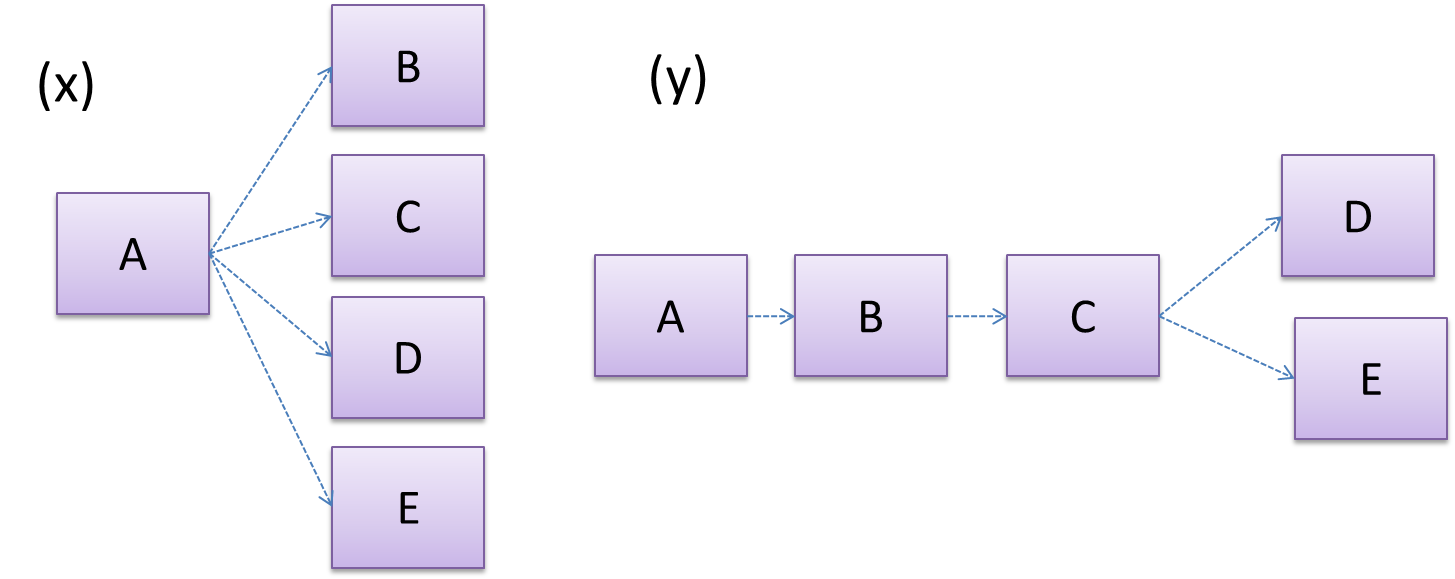
Overall coupling levels in x and y seem to be similar (neither has more dependencies than the other). (Note that the number of dependency links is not a definitive measure of the level of coupling. Some links may be stronger than the others.). However, in x, A is highly-coupled to the rest of the system while B, C, D, and E are standalone (do not depend on anything else). In y, no component is as highly-coupled as A of x. However, only D and E are standalone.
Explain the link (if any) between regressions and coupling.
When the system is highly-coupled, the risk of regressions is higher too e.g. when component A is modified, all components ‘coupled’ to component A risk ‘unintended behavioral changes’.
Discuss the relationship between coupling and
Coupling decreases testability because if the
Choose the correct statements.
- a. As coupling increases, testability decreases.
- b. As coupling increases, the risk of regression increases.
- c. As coupling increases, the value of automated regression testing increases.
- d. As coupling increases, integration becomes easier as everything is connected together.
- e. As coupling increases, maintainability decreases.
(a)(b)(c)(d)(e)
Explanation: High coupling means either more components require to be integrated at once in a big-bang fashion (increasing the risk of things going wrong) or more drivers and stubs are required when integrating incrementally.
Design → Design Fundamentals → Cohesion →
Cohesion is a measure of how strongly-related and focused the various responsibilities of a component are. A highly-cohesive component keeps related functionalities together while keeping out all other unrelated things.
Higher cohesion is better. Disadvantages of low cohesion (aka weak cohesion):
- Lowers the understandability of modules as it is difficult to express module functionalities at a higher level.
- Lowers maintainability because a module can be modified due to unrelated causes (reason: the module contains code unrelated to each other) or many many modules may need to be modified to achieve a small change in behavior (reason: because the code realated to that change is not localized to a single module).
- Lowers reusability of modules because they do not represent logical units of functionality.
“Only the GUI class should interact with the user. The GUI class should only concern itself with user interactions”. This statement follows from,
- a. A software design should promote separation of concerns in a design.
- b. A software design should increase cohesion of its components.
- c. A software design should follow single responsibility principle.
(a)(b)(c)
Explanation: By making ‘user interaction’ GUI class’ sole responsibility, we increase its cohesion. This is also in line with separation of concerns (i.e., we separated the concern of user interaction) and single responsibility principle (GUI class has only one responsibility).
Evidence:
Explain SoC with examples from AddressBook-Level4 (or your own project).
W10.2b Can explain single responsibility principle
Supplmentary → Principles →
Single Responsibility Principle (SRP): A class should have one, and only one, reason to change. -- Robert C. Martin
If a class has only one responsibility, it needs to change only when there is a change to that responsibility.
Consider a TextUi class that does parsing of the user commands as well as interacting with the user. That class needs to change when the formatting of the UI changes as well as when the syntax of the user command changes. Hence, such a class does not follow the SRP.
Gather together the things that change for the same reasons. Separate those things that change for different reasons. ―Agile Software Development, Principles, Patterns, and Practices by Robert C. Martin
- An explanation of the SRP from www.oodesign.com
- Another explanation (more detailed) by Patkos Csaba
- A book chapter on SRP - A book chapter on SRP, written by the father of the principle itself Robert C Martin.
Evidence:
Acceptable: Evidence of having used SRP in some project.
Suggested: Do the exercise in [Addressbook-Level2: LO-SRP]
null
W10.2c Can explain Liskov Substitution Principle
Supplmentary → Principles →
Liskov Substitution Principle (LSP): Derived classes must be substitutable for their base classes. -- proposed by Barbara Liskov
LSP sounds same as
Paradigms → Object Oriented Programming → Inheritance →
Every instance of a subclass is an instance of the superclass, but not vice-versa. As a result, inheritance allows substitutability : the ability to substitute a child class object where a parent class object is expected.
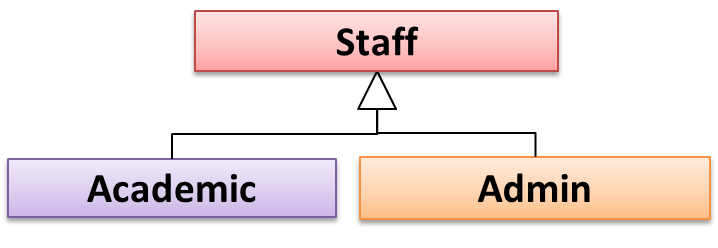
an Academic is an instance of a Staff, but a Staff is not necessarily an instance of an Academic. i.e. wherever an object of the superclass is expected, it can be substituted by an object of any of its subclasses.
The following code is valid because an AcademicStaff object is substitutable as a Staff object.
Staff staff = new AcademicStaff (); // OK
But the following code is not valid because staff is declared as a Staff type and therefore its value may or may not be of type AcademicStaff, which is the type expected by variable academicStaff.
Staff staff;
...
AcademicStaff academicStaff = staff; // Not OK
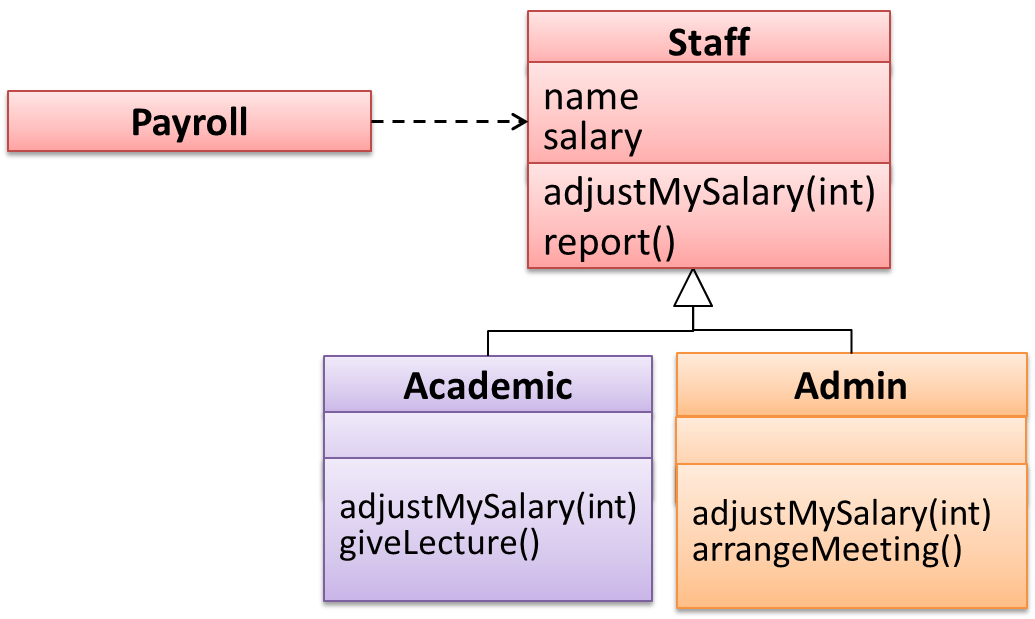
Suppose the Payroll class depends on the adjustMySalary(int percent) method of the Staff class. Furthermore, the Staff class states that the adjustMySalary method will work for all positive percent values. Both Admin and Academic classes override the adjustMySalary method.
Now consider the following:
Admin#adjustMySalarymethod works for both negative and positive percent values.Academic#adjustMySalarymethod works for percent values1..100only.
In the above scenario,
Adminclass follows LSP because it fulfillsPayroll’s expectation ofStaffobjects (i.e. it works for all positive values). SubstitutingAdminobjects for Staff objects will not break thePayrollclass functionality.Academicclass violates LSP because it will not work for percent values over100as expected by thePayrollclass. SubstitutingAcademicobjects forStaffobjects can potentially break thePayrollclass functionality.
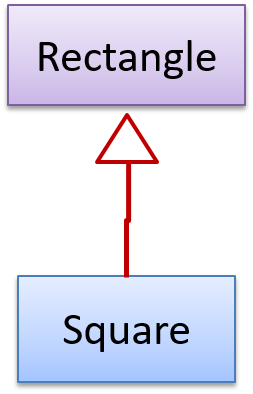
The Rectangle#resize() can take any integers for height and width. This contract is violated by the subclass Square#resize() because it does not accept a height that is different from the width.
class Rectangle {
    ...
    /** sets the size to given height and width*/
    void resize(int height, int width){
        ...
    }
}


class Square extends Rectangle {

    @Override
    void resize(int height, int width){
        if (height != width) {
            //error
       }
    }
}
Now consider the following method that is written to work with the Rectangle class.
void makeSameSize(Rectangle original, Rectangle toResize){
    toResize.resize(original.getHeight(), original.getWidth());
}
This code will fail if it is called as maekSameSize(new Rectangle(12,8), new Square(4, 4)) That is, Square class is not substitutable for the Rectangle class.
If a subclass imposes more restrictive conditions than its parent class, it violates Liskov Substitution Principle.
True.
Explanation: If the subclass is more restrictive than the parent class, code that worked with the parent class may not work with the child class. Hence, the substitutability does not exist and LSP has been violated.
Evidence:
Give an example from the project where LSP is followed. Explain what kind of a change to that code will violate LSP e.g. Here, the superclass X and the subclass Y follow LSP. But if we change X in this way, or Y in this way, it will no longer follow LSP
W10.2d Can explain open-closed principle (OCP)
Supplmentary → Principles →
The Open-Close Principle aims to make a code entity easy to adapt and reuse without needing to modify the code entity itself.
Open-Closed Principle (OCP): A module should be open for extension but closed for modification. That is, modules should be written so that they can be extended, without requiring them to be modified. -- proposed by Bertrand Meyer
In object-oriented programming, OCP can be achieved in various ways. This often requires separating the specification (i.e. interface) of a module from its implementation.
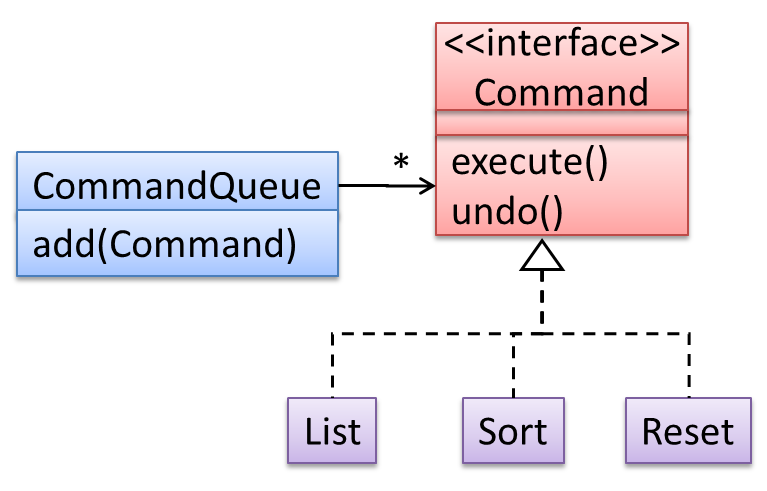
In the design given below, the behavior of the CommandQueue class can be altered by adding more concrete Command subclasses. For example, by including a Delete class alongside List, Sort, and Reset, the CommandQueue can now perform delete commands without modifying its code at all. That is, its behavior was extended without having to modify its code. Hence, it was open to extensions, but closed to modification.
The behavior of a Java generic class can be altered by passing it a different class as a parameter. In the code below, the ArrayList class behaves as a container of Students in one instance and as a container of Admin objects in the other instance, without having to change its code. That is, the behavior of the ArrayList class is extended without modifying its code.
ArrayList students = new ArrayList< Student >();
ArrayList admins = new ArrayList< Admin >();
Which of these is closest to the meaning of the open-closed principle?
(a)
Explanation: Please refer the handout for the definition of OCP.
Evidence:
Identify where OCP is applied (or applicable) in AddressBook-Level4 (or your own project).
W10.2e Can explain the Law of Demeter
Supplmentary → Principles →
Law of Demeter (LoD):
- An object should have limited knowledge of another object.
- An object should only interact with objects that are closely related to it.
Also known as
- Don’t talk to strangers.
- Principle of least knowledge
More concretely, a method m of an object O should invoke only the methods of the following kinds of objects:
- The object
Oitself - Objects passed as parameters of
m - Objects created/instantiated in
m(directly or indirectly) - Objects from the
direct association of O
The following code fragment violates LoD due to the reason: while b is a ‘friend’ of foo (because it receives it as a parameter), g is a ‘friend of a friend’ (which should be considered a ‘stranger’), and g.doSomething() is analogous to ‘talking to a stranger’.
void foo(Bar b) {
    Goo g = b.getGoo();
    g.doSomething();
}
LoD aims to prevent objects navigating internal structures of other objects.
An analogy for LoD can be drawn from Facebook. If Facebook followed LoD, you would not be allowed to see posts of friends of friends, unless they are your friends as well. If Jake is your friend and Adam is Jake’s friend, you should not be allowed to see Adam’s posts unless Adam is a friend of yours as well.
Explain the Law of Demeter using code examples. You are to make up your own code examples. Take Minesweeper as the basis for your code examples.
Let us take the Logic class as an example. Assume that it has the following operation.
setMinefield(Minefiled mf):void
Consider the following that can happen inside this operation.
mf.init();: this does not violate LoD since LoD allows calling operations of parameters received.mf.getCell(1,3).clear();: //this violates LoD becauseLogicis handlingCellobjects deep insideMinefield. Instead, it should bemf.clearCellAt(1,3);timer.start();: //this does not violate LoD becausetimerappears to be an internal component (i.e. a variable) ofLogicitself.Cell c = new Cell();c.init();: // this does not violate LoD becausecwas created inside the operation.
This violates Law of Demeter.
void foo(Bar b) {
    Goo g =  new Goo();
    g.doSomething();
}
False
Explanation: The line g.doSomething() does not violate LoD because it is OK to invoke methods of objects created within a method.
Pick the odd one out.
- a. Law of Demeter.
- b. Don’t add people to a late project.
- c. Don’t talk to strangers.
- d. Principle of least knowledge.
- e. Coupling.
(b)
Explanation: Law of Demeter, which aims to reduce coupling, is also known as ‘Don’t talk to strangers’ and ‘Principle of least knowledge’.
Evidence:
Identify places where LoD is followed/violated in your project.
Implementation
W10.3 Can use more error handling teachniques
Can use logging
W10.3a Can explain logging
Implementation → Error Handling → Logging →
Logging is the deliberate recording of certain information during a program execution for future reference. Logs are typically written to a log file but it is also possible to log information in other ways e.g. into a database or a remote server.
Logging can be useful for troubleshooting problems. A good logging system records some system information regularly. When bad things happen to a system e.g. an unanticipated failure, their associated log files may provide indications of what went wrong and action can then be taken to prevent it from happening again.
💡 A log file is like the

Why is logging like having the 'black box' in an airplane?
(a)
W10.3b Can use logging
Implementation → Error Handling → Logging →
Most programming environments come with logging systems that allow sophisticated forms of logging. They have features such as the ability to enable and disable logging easily or to change the logging
This sample Java code uses Java’s default logging mechanism.
First, import the relevant Java package:
import java.util.logging.*;
Next, create a Logger:
private static Logger logger = Logger.getLogger("Foo");
Now, you can use the Logger object to log information. Note the use of WARNING so that log messages specified as INFO level (which is a lower level than WARNING) will not be written to the log file at all.
// log a message at INFO level
logger.log(Level.INFO, "going to start processing");
//...
processInput();
if(error){
    //log a message at WARNING level
    logger.log(Level.WARNING, "processing error", ex);
}
//...
logger.log(Level.INFO, "end of processing");
Tutorials:
- Java Logging API - Tutorial -- A tutorial by Lars Vogella
- Java Logging Tutorial -- An alternative tutorial by Jakob Jenkov
- A video tutorial by SimplyCoded:
Best Practices:
- 10 Tips for Proper Application Logging -- by Tomasz Nurkiewicz
- What each logging level means -- conventions recommended by Apache Project
Evidence:
Use of logging in the code you have written in the module project or elsewhere.
Can use assertions
W10.3c Can explain assertions
Implementation → Error Handling → Assertions →
Assertions are used to define assumptions about the program state so that the runtime can verify them. An assertion failure indicates a possible bug in the code because the code has resulted in a program state that violates an assumption about how the code should behave.
An assertion can be used to express something like when the execution comes to this point, the variable v cannot be null.
If the runtime detects an assertion failure, it typically take some drastic action such as terminating the execution with an error message. This is because an assertion failure indicates a possible bug and the sooner the execution stops, the safer it is.
In the Java code below, suppose we set an assertion that timeout returned by Config.getTimeout() is greater than 0. Now, if the Config.getTimeout() returned -1 in a specific execution of this line, the runtime can detect it as a assertion failure -- i.e. an assumption about the expected behavior of the code turned out to be wrong which could potentially be the result of a bug -- and take some drastic action such as terminating the execution.
int timeout = Config.getTimeout();
W10.3d Can use assertions
Implementation → Error Handling → Assertions →
Use the assert keyword to define assertions.
This assertion will fail with the message x should be 0 if x is not 0 at this point.
x = getX();
assert x == 0 : "x should be 0";
...
Assertions can be disabled without modifying the code.
java -enableassertions HelloWorld (or java -ea HelloWorld) will run HelloWorld with assertions enabled while java -disableassertions HelloWorld will run it without verifying assertions.
Java disables assertions by default. This could create a situation where you think all assertions are being verified as true while in fact they are not being verified at all. Therefore, remember to enable assertions when you run the program if you want them to be in effect.
💡 Enable assertions in Intellij (how?) and get an assertion to fail temporarily (e.g. insert an assert false into the code temporarily) to confirm assertions are being verified.
Java assert vs JUnit assertions: They are similar in purpose but JUnit assertions are more powerful and customized for testing. In addition, JUnit assertions are not disabled by default. We recommend you use JUnit assertions in test code and Java assert in functional code.
Tutorials:
- Java Assertions -- a simple tutorial from javatpoint.com
- Programming with Assertions (first half) -- a more detailed tutorial from Oracle
Best practices:
- Programming with Assertions (second half) -- from Oracle (also listed above as a tutorial) contains some best practices towards the end of the article.
Evidence:
Explain assertions in AddressBook-Level4 code.
W10.3e Can use assertions optimally
Implementation → Error Handling → Assertions →
It is recommended that assertions be used liberally in the code. Their impact on performance is considered low and worth the additional safety they provide.
Do not use assertions to do work because assertions can be disabled. If not, your program will stop working when assertions are not enabled.
The code below will not invoke the writeFile() method when assertions are disabled. If that method is performing some work that is necessary for your program, your program will not work correctly when assertions are disabled.
...
assert writeFile() : "File writing is supposed to return true";
Assertions are suitable for verifying assumptions about Internal Invariants, Control-Flow Invariants, Preconditions, Postconditions, and Class Invariants. Refer to [Programming with Assertions (second half)] to learn more.
Exceptions and assertions are two complementary ways of handling errors in software but they serve different purposes. Therefore, both assertions and exceptions should be used in code.
- The raising of an exception indicates an unusual condition created by the user (e.g. user inputs an unacceptable input) or the environment (e.g., a file needed for the program is missing).
- An assertion failure indicates the programmer made a mistake in the code (e.g., a null value is returned from a method that is not supposed to return null under any circumstances).
A Calculator program crashes with an ‘assertion failure’ message when you try to find the square root of a negative number.
(c)
Explanation: An assertion failure indicates a bug in the code. (b) is not acceptable because of the word "terminated". The application should not fail at all for this input. But it could have used an exception to handle the situation internally.
Which statements are correct?
- a. Use assertions to indicate the programmer messed up; Use exceptions to indicate the user or the environment messed up.
- b. Use exceptions to indicate the programmer messed up; Use assertions to indicate the user or the environment messed up.
(a)
Evidence:
Give an example from the AddressBook-Level4 code where an exception is used and explain why an assertion is not suitable for that situation. Similarly, explain why an exception is not suitable for a place where AddressBook Level4 uses an assertion.
W10.4 Can use Java8 streams
W10.4a Can use Java8 streams
Tools → Java →
Java 8 introduced a number of new features (e.g. Lambdas, Streams) that are not trivial to learn but also extremely useful to know.
Here is an overview of new Java 8 features . (written by Benjamin Winterberg)
Tutorials:
- Java 8 Tutorial -- from tutorialspoint.com. 💡 Also provides a way to try out code online
- Tutorials from Oracle: [Lambdas][Streams]
A video tutorial by well-known Java coach Venkat Subramaniam
Evidence:
Any code that you have written using (can be toy examples) Java 8 features.
W10.5 Can use JavaFX to build a simple GUI
W10.5a Can use JavaFX to build a simple GUI
Tools → Java →
Adapted (with permissions) from Marco Jakob's JavaFX 8 tutorial.
JavaFx 9 Tutorial - Part 1: Scene Builder
Introduction
This tutorial will teach you how to create a new JavaFX application in IntelliJ, and to use the SceneBuilder to create a layouts for your application.
Prerequisites
- Latest Java JDK 9 (includes JavaFX 9)
- IntelliJ (2018.2 or later)
- SceneBuilder 8 (provided by Gluon as Oracle no longer ships the tool in binary form)
Do remember the installation path to SceneBuilder 8 as we will need it to configure IntelliJ in a later step.
IntelliJ Configurations
If this is the first time using IntelliJ, you need to tell IntelliJ where to find JDK 9 and SceneBuilder.
Configuring JDK 9
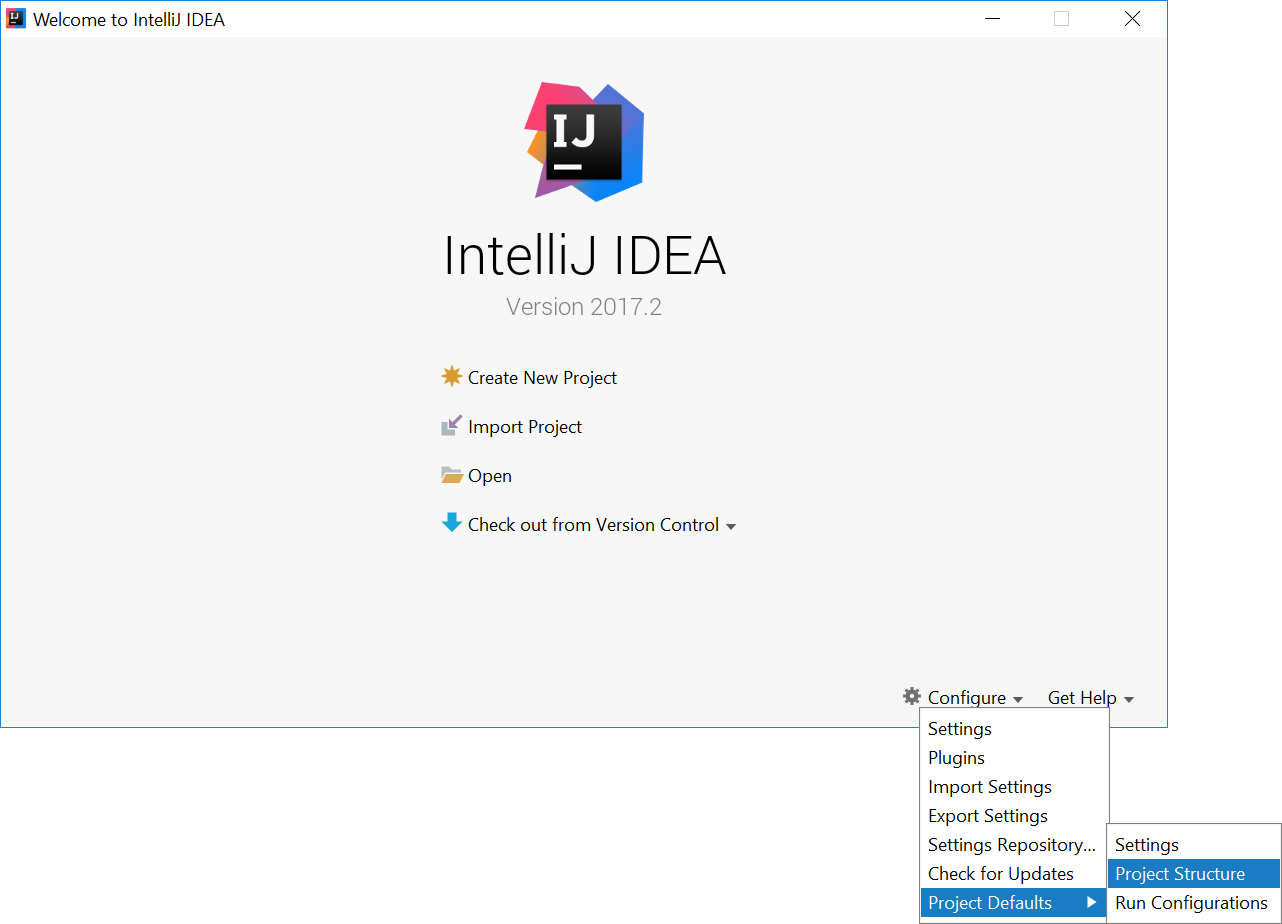
- On the Welcome screen, press
Configure→Project Default→Project Structure.
- If you already have a project open, go to the Welcome screen by going to
File→Close Project.
- Under
Project SDK:, pressNew...→JDK. - Select the directory that you install JDK on, and press
OK. - Under
Project language level:, select9 - Modules, private methods in interfaces etc..
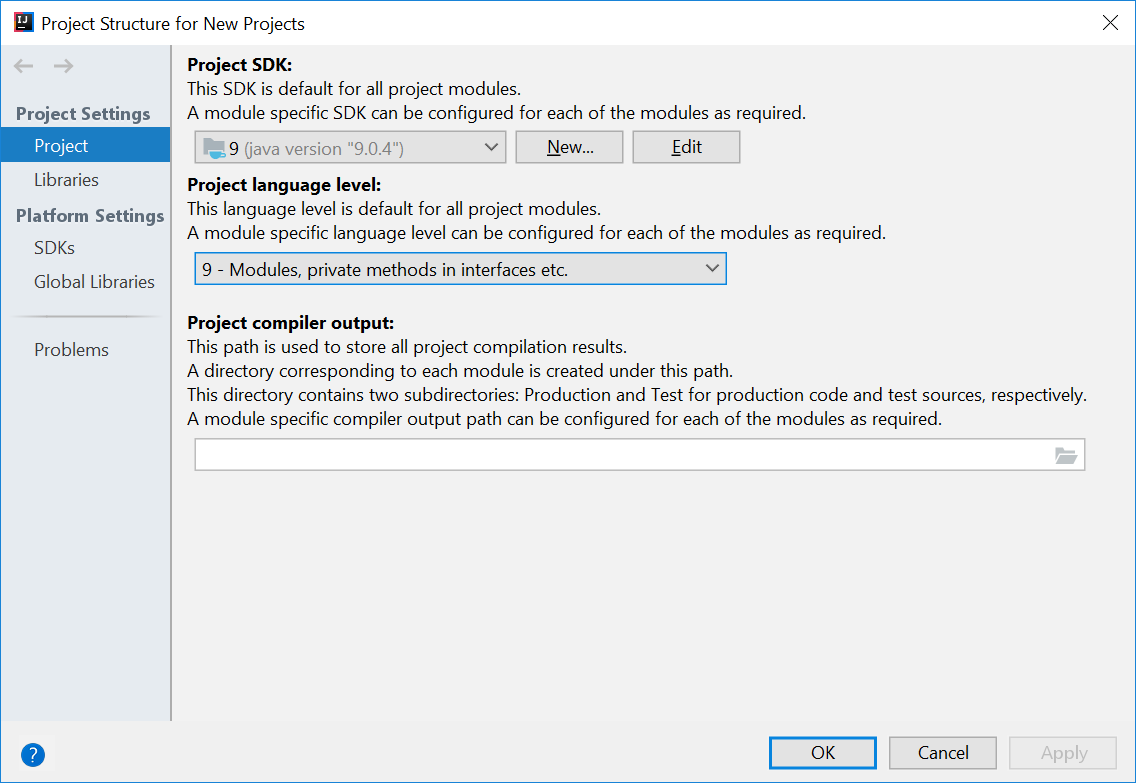
- Press
OKagain.
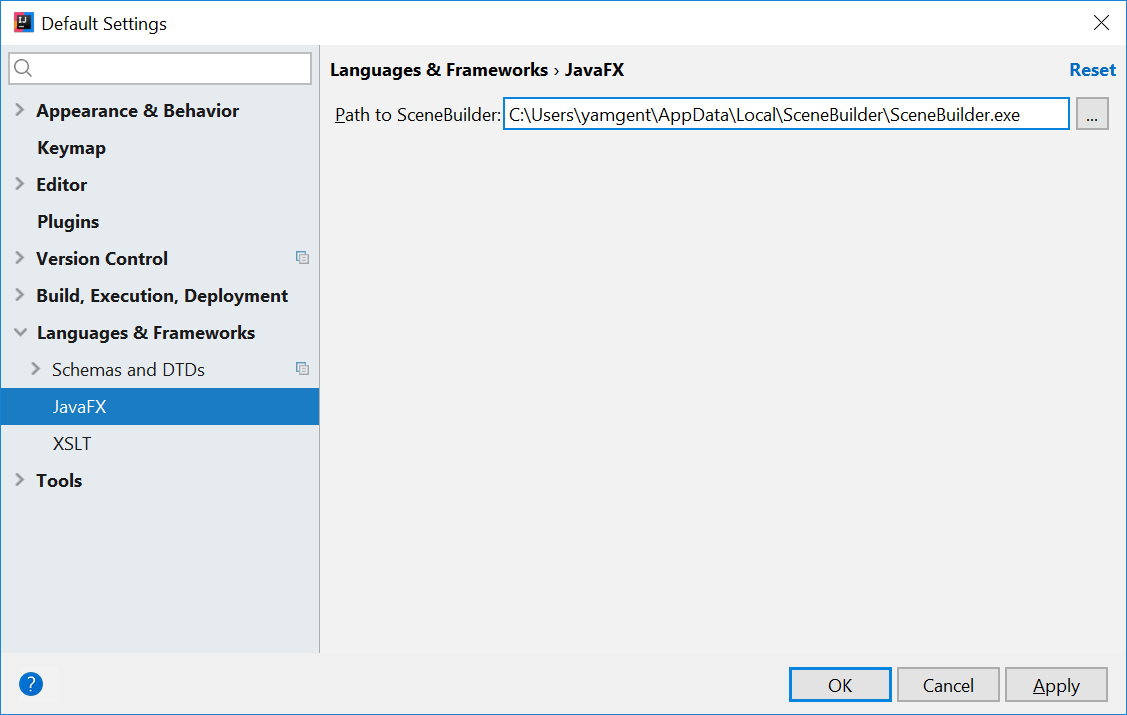
Configuring Scene Builder
- On the Welcome screen, press
Configure→Settings. - On the left hand side, select
Languages & Frameworks→JavaFX - Under
Path to SceneBuilder:, select the path to where SceneBuilder is installed (e.g.C:\Users\Admin\AppData\Local\SceneBuilder\SceneBuilder.exeon Windows)
The JavaDocs will come in handy when writing your own JavaFX applications:
Additionally, Oracle also has a tutorial on JavaFX if you are interested.
Create a new JavaFX Project
- On the Welcome screen, press
Create New Project.
- If you already have a project, you can create a new project by going
File→New→Project....
- On the left side, select
JavaFX. Make sure that the Project SDK is set to9andJavaFX Applicationis selected.
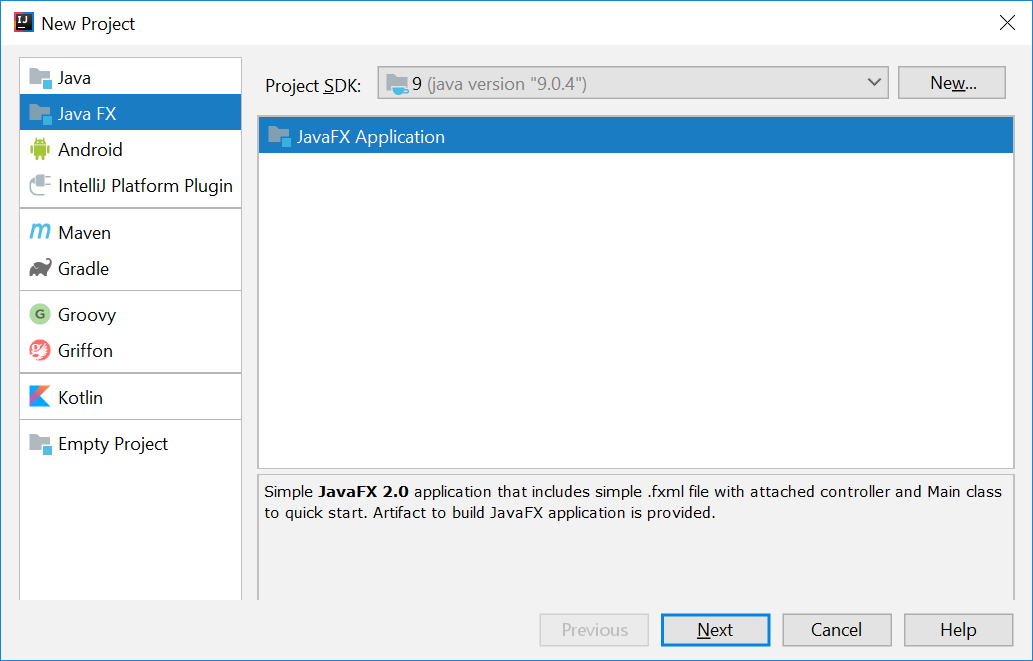
- Press
Next. - Give a name for the application (e.g.
AddressApp), and specify a suitable location. - Press
Finish. If prompted to create a new directory, just pressOK.
Remove the sample package and its content. We will manually create our own package and resources in our tutorial.
We will also have to set up the IDE further, so that warnings and errors show up correctly when working with Java 9:
- Go to the menu
File→Project Structure. - Under
Project language level:, ensure that9 - Modules, private methods in interfaces etc.is selected.
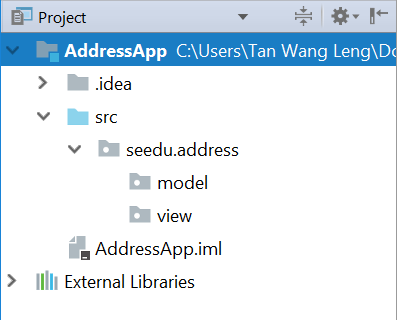
Create the Packages
In We will create a package for each of the component. Ensure that your Project pane is open (Alt+1). Right click on the src folder, and select New → Package:
seedu.address- contains the controller classes (i.e. the part that deals with the business logic)seedu.address.model- contains the model classes (i.e. the part that deals with data)seedu.address.view- contains the views (i.e. the part that deals with presenting the data to the user)
In subsequent tutorials, our view package will also contain some controllers that are directly related to a single view. We will call them view-controllers.
Create the FXML Layout File
There are two ways to create the UI:
- Use FXML, which is an XML format.
- Programmatically create the interface in Java.
We will use FXML for most parts, so that we can separate the view and controller from each other. Furthermore, we are able to use the Scene Builder tool to edit our FXML file. That means we will not have to directly work with XML.
Right click on the view package, and press New → FXML file. For the file name, type PersonOverview.fxml.
Design with Scene Builder
Right-click on PersonOverview.fxml and choose Open with Scene Builder. Now you should see the Scene Builder with just an AnchorPane (visible under Hierarchy on the left).
If IntelliJ prompts for a location of the SceneBuilder executable, make sure to point to where you install SceneBuilder.
- Select the
Anchor Panein your Hierarchy, and adjust the size under Layout (right side). (Pref Width: 600, Pref Height: 300)
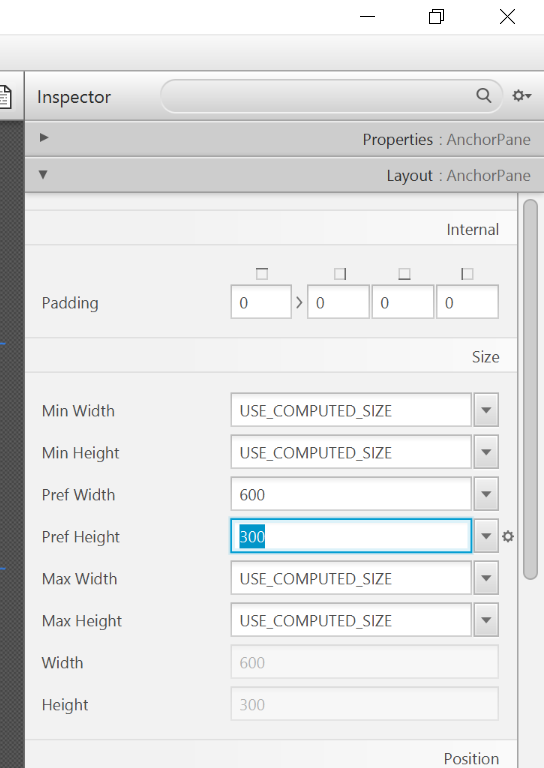
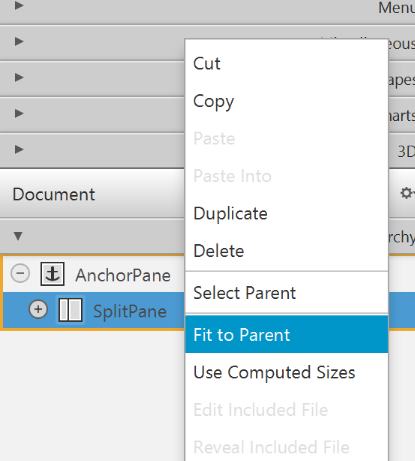
- Add a
Split Pane (horizontal)(underContainers) by dragging it from the Library into the main area. Right-click theSplit Panein the Hierarchy view and selectFit to Parent.
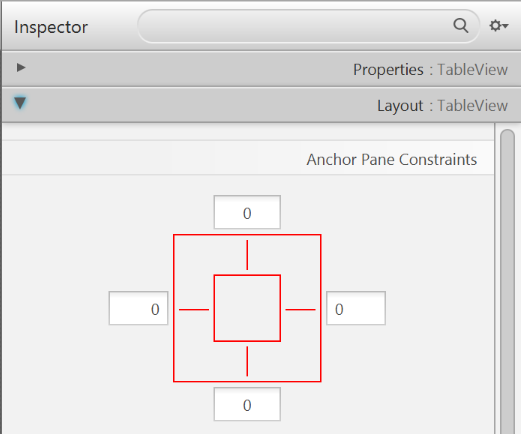
- Drag a
TableView(underControlsin Library view) into the left side of theSplitPane. Select theTableView(not a Column) and set the following layout constraints in the Inspector to theTableView. Inside anAnchorPaneyou can always set anchors to the four borders (see this page for more information on Layouts).
-
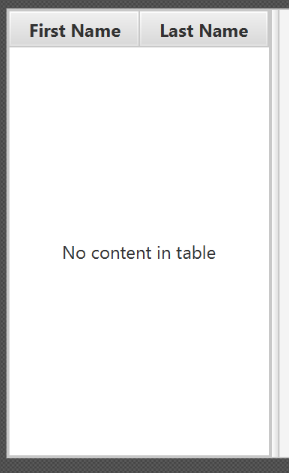
Go to the menu
Preview→Show Preview in Windowto see whether the layout configuration is done correctly. Try resizing the window. TheTableViewshould resize together with the window as it is anchored to the borders. -
Change the column text (under Properties) to "First Name" and "Last Name".
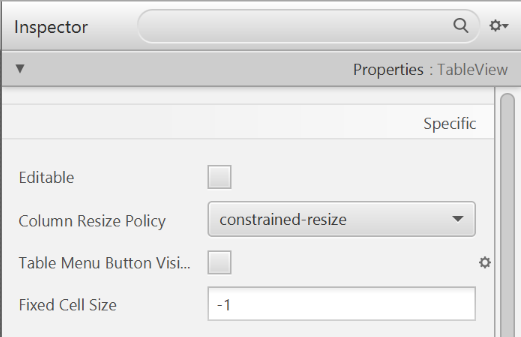
- Select the
TableViewand chooseconstrainted-resizefor the 'Column Resize Policy'. This ensures that the columns will always fill up the entire available space.
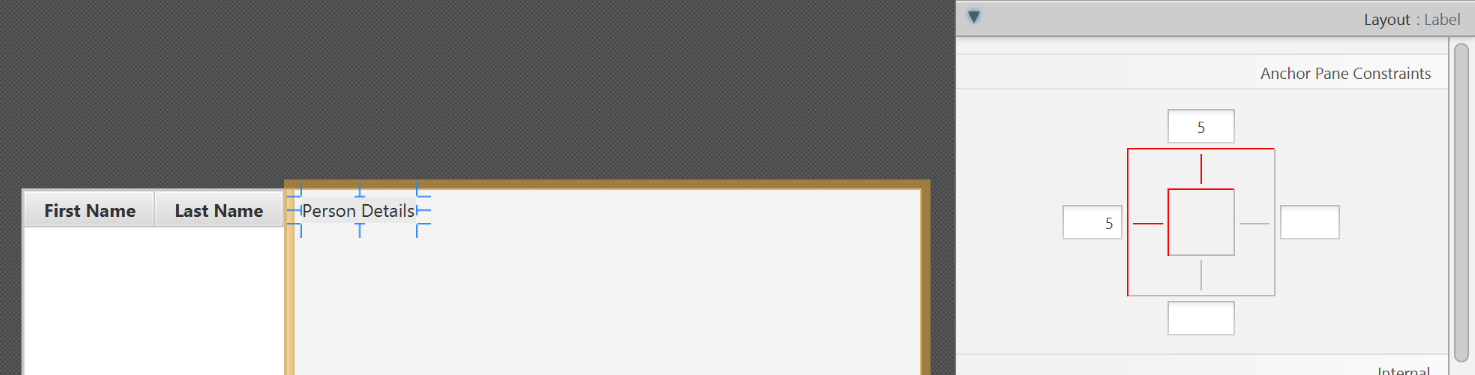
- Add a
Labelon the right side with the text "Person Details:". Adjust the layout using anchors (Top: 5, Left: 5. Right: Blank, Bottom: Blank).
You can use the Search Bar at the top of Library/Inspector to find the respective controls/properties.
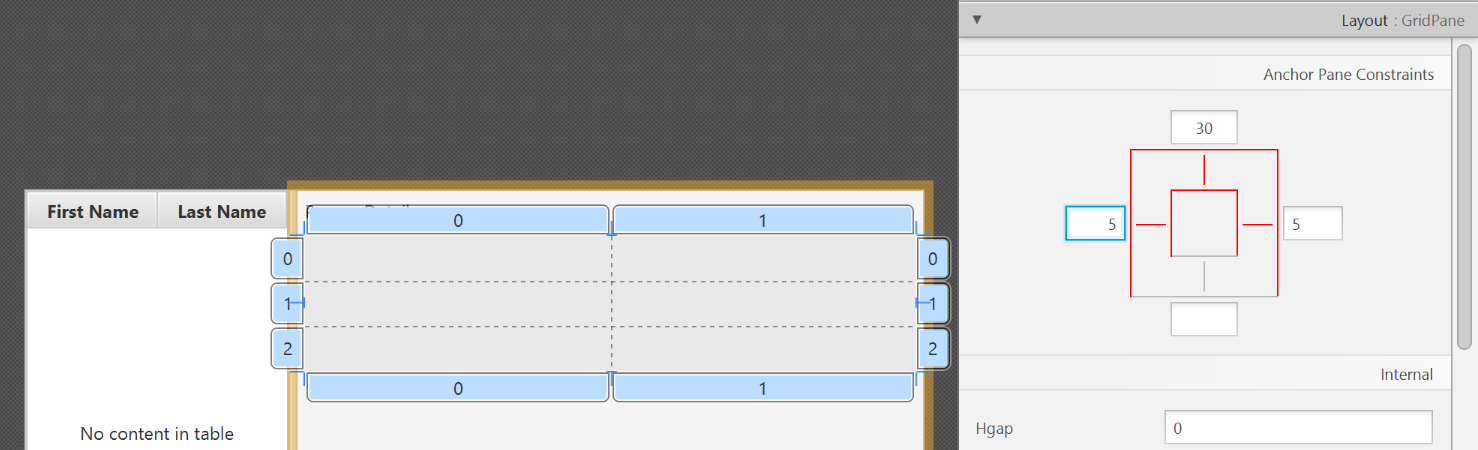
- Add a
GridPaneon the right side. Select it, and adjust its layout using anchors (Top: 30, Left: 5, Right: 5, Bottom: Blank).
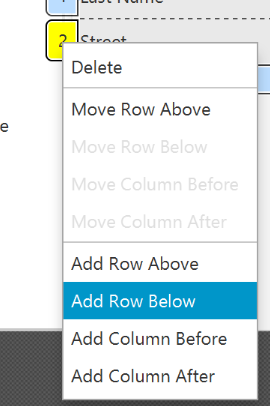
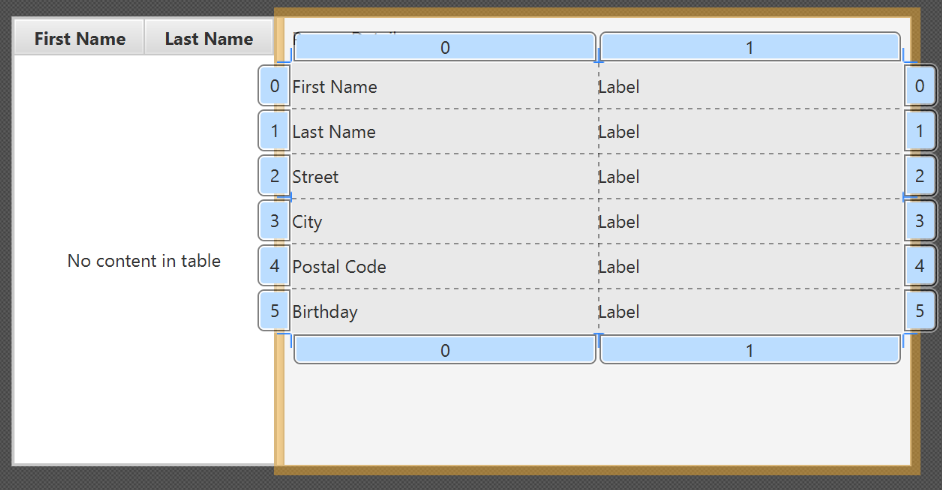
- Add the following labels to the cells, such that the grid is of this form:
| First Name | Label |
|---|---|
| Last Name | Label |
| Street | Label |
| City | Label |
| Postal Code | Label |
| Birthday | Label |
To add a row to the GridPane, select an existing row number, right click the row number and choose "Add Row Below".
- Add a
ButtonBarat the bottom. Add three buttons to the bar ("New...", "Edit...","Delete"). Adjust the anchors so that it stays at the bottom right (Top: Blank, Left: Blank, Right: 10, Bottom: 5).
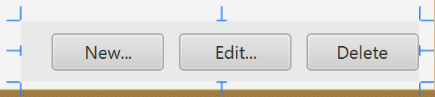
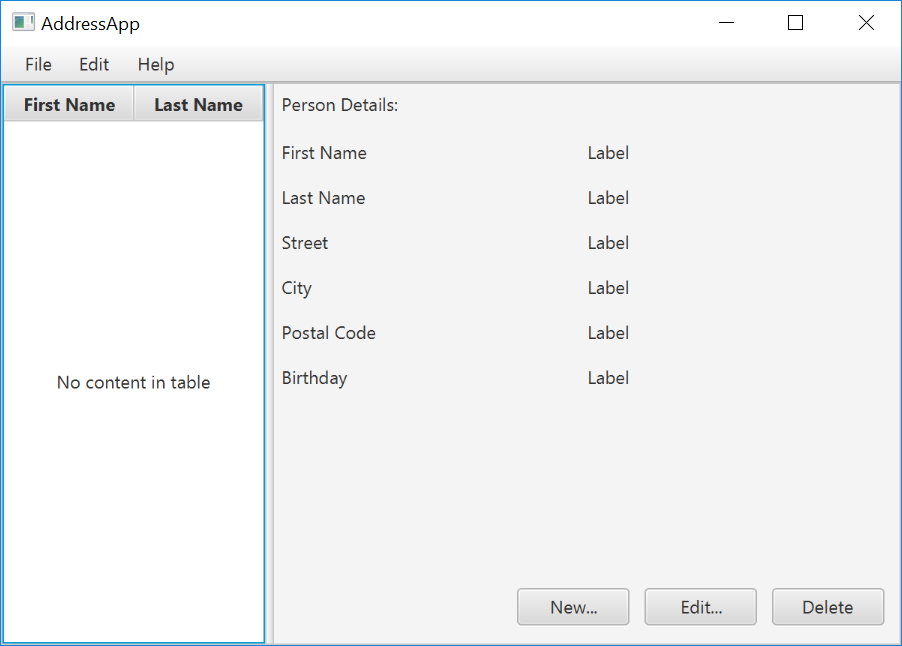
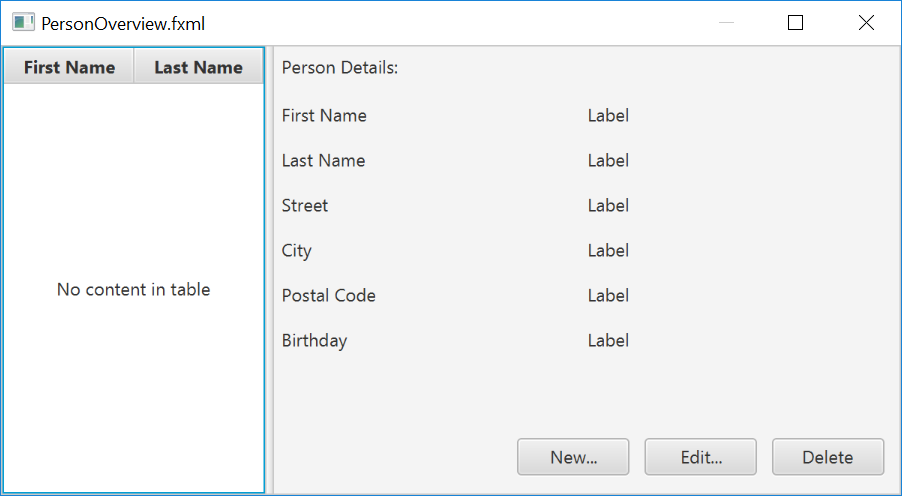
- Now you should see something like the following. Use the
Previewmenu to test its resizing behaviour.
- Save the
.fxmlfile.
Create the Main Application
The PersonOverview.fxml that we just created only contains the content of our entire application. We need another FXML for our root layout, which will contain a menu bar and wraps PersonOverview.fxml.
- Inside IntelliJ, right click on the
viewpackage, and pressNew→FXML file. For the file name, typeRootLayout.fxml. - Right-click on
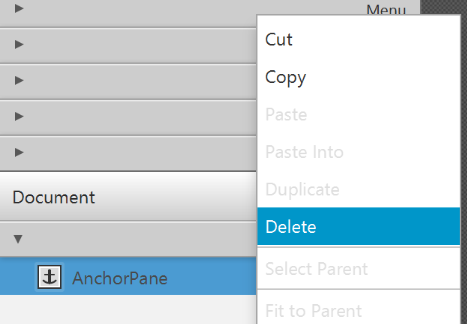
RootLayout.fxmland chooseOpen with Scene Builder. - Delete the
AnchorPane. We will use another pane for our root layout.
- Add
BorderPaneby dragging it from the Library view into the main area.
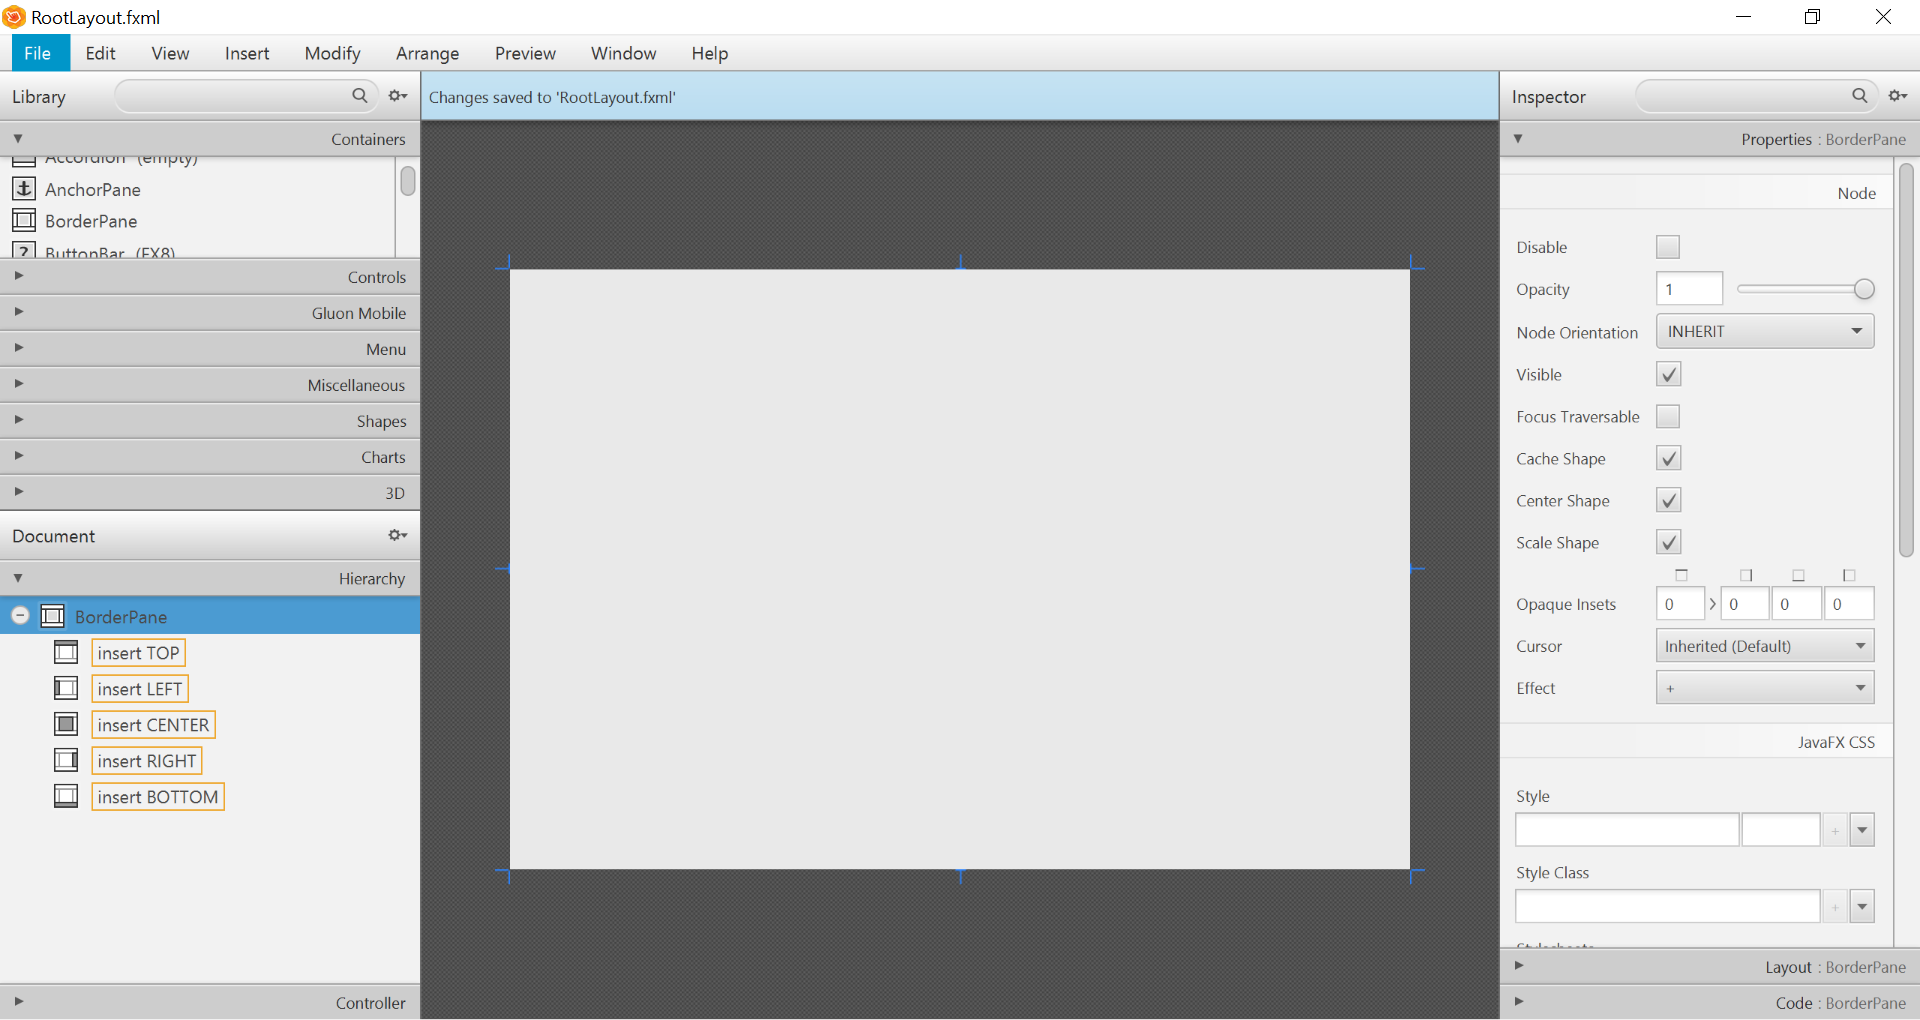
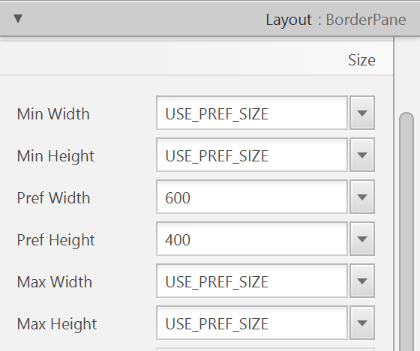
- Resize the
BorderPane(Pref Width: 600, Pref Height: 400)
- Add a
MenuBarinto theinsert TOPslot. We will not implement menu functionality for now.

The JavaFX Main Class
Now, we need to create the main Java class that starts up our application with the RootLayout.fxml and adds the PersonOverview.fxml in the center.
Right-click on your seedu.address package, and choose New → JavaFXApplication. For the class name, type MainApp.
The generated MainApp.java class extends from Application and contains two methods. This is the basic structure that we need to start a JavaFX Application. The most important part for us is the start(Stage primaryStage) method. It is automatically called when the application is launch() from within the main() method.
As you see, the start(...) method receives a Stage as parameter. The following graphic illustrates the structure of every JavaFX application:
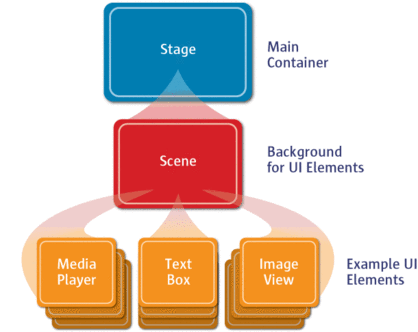
Image Source: http://www.oracle.com
It's like a theater play: The Stage is the main container which is usually a Window with a border and the typical minimize, maximize and close buttons. Inside the Stage you add a Scene which can, of course, be switched out by another Scene. Inside the Scene the actual JavaFX nodes like AnchorPane, TextBox, etc. are added.
See this page for more info on working with the JavaFX Scene Graph.
Open MainApp.java and replace the code with the following:
MainApp.java
package seedu.address;

import java.io.IOException;

import javafx.application.Application;
import javafx.fxml.FXMLLoader;
import javafx.scene.Scene;
import javafx.scene.layout.AnchorPane;
import javafx.scene.layout.BorderPane;
import javafx.stage.Stage;

public class MainApp extends Application {
    private Stage primaryStage;
    private BorderPane rootLayout;

    @Override
    public void start(Stage primaryStage) {
        this.primaryStage = primaryStage;
        this.primaryStage.setTitle("AddressApp");

        initRootLayout();

        showPersonOverview();
    }

    /**
     * Initializes the root layout.
     */
    public void initRootLayout() {
        try {
            // Load root layout from fxml file.
            FXMLLoader loader = new FXMLLoader();
            loader.setLocation(MainApp.class.getResource("view/RootLayout.fxml"));
            rootLayout = loader.load();

            // Show the scene containing the root layout.
            Scene scene = new Scene(rootLayout);
            primaryStage.setScene(scene);
            primaryStage.show();
        } catch (IOException e) {
            e.printStackTrace();
        }
    }

    /**
     * Shows the person overview inside the root layout.
     */
    public void showPersonOverview() {
        try {
            // Load person overview.
            FXMLLoader loader = new FXMLLoader();
            loader.setLocation(MainApp.class.getResource("view/PersonOverview.fxml"));
            AnchorPane personOverview = loader.load();

            // Set person overview into the center of root layout.
            rootLayout.setCenter(personOverview);
        } catch (IOException e) {
            e.printStackTrace();
        }
    }

    /**
     * Returns the main stage.
     */
    public Stage getPrimaryStage() {
        return primaryStage;
    }

    public static void main(String[] args) {
        launch(args);
    }
}
The various comments should give you some hints about what's going on.
Importing JavaFx 9
JavaFx 9 is a separate module from Java 9. We must ensure that the modules are imported correctly.
Notice that IntellJ will complain about the imported modules "not being in the module graph":
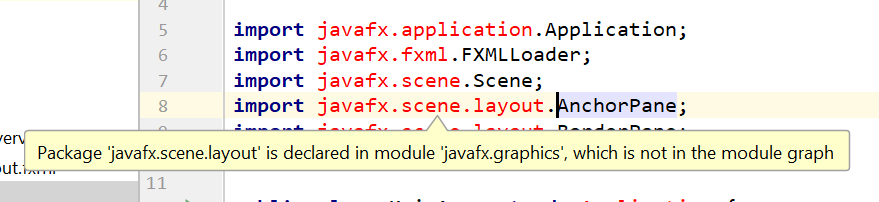
To fix this:
- Ensure that your Project pane is open (Alt+1). Right click on the
srcfolder, and selectNew→module-info.java: - Add the following
requiresandexportsin order to import and export the modules correctly:
module AddressApp {
    requires javafx.graphics;
    requires javafx.fxml;
    requires javafx.controls;

    exports seedu.address;
}
Running the Application
If you run the application now (right click MainApp.java and select Run MainApp.main()), you should see something like this:
Possible Issues
If JavaFx fails to load PersonOverview.fxml, you might get the following error message:
javafx.fxml.LoadException:
/.../AddressApp/out/production/AddressApp/seedu/address/view/PersonOverview.fxml:15
To solve this issue, open PersonOverview.fxml normally in IntelliJ and ensure that there is no such attribute around:
fx:controller="seedu.address.view.PersonOverview"
JavaFx 9 tutorial - Part 2: Model and TableView
Introduction
In this tutorial, we will create the other parts of the application (mainly the model and the controller). We will also use ObservableList and *Property to bind our list of new model's Persons, and their individual details, to the view, with the controller as the "middleman".
Create the Model class
We need a model class in order to hold information about the people in our address book. Add a new class to the model package (seedu.address.model) called Person. The Person class will encapsulate the details of an individual person such as name, address and birthday. Add the following code to the class. The JavaFX specifics will be explained after the code snippet.
Person.java
package seedu.address.model;

import java.time.LocalDate;

import javafx.beans.property.IntegerProperty;
import javafx.beans.property.ObjectProperty;
import javafx.beans.property.SimpleIntegerProperty;
import javafx.beans.property.SimpleObjectProperty;
import javafx.beans.property.SimpleStringProperty;
import javafx.beans.property.StringProperty;

/**
 * Model class for a Person.
 */
public class Person {

    private final StringProperty firstName;
    private final StringProperty lastName;
    private final StringProperty street;
    private final IntegerProperty postalCode;
    private final StringProperty city;
    private final ObjectProperty< LocalDate > birthday;

    /**
     * Default constructor.
     */
    public Person() {
        this(null, null);
    }

    /**
     * Constructor with some initial data.
     */
    public Person(String firstName, String lastName) {
        this.firstName = new SimpleStringProperty(firstName);
        this.lastName = new SimpleStringProperty(lastName);

        // Some initial dummy data, just for convenient testing.
        this.street = new SimpleStringProperty("some street");
        this.postalCode = new SimpleIntegerProperty(1234);
        this.city = new SimpleStringProperty("some city");
        this.birthday = new SimpleObjectProperty< LocalDate >(LocalDate.of(1999, 2, 21));
    }

    public String getFirstName() {
        return firstName.get();
    }

    public void setFirstName(String firstName) {
        this.firstName.set(firstName);
    }

    public StringProperty firstNameProperty() {
        return firstName;
    }

    public String getLastName() {
        return lastName.get();
    }

    public void setLastName(String lastName) {
        this.lastName.set(lastName);
    }

    public StringProperty lastNameProperty() {
        return lastName;
    }

    public String getStreet() {
        return street.get();
    }

    public void setStreet(String street) {
        this.street.set(street);
    }

    public StringProperty streetProperty() {
        return street;
    }

    public int getPostalCode() {
        return postalCode.get();
    }

    public void setPostalCode(int postalCode) {
        this.postalCode.set(postalCode);
    }

    public IntegerProperty postalCodeProperty() {
        return postalCode;
    }

    public String getCity() {
        return city.get();
    }

    public void setCity(String city) {
        this.city.set(city);
    }

    public StringProperty cityProperty() {
        return city;
    }

    public LocalDate getBirthday() {
        return birthday.get();
    }

    public void setBirthday(LocalDate birthday) {
        this.birthday.set(birthday);
    }

    public ObjectProperty< LocalDate > birthdayProperty() {
        return birthday;
    }
}
Explanations
- With JavaFX, it is common to use
*Propertyfor all fields of a model class. APropertyallows us, for example, to automatically be notified when thelastNameor any other variable is changed. This helps us keep the view in sync with the data. - To learn more about
*Property, refer to Using JavaFX Properties and Binding LocalDate, the type that we are using forbirthday, is part of the new Date and Time API since JDK 8
A List of Persons
The main data that our application manages is simply a bunch of persons. Let's create a list of Person objects inside the MainApp class. All other controller classes will later get access to that central list inside the MainApp.
ObservableList
We are working with JavaFX view classes that need to be informed about any changes made to the list of persons. This is important, since otherwise the view would not be in sync with the data. For this purpose, JavaFX introduces some new Collection classes.
Among all these collections, we need the ObservableList. To create a new ObservableList, add the following code at the beginning of the MainApp class. We'll also add a constructor that creates some sample data and a public getter method:
MainApp.java
// ... AFTER THE OTHER VARIABLES ...

/**
* The data as an observable list of {@link Person}.
*/
private ObservableList< Person > personData = FXCollections.observableArrayList();

    /**
     * Constructor
     */
    public MainApp() {
        // Add some sample data
        personData.add(new Person("Hans", "Muster"));
        personData.add(new Person("Ruth", "Mueller"));
        personData.add(new Person("Heinz", "Kurz"));
        personData.add(new Person("Cornelia", "Meier"));
        personData.add(new Person("Werner", "Meyer"));
        personData.add(new Person("Lydia", "Kunz"));
        personData.add(new Person("Anna", "Best"));
        personData.add(new Person("Stefan", "Meier"));
        personData.add(new Person("Martin", "Mueller"));
    }

    /**
     * Returns the data as an observable list of {@link Person}.
     */
    public ObservableList< Person > getPersonData() {
        return personData;
    }

    // ... THE REST OF THE CLASS ...
The PersonOverviewController
We have our model and view. Let's get our data into our table. We'll need a controller for our PersonOverview.fxml to act as a "middleman" for the model and view.
Create a normal Java class inside the view package called PersonOverviewController.
Note: We must put the class inside the same package as PersonOverview.fxml, otherwise the SceneBuilder won't be able to find it.
We will add some instance variables that give us access to the table and the labels inside the view. The fields and some methods have a special @FXML annotation. This is necessary in order for the .fxml file to have access to private fields and private methods. After we have everything set up in the .fxml file, the application will automatically fill the variables when the .fxml file is loaded.
So let's add the following code:
Note: Remember to always use the javafx imports, NOT awt or swing.
PersonOverviewController.java
package seedu.address.view;

import javafx.fxml.FXML;
import javafx.scene.control.Label;
import javafx.scene.control.TableColumn;
import javafx.scene.control.TableView;
import seedu.address.MainApp;
import seedu.address.model.Person;

public class PersonOverviewController {
    @FXML
    private TableView< Person> personTable;
    @FXML
    private TableColumn< Person, String> firstNameColumn;
    @FXML
    private TableColumn< Person, String> lastNameColumn;

    @FXML
    private Label firstNameLabel;
    @FXML
    private Label lastNameLabel;
    @FXML
    private Label streetLabel;
    @FXML
    private Label postalCodeLabel;
    @FXML
    private Label cityLabel;
    @FXML
    private Label birthdayLabel;

    // Reference to the main application.
    private MainApp mainApp;

    /**
     * The constructor. It is called before the initialize() method.
     */
    public PersonOverviewController() {
    }

    /**
     * Initializes the controller class. This method is automatically called
     * after the fxml file has been loaded.
     */
    @FXML
    private void initialize() {
        // Initialize the person table with the two columns.
        firstNameColumn.setCellValueFactory(cellData -> cellData.getValue().firstNameProperty());
        lastNameColumn.setCellValueFactory(cellData -> cellData.getValue().lastNameProperty());
    }

    /**
     * Is called by the main application to give a reference back to itself.
     */
    public void setMainApp(MainApp mainApp) {
        this.mainApp = mainApp;

        // Add observable list data to the table
        personTable.setItems(mainApp.getPersonData());
    }
}
Explanations
- All fields and methods where the
.fxmlfile needs access must be annotated with@FXML.- Actually, only if they are private, but it's better to have them private and mark them with the annotation!
- The
initialize()method is automatically called after the.fxmlfile has been loaded. At this time, all the FXML fields should have been initialized already. - The
setCellValueFactory(...)that we set on the table colums are used to determine which field inside thePersonobjects should be used for the particular column. The arrow->indicates that we're using a Java 8 feature called Lambdas. (Another option would be to use aPropertyValueFactory, but this is not type-safe).
Note:
We're only using StringProperty values for our table columns in this example. When you want to use IntegerProperty or DoubleProperty, the setCellValueFactory(...) must have an additional asObject():
myIntegerColumn.setCellValueFactory(cellData ->
    cellData.getValue().myIntegerProperty().asObject());
This is necessary because of a bad design decision of JavaFX (see this discussion for more details).
Connecting MainApp with the PersonOverviewController
The setMainApp(...) method must be called by the MainApp class. This gives us a way to access the MainApp object and get the list of Persons and other things. Add the following three lines to showPersonOverview() the method:
MainApp.java - additional lines to add to showPersonOverview() method
// (.... root layout statement goes here ....)

// Give the controller access to the main app.
    PersonOverviewController controller = loader.getController();
    controller.setMainApp(this);

// (.... catch statement goes here ....)
Your showPersonOverview() method in MainApp should now look like this:
MainApp.java - new showPersonOverview() method
/**
* Shows the person overview inside the root layout.
*/
public void showPersonOverview() {
    try {
        // Load person overview.
        FXMLLoader loader = new FXMLLoader();
        loader.setLocation(MainApp.class.getResource("view/PersonOverview.fxml"));
        AnchorPane personOverview = loader.load();

        // Set person overview into the center of root layout.
        rootLayout.setCenter(personOverview);

        // Give the controller access to the main app.
        PersonOverviewController controller = loader.getController();
        controller.setMainApp(this);
    } catch (IOException e) {
        e.printStackTrace();
    }
}
Hook the View to the controller
We're almost there! But one thing is missing: We haven't told our PersonOverview.fxml file which controller to use, and which element should match to which field inside the controller.
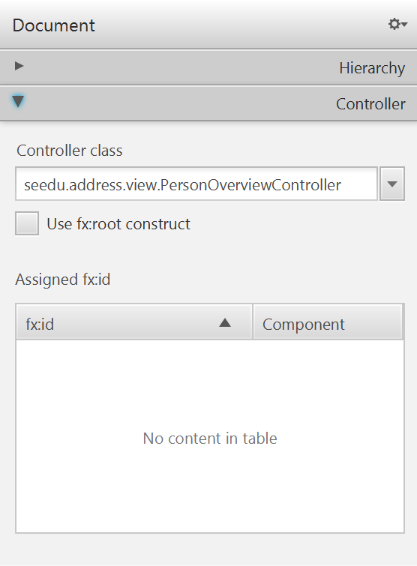
- Open
PersonOverview.fxmlwith the SceneBuilder. - Open the Controller group on the left side (just below Hierarchy), and select the
seedu.address.view.PersonOverviewControlleras the controller class.
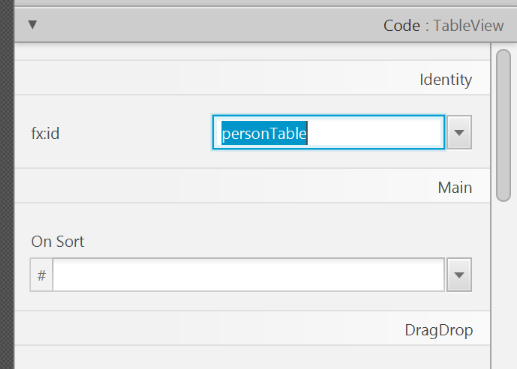
- Select the
TableViewin the Hierarchy group. - In the Inspector view, under the Code group, set 'fx:id' to
personTable.
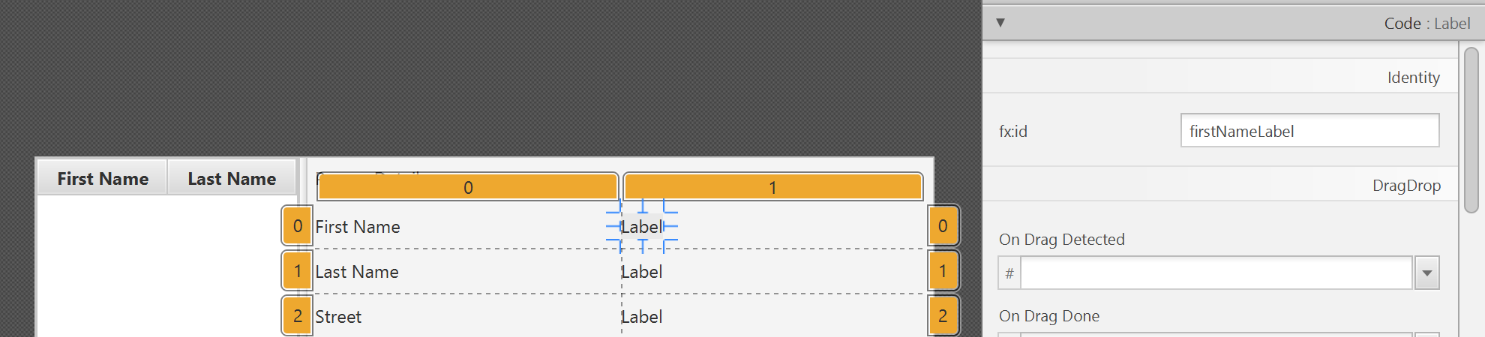
- Do the same for the table columns. Select
firstNameColumnandlastNameColumnfor the 'fx:id' respectively. - For each label in the second column of the grid pane, choose the corresponding 'fx:id'.
- Save the
.fxmlfile.
Opening up the PersonOverviewController to JavaFx
If you try and run the application now, you will encounter the following error:
javafx.fxml.LoadException: ...

...

Caused by: java.lang.IllegalAccessException: class javafx.fxml.FXMLLoader$ValueElement (in module javafx.fxml) cannot access class seedu.address.view.PersonOverviewController (in module AddressApp) because module AddressApp does not export seedu.address.view to module javafx.fxml
This is because JavaFx is unable to access our PersonOverviewController class.
To fix this, add this line of code to src/module-info.java:
module AddressApp {
    ...

    opens seedu.address.view;
}
The file should now look something like this:
module-info.java
module AddressApp {
    requires javafx.graphics;
    requires javafx.fxml;
    requires javafx.controls;

    exports seedu.address;
    opens seedu.address.view;
}
Start the Application
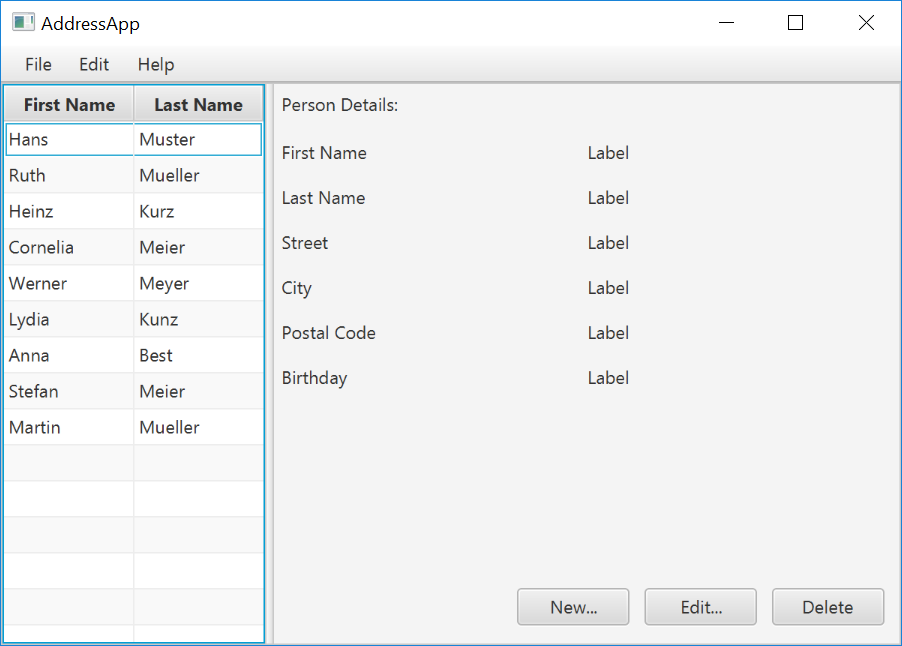
When you start your application now, you should see something like this:
Congratulations! The application now shows the list of Persons in the view!
You may notice that selecting a person in the TableView does nothing to the labels at the right side. That is because the user interaction portion has not been programmed yet, which we will cover in the next part of the tutorial.
Evidence:
Any code that you have written using JavaFX.
Project Management
W10.6 Can explain basic scheduling and tracking tools
W10.6a Can explain milestones
Project Management → Project Planning →
A milestone is the end of a stage which indicates a significant progress. We should take into account dependencies and priorities when deciding on the features to be delivered at a certain milestone.
Each intermediate product release is a milestone.
In some projects, it is not practical to have a very detailed plan for the whole project due to the uncertainty and unavailability of required information. In such cases, we can use a high-level plan for the whole project and a detailed plan for the next few milestones.
Milestones for the Minesweeper project, iteration 1
| Day | Milestones |
|---|---|
| Day 1 | Architecture skeleton completed |
| Day 3 | ‘new game’ feature implemented |
| Day 4 | ‘new game’ feature tested |
Evidence:
Identify milestones of your class project.
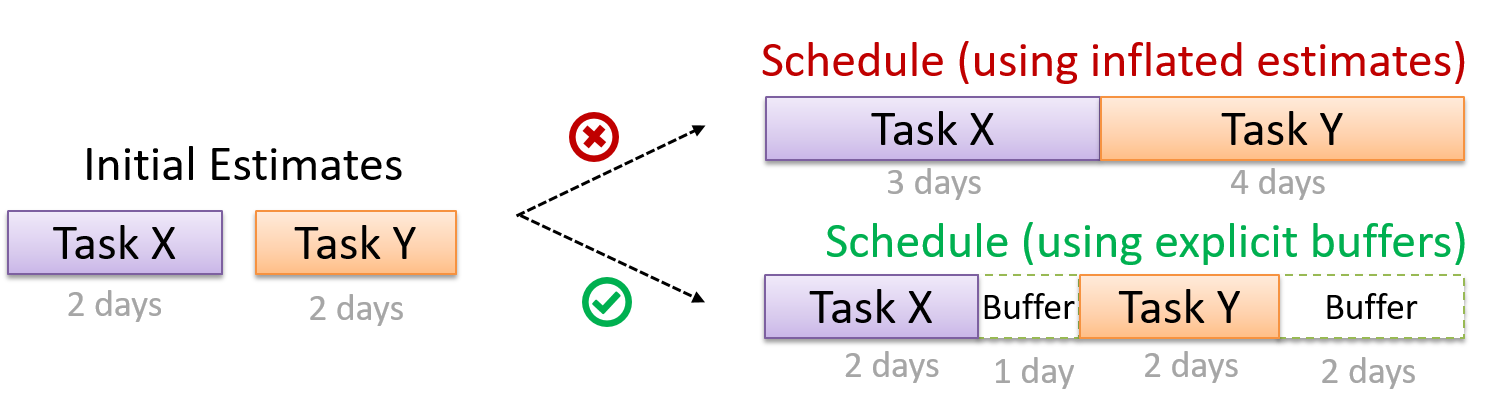
W10.6b Can explain buffers
Project Management → Project Planning →
A buffer is a time set aside to absorb any unforeseen delays. It is very important to include buffers in a software project schedule because effort/time estimations for software development is notoriously hard. However, do not inflate task estimates to create hidden buffers; have explicit buffers instead. Reason: With explicit buffers it is easier to detect incorrect effort estimates which can serve as a feedback to improve future effort estimates.
Evidence:
Explain how buffers can be used in your class project.
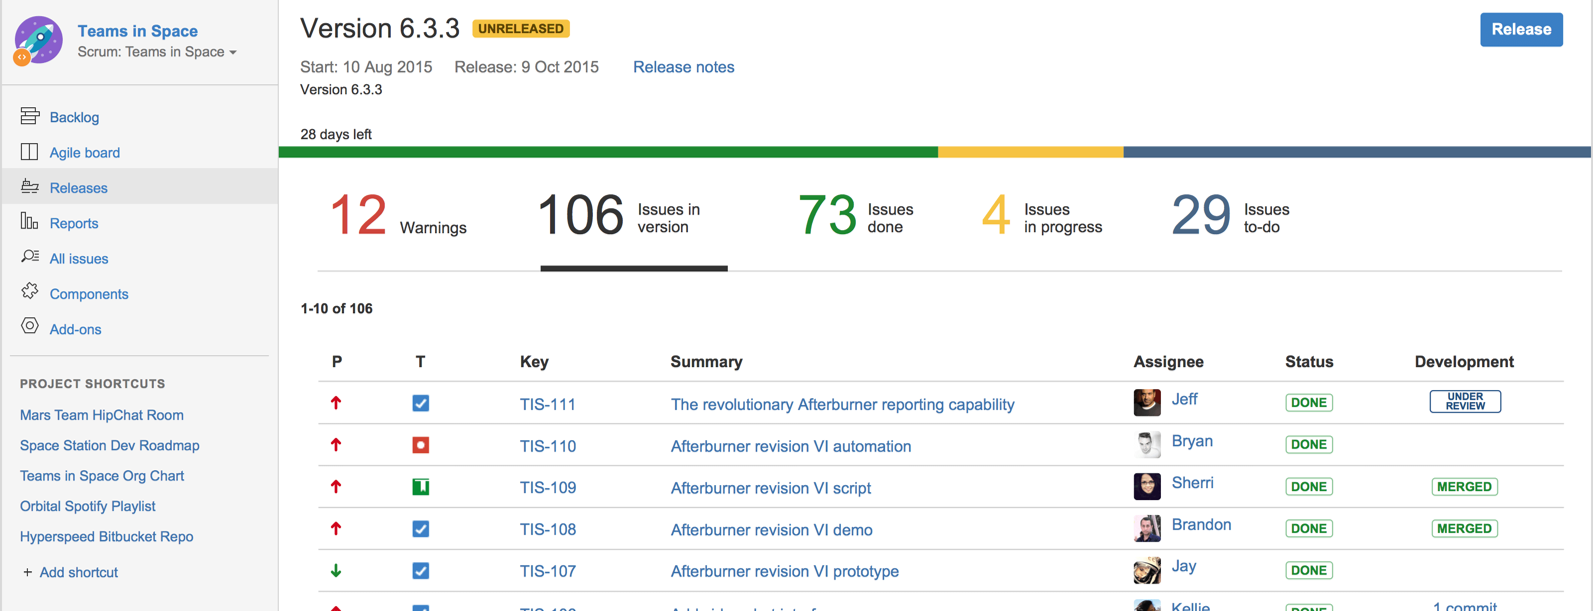
W10.6c Can explain issue trackers
Project Management → Project Planning →
Keeping track of project tasks (who is doing what, which tasks are ongoing, which tasks are done etc.) is an essential part of project management. In small projects it may be possible to track tasks using simple tools as online spreadsheets or general-purpose/light-weight tasks tracking tools such as Trello. Bigger projects need more sophisticated task tracking tools.
Issue trackers (sometimes called bug trackers) are commonly used to track task assignment and progress. Most online project management software such as GitHub, SourceForge, and BitBucket come with an integrated issue tracker.
A screenshot from the Jira Issue tracker software (Jira is part of the BitBucket project management tool suite):
Evidence:
Explain the role of GitHub issue tracker can play in your project.
W10.6d Can explain work breakdown structures
Project Management → Project Planning →
A Work Breakdown Structure (WBS) depicts information about tasks and their details in terms of subtasks. When managing projects it is useful to divide the total work into smaller, well-defined units. Relatively complex tasks can be further split into subtasks. In complex projects a WBS can also include prerequisite tasks and effort estimates for each task.
The high level tasks for a single iteration of a small project could look like the following:
| Task ID | Task | Estimated Effort | Prerequisite Task |
|---|---|---|---|
| A | Analysis | 1 man day | - |
| B | Design | 2 man day | A |
| C | Implementation | 4.5 man day | B |
| D | Testing | 1 man day | C |
| E | Planning for next version | 1 man day | D |
The effort is traditionally measured in man hour/day/month i.e. work that can be done by one person in one hour/day/month. The Task ID is a label for easy reference to a task. Simple labeling is suitable for a small project, while a more informative labeling system can be adopted for bigger projects.
An example WBS for a project for developing a game.
| Task ID | Task | Estimated Effort | Prerequisite Task |
|---|---|---|---|
| A | High level design | 1 man day | - |
| B |
Detail design
|
2 man day
|
A |
| C |
Implementation
|
4.5 man day
|
|
| D | System Testing | 1 man day | C |
| E | Planning for next version | 1 man day | D |
All tasks should be well-defined. In particular, it should be clear as to when the task will be considered done.
Some examples of ill-defined tasks and their better-defined counterparts:
| Bad | Better |
|---|---|
| more coding | implement component X |
| do research on UI testing | find a suitable tool for testing the UI |
Which one these project tasks is not well-defined?
(c)
Explanation: ‘More testing’ is not well-defined. How much is ‘more’? ‘Test the delete functionality’ is a better-defined task.
Evidence:
Break down the project into well-defined tasks and records them in the issue tracker.
W10.6e Can explain GANTT charts
Project Management → Project Planning →
A Gantt chart is a 2-D bar-chart, drawn as time vs tasks (represented by horizontal bars).
A sample Gantt chart:
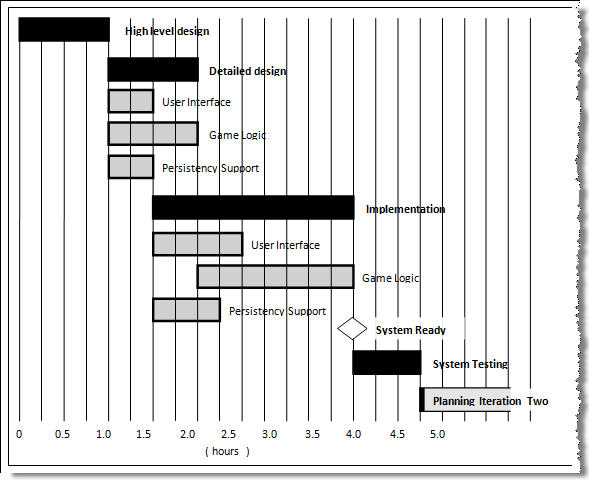
In a Gantt chart, a solid bar represents the main task, which is generally composed of a number of subtasks, shown as grey bars. The diamond shape indicates an important deadline/deliverable/milestone.
W10.6f Can explain PERT charts
Project Management → Project Planning →
PERT (Program Evaluation Review Technique) chart uses a graphical technique to show the order/sequence of tasks. It is based on a simple idea of drawing a directed graph in which:
- Node or vertex captures the effort estimation of a task, and
- Arrow depicts the precedence between tasks
an example PERT chart for a simple software project
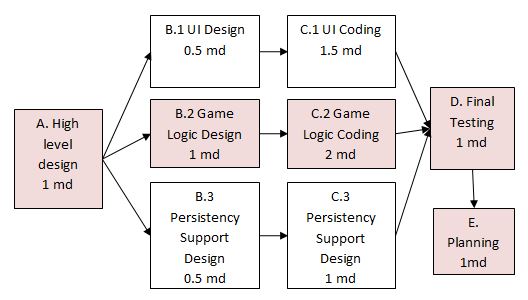
md = man days
A PERT chart can help determine the following important information:
- The order of tasks. In the example above,
Final Testingcannot begin until all coding of individual subsystems have been completed. - Which tasks can be done concurrently. In the example above, the various subsystem designs can start independently once the
High level designis completed. - The shortest possible completion time. In the example above, there is a path (indicated by the shaded boxes) from start to end that determines the shortest possible completion time.
- The Critical Path. In the example above, the shortest possible path is also the critical path.
Critical path is the path in which any delay can directly affect the project duration. It is important to ensure tasks on the critical path are completed on time.
🅿️ Project
W10.7 Mid-project check point
Extract from the Admin Info page:
Week 10: mid-project checkpoint
Deadline: week 10 lecture
Marks: 10, if you show a satisfactory level in the items below
- Create a GitHub account. Create a repository under your account and push our code to it.
- Demo the current state of the project to prof during the week 10 lecture session. There should be some working features at this point.
- Submit interim project documents (handover a hard copy during lecture 10 or upload to IVLE before lecture 10). The document should contain,
- URL of your GitHub repo
- Some representative user stories for the product
- A class diagram to match your code (scans of hand-drawn diagrams are acceptable too)
- At least one object diagram illustrating the state of your program at some point
W10.8 Can use assertions
Extract from the Admin Info page:
After the mid-project checkpoint,
- Enhance your project (TaskManager or otherwise) as explained in the exercise below:
This exercise continues from the TaskManager Level 1-10 exercises quoted above.
Add some assertions (i.e., Java asserts, not JUnit assertions) to your code.
Tutorial 10
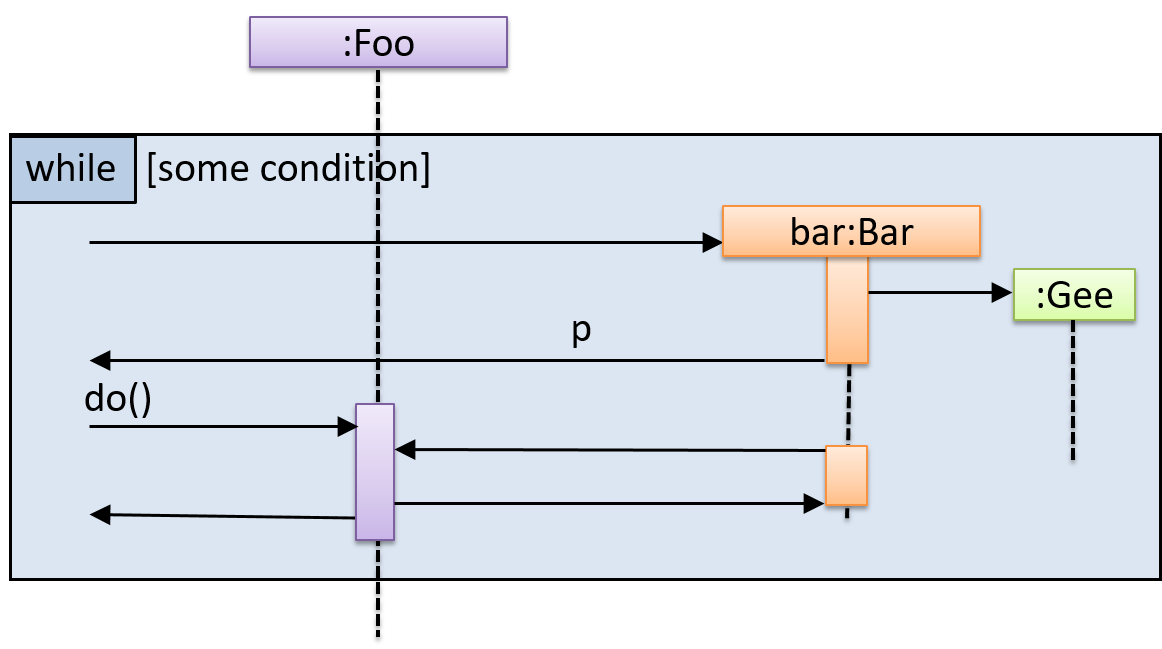
W9.1a Can draw basic sequence diagrams
Design → Modelling → Modelling Behaviors
Explain in your own words the interactions illustrated by this Sequence Diagram:
Consider the code below:
class Person{
    Tag tag;
    String name;

    Person(String personName, String tagName){
        name = personName;
        tag = new Tag(tagName);
    }
}
class Tag{
    Tag(String value){
        //...
    }
}

class PersonList{
    void addPerson(Person p){
        //...
    }
}
Draw a sequence diagram to illustrate the object interactions that happen in the code snippet below:
PersonList personList = new PersonList();
while (hasRoom){
    Person p = new Person("Adam", "friend");
    personList.addPerson(p);
}
Find notation mistakes in the sequence diagram below:
Evidence:
Consider the code below:
class Person{
    Tag tag;
    String name;

    Person(String personName, String tagName){
        name = personName;
        tag = new Tag(tagName);
    }
}
class Tag{
    Tag(String value){
        //...
    }
}

class PersonList{
    void addPerson(Person p){
        //...
    }
}
Draw a sequence diagram to illustrate the object interactions that happen in the code snippet below:
PersonList personList = new PersonList();
while (hasRoom){
    Person p = new Person("Adam", "friend");
    personList.addPerson(p);
}
W9.2c Can explain coupling
Design → Design Fundamentals → Coupling →
Coupling is a measure of the degree of dependence between components, classes, methods, etc. Low coupling indicates that a component is less dependent on other components. High coupling (aka tight coupling or strong coupling) is discouraged due to the following disadvantages:
- Maintenance is harder because a change in one module could cause changes in other modules coupled to it (i.e. a ripple effect).
- Integration is harder because multiple components coupled with each other have to be integrated at the same time.
- Testing and reuse of the module is harder due to its dependence on other modules.
In the example below, design A appears to have a more coupling between the components than design B.
Discuss the coupling levels of alternative designs x and y.
Overall coupling levels in x and y seem to be similar (neither has more dependencies than the other). (Note that the number of dependency links is not a definitive measure of the level of coupling. Some links may be stronger than the others.). However, in x, A is highly-coupled to the rest of the system while B, C, D, and E are standalone (do not depend on anything else). In y, no component is as highly-coupled as A of x. However, only D and E are standalone.
Explain the link (if any) between regressions and coupling.
When the system is highly-coupled, the risk of regressions is higher too e.g. when component A is modified, all components ‘coupled’ to component A risk ‘unintended behavioral changes’.
Discuss the relationship between coupling and
Coupling decreases testability because if the
Choose the correct statements.
- a. As coupling increases, testability decreases.
- b. As coupling increases, the risk of regression increases.
- c. As coupling increases, the value of automated regression testing increases.
- d. As coupling increases, integration becomes easier as everything is connected together.
- e. As coupling increases, maintainability decreases.
(a)(b)(c)(d)(e)
Explanation: High coupling means either more components require to be integrated at once in a big-bang fashion (increasing the risk of things going wrong) or more drivers and stubs are required when integrating incrementally.
Evidence:
Explain coupling with examples from your project.
W9.2d Can reduce coupling
Design → Design Fundamentals → Coupling →
X is coupled to Y if a change to Y can potentially require a change in X.
If Foo class calls the method Bar#read(), Foo is coupled to Bar because a change to Bar can potentially (but not always) require a change in the Foo class e.g. if the signature of the Bar#read() is changed, Foo needs to change as well, but a change to the Bar#write() method may not require a change in the Foo class because Foo does not call Bar#write().
class Foo{
    ...
    new Bar().read();
    ...
}

class Bar{
    void read(){
        ...
    }

    void write(){
        ...
    }
}
Some examples of coupling: A is coupled to B if,
Ahas access to the internal structure ofB(this results in a very high level of coupling)AandBdepend on the same global variableAcallsBAreceives an object ofBas a parameter or a return valueAinherits fromBAandBare required to follow the same data format or communication protocol
Which of these indicate a coupling between components A and B?
- a. component A has access to internal structure of component B.
- b. component A and B are written by the same developer.
- c. component A calls component B.
- d. component A receives an object of component B as a parameter.
- e. component A inherits from component B.
- f. components A and B have to follow the same data format or communication protocol.
(a)(b)(c)(d)(e)(f)
Explanation: Being written by the same developer does not imply a coupling.
Evidence:
Explain with examples from your project how coupling can be increased/decreased.
W9.2e Can identify types of coupling
Design → Design Fundamentals → Coupling →
Some examples of different coupling types:
- Content coupling: one module modifies or relies on the internal workings of another module e.g., accessing local data of another module
- Common/Global coupling: two modules share the same global data
- Control coupling: one module controlling the flow of another, by passing it information on what to do e.g., passing a flag
- Data coupling: one module sharing data with another module e.g. via passing parameters
- External coupling: two modules share an externally imposed convention e.g., data formats, communication protocols, device interfaces.
- Subclass coupling: a class inherits from another class. Note that a child class is coupled to the parent class but not the other way around.
- Temporal coupling: two actions are bundled together just because they happen to occur at the same time e.g. extracting a contiguous block of code as a method although the code block contains statements unrelated to each other
Evidence:
Explain types of coupling with examples from your own project.
W9.2f Can explain cohesion
Design → Design Fundamentals → Cohesion →
Cohesion is a measure of how strongly-related and focused the various responsibilities of a component are. A highly-cohesive component keeps related functionalities together while keeping out all other unrelated things.
Higher cohesion is better. Disadvantages of low cohesion (aka weak cohesion):
- Lowers the understandability of modules as it is difficult to express module functionalities at a higher level.
- Lowers maintainability because a module can be modified due to unrelated causes (reason: the module contains code unrelated to each other) or many many modules may need to be modified to achieve a small change in behavior (reason: because the code realated to that change is not localized to a single module).
- Lowers reusability of modules because they do not represent logical units of functionality.
Evidence:
Explain cohesion with examples from your project.
W9.2g Can increase cohesion
Design → Design Fundamentals → Cohesion →
Cohesion can be present in many forms. Some examples:
- Code related to a single concept is kept together, e.g. the
Studentcomponent handles everything related to students. - Code that is invoked close together in time is kept together, e.g. all code related to initializing the system is kept together.
- Code that manipulates the same data structure is kept together, e.g. the
GameArchivecomponent handles everything related to the storage and retrieval of game sessions.
Suppose a Payroll application contains a class that deals with writing data to the database. If the class include some code to show an error dialog to the user if the database is unreachable, that class is not cohesive because it seems to be interacting with the user as well as the database.
Compare the cohesion of the following two versions of the EmailMessage class. Which one is more cohesive and why?
// version-1
class EmailMessage {
    private String sendTo;
 	  private String subject;
    private String message;

    public EmailMessage(String sendTo, String subject, String message) {
        this.sendTo = sendTo;
        this.subject = subject;
        this.message = message;
    }

    public void sendMessage() {
        // sends message using sendTo, subject and message
    }
}

// version-2
class EmailMessage {
    private String sendTo;
    private String subject;
    private String message;
    private String username;

    public EmailMessage(String sendTo, String subject, String message) {
        this.sendTo = sendTo;
        this.subject = subject;
        this.message = message;
    }

    public void sendMessage() {
        // sends message using sendTo, subject and message
    }

    public void login(String username, String password) {
        this.username = username;
        // code to login
    }
}
Version 2 is less cohesive.
Explanation: Version 2 is handling functionality related to login, which is not directly related to the concept of ‘email message’ that the class is supposed to represent. On a related note, we can improve the cohesion of both versions by removing the sendMessage functionality. Although sending message is related to emails, this class is supposed to represent an email message, not an email server.
Evidence:
Explain with examples from your project how cohesion can be increased/decreased.
W9.3a Can use Java varargs feature
Tools → Java →
Evidence:
Any code that you have written using the varargs feature.
W9.4b Can explain the need for following a standard
Implementation → Code Quality → Style →
One essential way to improve code quality is to follow a consistent style. That is why software engineers follow a strict coding standard (aka style guide).
The aim of a coding standard is to make the entire code base look like it was written by one person. A coding standard is usually specific to a programming language and specifies guidelines such as the location of opening and closing braces, indentation styles and naming styles (e.g. whether to use Hungarian style, Pascal casing, Camel casing, etc.). It is important that the whole team/company use the same coding standard and that standard is not generally inconsistent with typical industry practices. If a company's coding standards is very different from what is used typically in the industry, new recruits will take longer to get used to the company's coding style.
💡 IDEs can help to enforce some parts of a coding standard e.g. indentation rules.
What is the recommended approach regarding coding standards?
c
What is the aim of using a coding standard? How does it help?
Evidence:
What is the aim of using a coding standard? How does it help?
W9.4c Can follow simple mechanical style rules
Implementation → Code Quality → Style →
Learn basic guidelines of the Java coding standard (by OSS-Generic)
Sample coding standard: PEP 8 Python Style Guide -- by Python.org
Consider the code given below:
import java.util.*;

public class Task {
    public static final String descriptionPrefix = "description: ";
    private String description;
    private boolean important;
    List<String> pastDescription = new ArrayList<>(); // a list of past descriptions

    public Task(String d) {
      this.description = d;
      if (!d.isEmpty())
          this.important = true;
    }

    public String getAsXML() { return "<task>"+description+"</task>"; }

    /**
     * Print the description as a string.
     */
    public void printingDescription(){ System.out.println(this); }

    @Override
    public String toString() { return descriptionPrefix + description; }
}
In what ways the code violate the basic guidelines (i.e., those marked with one ⭐️) of the OSS-Generic Java Coding Standard given here?
Here are three:
descriptionPrefixis a constant and should be namedDESCRIPTION_PREFIX- method name
printingDescription()should be named asprintDescription() - boolean variable
importantshould be named to sound boolean e.g.,isImportant
There are many more.
Evidence:
Go through the provided Java coding standard. Identify and fix any violations of basic style rules in your project code.
W9.4d Can follow intermediate style rules
Implementation → Code Quality → Style →
Go through the provided Java coding standard and learn the intermediate style rules.
According to the given Java coding standard, which one of these is not a good name?
b
Explanation: checkWeight is an action. Naming variables as actions makes the code harder to follow. isWeightValid may be a better name.
Repeat the exercise in the panel below but also find violations of intermediate level guidelines.
Consider the code given below:
import java.util.*;

public class Task {
    public static final String descriptionPrefix = "description: ";
    private String description;
    private boolean important;
    List<String> pastDescription = new ArrayList<>(); // a list of past descriptions

    public Task(String d) {
      this.description = d;
      if (!d.isEmpty())
          this.important = true;
    }

    public String getAsXML() { return "<task>"+description+"</task>"; }

    /**
     * Print the description as a string.
     */
    public void printingDescription(){ System.out.println(this); }

    @Override
    public String toString() { return descriptionPrefix + description; }
}
In what ways the code violate the basic guidelines (i.e., those marked with one ⭐️) of the OSS-Generic Java Coding Standard given here?
Here are three:
descriptionPrefixis a constant and should be namedDESCRIPTION_PREFIX- method name
printingDescription()should be named asprintDescription() - boolean variable
importantshould be named to sound boolean e.g.,isImportant
There are many more.
Here's one you are more likely to miss:
* Print the description as a string.→* Prints the description as a string.
There are more.
Evidence:
Similar to [Can follow simple mechanical style rules] above, but also fix violations of intermediate style rules.
W9.6 Follow a coding standard, improve code quality
Extract from the Admin Info page:
Week 9
- Enhance your project (TaskManager or otherwise) as explained in the exercise below:
This exercise continues from the TaskManager Level 1-9 exercises quoted above.
Ensure the code follows the basic rules (optional to apply intermediate/advanced rules) specified in the provided Java coding standard.
- Recommended (but not required): Improve the code quality of your code by applying the practices taught in the module.
Lecture 10
[slides]