Week 7 [Oct 1]
Todo
Admin info to read:
Update UG and DG in the repo, update project plan in repo, attempt to do global-impact changes to the code base.
v1.1 Summary of Milestone
| Milestone | Minimum acceptable performance to consider as 'reached' |
|---|---|
| Team org/repo set up | as stated |
| Project plan formalized | as stated |
| Have done some enhancement to the code | at least attempted to enhance the code of a component, even if you did not fully succeed |
| All project documents updated as required | updated docs are merged to the master branch |
Reminder: Reaching individual and team milestones are considered for
A. Process:
Evaluates: How well you did in project management related aspects of the project, as an individual and as a team
Based on: Supervisor observations of project milestones and GitHub data.
Milestones need to be reached the midnight before of the tutorial for it to be counted as achieved. To get a good grade for this aspect, achieve recommended weekly progress in at least 6/10 weeks.
Other criteria:
- Good use of GitHub milestones
- Good use of GitHub release mechanism
- Good version control, based on the repo
- Reasonable attempt to use the forking workflow
- Good task definition, assignment and tracking, based on the issue tracker
- Good use of buffers (opposite: everything at the last minute)
- Project done iteratively and incrementally (opposite: doing most of the work in one big burst)
B. Team-based tasks:
Evaluates: how much you contributed to common team-based tasks
Based on: peer evaluations and tutor observations
Relevant: [
Here is a non-exhaustive list of team-tasks:
- Necessary general code enhancements e.g.,
- Work related to renaming the product
- Work related to changing the product icon
- Morphing the product into a different product
- Setting up the GitHub, Travis, AppVeyor, etc.
- Maintaining the issue tracker
- Release management
- Updating user/developer docs that are not specific to a feature e.g. documenting the target user profile
- Incorporating more useful tools/libraries/frameworks into the product or the project workflow (e.g. automate more aspects of the project workflow using a GitHub plugin)
v1.1 Project Management
-
Fix any errors in org/repo set up (e.g. wrong repo name).
-
When all changes intended for v1.1 is merged to the master branch, use
git tagfeature to tag the current version asv1.1 -
Start tracking your project schedule using GitHub issue tracker and milestones. More instructions coming soon.
v1.1 Documentation
-
Update User Guide, Developer Guide, README, and About Us pages as described earlier.
Submission: merge your changes to the master branch of your repo.
v1.1 Product
- Each member should try to add some enhancements that are in line with the vision for v2.0. Preferably, these should be
global-impact enhancements, touching as many other components as possible. Refer to the AddressBook-Level4 Developer Guide has some guidance on how to implement a new feature end-to-end.
If your team is facing difficulties due to differences in skill/motivation /availability among team members,
-
First, do not expect everyone to have the same skill/motivation level as you. It is fine if someone wants to do less and have low expectations from the module. That doesn't mean that person is a bad person. Everyone is entitled to have their own priorities.
-
Second, don't give up. It is unfortunate that your team ended up in this situation, but you can turn it into a good learning opportunity. You don't get an opportunity to save a sinking team every day 😃
-
Third, if you care about your grade and willing to work for it, you need to take initiative to turn the situation around or else the whole team is going to suffer. Don't hesitate to take charge if the situation calls for it. By doing so, you'll be doing a favor for your team. Be professional, kind, and courteous to the team members, but also be firm and assertive. It is your grade that is at stake. Don't worry about making a bad situation worse. You won't know until you try.
-
Finally, don't feel angry or 'wronged'. Teamwork problems are not uncommon in this module and we know how to grade so that you will not be penalized for others' low contribution. We can use Git to find exactly what others did. It's not your responsibility to get others to contribute.
Given below are some suggestions you can adopt if the project work is not going smooth due to team issues. Note that the below measures can result in some team members doing more work than others and earning better project grades than others. It is still better than sinking the whole team together.
-
Redistribute the work: Stronger programmers in the team should take over the critical parts of the code.
-
Enforce stricter integration workflow: Appoint an integrator (typically, the strongest programmer). His/her job is to maintain the integrated version of the code. He/she should not accept any code that breaks the existing product or is not up to the acceptable quality standard. It is up to others to submit acceptable code to the integrator. Note that if the integrator rejected your code unreasonably, you can still earn marks for that code. You are allowed to submit such 'rejected' code for grading. They can earn marks based on the quality of the code.
If you have very unreliable or totally disengaged team members :
- Re-allocate to others any mission-critical work allocated to that person so that such team members cannot bring down the entire team.
- However, do not leave out such team members from project communications. Always keep them in the loop so that they can contribute any time they wish to.
- Furthermore, evaluate them sincerely and fairly during peer evaluations so that they do get the grade their work deserves, no more, no less.
- Be courteous to such team members too. Some folks have genuine problems that prevent them from contributing more although they may not be able tell you the reasons. Just do your best for the project and assume everyone else is doing their best too, although their best may be lower than yours.
Why I’m not allowed to use my favorite tool/framework/language etc.?
We have chosen a basic set of tools after considering ease of learning, availability, typical-ness, popularity, migration path to other tools, etc. There are many reasons for limiting your choices:
Pedagogical reasons:
- Sometimes 'good enough', not necessarily the best, tools are a better fit for beginners: Most bleeding edge, most specialized, or most sophisticated tools are not suitable for a beginner course. After mastering our toolset, you will find it easy to upgrade to such high-end tools by yourself. We do expect you to eventually (after this module) migrate to better tools and, having learned more than one tool, to attain a more general understanding about a family of tools.
- We want you to learn to thrive under given conditions: As a professional Software Engineer, you must learn to be productive in any given tool environment, rather than insist on using your preferred tools. It is usually in small companies doing less important work that you get to chose your own toolset. Bigger companies working on mature products often impose some choices on developers, such as the project management tool, code repository, IDE, language etc. For example, Google used SVN as their revision control software until very recently, long after SVN fell out of popularity among developers. Sometimes this is due to cost reasons (tool licensing cost), and sometimes due to legacy reasons (because the tool is already entrenched in their code base).
While programming in school is often a solo sport, programming in the industry is a team sport. As we are training you to become professional software engineers, it is important to get over the psychological hurdle of needing to satisfy individual preferences and get used to making the best of a given environment.
Practical reasons:
- Some of the LOs are tightly coupled to tools. Allowing more tools means tutors need to learn more tools, which increases their workload.
- We provide learning resources for tools. e.g. 'Git guides'. Allowing more tools means we need to produce more resources.
- When all students use the same tool, the collective expertise of the tool is more, increasing the opportunities for you to learn from each others.
Meanwhile, feel free to share with peers your experience of using other tools.
Outcomes
Revision Control
W7.1 Can use Git to save history
W7.1a Can explain revision control
Project Management → Revision Control →
Revision control is the process of managing multiple versions of a piece of information. In its simplest form, this is something that many people do by hand: every time you modify a file, save it under a new name that contains a number, each one higher than the number of the preceding version.
Manually managing multiple versions of even a single file is an error-prone task, though, so software tools to help automate this process have long been available. The earliest automated revision control tools were intended to help a single user to manage revisions of a single file. Over the past few decades, the scope of revision control tools has expanded greatly; they now manage multiple files, and help multiple people to work together. The best modern revision control tools have no problem coping with thousands of people working together on projects that consist of hundreds of thousands of files.
Revision control software will track the history and evolution of your project, so you don't have to. For every change, you'll have a log of who made it; why they made it; when they made it; and what the change was.
Revision control software makes it easier for you to collaborate when you're working with other people. For example, when people more or less simultaneously make potentially incompatible changes, the software will help you to identify and resolve those conflicts.
It can help you to recover from mistakes. If you make a change that later turns out to be an error, you can revert to an earlier version of one or more files. In fact, a really good revision control tool will even help you to efficiently figure out exactly when a problem was introduced.
It will help you to work simultaneously on, and manage the drift between, multiple versions of your project. Most of these reasons are equally valid, at least in theory, whether you're working on a project by yourself, or with a hundred other people.
-- [adapted from
bryan-mercurial-guide
Mercurial: The Definitive Guide by Bryan O'Sullivan retrieved on 2012/07/11
RCS : Revision Control Software are the software tools that automate the process of Revision Control i.e. managing revisions of software artifacts.
Revision: A revision (some seem to use it interchangeably with version while others seem to distinguish the two -- here, let us treat them as the same, for simplicity) is a state of a piece of information at a specific time that is a result of some changes to it e.g., if you modify the code and save the file, you have a new revision (or a version) of that file.
Revision control is also known as Version Control Software (VCS), and a few other names.
Revision Control Software
In the context of RCS, what is a Revision? Give an example.
A revision (some seem to use it interchangeably with version while others seem to distinguish the two -- here, let us treat them as the same, for simplicity) is a state of a piece of information at a specific time that is a result of some changes to it. For example, take a file containing program code. If you modify the code and save the file, you have a new revision (or a version) of that file.
- a. Help a single user manage revisions of a single file
- b. Help a developer recover from a incorrect modification to a code file
- c. Makes it easier for a group of developers to collaborate on a project
- d. Manage the drift between multiple versions of your project
- e. Detect when multiple developers make incompatible changes to the same file
- f. All of them are benefits of RCS
f
Suppose You are doing a team project with Tom, Dick, and Harry but those three have not even heard the term RCS. How do you explain RCS to them as briefly as possible, using the project as an example?
Evidence:
Be able to answer questions such as these:
Suppose You are doing a team project with Tom, Dick, and Harry but those three have not even heard the term RCS. How do you explain RCS to them as briefly as possible, using the project as an example?
W7.1b Can explain repositories
Project Management → Revision Control →
Repository (repo for short): The database of the history of a directory being tracked by an RCS software (e.g. Git).
The repository is the database where the meta-data about the revision history are stored. Suppose you want to apply revision control on files in a directory called ProjectFoo. In that case you need to set up a repo (short for repository) in ProjectFoo directory, which is referred to as the working directory of the repo. For example, Git uses a hidden folder named .git inside the working directory.
You can have multiple repos in your computer, each repo revision-controlling files of a different working directly, for examples, files of different projects.
In the context of RCS, what is a repo?
Evidence:
Be able to answer questions such as these:
In the context of RCS, what is a repo?
W7.1c Can create a local Git repo
Tools → Git and GitHub →
Soon you are going to take your first step in using Git. If you would like to see a quick overview of the full Git landscape before jumping in, watch the video below.
Install SourceTree which is Git + a GUI for Git. If you prefer to use Git via the command line (i.e., without a GUI), you can install Git instead.
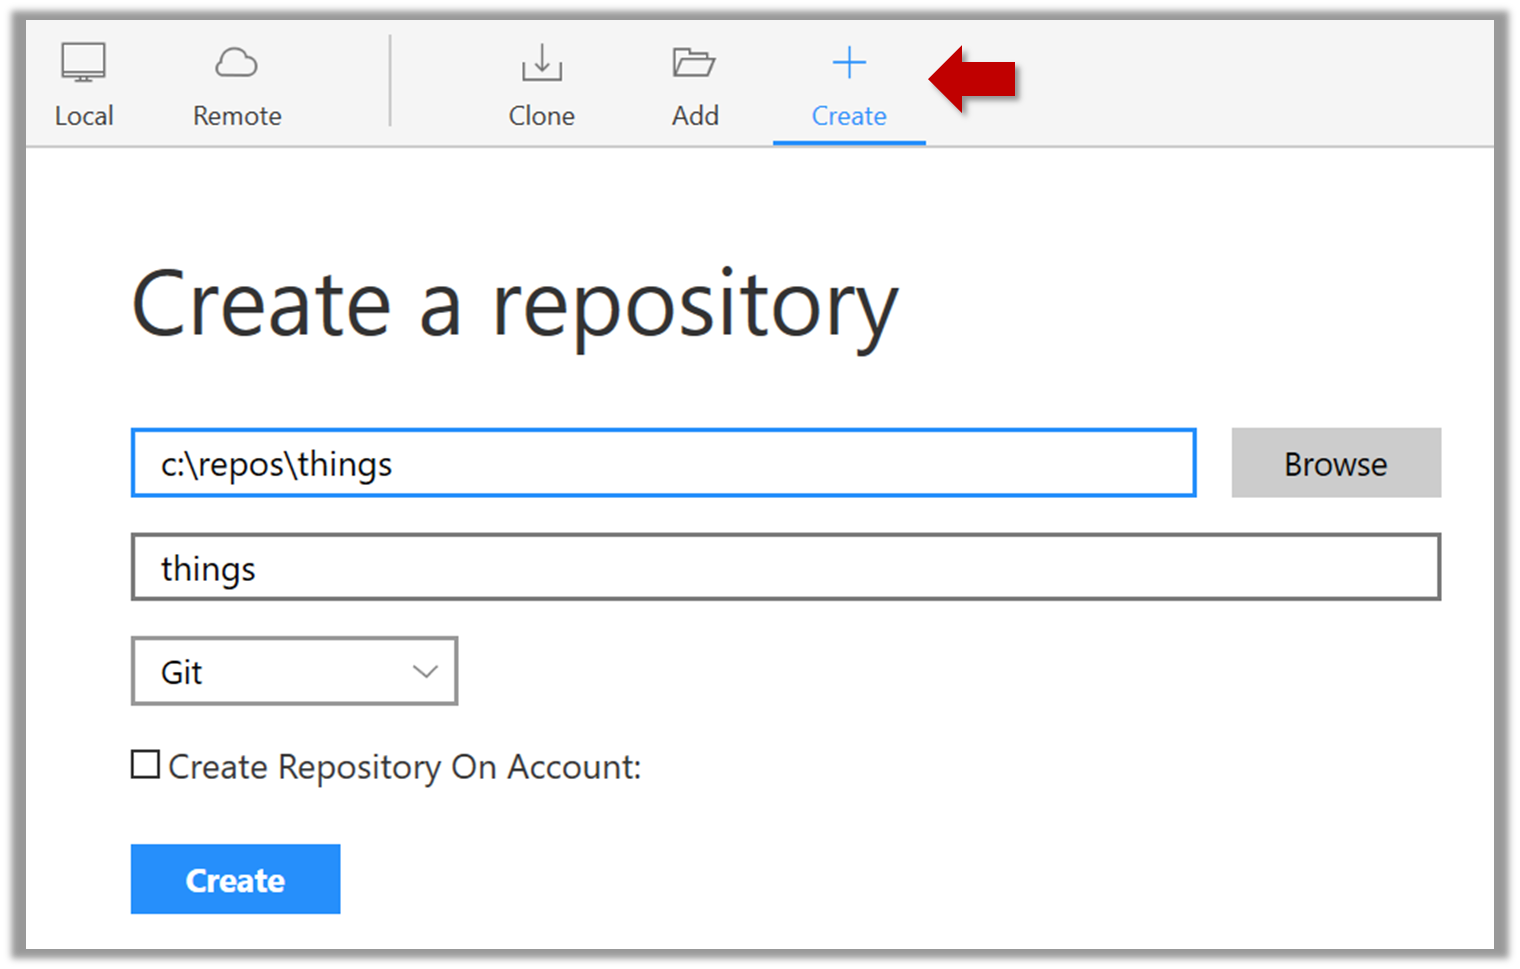
Suppose you want to create a repository in an empty directory things. Here are the steps:
Windows: Click File → Clone/New…. Click on Create button.
Mac: New... → Create New Repository.
Enter the location of the directory (Windows version shown below) and click Create.
Go to the things folder and observe how a hidden folder .git has been created.
Note: If you are on Windows, you might have to configure Windows Explorer to show hidden files.
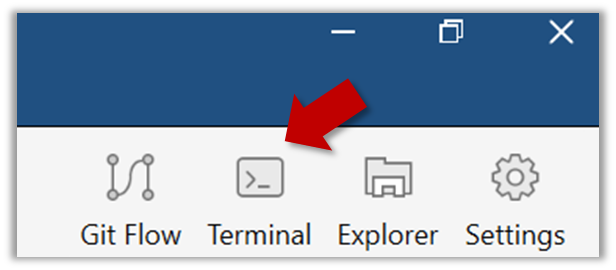
Open a Git Bash Terminal.
If you installed SourceTree, you can click the Terminal button to open a GitBash terminal.
Navigate to the things directory.
Use the command git init which should initialize the repo.
$ git init
Initialized empty Git repository in c:/repos/things/.git/
You can use the command ls -a to view all files, which should show the .git directory that was created by the previous command.
$ ls -a
.  ..  .git
You can also use the git status command to check the status of the newly-created repo. It should respond with something like the bellow
git status
# On branch master
#
# Initial commit
#
nothing to commit (create/copy files and use "git add" to track)
Evidence:
Have a local repo that you created.
W7.1d Can explain saving history
Project Management → Revision Control →
Tracking and Ignoring
In a repo, we can specify which files to track and which files to ignore. Some files such as temporary log files created during the build/test process should not be revision-controlled.
Staging and Committing
Committing saves a snapshot of the current state of the tracked files in the revision control history. Such a snapshot is also called a commit (i.e. the noun).
When ready to commit, we first stage the specific changes we want to commit. This intermediate step allows us to commit only some changes while saving other changes for a later commit.
Identifying Points in History
Each commit in a repo is a recorded point in the history of the project that is uniquely identified by an auto-generated hash e.g. a16043703f28e5b3dab95915f5c5e5bf4fdc5fc1.
We can tag a specific commit with a more easily identifiable name e.g. v1.0.2
Evidence:
Have a local repo that has commits you created.
W7.1e Can commit using Git
Tools → Git and GitHub →
Create an empty repo.
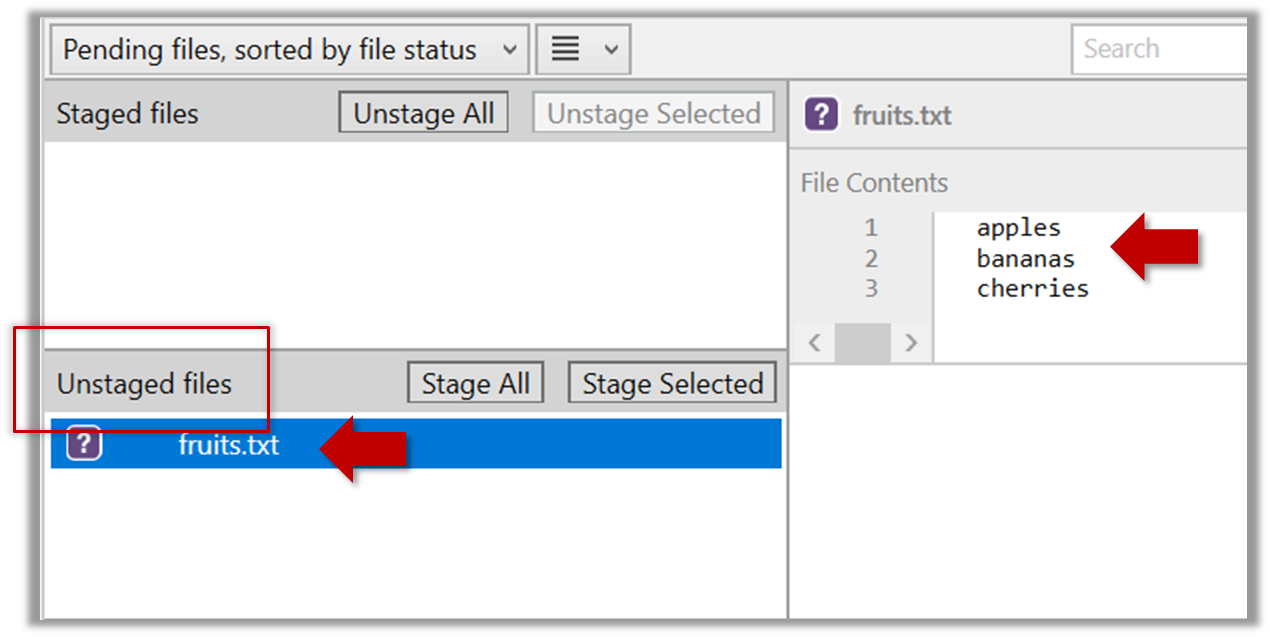
Create a file named fruits.txt in the working directory and add some dummy text to it.
Working directory: The directory the repo is based in is called the working directory.
Observe how the file is detected by Git.
The file is shown as ‘unstaged’
You can use the git status command to check the status of the working directory.
git status
# On branch master
#
# Initial commit
#
# Untracked files:
#   (use "git add <file>..." to include in what will be committed)
#
#   a.txt
nothing added to commit but untracked files present (use "git add" to track)
Although git has detected the file in the working directory, it will not do anything with the file unless you tell it to. Suppose we want to commit the current state of the file. First, we should stage the file.
Commit: Saving the current state of the working folder into the Git revision history.
Stage: Instructing Git to prepare a file for committing.
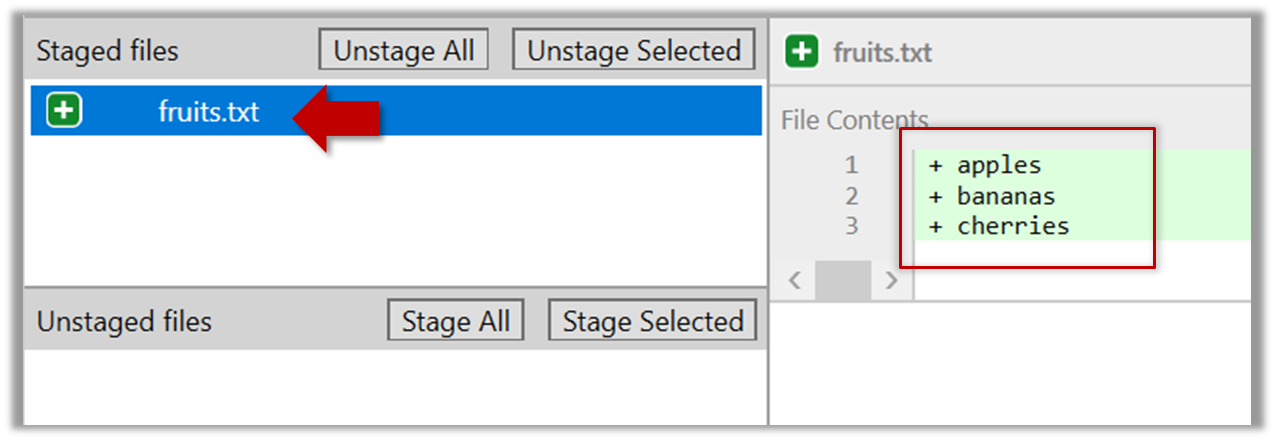
Select the fruits.txt and click on the Stage Selected button
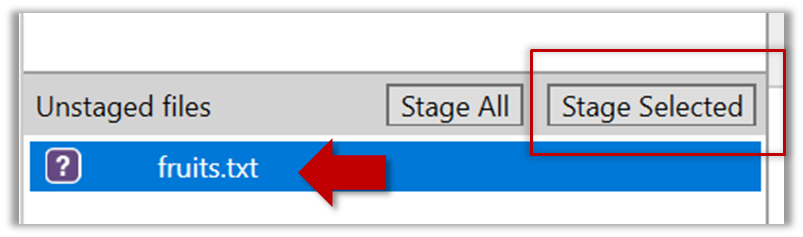
fruits.txt should appear in the Staged files panel now.
You can use the stage or the add command (they are synonyms, add is the more popular choice) to stage files.
git add fruits.txt
git status
# On branch master
#
# Initial commit
#
# Changes to be committed:
#   (use "git rm --cached <file>..." to unstage)
#
#       new file:   fruits.txt
#
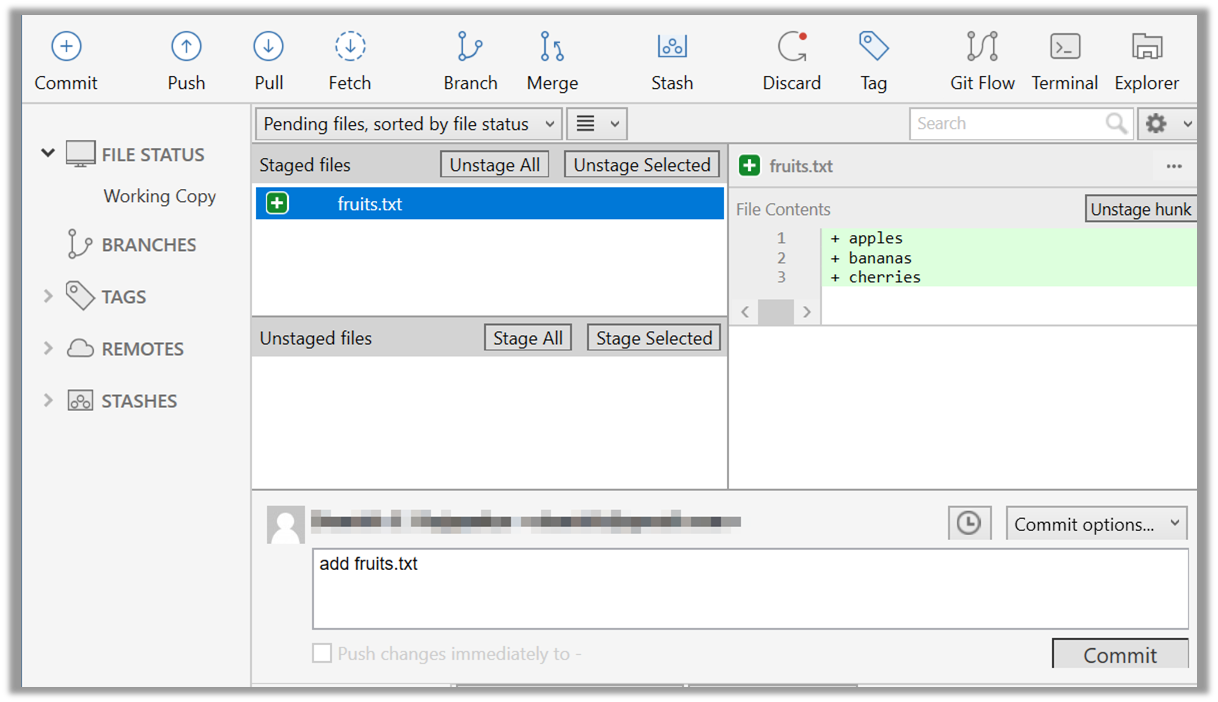
Now, you can commit the staged version of fruits.txt
Click the Commit button, enter a commit message e.g. add fruits.txt in to the text box, and click Commit
Use the commit command to commit. The -m switch is used to specify the commit message.
git commit -m "add fruits.txt"
You can use the log command to see the commit history
git log
commit 8fd30a6910efb28bb258cd01be93e481caeab846
Author: … < … @... >
Date:   Wed Jul 5 16:06:28 2017 +0800

  Add fruits.txt
Note the existence of something called the master branch. Git allows you to have multiple branches (i.e. it is a way to evolve the content in parallel) and Git creates a default branch named master on which the commits go on by default.
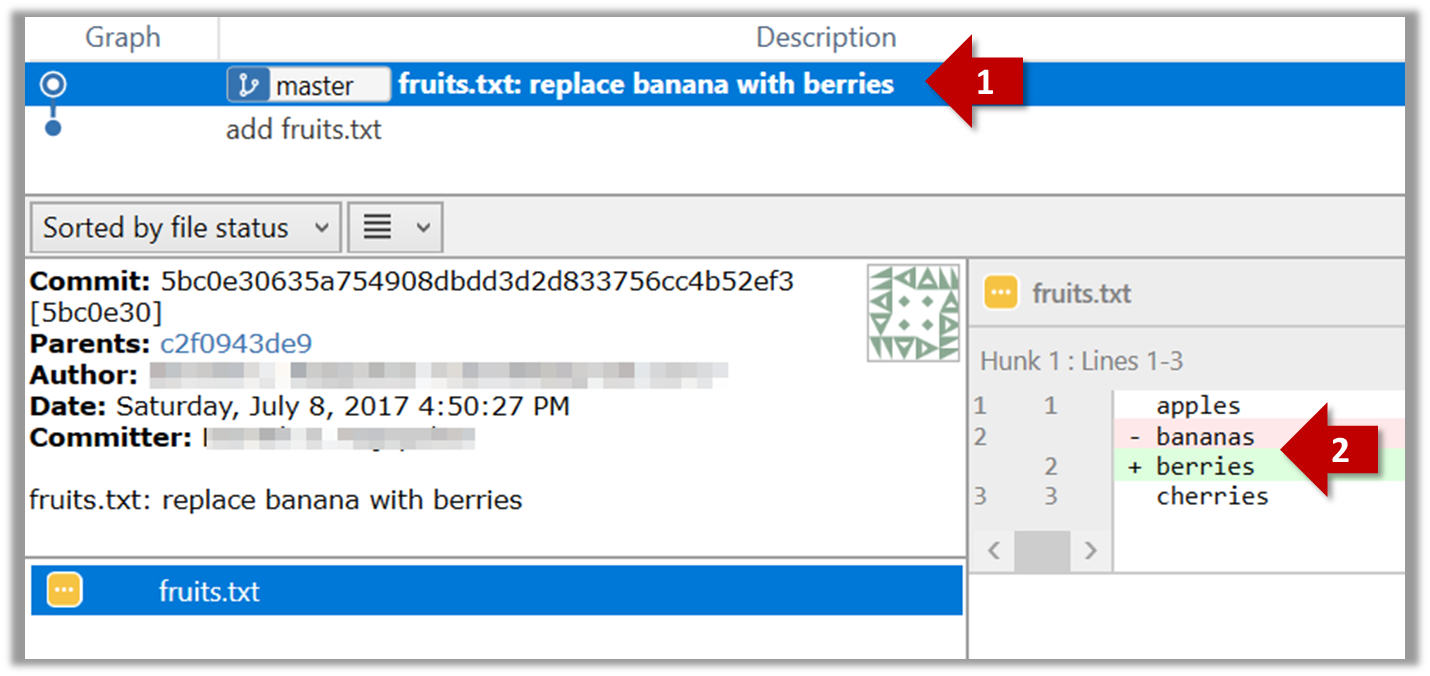
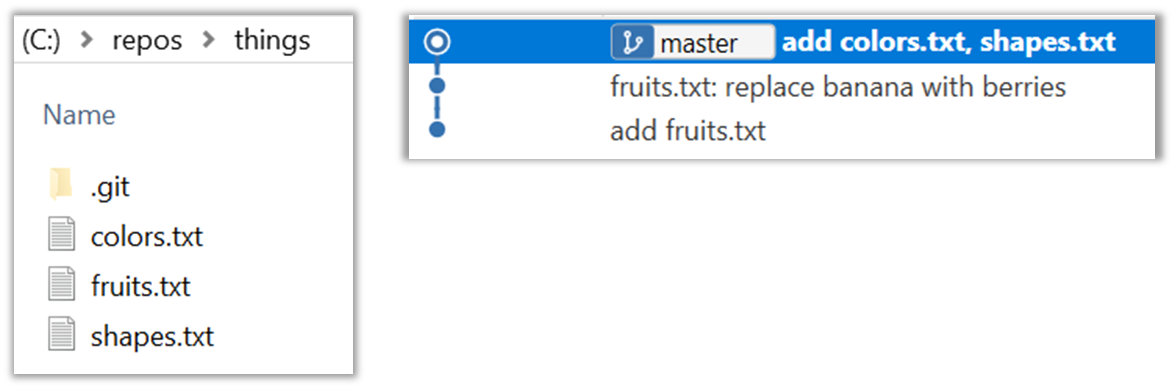
Do some changes to fruits.txt (e.g. add some text and delete some text). Stage the changes, and commit the changes using the same steps you followed before. You should end up with something like this.
Next, add two more files colors.txt and shapes.txt to the same working directory. Add a third commit to record the current state of the working directory.
- Try Git is an online simulation/tutorial of Git basics. You can try its first few steps to solidify what you learned in this LO.
W7.1f Can set Git to ignore files
Tools → Git and GitHub →
Add a file names temp.txt to the things repo you created. Suppose we don’t want this file to be revision controlled by Git. Let’s instruct Git to ignore temp.txt
The file should be currently listed under Unstaged files. Right-click it and choose Ignore…. Choose Ignore exact filename(s) and click OK.
Observe that a file named .gitignore has been created in the working directory root and has the following line in it.
temp.txt
Create a file named .gitignore in the working directory root and add the following line in it.
temp.txt
The .gitignore file tells Git which files to ignore when tracking revision history. That file itself can be either revision controlled or ignored.
- To version control it (the more common choice – which allows you to track how the
.gitignorefile changed over time), simply commit it as you would commit any other file. - To ignore it, follow the same steps we followed above when we set Git to ignore the
temp.txtfile.
Evidence:
Have a local repo that has git-ignored files.
W7.2 Can traverse Git history
W7.2a Can explain using history
Project Management → Revision Control →
To see what changed between two points of the history, you can ask the RCS tool to diff the two commits in concern.
To restore the state of the working directory at a point in the past, you can checkout the commit in concern. i.e., we can traverse the history of the working directory simply by checking out the commits we are interested in.
RCS : Revision Control Software are the software tools that automate the process of Revision Control i.e. managing revisions of software artifacts.
W7.2b Can load a specific version of a Git repo
Tools → Git and GitHub →
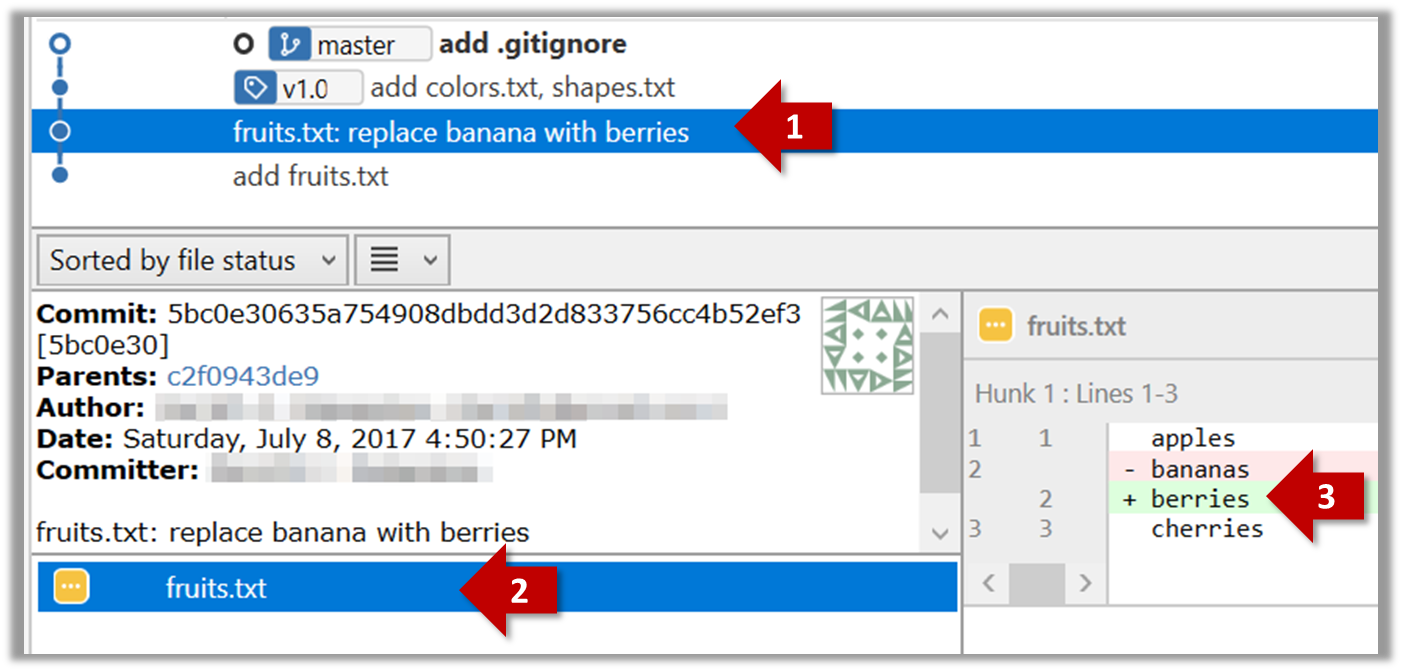
Git can show you what changed in each commit.
To see which files changed in a commit, click on the commit. To see what changed in a specific file in that commit, click on the file name.
git show < part-of-commit-hash >
Example:
git show 251b4cf
commit 5bc0e30635a754908dbdd3d2d833756cc4b52ef3
Author: … < … >
Date:   Sat Jul 8 16:50:27 2017 +0800

    fruits.txt: replace banana with berries

diff --git a/fruits.txt b/fruits.txt
index 15b57f7..17f4528 100644
--- a/fruits.txt
+++ b/fruits.txt
@@ -1,3 +1,3 @@
 apples
-bananas
+berries
 cherries
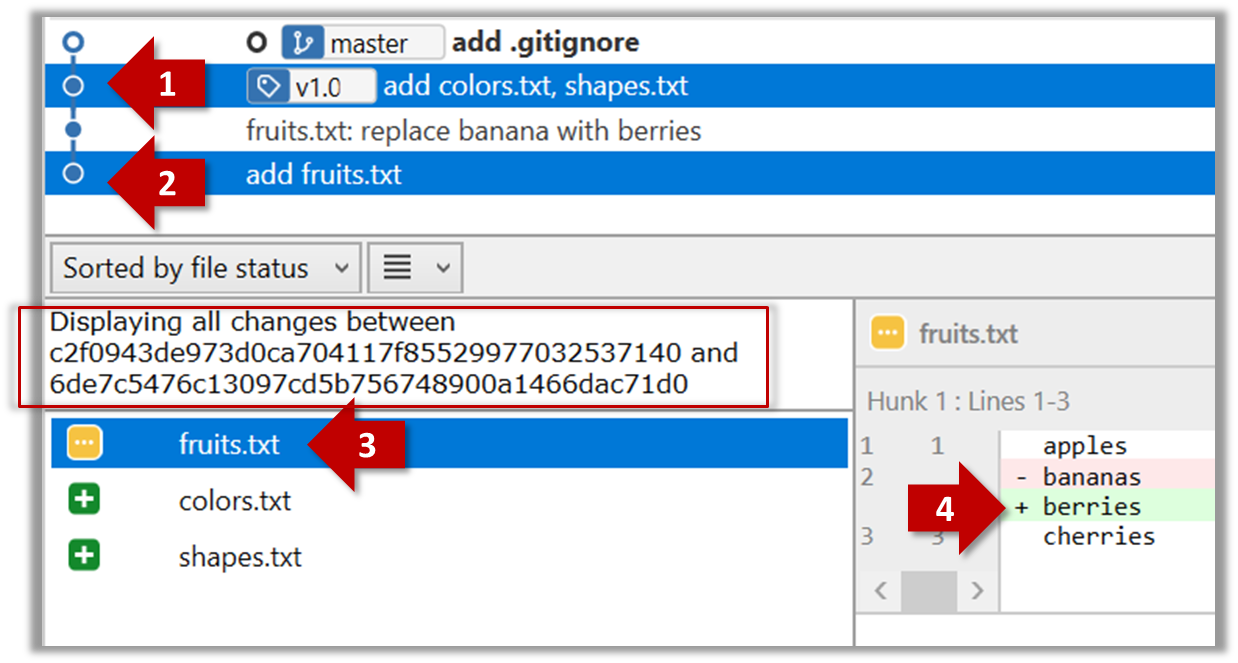
Git can also show you the difference between two points in the history of the repo.
Select the two points you want to compare using Ctrl+Click.
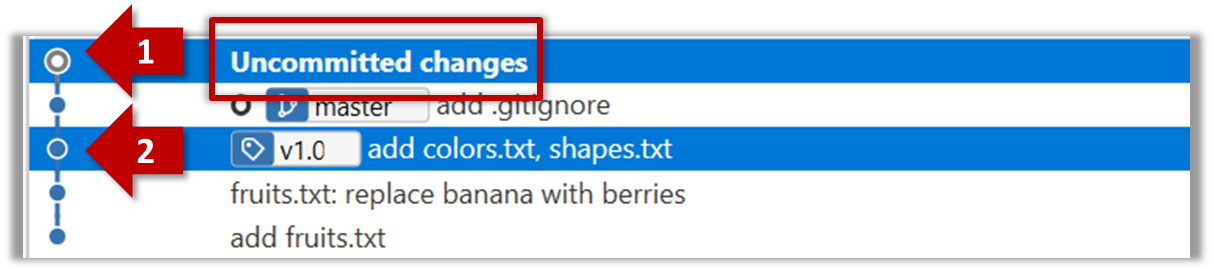
The same method can be used to compare the current state of the working directory (which might have uncommitted changes) to a point in the history.
The diff command can be used to view the differences between two points of the history.
git diff: shows the changes (uncommitted) since the last commitgit diff 0023cdd..fcd6199: shows the changes between the points indicated by by commit hashesgit diff v1.0..HEAD: shows changes that happened from the commit tagged asv1.0to the most recent commit.
Git can load a specific version of the history to the working directory. Note that if you have uncommitted changes in the working directory, you need to
Tools → Git and GitHub →
You can use the git's stash feature to temporarily shelve (or stash) changes you've made to your working copy so that you can work on something else, and then come back and re-apply the stashed changes later on. -- adapted from this
Follow this article from SourceTree creators. Note the GUI shown in the article is slightly outdated but you should be able to map it to the current GUI.
Follow this article from Atlassian.
Double-click the commit you want to load to the working directory, or right-click on that commit and choose Checkout....
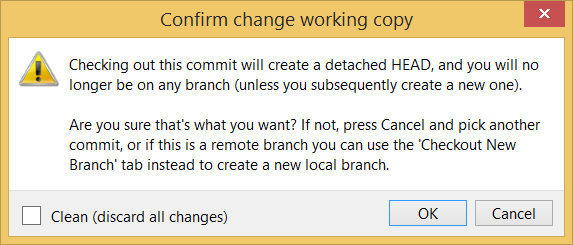
Click OK to the warning about ‘detached HEAD’ (similar to below).
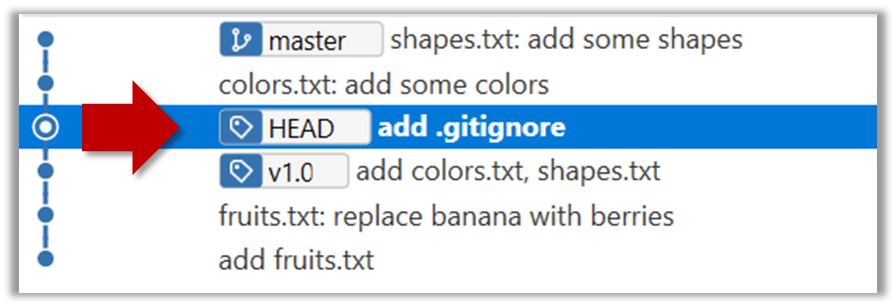
The specified version is now loaded to the working folder, as indicated by the HEAD label. HEAD is a reference to the currently checked out commit.
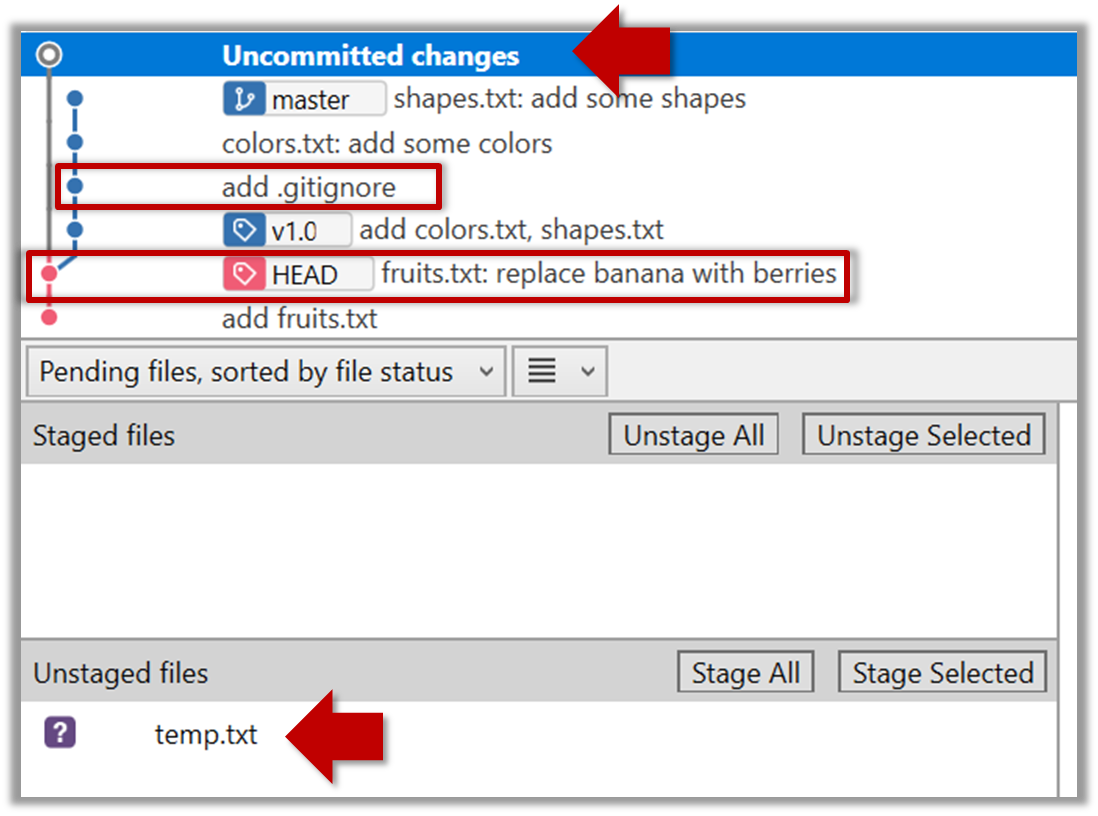
If you checkout a commit that come before the commit in which you added the .gitignore file, Git will now show ignored fiels as ‘unstaged modifications’ because at that stage Git hasn’t been told to ignore those files.
To go back to the latest commit, double-click it.
Use the checkout <commit-identifier> command to change the working directory to the state it was in at a specific past commit.
git checkout v1.0: loads the state as at commit taggedv1.0git checkout 0023cdd: loads the state as at commit with the hash0023cddgit checkout HEAD~2: loads the state that is 2 commits behind the most recent commit
For now, you can ignore the warning about ‘detached HEAD’.
Use the checkout <branch-name> to go back to the most recent commit of the current branch (the default branch in git is named master)
git checkout master
Evidence:
Being able to traverse history using the steps given in the LO above.
W7.2c Can tag commits using Git
Tools → Git and GitHub →
Let's tag a commit in a local repo you have (e.g. the sampelrepo-things repo)
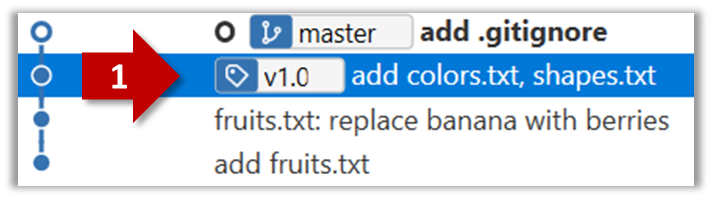
Right-click on the commit (in the graphical revision graph) you want to tag and choose Tag…
Specify the tag name e.g. v1.0 and click Add Tag.
The added tag will appear in the revision graph view.
To add a tag to the current commit as v1.0,
git tag –a v1.0
To view tags
git tag
To learn how to add a tag to a past commit, go to the ‘Git Basics – Tagging’ page of the git-scm book and refer the ‘Tagging Later’ section.
Evidence:
Being able to tag a commit in a repo.
W7.2d Can use Git to stash files
Tools → Git and GitHub →
You can use the git's stash feature to temporarily shelve (or stash) changes you've made to your working copy so that you can work on something else, and then come back and re-apply the stashed changes later on. -- adapted from this
Follow this article from SourceTree creators. Note the GUI shown in the article is slightly outdated but you should be able to map it to the current GUI.
Follow this article from Atlassian.
Evidence:
Being able to demonstrate stashing.
Quality Assurance
W7.3 Can use simple JUnit tests
W7.3a Can explain developer testing
W7.3b Can explain the need for early developer testing
Quality Assurance → Testing → Developer Testing →
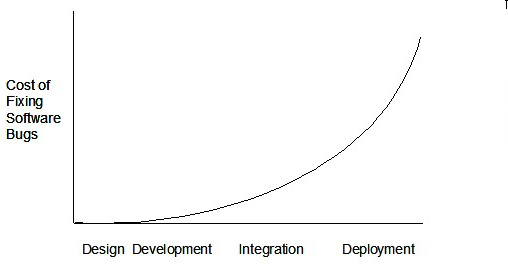
Delaying testing until the full product is complete has a number of disadvantages:
- Locating the cause of such a test case failure is difficult due to a large search space; in a large system, the search space could be millions of lines of code, written by hundreds of developers! The failure may also be due to multiple inter-related bugs.
- Fixing a bug found during such testing could result in major rework, especially if the bug originated during the design or during requirements specification i.e. a faulty design or faulty requirements.
- One bug might 'hide' other bugs, which could emerge only after the first bug is fixed.
- The delivery may have to be delayed if too many bugs were found during testing.
Therefore, it is better to do early testing, as hinted by the popular rule of thumb given below, also illustrated by the graph below it.
The earlier a bug is found, the easier and cheaper to have it fixed.
Such early testing of partially developed software is usually, and by necessity, done by the developers themselves i.e. developer testing.
Discuss pros and cons of developers testing their own code.
Pros:
- Can be done early (the earlier we find a bug, the cheaper it is to fix).
- Can be done at lower levels, for examples, at operation and class level (testers usually test the system at UI level).
- It is possible to do more thorough testing because developers know the expected external behavior as well as the internal structure of the component.
- It forces developers to take responsibility for their own work (they cannot claim that "testing is the job of the testers").
Cons:
- A developer may subconsciously test only situations that he knows to work (i.e. test it too 'gently').
- A developer may be blind to his own mistakes (if he did not consider a certain combination of input while writing code, it is possible for him to miss it again during testing).
- A developer may have misunderstood what the SUT is supposed to do in the first place.
- A developer may lack the testing expertise.
The cost of fixing a bug goes down as we reach the product release.
False. The cost goes up over time.
Explain why early testing by developers is important.
Evidence:
Explain why early testing by developers is important.
W7.3c Can explain test drivers
Quality Assurance → Testing → Test Automation →
A test driver is the code that ‘drives’ the
PayrollTest ‘drives’ the PayRoll class by sending it test inputs and verifies if the output is as expected.
public class PayrollTestDriver {
    public static void main(String[] args) throws Exception {

        //test setup
        Payroll p = new Payroll();

        //test case 1
        p.setEmployees(new String[]{"E001", "E002"});
        // automatically verify the response
        if (p.totalSalary() != 6400) {
            throw new Error("case 1 failed ");
        }

        //test case 2
        p.setEmployees(new String[]{"E001"});
        if (p.totalSalary() != 2300) {
            throw new Error("case 2 failed ");
        }

        //more tests...

        System.out.println("All tests passed");
    }
}
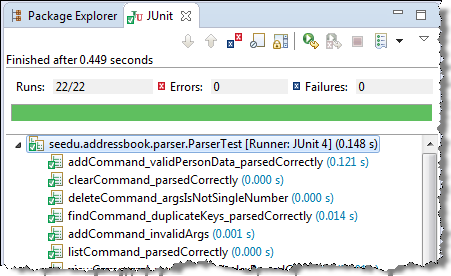
W7.3d Can explain test automation tools
Quality Assurance → Testing → Test Automation →
JUnit is a tool for automated testing of Java programs. Similar tools are available for other languages and for automating different types of testing.
This an automated test for a Payroll class, written using JUnit libraries.
@Test
public void testTotalSalary(){
    Payroll p = new Payroll();

    //test case 1
    p.setEmployees(new String[]{"E001", "E002"});
    assertEquals(6400, p.totalSalary());

    //test case 2
    p.setEmployees(new String[]{"E001"});
    assertEquals(2300, p.totalSalary());

    //more tests...
}
Most modern IDEs has integrated support for testing tools. The figure below shows the JUnit output when running some JUnit tests using the Eclipse IDE.
W7.3e Can use simple JUnit tests
Tools → JUnit →
When writing JUnit tests for a class Foo, the common practice is to create a FooTest class, which will contain various test methods.
Suppose we want to write tests for the IntPair class below.
public class IntPair {
    int first;
    int second;

    public IntPair(int first, int second) {
        this.first = first;
        this.second = second;
    }

    public int intDivision() throws Exception {
        if (second == 0){
            throw new Exception("Divisor is zero");
        }
        return first/second;
    }

    @Override
    public String toString() {
        return first + "," + second;
    }
}
Here's a IntPairTest class to match.
import org.junit.Test;
import org.junit.Assert;

public class IntPairTest {

    @Test
    public void testStringConversion() {
        Assert.assertEquals("4,7", new IntPair(4, 7).toString());
    }

    @Test
    public void intDivision_nonZeroDivisor_success() throws Exception {
        Assert.assertEquals(2, new IntPair(4, 2).intDivision());
        Assert.assertEquals(0, new IntPair(1, 2).intDivision());
        Assert.assertEquals(0, new IntPair(0, 5).intDivision());
    }

    @Test
    public void intDivision_zeroDivisor_exceptionThrown() {
        try {
            Assert.assertEquals(0, new IntPair(1, 0).intDivision());
            Assert.fail(); // the test should not reach this line
        } catch (Exception e) {
            Assert.assertEquals("Divisor is zero", e.getMessage());
        }
    }
}
Notes:
- Each test method is marked with a
@Testannotation. - Tests use
Assert.assertEquals(expected, actual)methods to compare the expected output with the actual output. If they do not match, the test will fail. JUnit comes with other similar methods such asAssert.assertNullandAssert.assertTrue. - Java code normally use camelCase for method names e.g.,
testStringConversionbut when writing test methods, sometimes another convention is used:whatIsBeingTested_descriptionOfTestInputs_expectedOutcomee.g.,intDivision_zeroDivisor_exceptionThrown - There are several ways to verify the code throws the correct exception. The third test method in the example above shows one of the simpler methods. If the exception is thrown, it will be caught and further verified inside the
catchblock. But if it is not thrown as expected, the test will reachAssert.fail()line and will fail as a result. - The easiest way to run JUnit tests is to do it via the IDE. For example, in Intellij you can right-click the folder containing test classes and choose 'Run all tests...'
- Optionally, you can use static imports to avoid having to specify
Assert.everywhere.import static org.junit.Assert.assertEquals; //... @Test public void testStringConversion() { assertEquals("4,7", new IntPair(4, 7).toString()); }
JUnit 4 with IntelliJ: A quick introduction -- by DrBFraser
- JUnit cookbook - a short tutorial from JUnit creators
- JUnit tutorial - a more detailed tutorial from a developer Lars Vogel
- How to test private methods in Java? [ short answer ] [ long answer ]
Evidence:
Evidence of having written JUnit tests in some project.
🅿️ Project
W7.4 Project kickoff
Extract from the Admin Info page:
Week 7: Project kick-off
Deadline for project kickoff: week 7 lecture
Marks: 5
- Show that you are ready to start the project: i.e., a sanity check to ensure you have enough programming skills to start a project
- If you are new to programming, complete the project preparation exercises i.e., reach TaskManager - Level 5. Demo your TaskManager to prof or email the code to prof.
- If you have prior programming experience, show/email to prof some code you have written before (at least 200 lines of code) to prove that you are ready to start the project.
- Declare project direction and team: Inform prof of the project direction and your team members and get approval to go ahead.
After the project kickoff
- if you chose option 1 (i.e., enhancing TaskManager), given below are some further improvements you are recommended to do to your code base, while you are adding other features.
If you chose option 2 or 3, you should still ensure you have similar enhancements in your code.
This exercise continues from the TaskManager Level 1-5 exercises quoted above.
Refactor the TaskManager to have classes such as the below so that your code is more Object-Oriented:
-
A
Parserclass containing methods that deals with parsing the user command to extract meaningful details from it. Some example methods:public static getCommandWord(String fullCommand): Returns a the command word i.e., the first word of the givenfullCommand
e.g.,Parser.getCommandWord("todo read book")"todo"public static createTodo(String fullCommand): Returns aTodoobject to match thefullCommand. Assumption: thefullCommandis for creating a Todo object.
e.g.,Parser.createTodo("todo read book")aTodoobject containing the description"read book"
-
A
Storageclass that will help to load Tasks from the hard disk and save tasks to the hard disk. Some example usage:Storage storage = new Storage("data/tasks.txt"); List<Task> tasks = storage.load(); ... storage.save(tasks); -
A
Uiclass that will be responsible for interacting with the user. Ideally, only this class should interact with the user. Some example usage:ui = new Ui(); ... ui.showWelcomeMessage(); ... String fullCommand = ui.readUserCommand();Note: The
Scannerobject should be inside theUiclass. -
A
TaskListclass that is responsible for keeping the in-memory task list. Most likely this class will use anArrayListinside it. Some example usage:private TaskList tasks = new TaskList(storage.load()); ... t = Parser.createTodo(fullCommand); tasks.addTask(t); ... String taskListDescription = tasks.getDescription(); ui.showToUser(taskListDescription); -
Tweak the main class (you can name it
TaskManager) class so that themainmethod can be simplified as follows:public static void main(String[] args) { new TaskManager("data/tasks.txt").run(); }Note: As a result of the above, you will have to convert most of the static methods in the
TaskManagerclass to non-static methods, which is more OO.
public class TaskManager {
private Storage storage;
private TaskList tasks;
private Ui ui;
public TaskManager(String filePath) {
ui = new Ui();
storage = new Storage(filePath);
try {
tasks = new TaskList(storage.load());
} catch (TaskManagerException e) {
ui.showToUser("Problem reading file. Starting with an empty task list");
tasks = new TaskList();
}
}
public void run() {
ui.printWelcome();
boolean isExit = false;
while (!isExit) {
try {
String fullCommand = ui.readUserCommand();
String commandWord = Parser.getCommandWord(fullCommand);
switch (commandWord) {
case "exit":
case "":
// ...
}
} catch (TaskManagerException e) {
ui.printError(e.getMessage());
}
}
exit();
}
// ...
public static void main(String[] args) {
    new TaskManager("data/tasks.txt").run();
}
}
import java.util.Scanner;

public class Ui {

    private Scanner in;

    public Ui() {
        in = new Scanner(System.in);
    }

    public String readUserCommand() {
        System.out.print("Your task? ");
        return in.nextLine().trim();
    }

    // ...
}
This exercise continues from the TaskManager Level 1-6 exercises quoted above.
Add JUnit tests for some of the methods in your code.
import org.junit.Test;

import static junit.framework.TestCase.assertEquals;

public class ParserTest {

    @Test
    public void getCommandWord(){
        assertEquals("todo", Parser.getCommandWord("todo read book"));
        assertEquals("deadline", Parser.getCommandWord("deadline return book /by next Friday"));
        assertEquals("exit", Parser.getCommandWord("exit"));
        assertEquals("xyz", Parser.getCommandWord("   xyz   ")); // leading and trailing spaces
        // ...
    }

    @Test
    public void createTodo() throws TaskManagerException {
        Todo actual = Parser.createTodo("todo read book");
        Todo expected = new Todo("read book");
        assertEquals(expected.toString(), actual.toString());
        //...
    }

    // more test methods
}
Tutorial 7
W6.2b Can use Java enumerations
C++ to Java → Miscellaneous Topics →
You can define an enum type by using the enum keyword. Because they are constants, the names of an enum type's fields are in uppercase letters e.g., FLAG_SUCCESS.
Defining an enumeration to represent days of a week (code to be put in the Day.java file):
public enum Day {
    SUNDAY, MONDAY, TUESDAY, WEDNESDAY,
    THURSDAY, FRIDAY, SATURDAY
}
Some examples of using the Day enumeration defined above:
Day today = Day.MONDAY;
Day[] holidays = new Day[]{Day.SATURDAY, Day.SUNDAY};

switch (today) {
case SATURDAY:
case SUNDAY:
    System.out.println("It's the weekend");
    break;
default:
    System.out.println("It's a week day");
}
Note that while enumerations are usually a simple set of fixed values, Java enumerations can have behaviors too, as explained in this tutorial from -- Java Tutorial
Define an enumeration named Priority. Add the missing describe method to the code below so that it produces the output given.
public class Main {

    // Add your method here

    public static void main(String[] args) {
        describe("Red", Priority.HIGH);
        describe("Orange", Priority.MEDIUM);
        describe("Blue", Priority.MEDIUM);
        describe("Green", Priority.LOW);
    }
}
Red indicates high priority
Orange indicates medium priority
Blue indicates medium priority
Green indicates low priority
Use a switch statement to select between possible values for Priority.
    public static void describe(String color, Priority p) {
        switch (p) {
            case LOW:
                System.out.println(color + " indicates low priority");
                break;
            // ...
        }
    }
Code for the enumeration is given below:
public enum Priority {
    HIGH, MEDIUM, LOW
}
Evidence:
The ability to do exercises such as,
Define an enumeration named Priority. Add the missing describe method to the code below so that it produces the output given.
public class Main {

    // Add your method here

    public static void main(String[] args) {
        describe("Red", Priority.HIGH);
        describe("Orange", Priority.MEDIUM);
        describe("Blue", Priority.MEDIUM);
        describe("Green", Priority.LOW);
    }
}
Red indicates high priority
Orange indicates medium priority
Blue indicates medium priority
Green indicates low priority
Use a switch statement to select between possible values for Priority.
    public static void describe(String color, Priority p) {
        switch (p) {
            case LOW:
                System.out.println(color + " indicates low priority");
                break;
            // ...
        }
    }
Code for the enumeration is given below:
public enum Priority {
    HIGH, MEDIUM, LOW
}
W6.3a Can read/write text files using Java
C++ to Java → Miscellaneous Topics →
You can use the java.io.File class to represent a file object. It can be used to access properties of the file object.
This code creates a File object to represent a file fruits.txt that exists in the data directory relative to the current working directory and uses that object to print some properties of the file.
import java.io.File;

public class FileClassDemo {

    public static void main(String[] args) {
        File f = new File("data/fruits.txt");
        System.out.println("full path: " + f.getAbsolutePath());
        System.out.println("file exists?: " + f.exists());
        System.out.println("is Directory?: " + f.isDirectory());
    }

}
full path: C:\sample-code\data\fruits.txt
file exists?: true
is Directory?: false
If you use backslash to specify the file path in a Windows Computer, you need to use an additional backslash as an escape character because the backslash by itself has a special meaning. e.g., use "data\\fruits.txt", not "data\fruits.txt". Alternatively, you can use forward slash "data/fruits.txt" (even on Windows).
You can read from a file using a Scanner object that uses a File object as the source of data.
This code uses a Scanner object to read (and print) contents of a text file line-by-line:
import java.io.File;
import java.io.FileNotFoundException;
import java.util.Scanner;

public class FileReadingDemo {

    private static void printFileContents(String filePath) throws FileNotFoundException {
        File f = new File(filePath); // create a File for the given file path
        Scanner s = new Scanner(f); // create a Scanner using the File as the source
        while (s.hasNext()) {
            System.out.println(s.nextLine());
        }
    }

    public static void main(String[] args) {
        try {
            printFileContents("data/fruits.txt");
        } catch (FileNotFoundException e) {
            System.out.println("File not found");
        }
    }

}
i.e., contents of the data/fruits.txt
5 Apples
3 Bananas
6 Cherries
You can use a java.io.FileWriter object to write to a file.
The writeToFile method below uses a FileWrite object to write to a file. The method is being used to write two lines to the file temp/lines.txt.
import java.io.FileWriter;
import java.io.IOException;

public class FileWritingDemo {

    private static void writeToFile(String filePath, String textToAdd) throws IOException {
        FileWriter fw = new FileWriter(filePath);
        fw.write(textToAdd);
        fw.close();
    }

    public static void main(String[] args) {
        String file2 = "temp/lines.txt";
        try {
            writeToFile(file2, "first line" + System.lineSeparator() + "second line");
        } catch (IOException e) {
            System.out.println("Something went wrong: " + e.getMessage());
        }
    }

}
Contents of the temp/lines.txt:
first line
second line
Note that you need to call the close() method of the FileWriter object for the writing operation to be completed.
You can create a FileWriter object that appends to the file (instead of overwriting the current content) by specifying an additional boolean parameter to the constructor.
The method below appends to the file rather than overwrites.
private static void appendToFile(String filePath, String textToAppend) throws IOException {
    FileWriter fw = new FileWriter(filePath, true); // create a FileWriter in append mode
    fw.write(textToAppend);
    fw.close();
}
The java.nio.file.Files is a utility class provides several useful file operations. It relies on the java.nio.file.Paths file to generate Path objects that represent file paths.
This example uses the Files class to copy a file and delete a file.
import java.io.IOException;
import java.nio.file.Files;
import java.nio.file.Paths;

public class FilesClassDemo {

    public static void main(String[] args) throws IOException{
        Files.copy(Paths.get("data/fruits.txt"), Paths.get("temp/fruits2.txt"));
        Files.delete(Paths.get("temp/fruits2.txt"));
    }

}
The techniques above are good enough to manipulate simple text files. Note that it is also possible to perform file I/O operations using other classes.
This exercise continues from the TaskManager Level 1-4 exercises quoted above.
Enhance the TaskManager to store tasks in a text file between runs:
- The text file can follow a format of your choice. For example, each line can represent one task. The attributes can be separated using a suitable delimiter.
Here is an example format:T | 1 | read book D | 0 | return book | June 6th T | 1 | join sports club- In the above example
|is used as a delimiter,T→ Todo,D→ Deadline,1→ task done,0→ task not done. - 💡 If you use
|as the delimiter, usesplit("\\|")to split the line into its parts.split("|")will not work because|has a special meaning when used in this context.
- In the above example
- Load all tasks in the text file to the memory (i.e., convert to
Taskobjects) at the start up of TaskManager. You can assume the data are in a predetermined file e.g.,data/tasks.txt. - Save all tasks to the text file every time there is a change to the data. Alternatively, you can introduce a new command to save tasks to the text file.
Here's an example method for loading data from the text file. Use this method at the start of your main method to load the tasks from the text file.
    private static List<Task> getTasksFromFile() {
        List<Task> loadedTasks = new ArrayList<>();
        try {
            List<String> lines = getLines("data/tasks.txt");
            for (String line : lines) {
                if (line.trim().isEmpty()) { //ignore empty lines
                    continue;
                }
                loadedTasks.add(createTask(line)); //convert the line to a task and add to the list
            }
        } catch (FileNotFoundException e) {
            printError("problem encountered while loading data: " + e.getMessage());
        }
        return loadedTasks;
    }
Evidence:
Any code that you have written to read from and write to files.
W6.5 Project preparation: Can use file access operations in a small project
Enhance your TaskManager program as explained in the exercise below:
This exercise continues from the TaskManager Level 1-4 exercises quoted above.
Enhance the TaskManager to store tasks in a text file between runs:
- The text file can follow a format of your choice. For example, each line can represent one task. The attributes can be separated using a suitable delimiter.
Here is an example format:T | 1 | read book D | 0 | return book | June 6th T | 1 | join sports club- In the above example
|is used as a delimiter,T→ Todo,D→ Deadline,1→ task done,0→ task not done. - 💡 If you use
|as the delimiter, usesplit("\\|")to split the line into its parts.split("|")will not work because|has a special meaning when used in this context.
- In the above example
- Load all tasks in the text file to the memory (i.e., convert to
Taskobjects) at the start up of TaskManager. You can assume the data are in a predetermined file e.g.,data/tasks.txt. - Save all tasks to the text file every time there is a change to the data. Alternatively, you can introduce a new command to save tasks to the text file.
Here's an example method for loading data from the text file. Use this method at the start of your main method to load the tasks from the text file.
    private static List<Task> getTasksFromFile() {
        List<Task> loadedTasks = new ArrayList<>();
        try {
            List<String> lines = getLines("data/tasks.txt");
            for (String line : lines) {
                if (line.trim().isEmpty()) { //ignore empty lines
                    continue;
                }
                loadedTasks.add(createTask(line)); //convert the line to a task and add to the list
            }
        } catch (FileNotFoundException e) {
            printError("problem encountered while loading data: " + e.getMessage());
        }
        return loadedTasks;
    }
Lecture 7
[slides]