Week 8 [Oct 8]
Todo
Admin info to read:
Adjust project schedule/rigor as needed, complete repo set up, start proper milestone management.
Project Management:
-
Complete the repo set up.
- Fix any errors in org/repo set up (e.g. wrong repo name).
- Set up auto-publishing of docs if you haven't done so already
-
Adjust project rigor to suit your team's pace, as explained below. Note that you are free to do similar adjustments at any future time in the project.
-
Automated tests have benefits, but they can be a pain to write/maintain; GUI tests are especially hard to maintain because their behavior can sometimes depend on things such as the OS, resolution etc.
It is OK to get rid of some of the troublesome tests and rely more on manual testing instead. The less automated test coverage you have, the higher the risk of regressions; but it may be an acceptable trade-off under the circumstances if tests are slowing you down too much. There is no direct penalty for removing GUI tests.
Also note
our expectation on test code . -
You can also reduce the rigor of checkstyle checks to expedite PR processing.
-
Another thing you can do is to switch to a simpler workflow if the forking workflow is slowing you down.
-
- There is no requirement for a minimum coverage level. Note that in a production environment you are often required to have at least 90% of the code covered by tests. In this project, it can be less. The less coverage you have, the higher the risk of regression bugs, which will cost marks if not fixed before the final submission.
- You must write some tests so that we can evaluate your ability to write tests.
- How much of each type of testing should you do? We expect you to decide. You learned different types of testing and what they try to achieve. Based on that, you should decide how much of each type is required. Similarly, you can decide to what extent you want to automate tests, depending on the benefits and the effort required.
- Applying
TDD is optional. If you plan to test something, it is better to apply TDD because TDD ensures that you write functional code in a testable way. If you do it the normal way, you often find that it is hard to test the functional code because the code has low testability.
-
Adjust project plan if necessary, as explained below. Note that you are free to do similar adjustments at any future time in the project.
- Now that you have a some idea about the code base, revisit the feature release plan and adjust it if necessary. The adjustment can be done using GitHub issue tracker.
-
Start proper milestone management
-
Starting from the upcoming milestone, there are additional requirements to follow regarding how you use GitHub to manage your milestones, as described in
[Admin Appendix E: GitHub: Project Schedule Tracking] .
-
Starting from the upcoming milestone, there are additional requirements to follow regarding how you use GitHub to manage your milestones, as described in
-
As before, you are recommended (but not required) to follow the forking workflow when evolving the product.
Project Schedule Tracking
In general, use the issue tracker (Milestones, Issues, PRs, Tags, Releases, and Labels) for assigning, scheduling, and tracking all noteworthy project tasks, including user stories. Update the issue tracker regularly to reflect the current status of the project. You can also use GitHub's new Projects feature to manage the project, but keep it linked to the issue tracker as much as you can.
Using Issues:
During the initial stages:
-
Record each of the user stories you plan to deliver as an issue in the issue tracker. e.g.
Title: As a user I can add a deadline
Description: ... so that I can keep track of my deadlines -
Assign the
type.*andpriority.*labels to those issues.
From milestone v1.1:
-
When you start implementing a story, break it down to tasks. Define reasonable sized, standalone tasks. A task should be able to done by one person, in a few hours. e.g.
- 👍 Good: Update class diagram in the project manual for v1.4
- 👎 Bad (reasons: not a one-person task, not small enough): Write the project manual
-
Write a descriptive title for the issue. e.g. Add support for the 'undo' command to the parser.
-
There is no need to break things into VERY small tasks. Keep them as big as possible, but they should be no bigger than what you are going to assign a single person to do within a week. eg.,
Implementing parser: too big because it cannot be done by a single person in a week.Implementing parser support for adding of floating tasks: appropriate size.
-
Do not track things taken for granted. e.g.,
push code to reposhould not be a task to track. In the example given under the previous point, it is taken for granted that the owner will also (a) test the code and (b) push to the repo when it is ready. Those two need not be tracked as separate tasks. -
Omit redundant details. In some cases, the summary/title is enough to describe the task. In that case, no need to repeat it in the description. There is no need for well-crafted and detailed descriptions for tasks. A minimal description is enough. Similarly, labels such as
prioritycan be omitted if you think they don't help you. -
Assign tasks to team members using the
assigneesfield. At any point, there should be some ongoing tasks and some pending tasks against each team member. -
Optionally, you can use
status.ongoinglabel to indicate issues currently ongoing.
Using Milestones:
We recommend you do the following from milestone v1.1:
-
Use GitHub milestones to indicate which issues are to be handled for which milestone by assigning issues to suitable milestones.
-
Set the deadlines for milestones (in GitHub). Your internal milestones can be set earlier than the deadlines we have set, to give you a buffer.
-
Note that you can change the milestone plan along the way as necessary.
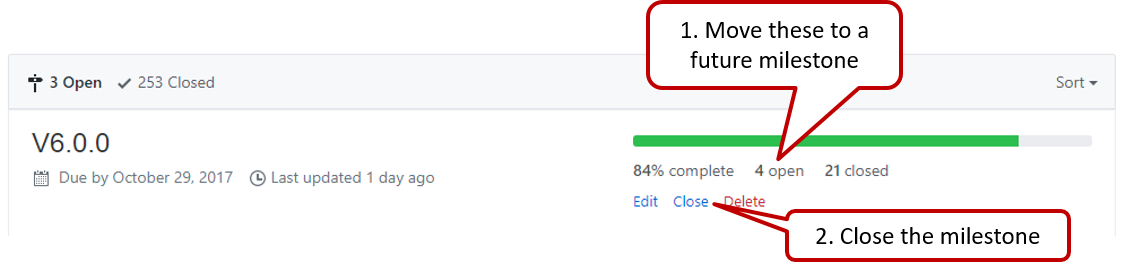
Wrapping up a Milestone:
Here are the conditions to satisfy for a milestone to be considered properly wrapped up:
-
A working product tagged with the correct tag (e.g. v1.2) is pushed to the main repo.
-
All tests passing on Travis for the version tagged above.
-
Milestone updated to match the product i.e. all issues completed and PRs merged for the milestone should be assigned to the milestone.

-
Milestone closed. If there are incomplete issues or unmerged PRs in the milestone, move them to a future milestone.
-
Optionally, issues for the next milestone are assigned to team members (this is not compulsory to do before the tutorial, but we recommend you to do it soon after the tutorial).
-
Optionally, future milestones are revised based on what you experienced in the current milestone e.g. if you could not finish all issues assigned to the current milestone, it is a sign that you overestimated how much you can do in a week, which means you might want to reduce the issues assigned to future milestones to match that observation.
-
Doing a 'release' on GitHub is optional for v1.1 and v1.2 but compulsory from v1.3.
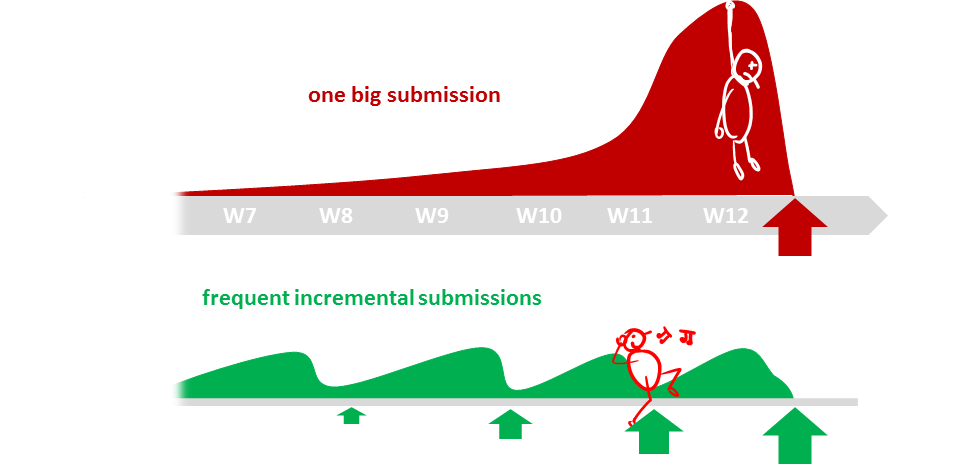
Product:
- From v1.2 onwards each member is expected to contribute
some code to eachmilestone , preferably each week; only merged code is considered as contributions(Reason) .
If an enhancement is too big to complete in one milestone, try to deliver it in smaller incremental steps e.g. deliver a basic version of the enhancement first.
Why aren't we allowed to build a new product from scratch?
There are many reasons. One of them is that most of you will be working with existing software in your first few years of the career while hardly any school projects train you to work with existing code bases. We decided to bite the bullet and use TIC2002 to train you to work in existing code bases.
Why so many submissions?
The high number of submissions is not meant to increase workload but to spread it across the semester. Learning theory and applying them should be done in parallel to maximize the learning effect. That can happen only if we spread theory and 'application of theory' (i.e., project work) evenly across the semester.
Why submission requirements differ between TIC2002 and CS2101?
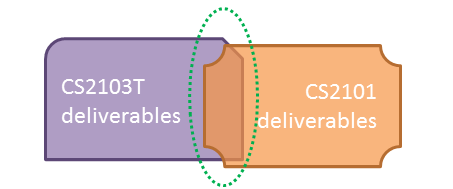
They do, and they should.
TIC2002T communication requirements are limited to a very narrow scope (i.e., communicate about the product to users and developers). CS2101 aims to teach you technical communication in a much wider context. While you may be able to reuse some of the stuff across the two modules, submissions are not intended to be exactly the same.
Outcomes
Revision Control
W8.1 Can communicate with a remote repo
W8.1a Can explain remote repositories
Project Management → Revision Control →
Remote repositories are copies of a repo that are hosted on remote computers. They are especially useful for sharing the revision history of a codebase among team members of a multi-person project. They can also serve as a remote backup of your code base.
You can clone a remote repo onto your computer which will create a copy of a remote repo on your computer, including the version history as the remote repo.
You can push new commits in your clone to the remote repo which will copy the new commits onto the remote repo. Note that pushing to a remote repo requires you to have write-access to it.
You can pull from the remote repos to receive new commits in the remote repo. Pulling is used to sync your local repo with latest changes to the remote repo.
While it is possible to set up your own remote repo on a server, an easier option is to use a remote repo hosting service such as GitHub or BitBucket.
A fork is a remote copy of a remote repo. If there is a remote repo that you want to push to but you do not have write access to it, you can fork the remote repo, which gives you your own remote repo that you can push to.
A pull request is mechanism for contributing code to a remote repo. It is a formal request sent to the maintainers of the repo asking them to pull your new code to their repo.
Here is a scenario that includes all the concepts introduced above (click on the slide to advance the animation):
W8.1b Can clone a remote repo
Tools → Git and GitHub →
Clone the sample repo samplerepo-things to your computer.
Note that the URL of the Github project is different form the URL you need to clone a repo in that Github project. e.g.
Github project URL: https://github.com/se-edu/samplerepo-things
Git repo URL: https://github.com/se-edu/samplerepo-things.git (note the .git at the end)
File → Clone / New… and provide the URL of the repo and the destination directory.
You can use the clone command to clone a repo.
Follow instructions given here.
Evidence:
Able to clone the samplerepo-things in your Computer.
W8.1c Can pull changes from a repo
Tools → Git and GitHub →
Clone the sample repo as explained in
Delete the last two commits to simulate cloning the repo 2 commits ago.
Can clone a remote repo
Clone the sample repo samplerepo-things to your computer.
Note that the URL of the Github project is different form the URL you need to clone a repo in that Github project. e.g.
Github project URL: https://github.com/se-edu/samplerepo-things
Git repo URL: https://github.com/se-edu/samplerepo-things.git (note the .git at the end)
File → Clone / New… and provide the URL of the repo and the destination directory.
You can use the clone command to clone a repo.
Follow instructions given here.
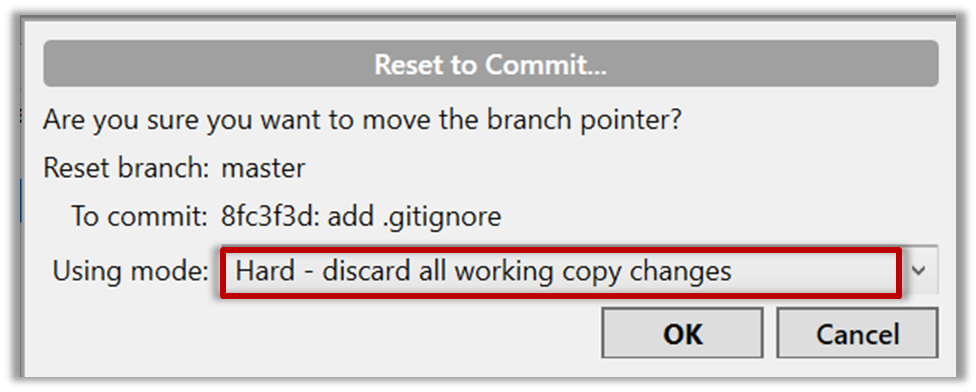
Right-click the target commit (i.e. the commit that is 2 commits behind the tip) and choose Reset current branch to this commit.
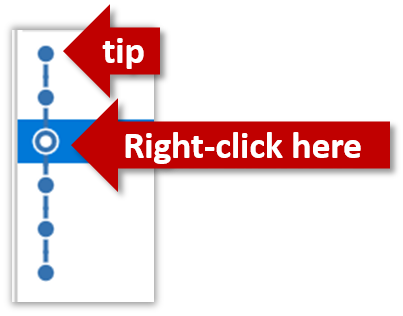
Choose the Hard - … option and click OK.
This is what you will see.
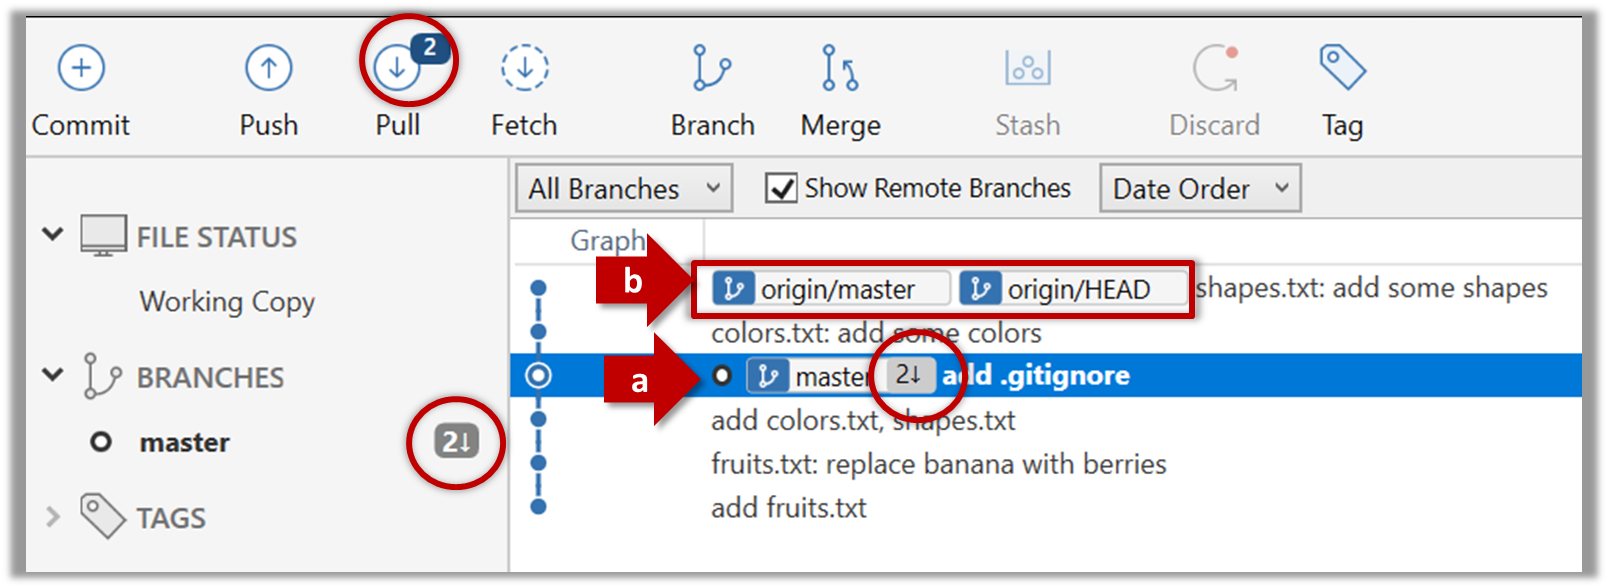
Note the following (cross refer the screenshot above):
Arrow marked as a: The local repo is now at this commit, marked by the master label.
Arrow marked as b: origin/master label shows what is the latest commit in the master branch in the remote repo.
Use the reset command to delete commits at the tip of the revision history.
git reset --hard HEAD~2
Now, your local repo state is exactly how it would be if you had cloned the repo 2 commits ago, as if somebody has added two more commits to the remote repo since you cloned it. To get those commits to your local repo (i.e. to sync your local repo with upstream repo) you can do a pull.
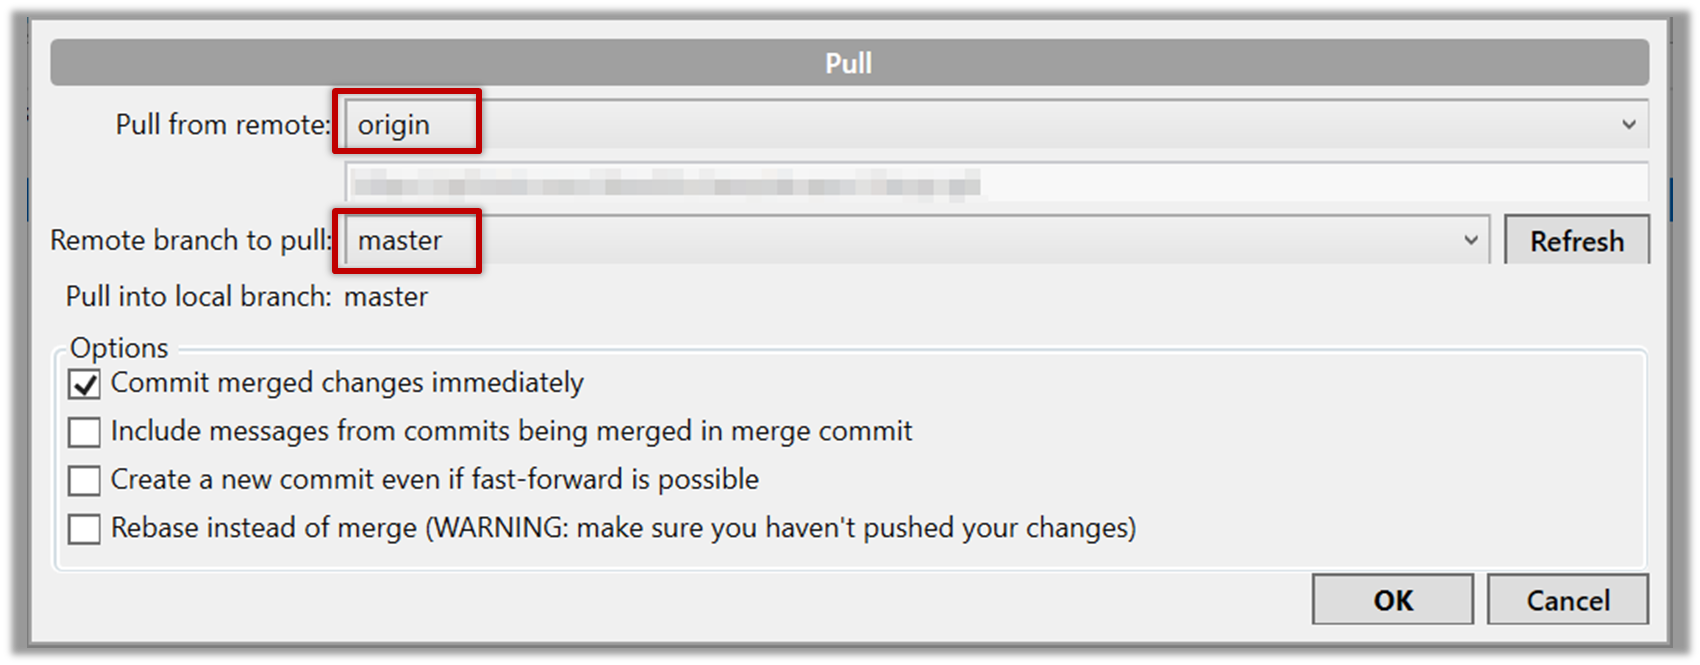
Click the Pull button in the main menu, choose origin and master in the next dialog, and click OK.
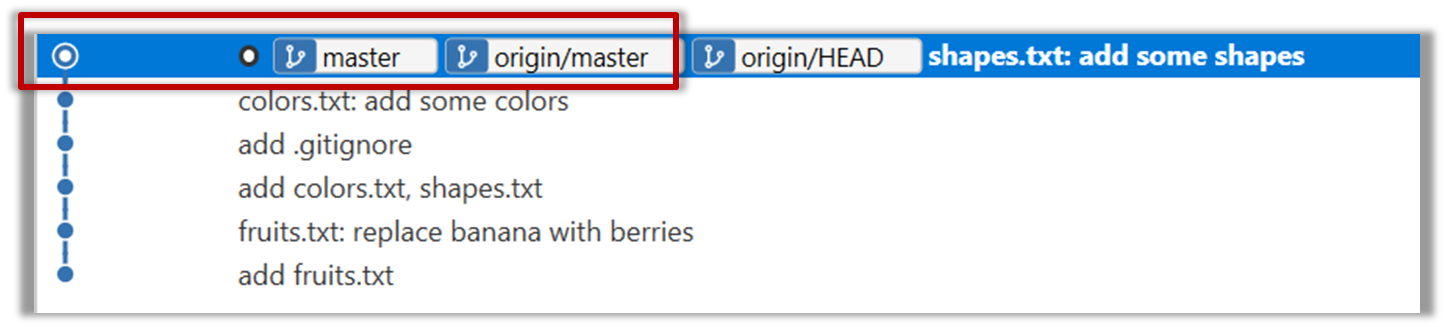
Now you should see something like this where master and origin/master are both pointing the same commit.
git pull origin
Evidence:
Being able to demo pulling from a remote repo.
W8.1d Can push to a remote repo
Tools → Git and GitHub →
-
Create a GitHub account if you don't have one yet.
-
Fork the samplerepo-things to your GitHub account:
Navigate to the on GitHub and click on the
 button on the top-right corner.
 -
Clone the fork (not the original) to your computer.
-
Create some commits in your repo.
-
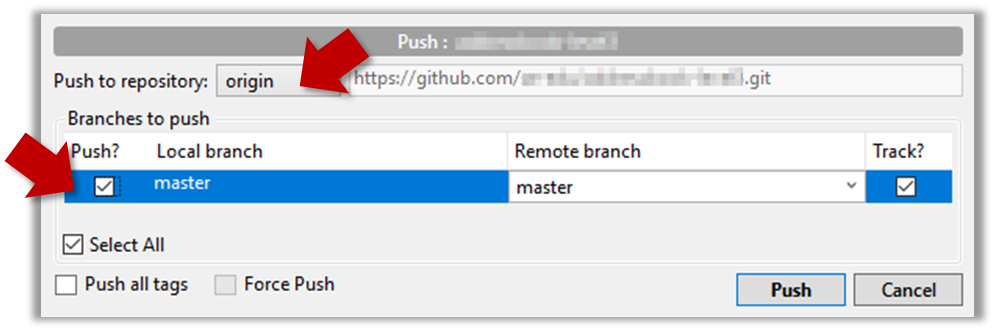
Push the new commits to your fork on GitHub
Click the Push button on the main menu, ensure the settings are as follows in the next dialog, and click the Push button on the dialog.

Use the command git push origin master. Enter Github username and password when prompted.
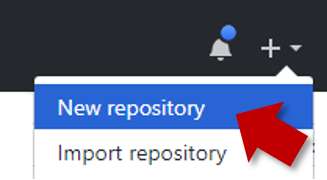
To push an existing local repo into a new remote repo on GitHub, first you need to create an empty remote repo on GitHub.
-
Login to your GitHub account and choose to create a new Repo.
-
In the next screen, provide a name for your repo but keep the
Initialize this repo ...tick box unchecked.
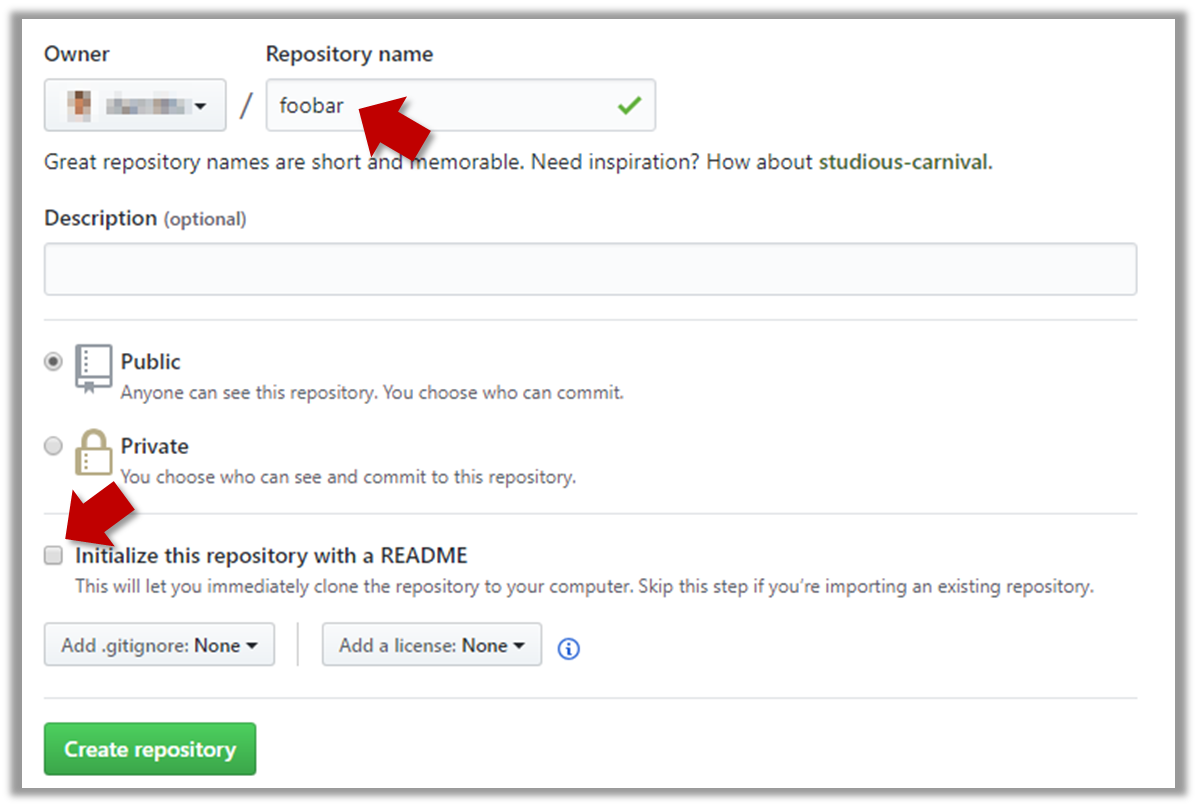
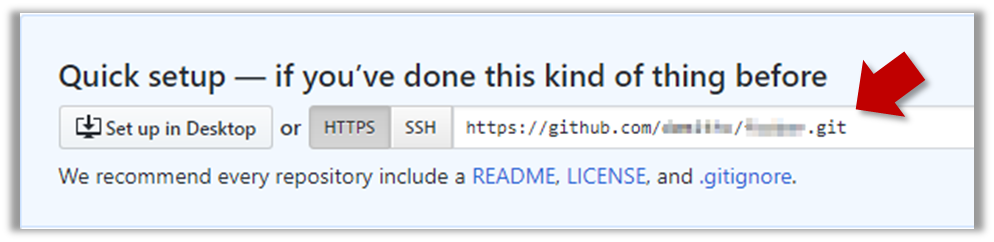
-
Note the URL of the repo. It will be of the form
https://github.com/{your_user_name}/{repo_name}.git
e.g.,https://github.com/johndoe/foobar.git
Next, you can push the existing local repo to the new remote repo as follows:
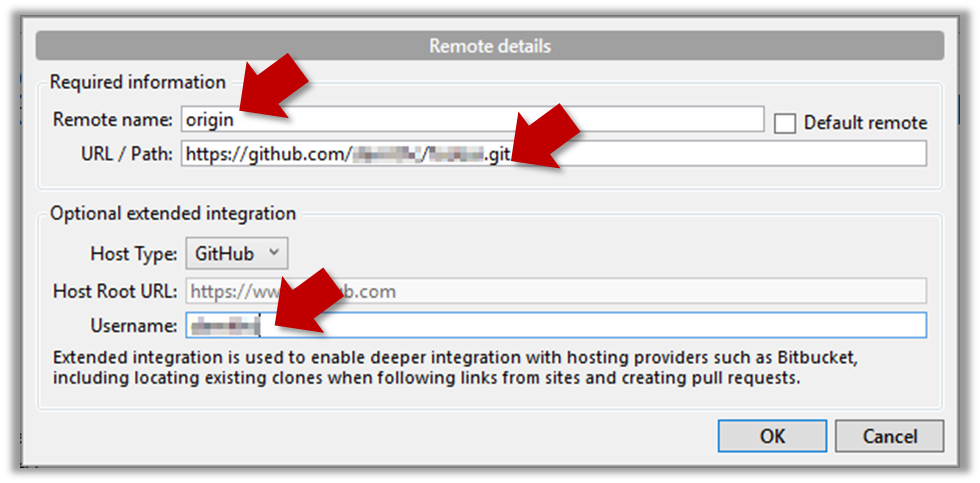
- Open the local repo in SourceTree.
- Choose
Repository→Repository Settingsmenu option. - Add a new remote to the repo with the following values.
Remote name: the name you want to assign to the remote repo. RecommendedoriginURL/path: the URL of your repo (ending in.git) that you collected earlier.Username: your GitHub username
- Now you can push your repo to the new remote the usual way.
- Navigate to the folder containing the local repo.
- Set the new remote repo as a remote of the local repo.
command:git remote add {remote_name} {remote_repo_url}
e.g.,git remote add origin https://github.com/johndoe/foobar.git - Push to the new remote the usual way. You can use the
-uflag to inform Git that you wish totrack the branch.
e.g.,git push -u origin master
Evidence:
Being able to demo pushing to a remote repo.
Implementation
W8.2 Can use Java packages
W8.2a Can use Java packages
C++ to Java → Miscellaneous Topics →
You can organize your types (i.e., classes, interfaces, enumerations, etc.) into packages for easier management (among other benefits).
To create a package, you put a package statement at the very top of every source file in that package. The package statement must be the first line in the source file and there can be no more than one package statement in each source file.
The Formatter class below (in Formatter.java file) is in the package seedu.tojava.util:
package seedu.tojava.util;

public class Formatter {
    public static final String PREFIX = ">>";

    public static String format(String s){
        return PREFIX + s;
    }
}
Package names are written in all lower case (not camelCase), using the dot as a separate. Companies use their reversed Internet domain name to begin their package names. Packages in the Java language itself begin with java. or javax.
For example, com.foobar.doohickey.util can be the name of a package created by a company with a domain name foobar.com
To use a public
- Use the
fully qualified name to refer to the member - Import the package or the specific package member
The Main class below has two import statements:
import seedu.tojava.util.StringParser: imports the classStringParserin theseedu.tojava.utilpackageimport seedu.tojava.frontend.*: imports all the classes in theseedu.tojava.frontendpackage
package seedu.tojava;

import seedu.tojava.util.StringParser;
import seedu.tojava.frontend.*;

public class Main {

    public static void main(String[] args) {

        // Using the fully qualified name to access the Processor class
        String status = seedu.tojava.logic.Processor.getStatus();

        // Using the StringParser previously imported
        StringParser sp = new StringParser();

        // Using classes from the tojava.frontend package
        Ui ui = new Ui();
        Message m = new Message();

    }
}
Note how the class can still use the Processor without importing it first, by using its fully qualified name seedu.tojava.logic.Processor
Importing a package does not import its sub-packages, as packages do not behave as hierarchies despite appearances.
import seedu.tojava.frontend.* does not import the classes in the sub-package seedu.tojava.frontend.widget.
If you do not use a package statement, your type doesn't have a package -- a practice not recommended (except for small code examples) as it is not possible for a type in a package to import a type that is not in a package.
Optionally, a static import can be used to import static members of a type so that the imported members can be used without specifying the type name.
The class below uses static imports to import the constant PREFIX and the method format() from the seedu.tojava.util.Formatter class.
import static seedu.tojava.util.Formatter.PREFIX;
import static seedu.tojava.util.Formatter.format;

public class Main {

    public static void main(String[] args) {

        String formatted = format("Hello");
        boolean isFormatted = formatted.startsWith(PREFIX);
        System.out.println(formatted);
    }
}
package seedu.tojava.util;

public class Formatter {
    public static final String PREFIX = ">>";

    public static String format(String s){
        return PREFIX + s;
    }
}
Note how the class can use PREFIX and format (instead of Formatter.PREFIX and Formatter.format()).
The package of a type should match the folder path of the source file. Similarly, the compiler will put the .class files in a folder structure that matches the package names.
If the seedu.tojava.Main class in defined in the file Main.java,
- the file should be in the location
<source folder>/seedu/tojava/ - when it is compiled, the
Main.classfile will be in the location<compiler output folder>/seedu/tojava/
When using the commandline to compile/run Java, you should take the package into account.
If the seedu.tojava.Main class in defined in the file Main.java,
- when compiling from the
<source folder>, the command is:
javac seedu/tojava/Main.java - when running it from the
<compiler output folder>, the command is:
java seedu.tojava.Main
- Oracle's tutorial on packages: [What is a Package?] [Creating and Using Packages]
This exercise continues from the TaskManager Level 1-7 exercises quoted above.
Move the classes in your TaskManager into a package. For example, assuming your name in John Doe, you can move it to a pacakge johndoe.tojava.taskmanager. Optionally, you can add sub-packages too.
W8.3 Can use Java access modifiers
W8.3a Can explain access modifiers
C++ to Java → Miscellaneous Topics →
Access level modifiers determine whether other classes can use a particular field or invoke a particular method.
There are two levels of access control:
-
At the class level:
public: the class is visible to all classes everywhere- no modifier (the default, also known as package-private): it is visible only within its own package
-
At the member level:
publicor no modifier (package-private): same meaning as when used with top-level classesprivate: the member can only be accessed in its own classprotected: the member can only be accessed within its own package (as with package-private) and, in addition, by a subclass of its class in another package
The following table shows the access to members permitted by each modifier.
| Modifier |
|
|
|
|
|---|---|---|---|---|
public |
||||
protected |
||||
| no modifier | ||||
private |
Access levels affect you in two ways:
- When you use classes that come from another source, such as the classes in the Java platform, access levels determine which members of those classes your own classes can use.
- When you write a class, you need to decide what access level every member variable and every method in your class should have.
W8.4 Can use Javadocs
W8.4a Can explain JavaDoc
Implementation → Documentation → Tools → JavaDoc
Javadoc is a tool for generating API documentation in HTML format from doc comments in source. In addition, modern IDEs use JavaDoc comments to generate explanatory tool tips.
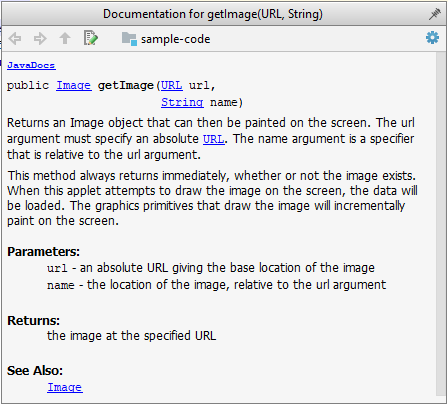
An example method header comment in JavaDoc format (adapted from Oracle's Java documentation)
/**
 * Returns an Image object that can then be painted on the screen.
 * The url argument must specify an absolute {@link URL}. The name
 * argument is a specifier that is relative to the url argument.
 * <p>
 * This method always returns immediately, whether or not the
 * image exists. When this applet attempts to draw the image on
 * the screen, the data will be loaded. The graphics primitives
 * that draw the image will incrementally paint on the screen.
 *
 * @param url an absolute URL giving the base location of the image
 * @param name the location of the image, relative to the url argument
 * @return the image at the specified URL
 * @see Image
 */
 public Image getImage(URL url, String name) {
        try {
            return getImage(new URL(url, name));
        } catch (MalformedURLException e) {
            return null;
        }
 }
Generated HTML documentation:

Tooltip generated by Intellij IDE:
W8.4b Can write Javadoc comments
Implementation → Documentation → Tools → JavaDoc
In the absence of more extensive guidelines (e.g., given in a coding standard adopted by your project), you can follow the two examples below in your code.
A minimal javadoc comment example for methods:
/**
 * Returns lateral location of the specified position.
 * If the position is unset, NaN is returned.
 *
 * @param x  X coordinate of position.
 * @param y Y coordinate of position.
 * @param zone Zone of position.
 * @return Lateral location.
 * @throws IllegalArgumentException  If zone is <= 0.
 */
public double computeLocation(double x, double y, int zone)
    throws IllegalArgumentException {
  ...
}
A minimal javadoc comment example for classes:
package ...

import ...

/**
 * Represents a location in a 2D space. A <code>Point</code> object corresponds to
 * a coordinate represented by two integers e.g., <code>3,6</code>
 */
public class Point{
    //...
}
- A short tutorial on writing JavaDoc comments -- from tutorialspoint.com
- A more detailed description --from Oracle
Requirements
W8.5 Can explain requirements
W8.5a Can explain requirements
Requirements → Requirements →
A software requirement specifies a need to be fulfilled by the software product.
A software project may be,
- a brown-field project i.e., develop a product to replace/update an existing software product
- a green-field project i.e., develop a totally new system with no precedent
In either case, requirements need to be gathered, analyzed, specified, and managed.
Requirements come from stakeholders.
Stakeholder: A party that is potentially affected by the software project. e.g. users, sponsors, developers, interest groups, government agencies, etc.
Identifying requirements is often not easy. For example, stakeholders may not be aware of their precise needs, may not know how to communicate their requirements correctly, may not be willing to spend effort in identifying requirements, etc.
W8.5b Can explain non-functional requirements
Requirements → Requirements →
There are two kinds of requirements:
- Functional requirements specify what the system should do.
- Non-functional requirements specify the constraints under which system is developed and operated.
Some examples of non-functional requirement categories:
- Data requirements e.g. size,
volatility ,persistency etc., - Environment requirements e.g. technical environment in which system would operate or need to be compatible with.
- Accessibility, Capacity, Compliance with regulations, Documentation, Disaster recovery, Efficiency, Extensibility, Fault tolerance, Interoperability, Maintainability, Privacy, Portability, Quality, Reliability, Response time, Robustness, Scalability, Security, Stability, Testability, and more ...
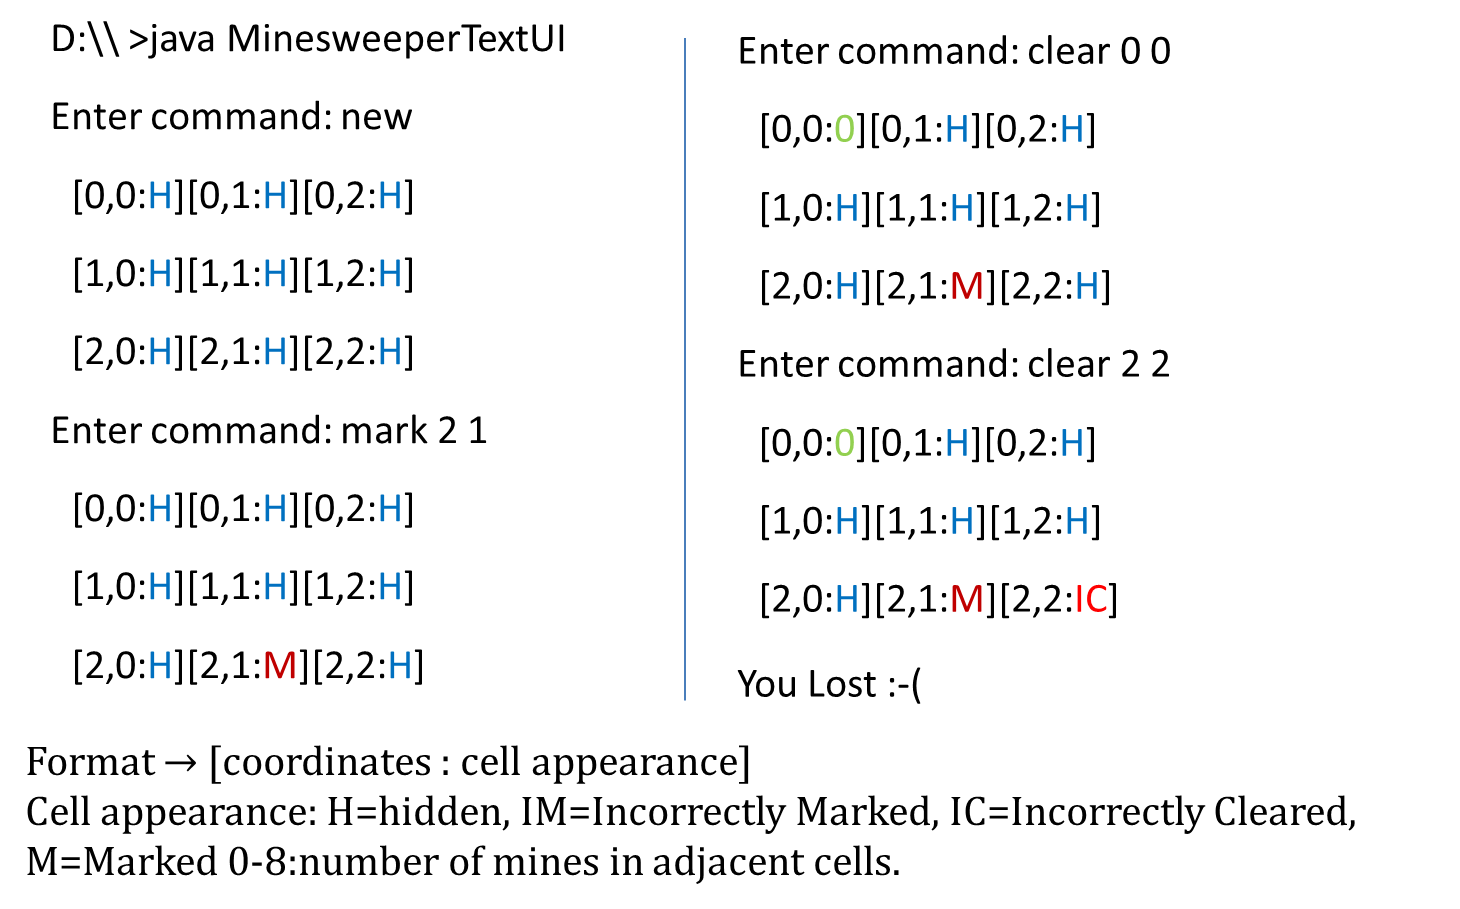
- Business/domain rules: e.g. the size of the minefield cannot be smaller than five.
- Constraints: e.g. the system should be backward compatible with data produced by earlier versions of the system; system testers are available only during the last month of the project; the total project cost should not exceed $1.5 million.
- Technical requirements: e.g. the system should work on both 32-bit and 64-bit environments.
- Performance requirements: e.g. the system should respond within two seconds.
- Quality requirements: e.g. the system should be usable by a novice who has never carried out an online purchase.
- Process requirements: e.g. the project is expected to adhere to a schedule that delivers a feature set every one month.
- Notes about project scope: e.g. the product is not required to handle the printing of reports.
- Any other noteworthy points: e.g. the game should not use images deemed offensive to those injured in real mine clearing activities.
We may have to spend an extra effort in digging NFRs out as early as possible because,
- NFRs are easier to miss e.g., stakeholders tend to think of functional requirements first
- sometimes NFRs are critical to the success of the software. E.g. A web application that is too slow or that has low security is unlikely to succeed even if it has all the right functionality.
Given below are some requirements of TEAMMATES (an online peer evaluation system for education). Which one of these are non-functional requirements?
- a. The response to any use action should become visible within 5 seconds.
- b. The application admin should be able to view a log of user activities.
- c. The source code should be open source.
- d. A course should be able to have up to 2000 students.
- e. As a student user, I can view details of my team members so that I can know who they are.
- f. The user interface should be intuitive enough for users who are not IT-savvy.
- g. The product is offered as a free online service.
(a)(c)(d)(f)(g)
Explanation: (b) are (e) are functions available for a specific user types. Therefore, they are functional requirements. (a), (c), (d), (f) and (g) are either constraints on functionality or constraints on how the project is done, both of which are considered non-functional requirements.
W8.5c Can explain prioritizing requirements
Requirements → Requirements →
Requirements can be prioritized based the importance and urgency, while keeping in mind the constraints of schedule, budget, staff resources, quality goals, and other constraints.
A common approach is to group requirements into priority categories. Note that all such scales are subjective, and stakeholders define the meaning of each level in the scale for the project at hand.
An example scheme for categorizing requirements:
Essential: The product must have this requirement fulfilled or else it does not get user acceptanceTypical: Most similar systems have this feature although the product can survive without it.Novel: New features that could differentiate this product from the rest.
Other schemes:
High,Medium,LowMust-have,Nice-to-have,Unlikely-to-haveLevel 0,Level 1,Level 2, ...
Some requirements can be discarded if they are considered ‘out of
The requirement given below is for a Calendar application. Stakeholder of the software (e.g. product designers) might decide the following requirement is not in the scope of the software.
The software records the actual time taken by each task and show the difference between the actual and scheduled time for the task.
W8.5d Can explain quality of requirements
Requirements → Requirements →
Here are some characteristics of well-defined requirements
- Unambiguous
- Testable (verifiable)
- Clear (concise, terse, simple, precise)
- Correct
- Understandable
- Feasible (realistic, possible)
- Independent
-
Atomic - Necessary
- Implementation-free (i.e. abstract)
Besides these criteria for individual requirements, the set of requirements as a whole should be
- Consistent
- Non-redundant
- Complete
Peter Zielczynski, Requirements Management Using IBM Rational RequisitePro, IBM Press, 2008
W8.6 Can explain some techniques for gathering requirements
W8.6a Can explain brainstorming
Requirements → Gathering Requirements →
Brainstorming: A group activity designed to generate a large number of diverse and creative ideas for the solution of a problem.
In a brainstorming session there are no "bad" ideas. The aim is to generate ideas; not to validate them. Brainstorming encourages you to "think outside the box" and put "crazy" ideas on the table without fear of rejection.
What is the key characteristic about brainstorming?
(b)
W8.6b Can explain product surveys
Requirements → Gathering Requirements →
Studying existing products can unearth shortcomings of existing solutions that can be addressed by a new product. Product manuals and other forms of technical documentation of an existing system can be a good way to learn about how the existing solutions work.
When developing a game for a mobile device, a look at a similar PC game can give insight into the kind of features and interactions the mobile game can offer.
W8.6c Can explain observation
Requirements → Gathering Requirements →
Observing users in their natural work environment can uncover product requirements. Usage data of an existing system can also be used to gather information about how an existing system is being used, which can help in building a better replacement e.g. to find the situations where the user makes mistakes when using the current system.
W8.6d Can explain user surveys
W8.6e Can explain interviews
Requirements → Gathering Requirements →
W8.6f Can explain focus groups
Requirements → Gathering Requirements →

[source]
Focus groups are a kind of informal interview within an interactive group setting. A group of people (e.g. potential users, beta testers) are asked about their understanding of a specific issue, process, product, advertisement, etc.
W8.6g Can explain prototyping
Requirements → Gathering Requirements →
Prototype: A prototype is a mock up, a scaled down version, or a partial system constructed
- to get users’ feedback.
- to validate a technical concept (a "proof-of-concept" prototype).
- to give a preview of what is to come, or to compare multiple alternatives on a small scale before committing fully to one alternative.
- for early field-testing under controlled conditions.
Prototyping can uncover requirements, in particular, those related to how users interact with the system. UI prototypes are often used in brainstorming sessions, or in meetings with the users to get quick feedback from them.
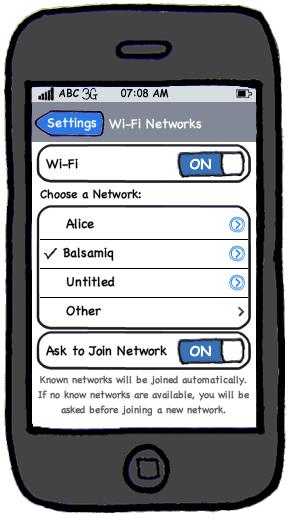
[source: http://balsamiq.com/products/mockups]
💡 Prototyping can be used for discovering as well as specifying requirements e.g. a UI prototype can serve as a specification of what to build.
W8.7 Can use some techniques for specifying requirements
Prose
W8.7a Can explain prose
Requirements → Specifying Requirements → Prose →
A textual description (i.e. prose) can be used to describe requirements. Prose is especially useful when describing abstract ideas such as the vision of a product.
The product vision of the TEAMMATES Project given below is described using prose.
TEAMMATES aims to become the biggest student project in the world (biggest here refers to 'many contributors, many users, large code base, evolving over a long period'). Furthermore, it aims to serve as a training tool for Software Engineering students who want to learn SE skills in the context of a non-trivial real software product.
Avoid using lengthy prose to describe requirements; they can be hard to follow.
Feature Lists
W8.7b Can explain feature list
Requirements → Specifying Requirements → Feature Lists →
Feature List: A list of features of a product grouped according to some criteria such as aspect, priority, order of delivery, etc.
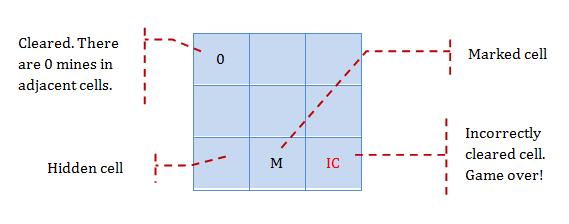
A sample feature list from a simple Minesweeper game (only a brief description has been provided to save space):
- Basic play – Single player play.
- Difficulty levels
- Medium-levels
- Advanced levels
- Versus play – Two players can play against each other.
- Timer – Additional fixed time restriction on the player.
- ...
User Stories
W8.7c Can write simple user stories
Requirements → Specifying Requirements → User Stories →
User story: User stories are short, simple descriptions of a feature told from the perspective of the person who desires the new capability, usually a user or customer of the system. [Mike Cohn]
A common format for writing user stories is:
User story format: As a {user type/role} I can {function} so that {benefit}
Examples (from a Learning Management System):
- As a student, I can download files uploaded by lecturers, so that I can get my own copy of the files
- As a lecturer, I can create discussion forums, so that students can discuss things online
- As a tutor, I can print attendance sheets, so that I can take attendance during the class
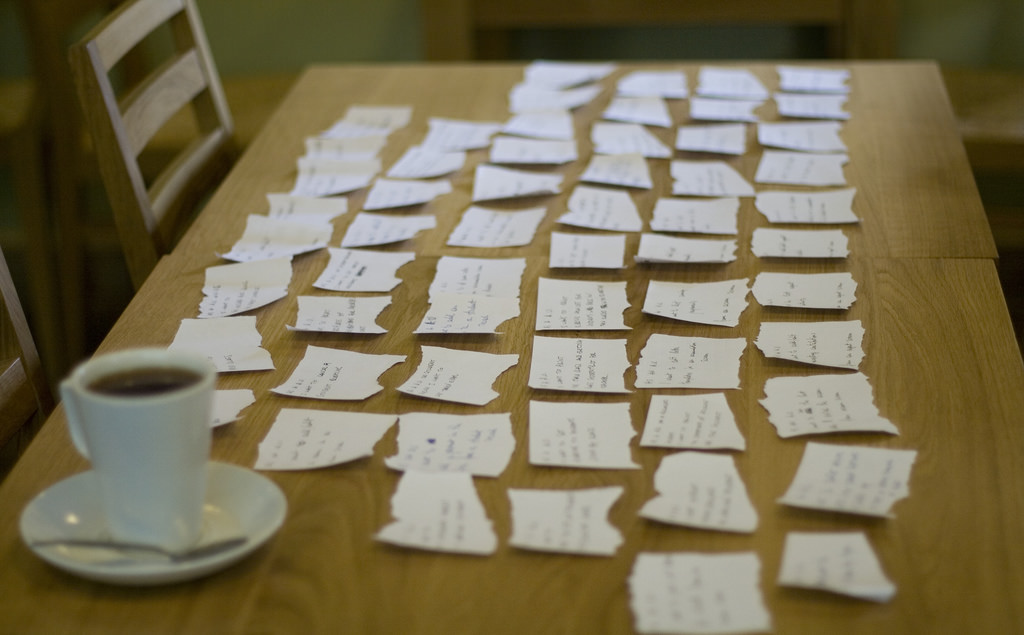
We can write user stories on index cards or sticky notes, and arrange on walls or tables, to facilitate planning and discussion. Alternatively, we can use a software (e.g., GitHub Project Boards, Trello, Google Docs, ...) to manage user stories digitally.
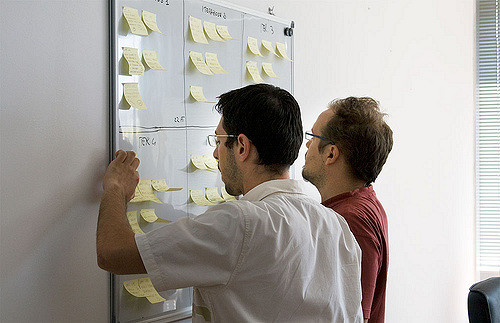
[credit: https://www.flickr.com/photos/jakuza/with/2726048607/]
[credit: https://commons.wikimedia.org/wiki/File:User_Story_Map_in_Action.png]
- a. They are based on stories users tell about similar systems
- b. They are written from the user/customer perspective
- c. They are always written in some physical medium such as index cards or sticky notes
- a. Reason: Despite the name, user stories are not related to 'stories' about the software.
- b.
- c. Reason: It is possible to use software to record user stories. When the team members are not co-located this may be the only option.
Critique the following user story taken from a software project to build an e-commerce website.
As a developer, I want to use Python to implement the software, so that we can resue existing Python modules.
Refer to the definition of a user story.
User story: User stories are short, simple descriptions of a feature told from the perspective of the person who desires the new capability, usually a user or customer of the system. [Mike Cohn]
This user story is not written from the perspective of the user/customer.
Bill wants you to build a Human Resource Management (HRM) system. He mentions that the system will help employees to view their own
Remember to follow the correct format when writing user stories.
User story format: As a {user type/role} I can {function} so that {benefit}
As an employee, I can view my leave balance, so that I can know how many leave days I have left.
Note: the {benefit} part may vary as it is not specifically mentioned in the question.
W8.7d Can write more detailed user stories
Requirements → Specifying Requirements → User Stories →
The {benefit} can be omitted if it is obvious.
As a user, I can login to the system so that I can access my data
💡 It is recommended to confirm there is a concrete benefit even if you omit it from the user story. If not, you could end up adding features that have no real benefit.
You can add more characteristics to the {user role} to provide more context to the user story.
- As a forgetful user, I can view a password hint, so that I can recall my password.
- As an expert user, I can tweak the underlying formatting tags of the document, so that I can format the document exactly as I need.
You can write user stories at various levels. High-level user stories, called epics (or themes) cover bigger functionality. You can then break down these epics to multiple user stories of normal size.
[Epic] As a lecturer, I can monitor student participation levels
- As a lecturer, I can view the forum post count of each student so that I can identify the activity level of students in the forum
- As a lecturer, I can view webcast view records of each student so that I can identify the students who did not view webcasts
- As a lecturer, I can view file download statistics of each student so that I can identify the students who do not download lecture materials
You can add conditions of satisfaction to a user story to specify things that need to be true for the user story implementation to be accepted as ‘done’.
- As a lecturer, I can view the forum post count of each student so that I can identify the activity level of students in the forum.
Conditions:
- Separate post count for each forum should be shown
- Total post count of a student should be shown
- The list should be sortable by student name and post count
Other useful info that can be added to a user story includes (but not limited to)
- Priority: how important the user story is
- Size: the estimated effort to implement the user story
- Urgency: how soon the feature is needed
User stories for a travel website (credit: Mike Cohen)
- As a registered user, I am required to log in so that I can access the system
- As a forgetful user, I can request a password reminder so that I can log in if I forget mine
- [Epic] As a user, I can cancel a reservation
- As a premium site member, I can cancel a reservation up to the last minute
- As a non-premium member, I can cancel up to 24 hours in advance
- As a member, I am emailed a confirmation of any cancelled reservation
- [Epic] As a frequent flyer, I want to book a trip
- As a frequent flyer, I want to book a trip using miles
- As a frequent flyer, I want to rebook a trip I take often
- As a frequent flyer, I want to request an upgrade
- As a frequent flyer, I want to see if my upgrade cleared
Choose the correct statements
- a. User stories are short and written in a formal notation.
- b. User stories is another name for use cases.
- c. User stories describes past experiences users had with similar systems. These are helpful in developing the new system.
- d. User stories are not detailed enough to tell us exact details of the product.
- a.
- b.
- c.
- d.
Explanation: User stories are short and written in natural language, NOT in a formal language. They are used for estimation and scheduling purposes but do not contain enough details to form a complete system specification.
W8.7e Can use user stories to manage requirements of project
Requirements → Specifying Requirements → User Stories →
User stories capture user requirements in a way that is convenient for
[User stories] strongly shift the focus from writing about features to discussing them. In fact, these discussions are more important than whatever text is written. [Mike Cohn, MountainGoat Software 🔗]
User stories differ from
User stories can capture
Requirements → Requirements →
There are two kinds of requirements:
- Functional requirements specify what the system should do.
- Non-functional requirements specify the constraints under which system is developed and operated.
Some examples of non-functional requirement categories:
- Data requirements e.g. size,
volatility ,persistency etc., - Environment requirements e.g. technical environment in which system would operate or need to be compatible with.
- Accessibility, Capacity, Compliance with regulations, Documentation, Disaster recovery, Efficiency, Extensibility, Fault tolerance, Interoperability, Maintainability, Privacy, Portability, Quality, Reliability, Response time, Robustness, Scalability, Security, Stability, Testability, and more ...
- Business/domain rules: e.g. the size of the minefield cannot be smaller than five.
- Constraints: e.g. the system should be backward compatible with data produced by earlier versions of the system; system testers are available only during the last month of the project; the total project cost should not exceed $1.5 million.
- Technical requirements: e.g. the system should work on both 32-bit and 64-bit environments.
- Performance requirements: e.g. the system should respond within two seconds.
- Quality requirements: e.g. the system should be usable by a novice who has never carried out an online purchase.
- Process requirements: e.g. the project is expected to adhere to a schedule that delivers a feature set every one month.
- Notes about project scope: e.g. the product is not required to handle the printing of reports.
- Any other noteworthy points: e.g. the game should not use images deemed offensive to those injured in real mine clearing activities.
We may have to spend an extra effort in digging NFRs out as early as possible because,
- NFRs are easier to miss e.g., stakeholders tend to think of functional requirements first
- sometimes NFRs are critical to the success of the software. E.g. A web application that is too slow or that has low security is unlikely to succeed even if it has all the right functionality.
Given below are some requirements of TEAMMATES (an online peer evaluation system for education). Which one of these are non-functional requirements?
- a. The response to any use action should become visible within 5 seconds.
- b. The application admin should be able to view a log of user activities.
- c. The source code should be open source.
- d. A course should be able to have up to 2000 students.
- e. As a student user, I can view details of my team members so that I can know who they are.
- f. The user interface should be intuitive enough for users who are not IT-savvy.
- g. The product is offered as a free online service.
(a)(c)(d)(f)(g)
Explanation: (b) are (e) are functions available for a specific user types. Therefore, they are functional requirements. (a), (c), (d), (f) and (g) are either constraints on functionality or constraints on how the project is done, both of which are considered non-functional requirements.
An example of a NFR captured as a user story:
| As a | I want to | so that |
|---|---|---|
| impatient user | to be able experience reasonable response time from the website while up to 1000 concurrent users are using it | I can use the app even when the traffic is at the maximum expected level |
Given their lightweight nature, user stories are quite handy for recording requirements during early stages of requirements gathering.
💡 Here are some tips for using user stories for early stages of requirement gathering:
- Define the target user:
Decide your target user's profile (e.g. a student, office worker, programmer, sales person) and work patterns (e.g. Does he work in groups or alone? Does he share his computer with others?). A clear understanding of the target user will help when deciding the importance of a user story. You can even give this user a name. e.g. Target user Jean is a university student studying in a non-IT field. She interacts with a lot of people due to her involvement in university clubs/societies. ... - Define the problem scope: Decide that exact problem you are going to solve for the target user. e.g. Help Jean keep track of all her school contacts
- Don't be too hasty to discard 'unusual' user stories:
Those might make your product unique and stand out from the rest, at least for the target users. - Don't go into too much details:
For example, consider this user story:As a user, I want to see a list of tasks that needs my attention most at the present time, so that I pay attention to them first.
When discussing this user story, don't worry about what tasks should be considered needs my attention most at the present time. Those details can be worked out later. - Don't be biased by preconceived product ideas:
When you are at the stage of identifying user needs, clear your mind of ideas you have about what your end product will look like. - Don't discuss implementation details or whether you are actually going to implement it:
When gathering requirements, your decision is whether the user's need is important enough for you to want to fulfil it. Implementation details can be discussed later. If a user story turns out to be too difficult to implement later, you can always omit it from the implementation plan.
While use cases can be recorded on
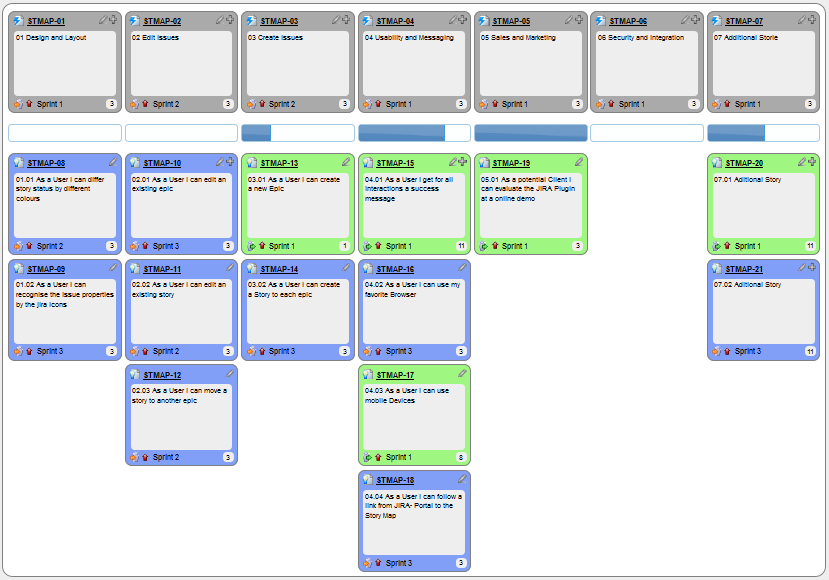
You can create issues for each of the user stories and use a GitHub Project Board to sort them into categories.
Example Project Board:
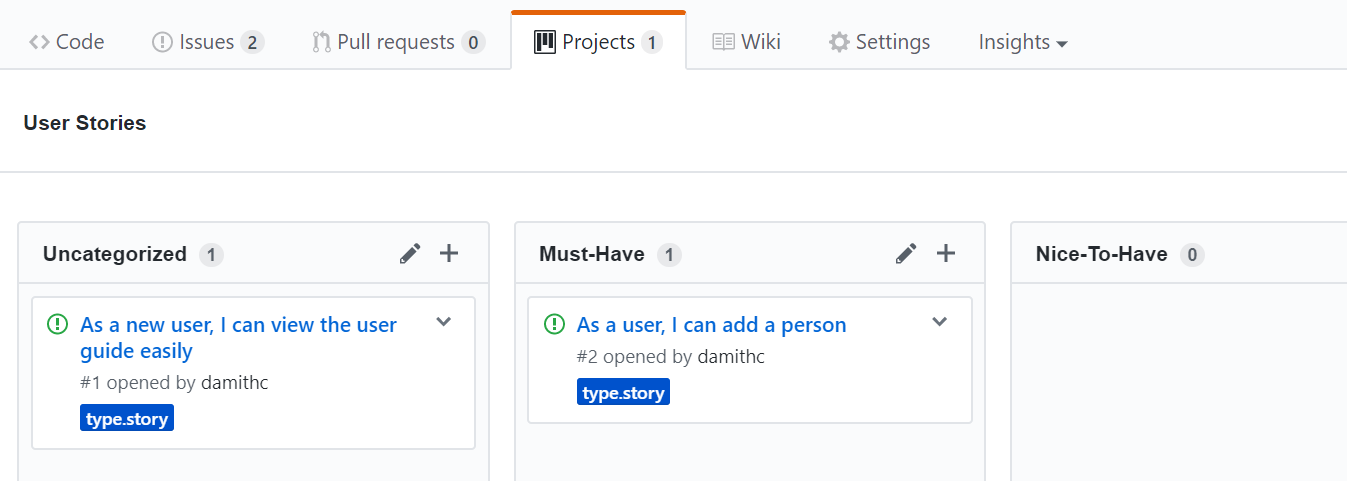
Example Issue to represent a user story:
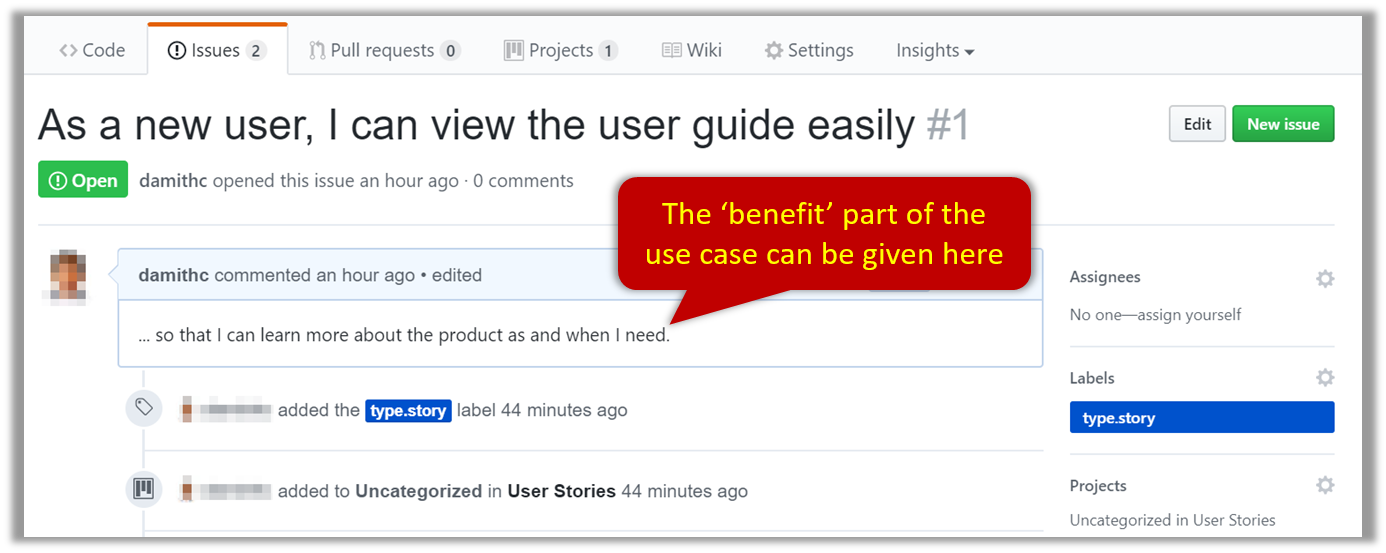
A video on GitHub Project Boards:
Example Google Sheet for recording user stories:

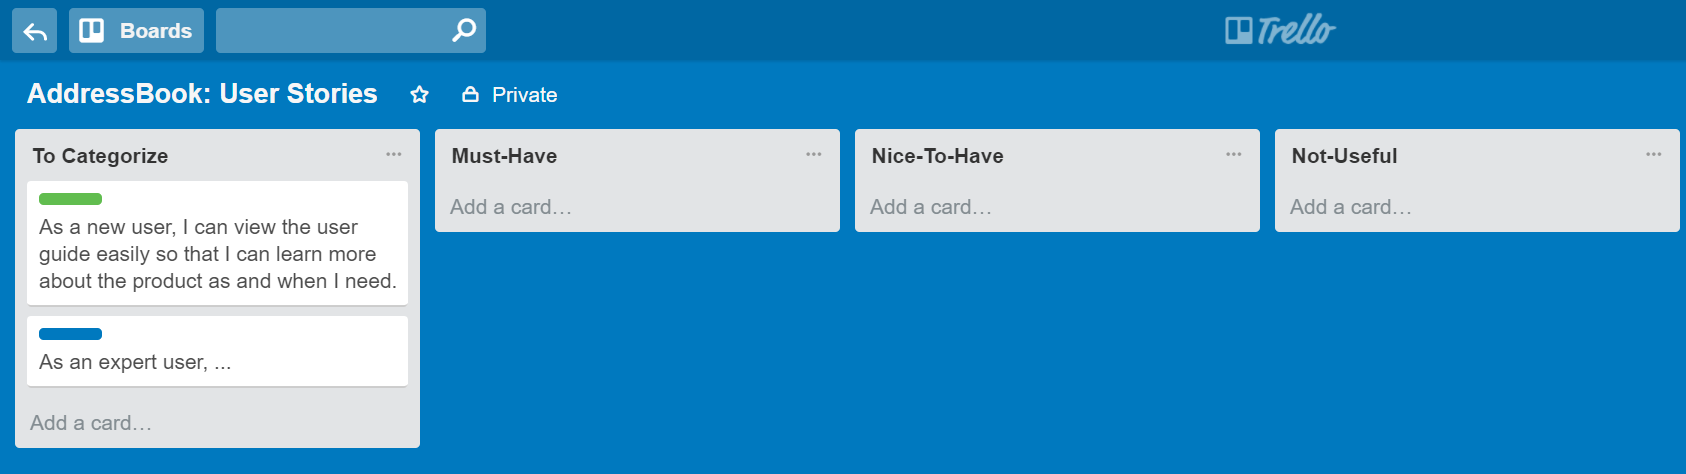
Example Trello Board for recording user stories:
Extreme programming (XP) is a software development methodology which is intended to improve software quality and responsiveness to changing customer requirements. As a type of agile software development, it advocates frequent "releases" in short development cycles, which is intended to improve productivity and introduce checkpoints at which new customer requirements can be adopted. [wikipedia, 2017.05.01]
This page in their website explains the difference between user stories and traditional requirements.
One of the biggest misunderstandings with user stories is how they differ from traditional requirements specifications. The biggest difference is in the level of detail. User stories should only provide enough detail to make a reasonably low risk estimate of how long the story will take to implement. When the time comes to implement the story developers will go to the customer and receive a detailed description of the requirements face to face.
- This article by Mike Cohn from MountainGoatSoftware explains how to use user stories to capture NFRs.
Evidence:
Ability to write user stories to match your project.
Use Cases
W8.7f Can explain use cases
Requirements → Specifying Requirements → Use Cases →
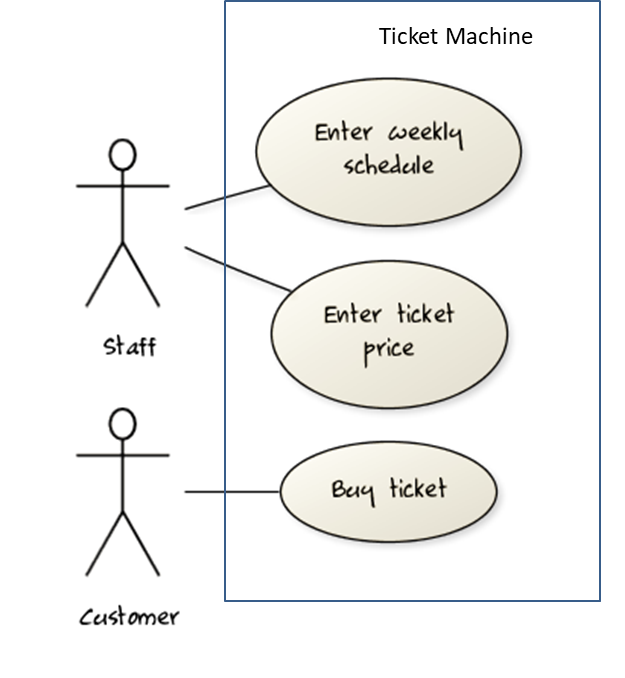
Use Case: A description of a set of sequences of actions, including variants, that a system performs to yield an observable result of value to an
Actor: An actor (in a use case) is a role played by a user. An actor can be a human or another system. Actors are not part of the system; they reside outside the system.
A use case describes an interaction between the user and the system for a specific functionality of the system.
- System:
ATM - Actor: Customer
- Use Case: Check account balance
- User inserts an ATM card
- ATM prompts for PIN
- User enters PIN
- ATM prompts for withdrawal amount
- User enters the amount
- ATM ejects the ATM card and issues cash
- User collects the card and the cash.
- System: A Learning Management System (LMS)
- Actor: Student
- Use Case: Upload file
- Student requests to upload file
- LMS requests for the file location
- Student specifies the file location
- LMS uploads the file
Unified Modeling Language (UML) is a graphical notation to describe various aspects of a software system. UML is the brainchild of three software modeling specialists James Rumbaugh, Grady Booch and Ivar Jacobson (also known as the Three Amigos). Each of them has developed their own notation for modeling software systems before joining force to create a unified modeling language (hence, the term ‘Unified’ in UML). UML is currently the de facto modeling notation used in the software industry.
Use cases capture the functional requirements of a system.
Glossary
W8.7g Can explain glossary
Requirements → Specifying Requirements → Glossary →
Glossary: A glossary serves to ensure that all stakeholders have a common understanding of the noteworthy terms, abbreviation, acronyms etc.
Here is a partial glossary from a variant of the Snakes and Ladders game:
- Conditional square: A square that specifies a specific face value which a player has to throw before his/her piece can leave the square.
- Normal square: a normal square does not have any conditions, snakes, or ladders in it.
Supplementary Requirements
W8.7h Can explain supplementary requirements
Requirements → Specifying Requirements → Supplementary Requirements →
A supplementary requirements section can be used to capture requirements that do not fit elsewhere. Typically, this is where most
Requirements → Requirements →
There are two kinds of requirements:
- Functional requirements specify what the system should do.
- Non-functional requirements specify the constraints under which system is developed and operated.
Some examples of non-functional requirement categories:
- Data requirements e.g. size,
volatility ,persistency etc., - Environment requirements e.g. technical environment in which system would operate or need to be compatible with.
- Accessibility, Capacity, Compliance with regulations, Documentation, Disaster recovery, Efficiency, Extensibility, Fault tolerance, Interoperability, Maintainability, Privacy, Portability, Quality, Reliability, Response time, Robustness, Scalability, Security, Stability, Testability, and more ...
- Business/domain rules: e.g. the size of the minefield cannot be smaller than five.
- Constraints: e.g. the system should be backward compatible with data produced by earlier versions of the system; system testers are available only during the last month of the project; the total project cost should not exceed $1.5 million.
- Technical requirements: e.g. the system should work on both 32-bit and 64-bit environments.
- Performance requirements: e.g. the system should respond within two seconds.
- Quality requirements: e.g. the system should be usable by a novice who has never carried out an online purchase.
- Process requirements: e.g. the project is expected to adhere to a schedule that delivers a feature set every one month.
- Notes about project scope: e.g. the product is not required to handle the printing of reports.
- Any other noteworthy points: e.g. the game should not use images deemed offensive to those injured in real mine clearing activities.
We may have to spend an extra effort in digging NFRs out as early as possible because,
- NFRs are easier to miss e.g., stakeholders tend to think of functional requirements first
- sometimes NFRs are critical to the success of the software. E.g. A web application that is too slow or that has low security is unlikely to succeed even if it has all the right functionality.
Given below are some requirements of TEAMMATES (an online peer evaluation system for education). Which one of these are non-functional requirements?
- a. The response to any use action should become visible within 5 seconds.
- b. The application admin should be able to view a log of user activities.
- c. The source code should be open source.
- d. A course should be able to have up to 2000 students.
- e. As a student user, I can view details of my team members so that I can know who they are.
- f. The user interface should be intuitive enough for users who are not IT-savvy.
- g. The product is offered as a free online service.
(a)(c)(d)(f)(g)
Explanation: (b) are (e) are functions available for a specific user types. Therefore, they are functional requirements. (a), (c), (d), (f) and (g) are either constraints on functionality or constraints on how the project is done, both of which are considered non-functional requirements.
🅿️ Project
W8.8 Use packages, javadocs
Extract from the Admin Info page:
Week 8
- As in the previous week, enhance your project (TaskManager or otherwise) as explained in the exercises below:
This exercise continues from the TaskManager Level 1-7 exercises quoted above.
Move the classes in your TaskManager into a package. For example, assuming your name in John Doe, you can move it to a pacakge johndoe.tojava.taskmanager. Optionally, you can add sub-packages too.
This exercise continues from the TaskManager Level 1-8 exercises quoted above.
Add javadoc comments to all non-trivial public classes and methods. Follow the format of the minimal javadoc comment examples given below.
Tutorial 8
W7.1a Can explain revision control
Project Management → Revision Control →
Revision control is the process of managing multiple versions of a piece of information. In its simplest form, this is something that many people do by hand: every time you modify a file, save it under a new name that contains a number, each one higher than the number of the preceding version.
Manually managing multiple versions of even a single file is an error-prone task, though, so software tools to help automate this process have long been available. The earliest automated revision control tools were intended to help a single user to manage revisions of a single file. Over the past few decades, the scope of revision control tools has expanded greatly; they now manage multiple files, and help multiple people to work together. The best modern revision control tools have no problem coping with thousands of people working together on projects that consist of hundreds of thousands of files.
Revision control software will track the history and evolution of your project, so you don't have to. For every change, you'll have a log of who made it; why they made it; when they made it; and what the change was.
Revision control software makes it easier for you to collaborate when you're working with other people. For example, when people more or less simultaneously make potentially incompatible changes, the software will help you to identify and resolve those conflicts.
It can help you to recover from mistakes. If you make a change that later turns out to be an error, you can revert to an earlier version of one or more files. In fact, a really good revision control tool will even help you to efficiently figure out exactly when a problem was introduced.
It will help you to work simultaneously on, and manage the drift between, multiple versions of your project. Most of these reasons are equally valid, at least in theory, whether you're working on a project by yourself, or with a hundred other people.
-- [adapted from
bryan-mercurial-guide
Mercurial: The Definitive Guide by Bryan O'Sullivan retrieved on 2012/07/11
RCS : Revision Control Software are the software tools that automate the process of Revision Control i.e. managing revisions of software artifacts.
Revision: A revision (some seem to use it interchangeably with version while others seem to distinguish the two -- here, let us treat them as the same, for simplicity) is a state of a piece of information at a specific time that is a result of some changes to it e.g., if you modify the code and save the file, you have a new revision (or a version) of that file.
Revision control is also known as Version Control Software (VCS), and a few other names.
Revision Control Software
In the context of RCS, what is a Revision? Give an example.
A revision (some seem to use it interchangeably with version while others seem to distinguish the two -- here, let us treat them as the same, for simplicity) is a state of a piece of information at a specific time that is a result of some changes to it. For example, take a file containing program code. If you modify the code and save the file, you have a new revision (or a version) of that file.
- a. Help a single user manage revisions of a single file
- b. Help a developer recover from a incorrect modification to a code file
- c. Makes it easier for a group of developers to collaborate on a project
- d. Manage the drift between multiple versions of your project
- e. Detect when multiple developers make incompatible changes to the same file
- f. All of them are benefits of RCS
f
Suppose You are doing a team project with Tom, Dick, and Harry but those three have not even heard the term RCS. How do you explain RCS to them as briefly as possible, using the project as an example?
Evidence:
Be able to answer questions such as these:
Suppose You are doing a team project with Tom, Dick, and Harry but those three have not even heard the term RCS. How do you explain RCS to them as briefly as possible, using the project as an example?
W7.1b Can explain repositories
Project Management → Revision Control →
Repository (repo for short): The database of the history of a directory being tracked by an RCS software (e.g. Git).
The repository is the database where the meta-data about the revision history are stored. Suppose you want to apply revision control on files in a directory called ProjectFoo. In that case you need to set up a repo (short for repository) in ProjectFoo directory, which is referred to as the working directory of the repo. For example, Git uses a hidden folder named .git inside the working directory.
You can have multiple repos in your computer, each repo revision-controlling files of a different working directly, for examples, files of different projects.
In the context of RCS, what is a repo?
Evidence:
Be able to answer questions such as these:
In the context of RCS, what is a repo?
W7.1c Can create a local Git repo
Tools → Git and GitHub →
Soon you are going to take your first step in using Git. If you would like to see a quick overview of the full Git landscape before jumping in, watch the video below.
Install SourceTree which is Git + a GUI for Git. If you prefer to use Git via the command line (i.e., without a GUI), you can install Git instead.
Suppose you want to create a repository in an empty directory things. Here are the steps:
Windows: Click File → Clone/New…. Click on Create button.
Mac: New... → Create New Repository.
Enter the location of the directory (Windows version shown below) and click Create.
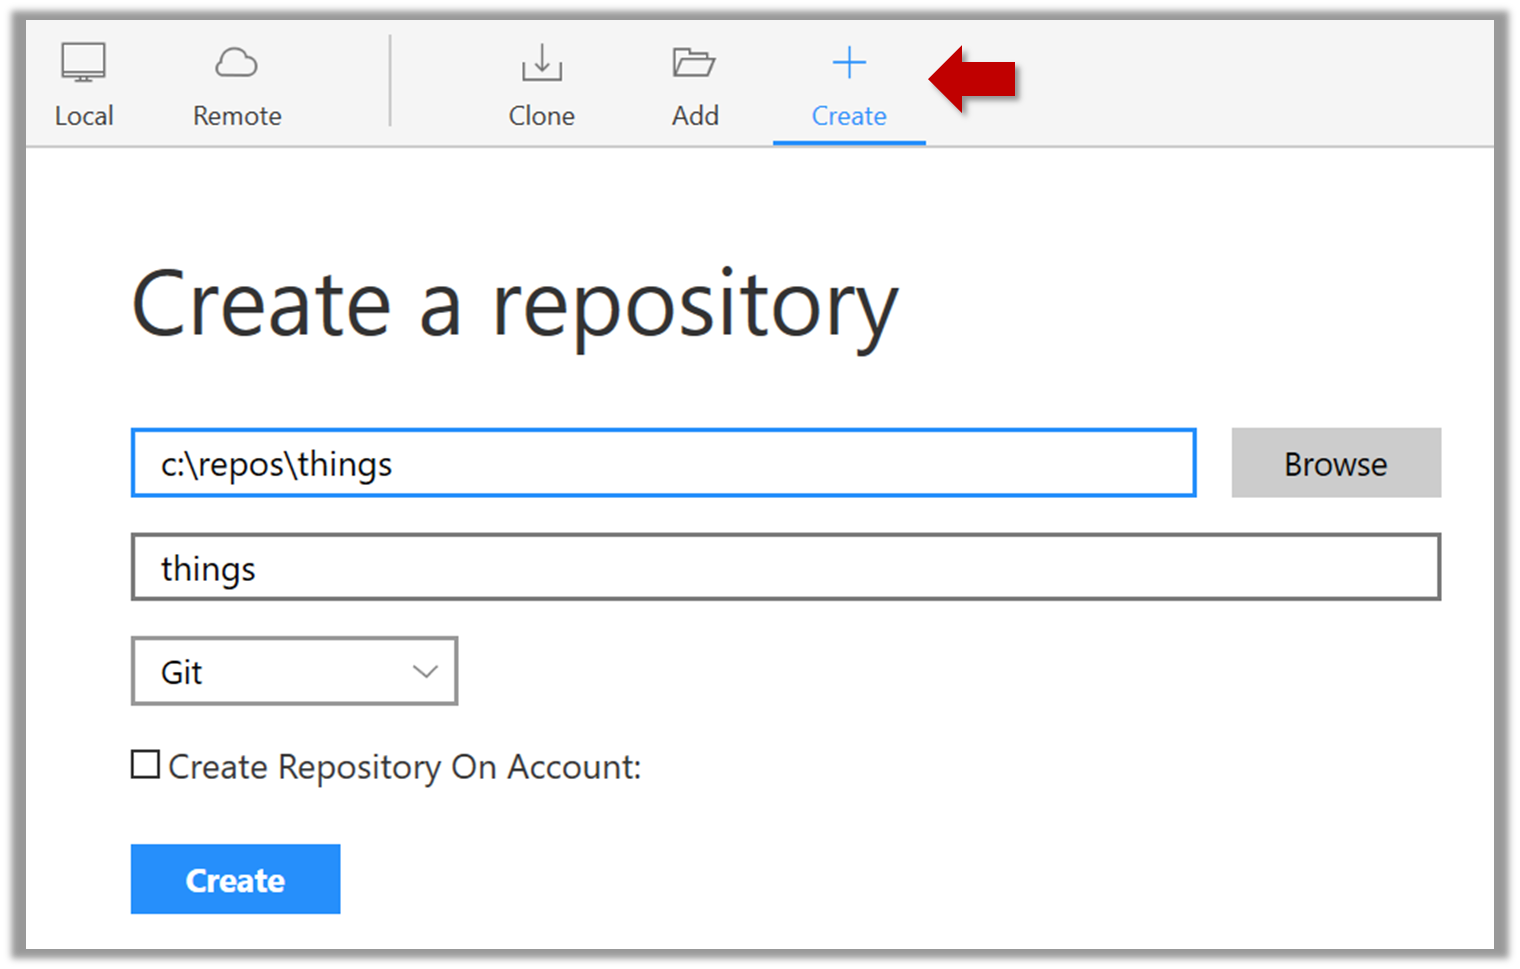
Go to the things folder and observe how a hidden folder .git has been created.
Note: If you are on Windows, you might have to configure Windows Explorer to show hidden files.
Open a Git Bash Terminal.
If you installed SourceTree, you can click the Terminal button to open a GitBash terminal.
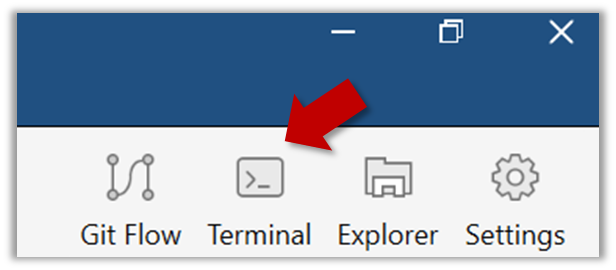
Navigate to the things directory.
Use the command git init which should initialize the repo.
$ git init
Initialized empty Git repository in c:/repos/things/.git/
You can use the command ls -a to view all files, which should show the .git directory that was created by the previous command.
$ ls -a
.  ..  .git
You can also use the git status command to check the status of the newly-created repo. It should respond with something like the bellow
git status
# On branch master
#
# Initial commit
#
nothing to commit (create/copy files and use "git add" to track)
Evidence:
Have a local repo that you created.
W7.1d Can explain saving history
Project Management → Revision Control →
Tracking and Ignoring
In a repo, we can specify which files to track and which files to ignore. Some files such as temporary log files created during the build/test process should not be revision-controlled.
Staging and Committing
Committing saves a snapshot of the current state of the tracked files in the revision control history. Such a snapshot is also called a commit (i.e. the noun).
When ready to commit, we first stage the specific changes we want to commit. This intermediate step allows us to commit only some changes while saving other changes for a later commit.
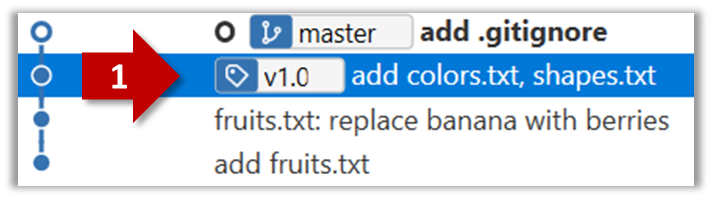
Identifying Points in History
Each commit in a repo is a recorded point in the history of the project that is uniquely identified by an auto-generated hash e.g. a16043703f28e5b3dab95915f5c5e5bf4fdc5fc1.
We can tag a specific commit with a more easily identifiable name e.g. v1.0.2
Evidence:
Have a local repo that has commits you created.
W7.1f Can set Git to ignore files
Tools → Git and GitHub →
Add a file names temp.txt to the things repo you created. Suppose we don’t want this file to be revision controlled by Git. Let’s instruct Git to ignore temp.txt
The file should be currently listed under Unstaged files. Right-click it and choose Ignore…. Choose Ignore exact filename(s) and click OK.
Observe that a file named .gitignore has been created in the working directory root and has the following line in it.
temp.txt
Create a file named .gitignore in the working directory root and add the following line in it.
temp.txt
The .gitignore file tells Git which files to ignore when tracking revision history. That file itself can be either revision controlled or ignored.
- To version control it (the more common choice – which allows you to track how the
.gitignorefile changed over time), simply commit it as you would commit any other file. - To ignore it, follow the same steps we followed above when we set Git to ignore the
temp.txtfile.
Evidence:
Have a local repo that has git-ignored files.
W7.2b Can load a specific version of a Git repo
Tools → Git and GitHub →
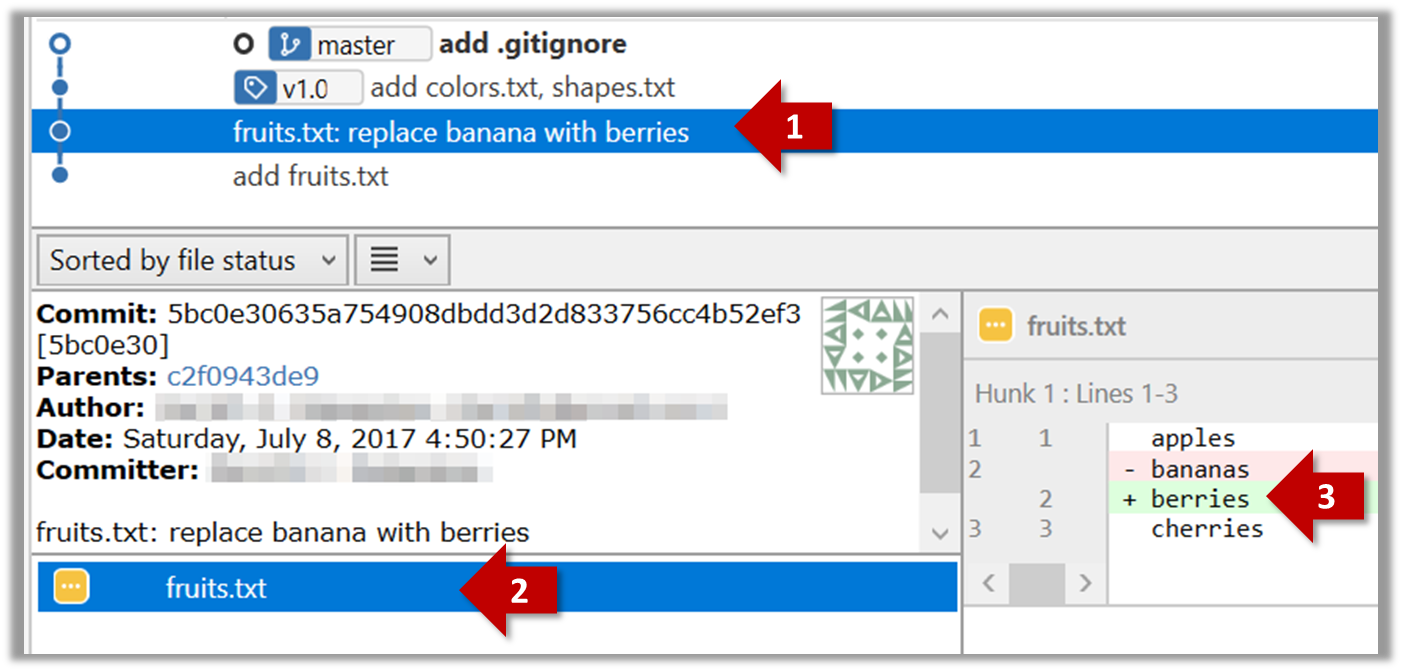
Git can show you what changed in each commit.
To see which files changed in a commit, click on the commit. To see what changed in a specific file in that commit, click on the file name.
git show < part-of-commit-hash >
Example:
git show 251b4cf
commit 5bc0e30635a754908dbdd3d2d833756cc4b52ef3
Author: … < … >
Date:   Sat Jul 8 16:50:27 2017 +0800

    fruits.txt: replace banana with berries

diff --git a/fruits.txt b/fruits.txt
index 15b57f7..17f4528 100644
--- a/fruits.txt
+++ b/fruits.txt
@@ -1,3 +1,3 @@
 apples
-bananas
+berries
 cherries
Git can also show you the difference between two points in the history of the repo.
Select the two points you want to compare using Ctrl+Click.
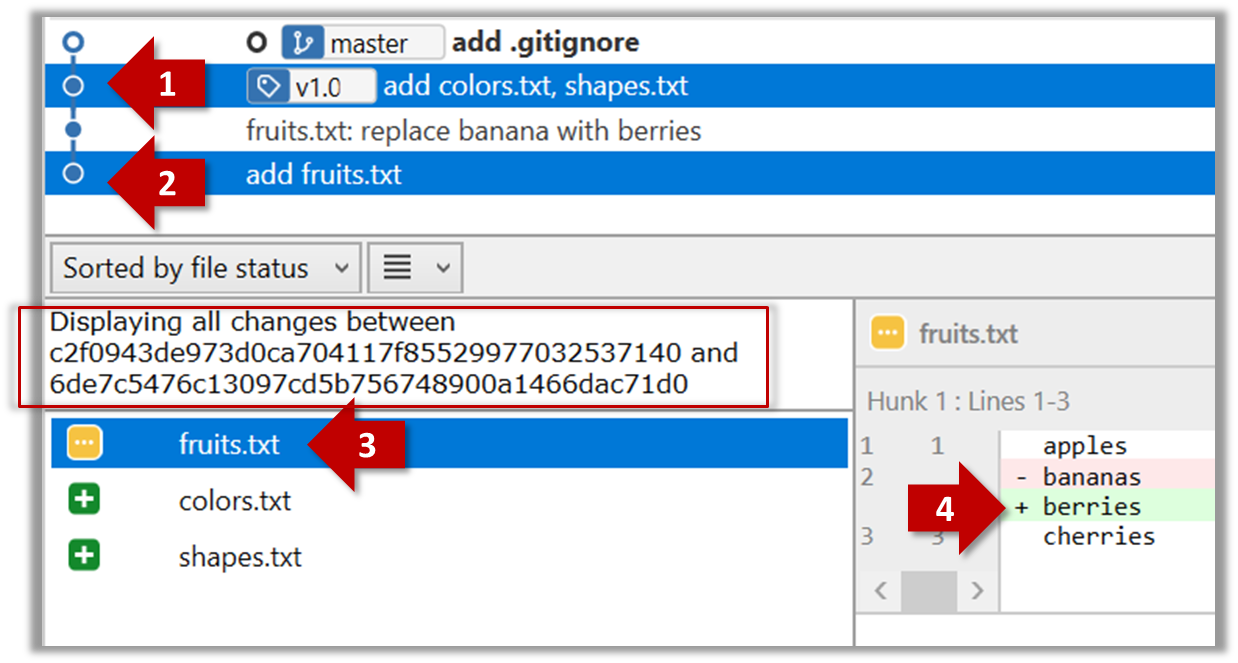
The same method can be used to compare the current state of the working directory (which might have uncommitted changes) to a point in the history.
The diff command can be used to view the differences between two points of the history.
git diff: shows the changes (uncommitted) since the last commitgit diff 0023cdd..fcd6199: shows the changes between the points indicated by by commit hashesgit diff v1.0..HEAD: shows changes that happened from the commit tagged asv1.0to the most recent commit.
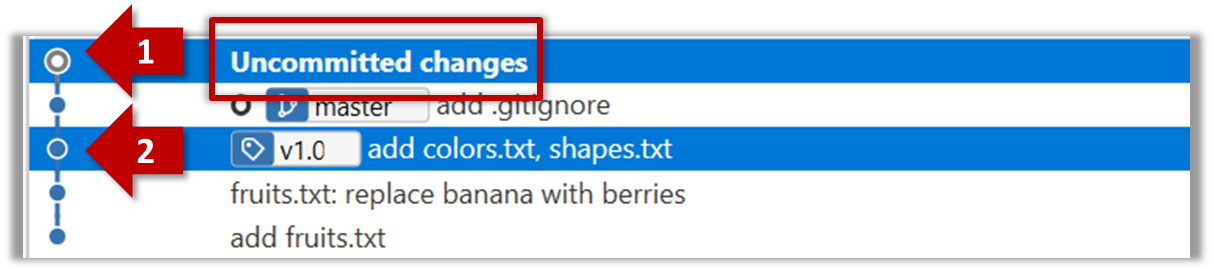
Git can load a specific version of the history to the working directory. Note that if you have uncommitted changes in the working directory, you need to
Tools → Git and GitHub →
You can use the git's stash feature to temporarily shelve (or stash) changes you've made to your working copy so that you can work on something else, and then come back and re-apply the stashed changes later on. -- adapted from this
Follow this article from SourceTree creators. Note the GUI shown in the article is slightly outdated but you should be able to map it to the current GUI.
Follow this article from Atlassian.
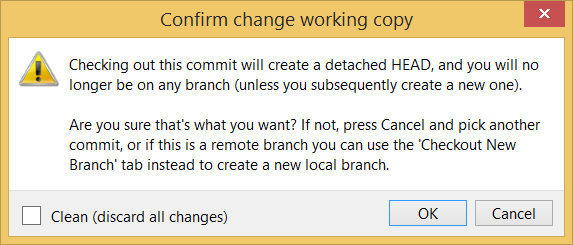
Double-click the commit you want to load to the working directory, or right-click on that commit and choose Checkout....
Click OK to the warning about ‘detached HEAD’ (similar to below).
The specified version is now loaded to the working folder, as indicated by the HEAD label. HEAD is a reference to the currently checked out commit.
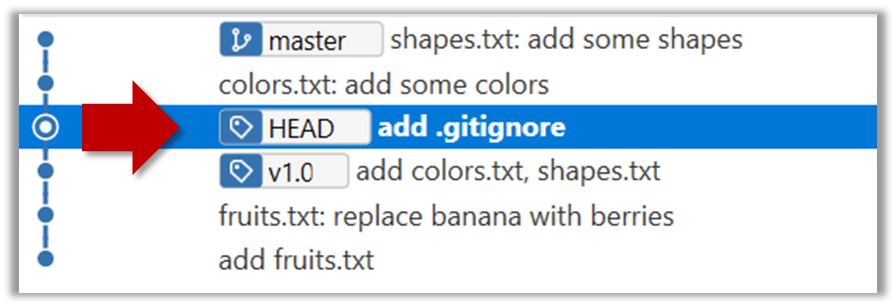
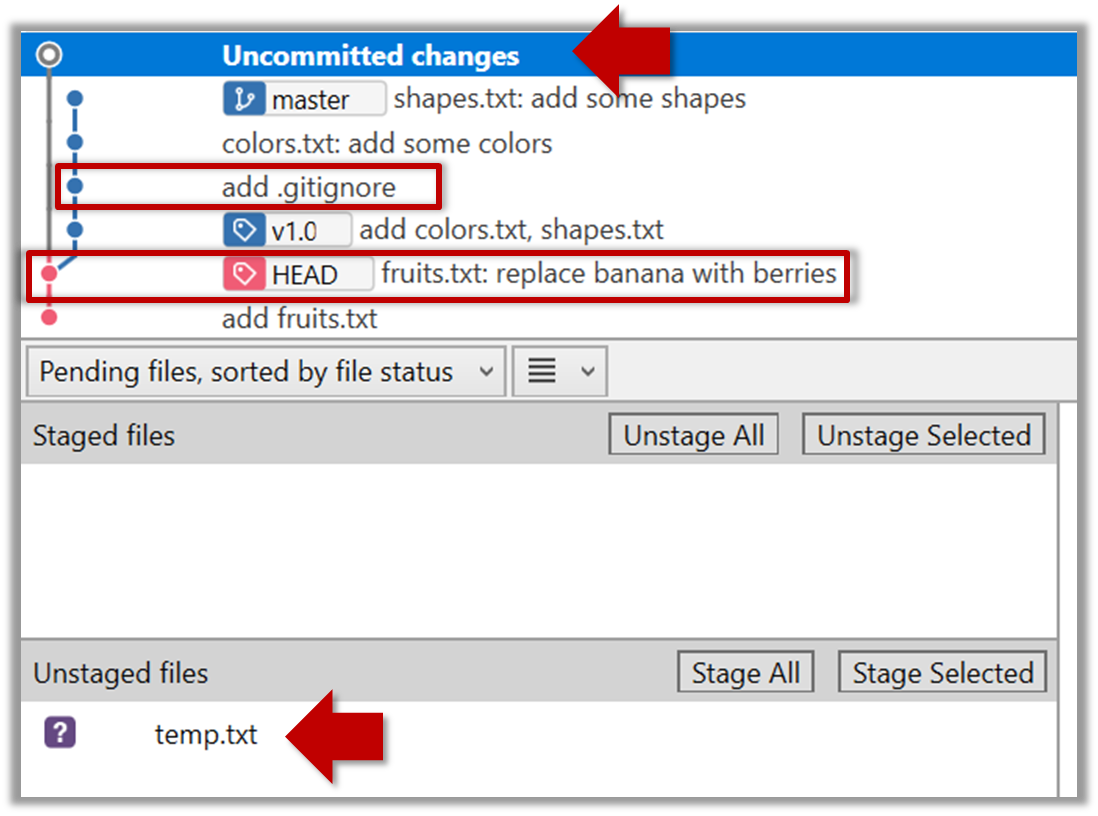
If you checkout a commit that come before the commit in which you added the .gitignore file, Git will now show ignored fiels as ‘unstaged modifications’ because at that stage Git hasn’t been told to ignore those files.
To go back to the latest commit, double-click it.
Use the checkout <commit-identifier> command to change the working directory to the state it was in at a specific past commit.
git checkout v1.0: loads the state as at commit taggedv1.0git checkout 0023cdd: loads the state as at commit with the hash0023cddgit checkout HEAD~2: loads the state that is 2 commits behind the most recent commit
For now, you can ignore the warning about ‘detached HEAD’.
Use the checkout <branch-name> to go back to the most recent commit of the current branch (the default branch in git is named master)
git checkout master
Evidence:
Being able to traverse history using the steps given in the LO above.
W7.2c Can tag commits using Git
Tools → Git and GitHub →
Let's tag a commit in a local repo you have (e.g. the sampelrepo-things repo)
Right-click on the commit (in the graphical revision graph) you want to tag and choose Tag…
Specify the tag name e.g. v1.0 and click Add Tag.
The added tag will appear in the revision graph view.
To add a tag to the current commit as v1.0,
git tag –a v1.0
To view tags
git tag
To learn how to add a tag to a past commit, go to the ‘Git Basics – Tagging’ page of the git-scm book and refer the ‘Tagging Later’ section.
Evidence:
Being able to tag a commit in a repo.
W7.2d Can use Git to stash files
Tools → Git and GitHub →
You can use the git's stash feature to temporarily shelve (or stash) changes you've made to your working copy so that you can work on something else, and then come back and re-apply the stashed changes later on. -- adapted from this
Follow this article from SourceTree creators. Note the GUI shown in the article is slightly outdated but you should be able to map it to the current GUI.
Follow this article from Atlassian.
Evidence:
Being able to demonstrate stashing.
W7.3b Can explain the need for early developer testing
Quality Assurance → Testing → Developer Testing →
Delaying testing until the full product is complete has a number of disadvantages:
- Locating the cause of such a test case failure is difficult due to a large search space; in a large system, the search space could be millions of lines of code, written by hundreds of developers! The failure may also be due to multiple inter-related bugs.
- Fixing a bug found during such testing could result in major rework, especially if the bug originated during the design or during requirements specification i.e. a faulty design or faulty requirements.
- One bug might 'hide' other bugs, which could emerge only after the first bug is fixed.
- The delivery may have to be delayed if too many bugs were found during testing.
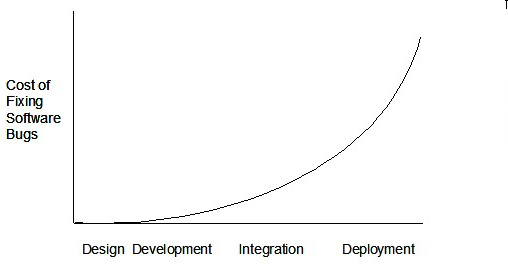
Therefore, it is better to do early testing, as hinted by the popular rule of thumb given below, also illustrated by the graph below it.
The earlier a bug is found, the easier and cheaper to have it fixed.
Such early testing of partially developed software is usually, and by necessity, done by the developers themselves i.e. developer testing.
Discuss pros and cons of developers testing their own code.
Pros:
- Can be done early (the earlier we find a bug, the cheaper it is to fix).
- Can be done at lower levels, for examples, at operation and class level (testers usually test the system at UI level).
- It is possible to do more thorough testing because developers know the expected external behavior as well as the internal structure of the component.
- It forces developers to take responsibility for their own work (they cannot claim that "testing is the job of the testers").
Cons:
- A developer may subconsciously test only situations that he knows to work (i.e. test it too 'gently').
- A developer may be blind to his own mistakes (if he did not consider a certain combination of input while writing code, it is possible for him to miss it again during testing).
- A developer may have misunderstood what the SUT is supposed to do in the first place.
- A developer may lack the testing expertise.
The cost of fixing a bug goes down as we reach the product release.
False. The cost goes up over time.
Explain why early testing by developers is important.
Evidence:
Explain why early testing by developers is important.
W7.3e Can use simple JUnit tests
Tools → JUnit →
When writing JUnit tests for a class Foo, the common practice is to create a FooTest class, which will contain various test methods.
Suppose we want to write tests for the IntPair class below.
public class IntPair {
    int first;
    int second;

    public IntPair(int first, int second) {
        this.first = first;
        this.second = second;
    }

    public int intDivision() throws Exception {
        if (second == 0){
            throw new Exception("Divisor is zero");
        }
        return first/second;
    }

    @Override
    public String toString() {
        return first + "," + second;
    }
}
Here's a IntPairTest class to match.
import org.junit.Test;
import org.junit.Assert;

public class IntPairTest {

    @Test
    public void testStringConversion() {
        Assert.assertEquals("4,7", new IntPair(4, 7).toString());
    }

    @Test
    public void intDivision_nonZeroDivisor_success() throws Exception {
        Assert.assertEquals(2, new IntPair(4, 2).intDivision());
        Assert.assertEquals(0, new IntPair(1, 2).intDivision());
        Assert.assertEquals(0, new IntPair(0, 5).intDivision());
    }

    @Test
    public void intDivision_zeroDivisor_exceptionThrown() {
        try {
            Assert.assertEquals(0, new IntPair(1, 0).intDivision());
            Assert.fail(); // the test should not reach this line
        } catch (Exception e) {
            Assert.assertEquals("Divisor is zero", e.getMessage());
        }
    }
}
Notes:
- Each test method is marked with a
@Testannotation. - Tests use
Assert.assertEquals(expected, actual)methods to compare the expected output with the actual output. If they do not match, the test will fail. JUnit comes with other similar methods such asAssert.assertNullandAssert.assertTrue. - Java code normally use camelCase for method names e.g.,
testStringConversionbut when writing test methods, sometimes another convention is used:whatIsBeingTested_descriptionOfTestInputs_expectedOutcomee.g.,intDivision_zeroDivisor_exceptionThrown - There are several ways to verify the code throws the correct exception. The third test method in the example above shows one of the simpler methods. If the exception is thrown, it will be caught and further verified inside the
catchblock. But if it is not thrown as expected, the test will reachAssert.fail()line and will fail as a result. - The easiest way to run JUnit tests is to do it via the IDE. For example, in Intellij you can right-click the folder containing test classes and choose 'Run all tests...'
- Optionally, you can use static imports to avoid having to specify
Assert.everywhere.import static org.junit.Assert.assertEquals; //... @Test public void testStringConversion() { assertEquals("4,7", new IntPair(4, 7).toString()); }
JUnit 4 with IntelliJ: A quick introduction -- by DrBFraser
- JUnit cookbook - a short tutorial from JUnit creators
- JUnit tutorial - a more detailed tutorial from a developer Lars Vogel
- How to test private methods in Java? [ short answer ] [ long answer ]
Evidence:
Evidence of having written JUnit tests in some project.
W7.4 Project kickoff
Extract from the Admin Info page:
Week 7: Project kick-off
Deadline for project kickoff: week 7 lecture
Marks: 5
- Show that you are ready to start the project: i.e., a sanity check to ensure you have enough programming skills to start a project
- If you are new to programming, complete the project preparation exercises i.e., reach TaskManager - Level 5. Demo your TaskManager to prof or email the code to prof.
- If you have prior programming experience, show/email to prof some code you have written before (at least 200 lines of code) to prove that you are ready to start the project.
- Declare project direction and team: Inform prof of the project direction and your team members and get approval to go ahead.
After the project kickoff
- if you chose option 1 (i.e., enhancing TaskManager), given below are some further improvements you are recommended to do to your code base, while you are adding other features.
If you chose option 2 or 3, you should still ensure you have similar enhancements in your code.
This exercise continues from the TaskManager Level 1-5 exercises quoted above.
Refactor the TaskManager to have classes such as the below so that your code is more Object-Oriented:
-
A
Parserclass containing methods that deals with parsing the user command to extract meaningful details from it. Some example methods:public static getCommandWord(String fullCommand): Returns a the command word i.e., the first word of the givenfullCommand
e.g.,Parser.getCommandWord("todo read book")"todo"public static createTodo(String fullCommand): Returns aTodoobject to match thefullCommand. Assumption: thefullCommandis for creating a Todo object.
e.g.,Parser.createTodo("todo read book")aTodoobject containing the description"read book"
-
A
Storageclass that will help to load Tasks from the hard disk and save tasks to the hard disk. Some example usage:Storage storage = new Storage("data/tasks.txt"); List<Task> tasks = storage.load(); ... storage.save(tasks); -
A
Uiclass that will be responsible for interacting with the user. Ideally, only this class should interact with the user. Some example usage:ui = new Ui(); ... ui.showWelcomeMessage(); ... String fullCommand = ui.readUserCommand();Note: The
Scannerobject should be inside theUiclass. -
A
TaskListclass that is responsible for keeping the in-memory task list. Most likely this class will use anArrayListinside it. Some example usage:private TaskList tasks = new TaskList(storage.load()); ... t = Parser.createTodo(fullCommand); tasks.addTask(t); ... String taskListDescription = tasks.getDescription(); ui.showToUser(taskListDescription); -
Tweak the main class (you can name it
TaskManager) class so that themainmethod can be simplified as follows:public static void main(String[] args) { new TaskManager("data/tasks.txt").run(); }Note: As a result of the above, you will have to convert most of the static methods in the
TaskManagerclass to non-static methods, which is more OO.
public class TaskManager {
private Storage storage;
private TaskList tasks;
private Ui ui;
public TaskManager(String filePath) {
ui = new Ui();
storage = new Storage(filePath);
try {
tasks = new TaskList(storage.load());
} catch (TaskManagerException e) {
ui.showToUser("Problem reading file. Starting with an empty task list");
tasks = new TaskList();
}
}
public void run() {
ui.printWelcome();
boolean isExit = false;
while (!isExit) {
try {
String fullCommand = ui.readUserCommand();
String commandWord = Parser.getCommandWord(fullCommand);
switch (commandWord) {
case "exit":
case "":
// ...
}
} catch (TaskManagerException e) {
ui.printError(e.getMessage());
}
}
exit();
}
// ...
public static void main(String[] args) {
    new TaskManager("data/tasks.txt").run();
}
}
import java.util.Scanner;

public class Ui {

    private Scanner in;

    public Ui() {
        in = new Scanner(System.in);
    }

    public String readUserCommand() {
        System.out.print("Your task? ");
        return in.nextLine().trim();
    }

    // ...
}
This exercise continues from the TaskManager Level 1-6 exercises quoted above.
Add JUnit tests for some of the methods in your code.
import org.junit.Test;

import static junit.framework.TestCase.assertEquals;

public class ParserTest {

    @Test
    public void getCommandWord(){
        assertEquals("todo", Parser.getCommandWord("todo read book"));
        assertEquals("deadline", Parser.getCommandWord("deadline return book /by next Friday"));
        assertEquals("exit", Parser.getCommandWord("exit"));
        assertEquals("xyz", Parser.getCommandWord("   xyz   ")); // leading and trailing spaces
        // ...
    }

    @Test
    public void createTodo() throws TaskManagerException {
        Todo actual = Parser.createTodo("todo read book");
        Todo expected = new Todo("read book");
        assertEquals(expected.toString(), actual.toString());
        //...
    }

    // more test methods
}
Lecture 8
[slides]