Week 9 [Oct 15]
Todo
Admin info to read:
Move code towards v2.0 in small steps, start documenting design/implementation details in DG.
v1.2 Summary of Milestone
| Milestone | Minimum acceptable performance to consider as 'reached' |
|---|---|
| Contributed code to the product as described in mid-v1.2 progress guide | some code merged |
| Described implementation details in the Developer Guide | some text and some diagrams added to the developer guide (at least in a PR), comprising at least one page worth of content |
| v1.2 managed using GitHub features (issue tracker, milestones, etc.) | A new version git tagged v1.2 is in your repo.There is evidence of an attempt (even if not completely successful) to use GitHub features as described in |
Project Schedule Tracking
In general, use the issue tracker (Milestones, Issues, PRs, Tags, Releases, and Labels) for assigning, scheduling, and tracking all noteworthy project tasks, including user stories. Update the issue tracker regularly to reflect the current status of the project. You can also use GitHub's new Projects feature to manage the project, but keep it linked to the issue tracker as much as you can.
Using Issues:
During the initial stages:
-
Record each of the user stories you plan to deliver as an issue in the issue tracker. e.g.
Title: As a user I can add a deadline
Description: ... so that I can keep track of my deadlines -
Assign the
type.*andpriority.*labels to those issues.
From milestone v1.1:
-
When you start implementing a story, break it down to tasks. Define reasonable sized, standalone tasks. A task should be able to done by one person, in a few hours. e.g.
- 👍 Good: Update class diagram in the project manual for v1.4
- 👎 Bad (reasons: not a one-person task, not small enough): Write the project manual
-
Write a descriptive title for the issue. e.g. Add support for the 'undo' command to the parser.
-
There is no need to break things into VERY small tasks. Keep them as big as possible, but they should be no bigger than what you are going to assign a single person to do within a week. eg.,
Implementing parser: too big because it cannot be done by a single person in a week.Implementing parser support for adding of floating tasks: appropriate size.
-
Do not track things taken for granted. e.g.,
push code to reposhould not be a task to track. In the example given under the previous point, it is taken for granted that the owner will also (a) test the code and (b) push to the repo when it is ready. Those two need not be tracked as separate tasks. -
Omit redundant details. In some cases, the summary/title is enough to describe the task. In that case, no need to repeat it in the description. There is no need for well-crafted and detailed descriptions for tasks. A minimal description is enough. Similarly, labels such as
prioritycan be omitted if you think they don't help you. -
Assign tasks to team members using the
assigneesfield. At any point, there should be some ongoing tasks and some pending tasks against each team member. -
Optionally, you can use
status.ongoinglabel to indicate issues currently ongoing.
Using Milestones:
We recommend you do the following from milestone v1.1:
-
Use GitHub milestones to indicate which issues are to be handled for which milestone by assigning issues to suitable milestones.
-
Set the deadlines for milestones (in GitHub). Your internal milestones can be set earlier than the deadlines we have set, to give you a buffer.
-
Note that you can change the milestone plan along the way as necessary.
Wrapping up a Milestone:
Here are the conditions to satisfy for a milestone to be considered properly wrapped up:
-
A working product tagged with the correct tag (e.g. v1.2) is pushed to the main repo.
-
All tests passing on Travis for the version tagged above.
-
Milestone updated to match the product i.e. all issues completed and PRs merged for the milestone should be assigned to the milestone.

-
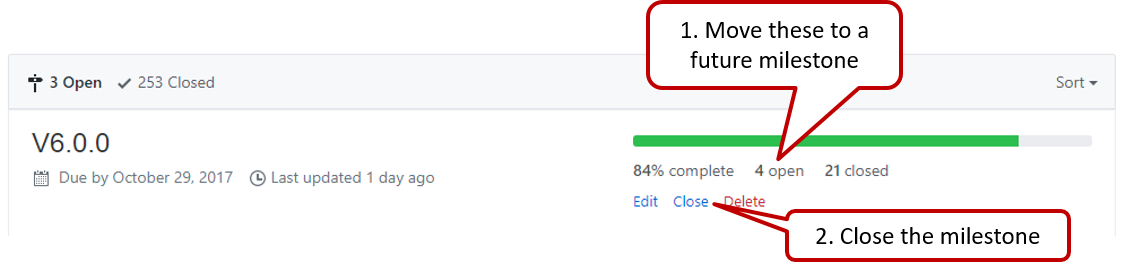
Milestone closed. If there are incomplete issues or unmerged PRs in the milestone, move them to a future milestone.
-
Optionally, issues for the next milestone are assigned to team members (this is not compulsory to do before the tutorial, but we recommend you to do it soon after the tutorial).
-
Optionally, future milestones are revised based on what you experienced in the current milestone e.g. if you could not finish all issues assigned to the current milestone, it is a sign that you overestimated how much you can do in a week, which means you might want to reduce the issues assigned to future milestones to match that observation.
-
Doing a 'release' on GitHub is optional for v1.1 and v1.2 but compulsory from v1.3.
v1.2 Project Management
- Manage, and close, the v1.2 milestone using GitHub.
v1.2 Product
- Merge some code into master (in the team repo).
💡 We use a tool called Collate to extract out code written by each member in your final project submission. The tool requires you to annotate code with special tags to mark code written by you. Adding those annotations is usually done at v1.3 but you are welcome to start early.
Steps to use Collate:
- Download
Collate-TUI.jarfrom the Collate Tool project - Annotate your code to indicate who wrote which part of the code (instructions given below)
- Run the Collate tool to collate code written by each person into separate files (instructions given below)
Annotating code to indicate authorship
-
Mark your code with a
//@@author {yourGithubUsername}. Note the double@.
The//@@authortag should appear only at the beginning of the code you wrote. The code up to the next//@@authortag or the end of the file (whichever comes first) will be considered as was written by that author. Here is a sample code file://@@author johndoe method 1 ... method 2 ... //@@author sarahkhoo method 3 ... //@@author johndoe method 4 ... -
If you don't know who wrote the code segment below yours, you may put an empty
//@@author(i.e. no GitHub username) to indicate the end of the code segment you wrote. The author of code below yours can add the GitHub username to the empty tag later. Here is a sample code with an emptyauthortag:method 0 ... //@@author johndoe method 1 ... method 2 ... //@@author method 3 ... method 4 ... -
The author tag syntax varies based on file type e.g. for java, css, fxml. Use the corresponding comment syntax for non-Java files.
Here is an example code from an xml/fxml file.<!-- @@author sereneWong --> <textbox> <label>...</label> <input>...</input> </textbox> ... -
Do not put the
//@@authorinside java header comments as only the content below that tag will be collated.
👎/** * Returns true if ... * @@author johndoe */👍
//@@author johndoe
/**
  * Returns true if ...
  */
What to and what not to annotate
-
Annotate both functional and test code but not documentation files.
-
Annotate only significant size code blocks that can be reviewed on its own e.g., a class, a sequence of methods, a method.
Claiming credit for code blocks smaller than a method is discouraged but allowed. If you do, do it sparingly and only claim meaningful blocks of code such as a block of statements, a loop, or an if-else statement%%.- If an enhancement required you to do tiny changes in many places, there is no need to collate all those tiny changes; you can describe those changes in the Project Portfolio page instead.
- If a code block was touched by more than one person, either let the person who wrote most of it (e.g. more than 80%) take credit for the entire block, or leave it as 'unclaimed' (i.e., no author tags).
- Related to the above point, if you claim a code block as your own, more than 80% of the code in that block should have been written by yourself. For example, no more than 20% of it can be code you reused from somewhere.
- 💡 GitHub has a blame feature and a history feature that can help you determine who wrote a piece of code.
-
Do not try to boost the length of your collated files using dubious means such as duplicating the same code in multiple places. In particular, do not copy-paste test cases to create redundant tests. Even repetitive code blocks within test methods should be extracted out as utility methods to reduce code duplication.
Individual members are responsible for making sure their own collated files contain the correct content.
If you notice a team member claiming credit for code that he/she did not write or use other questionable tactics, you can email us (after the final submission) to let us know. -
If you wrote a significant amount of code that was not used in the final product,
- Create a folder called
{project root}/unused - Move unused files (or copies of files containing unused code) to that folder
- use
//@@author {yourGithubUsername}-unusedto mark unused code in those files (note the suffixunused) e.g.
//@@author johndoe-unused
method 1 ...
method 2 ...
Please put a comment in the code to explain why it was not used.
- Create a folder called
-
If you reused code from elsewhere, mark such code as
//@@author {yourGithubUsername}-reused(note the suffixreused) e.g.//@@author johndoe-reused method 1 ... method 2 ... -
For code generated by the IDE/framework, it should not be annotated as your own.
-
Code you modified in minor ways e.g. adding a parameter. These can be left out of collated code but can be mentioned in the Project Portfolio page if you want to claim credit for them.
Collating the annotated code
You need to put the collated code in the following folders
| Code Type | Folder |
|---|---|
| functional code | collated/functional |
| test code | collated/test |
| unused code | collated/unused |
Refer to Collate Tool's user guide to find how to run the tool over the annotated code.
Given below are DOS sample commands you can put in a batch file and run it to collate the code.
java -jar Collate-TUI.jar collate from src/main to collated/functional include java, fxml, css

java -jar Collate-TUI.jar collate from src/test to collated/test include java

java -jar Collate-TUI.jar collate from unused to collated/unused include java, fxml, css
The output should be something like the structure given below.
collated/
    functional/
        johndoe.md
        sarahkhoo.md
        ravikumar.md
        ravikumarreused.md
    test/
        johndoe.md
        sarahkhoo.md
        ravikumar.md
    unused/
        johndoe.md
-
After running the collate tool, you are recommended to look through the generated .md files to ensure all your code has been extracted correctly.
-
Push the *.md files created to a folder called /collated in your repo.
v1.2 Documentation
-
User Guide: Update as necessary.
- If a feature has been released in this version, remove the
Coming in v2.0annotation from that feature. Also replace UI mock-ups with actual screenshots. - If a feature design has changed, update the descriptions accordingly.
- If a feature has been released in this version, remove the
-
Developer Guide:
- Each member should describe the implementation of at least one enhancement she has added (or planning to add).
Expected length: 1+ page per person - The description can contain things such as,
- How the feature is implemented.
- Why it is implemented that way.
- Alternatives considered.
- The stated objective is to explain the implementation to a future developer, but a hidden objective is to show evidence that you can document deeply-technical content using prose, examples, diagrams, code snippets, etc. appropriately. To that end, you may also describe features that you plan to implement in the future, even beyond v1.4 (hypothetically).
- For an example, see the description of the undo/redo feature implementation in the AddressBook-Level4 developer guide.
- Each member should describe the implementation of at least one enhancement she has added (or planning to add).
v1.2 Demo
Do an informal demo of the new feature during the tutorial. Each team member should demo their own work, using commit tagged as v1.2 in the master branch i.e. only features included in the current release should be demoed.
Outcomes
Design
W9.1 Can use basic sequence diagrams
W9.1a Can draw basic sequence diagrams
Design → Modelling → Modelling Behaviors
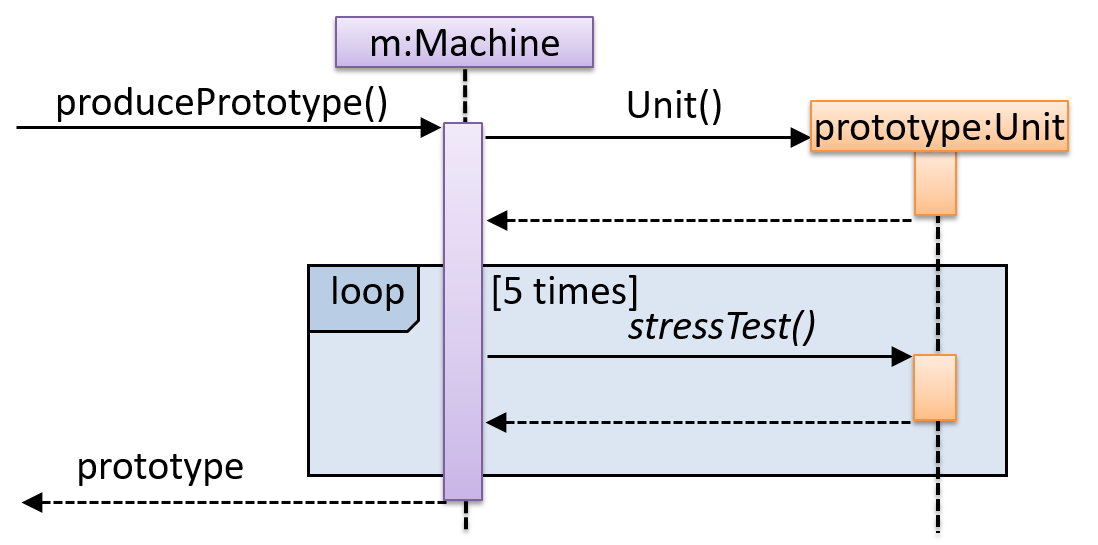
Explain in your own words the interactions illustrated by this Sequence Diagram:
Consider the code below:
class Person{
    Tag tag;
    String name;

    Person(String personName, String tagName){
        name = personName;
        tag = new Tag(tagName);
    }
}
class Tag{
    Tag(String value){
        //...
    }
}

class PersonList{
    void addPerson(Person p){
        //...
    }
}
Draw a sequence diagram to illustrate the object interactions that happen in the code snippet below:
PersonList personList = new PersonList();
while (hasRoom){
    Person p = new Person("Adam", "friend");
    personList.addPerson(p);
}
Find notation mistakes in the sequence diagram below:
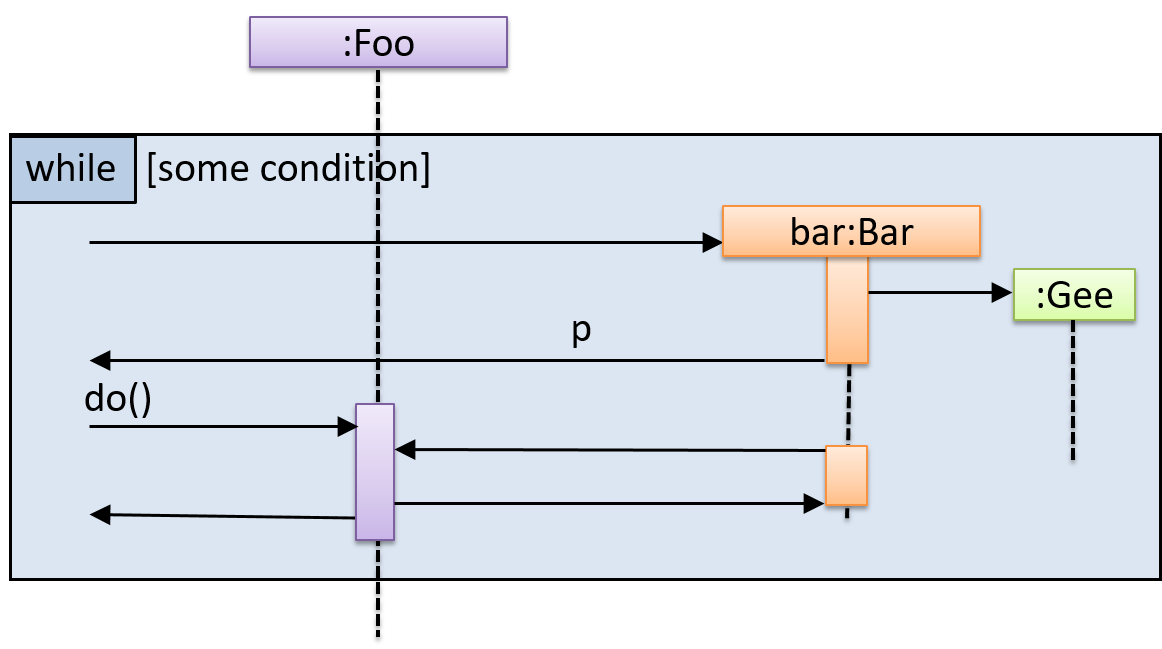
Evidence:
Consider the code below:
class Person{
    Tag tag;
    String name;

    Person(String personName, String tagName){
        name = personName;
        tag = new Tag(tagName);
    }
}
class Tag{
    Tag(String value){
        //...
    }
}

class PersonList{
    void addPerson(Person p){
        //...
    }
}
Draw a sequence diagram to illustrate the object interactions that happen in the code snippet below:
PersonList personList = new PersonList();
while (hasRoom){
    Person p = new Person("Adam", "friend");
    personList.addPerson(p);
}
W9.2 Can explain software design fundamentals
Abstraction
W9.2a Can explain what is software design
Design → Introduction →
Design in the creative process of transforming the problem into a solution; the solution is also called design. -- 📖 Software Engineering Theory and Practice, Shari Lawrence; Atlee, Joanne M. Pfleeger
Software design has two main aspects:
- Product/external design: designing the external behavior of the product to meet the users' requirements. This is usually done by product designers with the input from business analysts, user experience experts, user representatives, etc.
- Implementation/internal design: designing how the product will be implemented to meet the required external behavior. This is usually done by software architects and software engineers.
W9.2b Can explain abstraction
Design → Design Fundamentals → Abstraction →
Abstraction is a technique for dealing with complexity. It works by establishing a level of complexity we are interested in, and suppressing the more complex details below that level.
The guiding principle of abstraction is that only details that are relevant to the current perspective or the task at hand needs to be considered. As most programs are written to solve complex problems involving large amounts of intricate details, it is impossible to deal with all these details at the same time. That is where abstraction can help.
Ignoring lower level data items and thinking in terms of bigger entities is called data abstraction.
Within a certain software component, we might deal with a user data type, while ignoring the details contained in the user data item such as name, and date of birth. These details have been ‘abstracted away’ as they do not affect the task of that software component.
Control abstraction abstracts away details of the actual control flow to focus on tasks at a simplified level.
print(“Hello”) is an abstraction of the actual output mechanism within the computer.
Abstraction can be applied repeatedly to obtain progressively higher levels of abstractions.
An example of different levels of data abstraction: a File is a data item that is at a higher level than an array and an array is at a higher level than a bit.
An example of different levels of control abstraction: execute(Game) is at a higher level than print(Char) which is at a higher than an Assembly language instruction MOV.
Abstraction is a general concept that is not limited to just data or control abstractions.
Some more general examples of abstraction:
- An OOP class is an abstraction over related data and behaviors.
- An architecture is a higher-level abstraction of the design of a software.
- Models (e.g., UML models) are abstractions of some aspect of reality.
Coupling
W9.2c Can explain coupling
Design → Design Fundamentals → Coupling →
Coupling is a measure of the degree of dependence between components, classes, methods, etc. Low coupling indicates that a component is less dependent on other components. High coupling (aka tight coupling or strong coupling) is discouraged due to the following disadvantages:
- Maintenance is harder because a change in one module could cause changes in other modules coupled to it (i.e. a ripple effect).
- Integration is harder because multiple components coupled with each other have to be integrated at the same time.
- Testing and reuse of the module is harder due to its dependence on other modules.
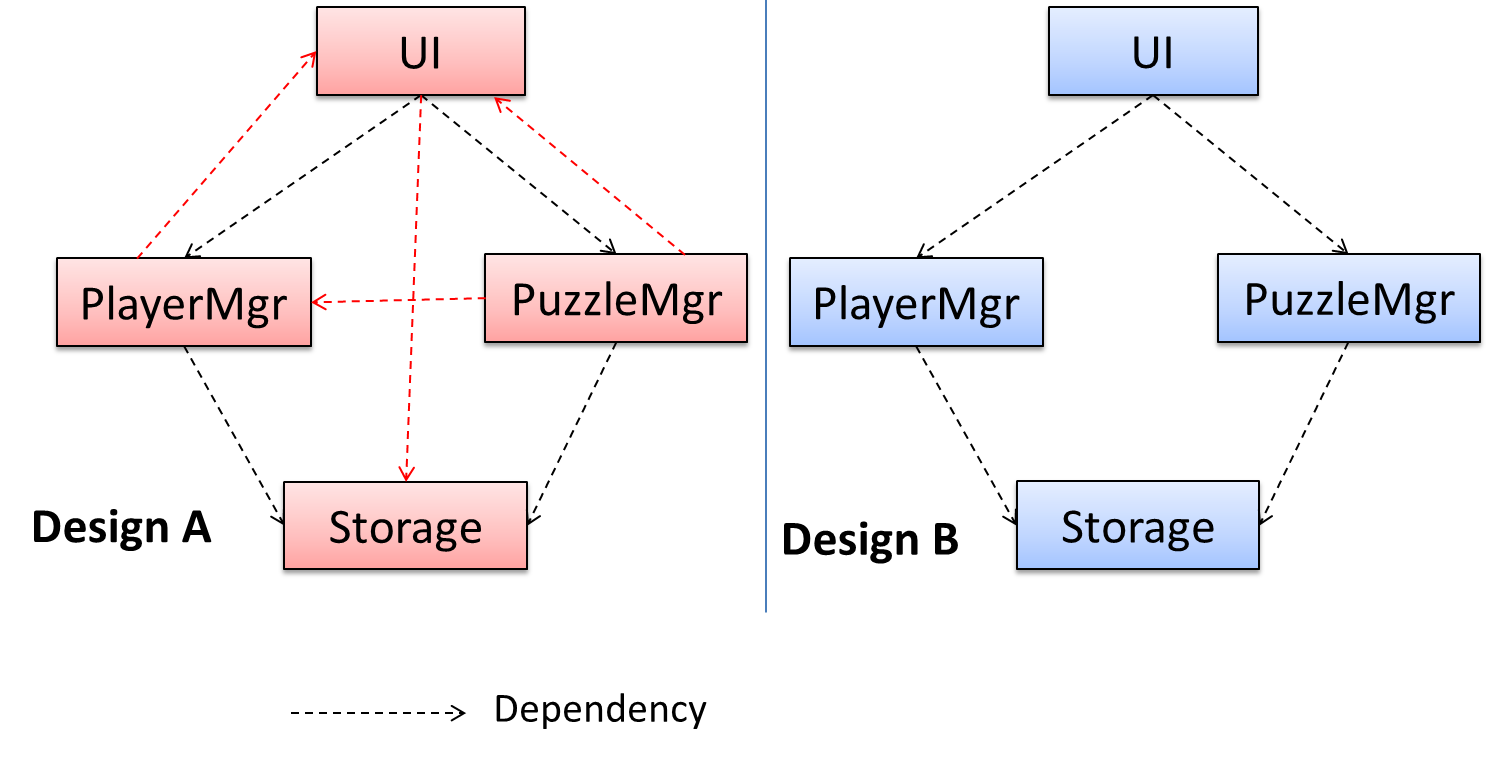
In the example below, design A appears to have a more coupling between the components than design B.
Discuss the coupling levels of alternative designs x and y.
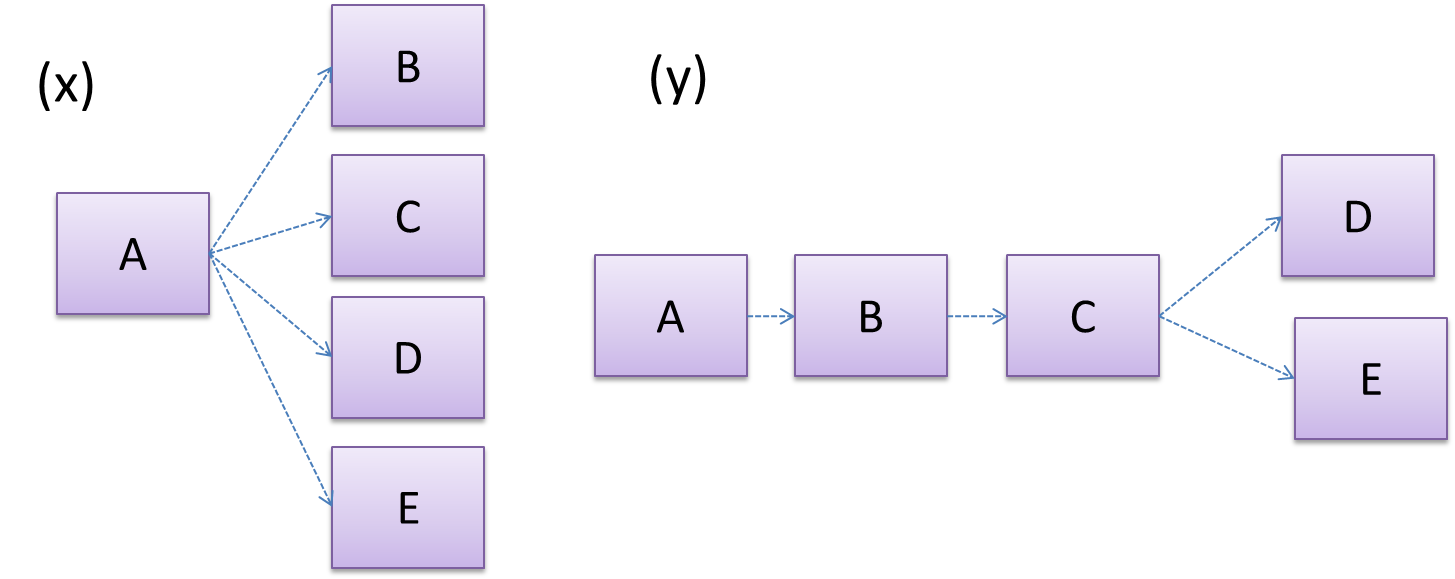
Overall coupling levels in x and y seem to be similar (neither has more dependencies than the other). (Note that the number of dependency links is not a definitive measure of the level of coupling. Some links may be stronger than the others.). However, in x, A is highly-coupled to the rest of the system while B, C, D, and E are standalone (do not depend on anything else). In y, no component is as highly-coupled as A of x. However, only D and E are standalone.
Explain the link (if any) between regressions and coupling.
When the system is highly-coupled, the risk of regressions is higher too e.g. when component A is modified, all components ‘coupled’ to component A risk ‘unintended behavioral changes’.
Discuss the relationship between coupling and
Coupling decreases testability because if the
Choose the correct statements.
- a. As coupling increases, testability decreases.
- b. As coupling increases, the risk of regression increases.
- c. As coupling increases, the value of automated regression testing increases.
- d. As coupling increases, integration becomes easier as everything is connected together.
- e. As coupling increases, maintainability decreases.
(a)(b)(c)(d)(e)
Explanation: High coupling means either more components require to be integrated at once in a big-bang fashion (increasing the risk of things going wrong) or more drivers and stubs are required when integrating incrementally.
Evidence:
Explain coupling with examples from your project.
W9.2d Can reduce coupling
Design → Design Fundamentals → Coupling →
X is coupled to Y if a change to Y can potentially require a change in X.
If Foo class calls the method Bar#read(), Foo is coupled to Bar because a change to Bar can potentially (but not always) require a change in the Foo class e.g. if the signature of the Bar#read() is changed, Foo needs to change as well, but a change to the Bar#write() method may not require a change in the Foo class because Foo does not call Bar#write().
class Foo{
    ...
    new Bar().read();
    ...
}

class Bar{
    void read(){
        ...
    }

    void write(){
        ...
    }
}
Some examples of coupling: A is coupled to B if,
Ahas access to the internal structure ofB(this results in a very high level of coupling)AandBdepend on the same global variableAcallsBAreceives an object ofBas a parameter or a return valueAinherits fromBAandBare required to follow the same data format or communication protocol
Which of these indicate a coupling between components A and B?
- a. component A has access to internal structure of component B.
- b. component A and B are written by the same developer.
- c. component A calls component B.
- d. component A receives an object of component B as a parameter.
- e. component A inherits from component B.
- f. components A and B have to follow the same data format or communication protocol.
(a)(b)(c)(d)(e)(f)
Explanation: Being written by the same developer does not imply a coupling.
Evidence:
Explain with examples from your project how coupling can be increased/decreased.
W9.2e Can identify types of coupling
Design → Design Fundamentals → Coupling →
Some examples of different coupling types:
- Content coupling: one module modifies or relies on the internal workings of another module e.g., accessing local data of another module
- Common/Global coupling: two modules share the same global data
- Control coupling: one module controlling the flow of another, by passing it information on what to do e.g., passing a flag
- Data coupling: one module sharing data with another module e.g. via passing parameters
- External coupling: two modules share an externally imposed convention e.g., data formats, communication protocols, device interfaces.
- Subclass coupling: a class inherits from another class. Note that a child class is coupled to the parent class but not the other way around.
- Temporal coupling: two actions are bundled together just because they happen to occur at the same time e.g. extracting a contiguous block of code as a method although the code block contains statements unrelated to each other
Evidence:
Explain types of coupling with examples from your own project.
Cohesion
W9.2f Can explain cohesion
Design → Design Fundamentals → Cohesion →
Cohesion is a measure of how strongly-related and focused the various responsibilities of a component are. A highly-cohesive component keeps related functionalities together while keeping out all other unrelated things.
Higher cohesion is better. Disadvantages of low cohesion (aka weak cohesion):
- Lowers the understandability of modules as it is difficult to express module functionalities at a higher level.
- Lowers maintainability because a module can be modified due to unrelated causes (reason: the module contains code unrelated to each other) or many many modules may need to be modified to achieve a small change in behavior (reason: because the code realated to that change is not localized to a single module).
- Lowers reusability of modules because they do not represent logical units of functionality.
Evidence:
Explain cohesion with examples from your project.
W9.2g Can increase cohesion
Design → Design Fundamentals → Cohesion →
Cohesion can be present in many forms. Some examples:
- Code related to a single concept is kept together, e.g. the
Studentcomponent handles everything related to students. - Code that is invoked close together in time is kept together, e.g. all code related to initializing the system is kept together.
- Code that manipulates the same data structure is kept together, e.g. the
GameArchivecomponent handles everything related to the storage and retrieval of game sessions.
Suppose a Payroll application contains a class that deals with writing data to the database. If the class include some code to show an error dialog to the user if the database is unreachable, that class is not cohesive because it seems to be interacting with the user as well as the database.
Compare the cohesion of the following two versions of the EmailMessage class. Which one is more cohesive and why?
// version-1
class EmailMessage {
    private String sendTo;
 	  private String subject;
    private String message;

    public EmailMessage(String sendTo, String subject, String message) {
        this.sendTo = sendTo;
        this.subject = subject;
        this.message = message;
    }

    public void sendMessage() {
        // sends message using sendTo, subject and message
    }
}

// version-2
class EmailMessage {
    private String sendTo;
    private String subject;
    private String message;
    private String username;

    public EmailMessage(String sendTo, String subject, String message) {
        this.sendTo = sendTo;
        this.subject = subject;
        this.message = message;
    }

    public void sendMessage() {
        // sends message using sendTo, subject and message
    }

    public void login(String username, String password) {
        this.username = username;
        // code to login
    }
}
Version 2 is less cohesive.
Explanation: Version 2 is handling functionality related to login, which is not directly related to the concept of ‘email message’ that the class is supposed to represent. On a related note, we can improve the cohesion of both versions by removing the sendMessage functionality. Although sending message is related to emails, this class is supposed to represent an email message, not an email server.
Evidence:
Explain with examples from your project how cohesion can be increased/decreased.
Implementation
W9.3 Can use Java varargs feature
W9.3a Can use Java varargs feature
Tools → Java →
Evidence:
Any code that you have written using the varargs feature.
W9.4 Can follow a simple style guide
W9.4a Can explain the importance of code quality
Implementation → Code Quality → Introduction →
Always code as if the person who ends up maintaining your code will be a violent psychopath who knows where you live. -- Martin Golding
W9.4b Can explain the need for following a standard
Implementation → Code Quality → Style →
One essential way to improve code quality is to follow a consistent style. That is why software engineers follow a strict coding standard (aka style guide).
The aim of a coding standard is to make the entire code base look like it was written by one person. A coding standard is usually specific to a programming language and specifies guidelines such as the location of opening and closing braces, indentation styles and naming styles (e.g. whether to use Hungarian style, Pascal casing, Camel casing, etc.). It is important that the whole team/company use the same coding standard and that standard is not generally inconsistent with typical industry practices. If a company's coding standards is very different from what is used typically in the industry, new recruits will take longer to get used to the company's coding style.
💡 IDEs can help to enforce some parts of a coding standard e.g. indentation rules.
What is the recommended approach regarding coding standards?
c
What is the aim of using a coding standard? How does it help?
Evidence:
What is the aim of using a coding standard? How does it help?
W9.4c Can follow simple mechanical style rules
Implementation → Code Quality → Style →
Learn basic guidelines of the Java coding standard (by OSS-Generic)
Sample coding standard: PEP 8 Python Style Guide -- by Python.org
Consider the code given below:
import java.util.*;

public class Task {
    public static final String descriptionPrefix = "description: ";
    private String description;
    private boolean important;
    List<String> pastDescription = new ArrayList<>(); // a list of past descriptions

    public Task(String d) {
      this.description = d;
      if (!d.isEmpty())
          this.important = true;
    }

    public String getAsXML() { return "<task>"+description+"</task>"; }

    /**
     * Print the description as a string.
     */
    public void printingDescription(){ System.out.println(this); }

    @Override
    public String toString() { return descriptionPrefix + description; }
}
In what ways the code violate the basic guidelines (i.e., those marked with one ⭐️) of the OSS-Generic Java Coding Standard given here?
Here are three:
descriptionPrefixis a constant and should be namedDESCRIPTION_PREFIX- method name
printingDescription()should be named asprintDescription() - boolean variable
importantshould be named to sound boolean e.g.,isImportant
There are many more.
Evidence:
Go through the provided Java coding standard. Identify and fix any violations of basic style rules in your project code.
W9.4d Can follow intermediate style rules
Implementation → Code Quality → Style →
Go through the provided Java coding standard and learn the intermediate style rules.
According to the given Java coding standard, which one of these is not a good name?
b
Explanation: checkWeight is an action. Naming variables as actions makes the code harder to follow. isWeightValid may be a better name.
Repeat the exercise in the panel below but also find violations of intermediate level guidelines.
Consider the code given below:
import java.util.*;

public class Task {
    public static final String descriptionPrefix = "description: ";
    private String description;
    private boolean important;
    List<String> pastDescription = new ArrayList<>(); // a list of past descriptions

    public Task(String d) {
      this.description = d;
      if (!d.isEmpty())
          this.important = true;
    }

    public String getAsXML() { return "<task>"+description+"</task>"; }

    /**
     * Print the description as a string.
     */
    public void printingDescription(){ System.out.println(this); }

    @Override
    public String toString() { return descriptionPrefix + description; }
}
In what ways the code violate the basic guidelines (i.e., those marked with one ⭐️) of the OSS-Generic Java Coding Standard given here?
Here are three:
descriptionPrefixis a constant and should be namedDESCRIPTION_PREFIX- method name
printingDescription()should be named asprintDescription() - boolean variable
importantshould be named to sound boolean e.g.,isImportant
There are many more.
Here's one you are more likely to miss:
* Print the description as a string.→* Prints the description as a string.
There are more.
Evidence:
Similar to [Can follow simple mechanical style rules] above, but also fix violations of intermediate style rules.
W9.5 Can follow best practices for improving code quality
W9.5a Can explain the importance of readability
Implementation → Code Quality → Readability →
Programs should be written and polished until they acquire publication quality. --Niklaus Wirth
Among various dimensions of code quality, such as run-time efficiency, security, and robustness, one of the most important is understandability. This is because in any non-trivial software project, code needs to be read, understood, and modified by other developers later on. Even if we do not intend to pass the code to someone else, code quality is still important because we all become 'strangers' to our own code someday.
The two code samples given below achieve the same functionality, but one is easier to read.
|
Bad |
|
Good |
|
Bad |
|
Good |
W9.5b Can improve code quality using technique: avoid long methods
W9.5c Can improve code quality using technique: avoid deep nesting
Implementation → Code Quality → Readability → Basic →
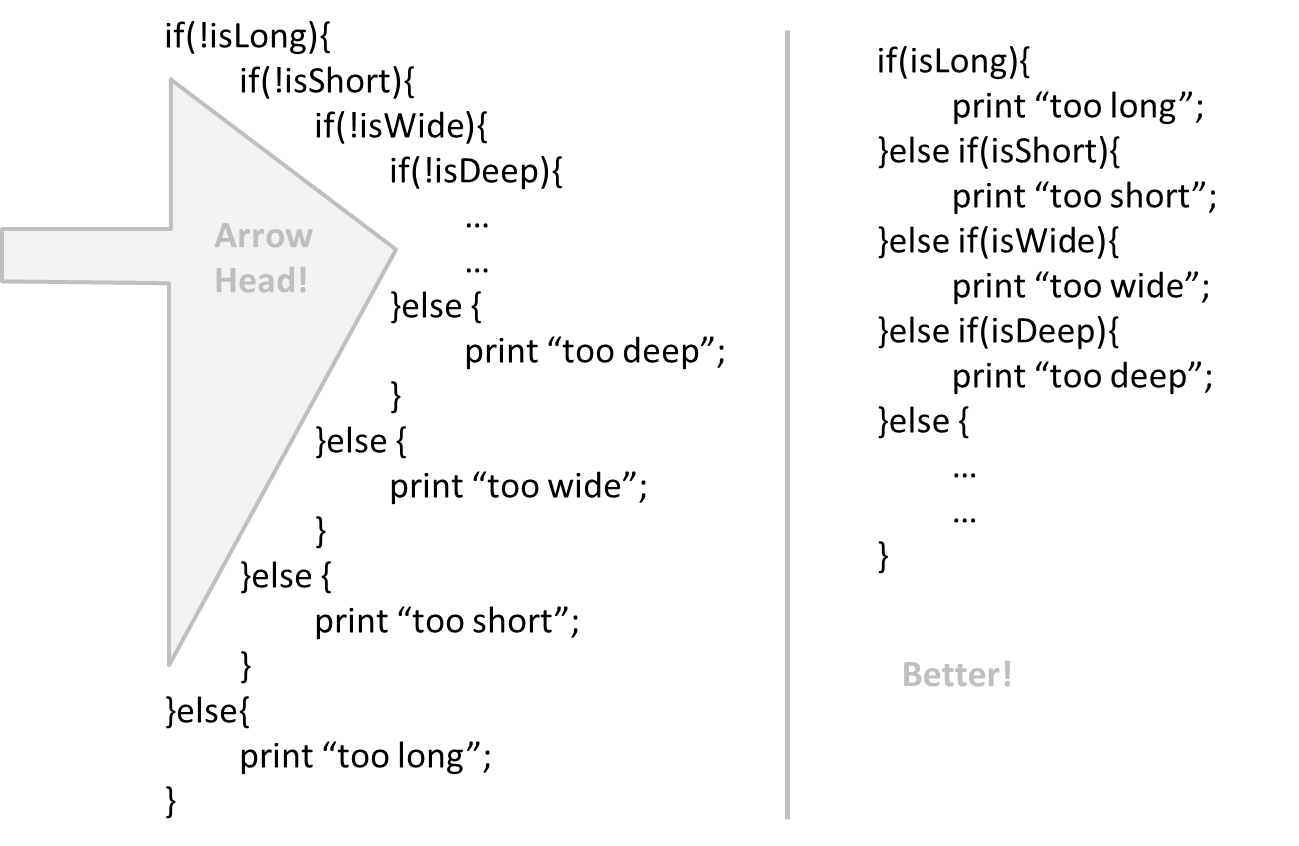
If you need more than 3 levels of indentation, you're screwed anyway, and should fix your program. --Linux 1.3.53 CodingStyle
In particular, avoid arrowhead style code.
Example:
W9.5d Can improve code quality using technique: avoid complicated expressions
Implementation → Code Quality → Readability → Basic →
Avoid complicated expressions, especially those having many negations and nested parentheses. If you must evaluate complicated expressions, have it done in steps (i.e. calculate some intermediate values first and use them to calculate the final value).
Example:
Bad
return ((length < MAX_LENGTH) || (previousSize != length)) && (typeCode == URGENT);
Good
boolean isWithinSizeLimit = length < MAX_LENGTH;
boolean isSameSize = previousSize != length;
boolean isValidCode = isWithinSizeLimit || isSameSize;

boolean isUrgent = typeCode == URGENT;

return isValidCode && isUrgent;
Example:
Bad
return ((length < MAX_LENGTH) or (previous_size != length)) and (type_code == URGENT)
Good
is_within_size_limit = length < MAX_LENGTH
is_same_size = previous_size != length
is_valid_code = is_within_size_limit or is_same_size

is_urgent = type_code == URGENT

return is_valid_code and is_urgent
The competent programmer is fully aware of the strictly limited size of his own skull; therefore he approaches the programming task in full humility, and among other things he avoids clever tricks like the plague. -- Edsger Dijkstra
W9.5e Can improve code quality using technique: avoid magic numbers
Implementation → Code Quality → Readability → Basic →
When the code has a number that does not explain the meaning of the number, we call that a magic number (as in “the number appears as if by magic”). Using a
Example:
|
Bad |
|
Good |
Note: Python does not have a way to make a variable a constant. However, you can use a normal variable with an ALL_CAPS name to simulate a constant.
|
Bad |
|
Good |
Similarly, we can have ‘magic’ values of other data types.
Bad
"Error 1432" // A magic string!
W9.5f Can improve code quality using technique: make the code obvious
Implementation → Code Quality → Readability → Basic →
Make the code as explicit as possible, even if the language syntax allows them to be implicit. Here are some examples:
- [
Java] Use explicit type conversion instead of implicit type conversion. - [
Java,Python] Use parentheses/braces to show grouping even when they can be skipped. - [
Java,Python] Useenumerations when a certain variable can take only a small number of finite values. For example, instead of declaring the variable 'state' as an integer and using values 0,1,2 to denote the states 'starting', 'enabled', and 'disabled' respectively, declare 'state' as typeSystemStateand define an enumerationSystemStatethat has values'STARTING','ENABLED', and'DISABLED'.
W9.5g Can improve code quality using technique: structure code logically
Implementation → Code Quality → Readability → Intermediate →
Lay out the code so that it adheres to the logical structure. The code should read like a story. Just like we use section breaks, chapters and paragraphs to organize a story, use classes, methods, indentation and line spacing in your code to group related segments of the code. For example, you can use blank lines to group related statements together. Sometimes, the correctness of your code does not depend on the order in which you perform certain intermediary steps. Nevertheless, this order may affect the clarity of the story you are trying to tell. Choose the order that makes the story most readable.
W9.5h Can improve code quality using technique: do not 'trip up' reader
Implementation → Code Quality → Readability → Intermediate →
Avoid things that would make the reader go ‘huh?’, such as,
- unused parameters in the method signature
- similar things look different
- different things that look similar
- multiple statements in the same line
- data flow anomalies such as, pre-assigning values to variables and modifying it without any use of the pre-assigned value
W9.5i Can improve code quality using technique: practice kissing
Implementation → Code Quality → Readability → Intermediate →
As the old adage goes, "keep it simple, stupid” (KISS). Do not try to write ‘clever’ code. For example, do not dismiss the brute-force yet simple solution in favor of a complicated one because of some ‘supposed benefits’ such as 'better reusability' unless you have a strong justification.
Debugging is twice as hard as writing the code in the first place. Therefore, if you write the code as cleverly as possible, you are, by definition, not smart enough to debug it. --Brian W. Kernighan
Programs must be written for people to read, and only incidentally for machines to execute. --Abelson and Sussman
W9.5j Can improve code quality using technique: avoid premature optimizations
Implementation → Code Quality → Readability → Intermediate →
Optimizing code prematurely has several drawbacks:
- We may not know which parts are the real performance bottlenecks. This is especially the case when the code undergoes transformations (e.g. compiling, minifying, transpiling, etc.) before it becomes an executable. Ideally, you should use a profiler tool to identify the actual bottlenecks of the code first, and optimize only those parts.
- Optimizing can complicate the code, affecting correctness and understandability
- Hand-optimized code can be harder for the compiler to optimize (the simpler the code, the easier for the compiler to optimize it). In many cases a compiler can do a better job of optimizing the runtime code if you don't get in the way by trying to hand-optimize the source code.
A popular saying in the industry is make it work, make it right, make it fast which means in most cases getting the code to perform correctly should take priority over optimizing it. If the code doesn't work correctly, it has no value on matter how fast/efficient it it.
Premature optimization is the root of all evil in programming. --Donald Knuth
Note that there are cases where optimizing takes priority over other things e.g. when writing code for resource-constrained environments. This guideline simply a caution that you should optimize only when it is really needed.
W9.5k Can improve code quality using technique: SLAP hard
Implementation → Code Quality → Readability → Intermediate →
Avoid varying the level of
Example:
Bad
readData();
salary = basic*rise+1000;
tax = (taxable?salary*0.07:0);
displayResult();
Good
readData();
processData();
displayResult();
Design → Design Fundamentals → Abstraction →
Abstraction is a technique for dealing with complexity. It works by establishing a level of complexity we are interested in, and suppressing the more complex details below that level.
The guiding principle of abstraction is that only details that are relevant to the current perspective or the task at hand needs to be considered. As most programs are written to solve complex problems involving large amounts of intricate details, it is impossible to deal with all these details at the same time. That is where abstraction can help.
Ignoring lower level data items and thinking in terms of bigger entities is called data abstraction.
Within a certain software component, we might deal with a user data type, while ignoring the details contained in the user data item such as name, and date of birth. These details have been ‘abstracted away’ as they do not affect the task of that software component.
Control abstraction abstracts away details of the actual control flow to focus on tasks at a simplified level.
print(“Hello”) is an abstraction of the actual output mechanism within the computer.
Abstraction can be applied repeatedly to obtain progressively higher levels of abstractions.
An example of different levels of data abstraction: a File is a data item that is at a higher level than an array and an array is at a higher level than a bit.
An example of different levels of control abstraction: execute(Game) is at a higher level than print(Char) which is at a higher than an Assembly language instruction MOV.
Abstraction is a general concept that is not limited to just data or control abstractions.
Some more general examples of abstraction:
- An OOP class is an abstraction over related data and behaviors.
- An architecture is a higher-level abstraction of the design of a software.
- Models (e.g., UML models) are abstractions of some aspect of reality.
W9.5l Can improve code quality using technique: make the happy path prominent
Implementation → Code Quality → Readability → Advanced →
The happy path (i.e. the execution path taken when everything goes well) should be clear and prominent in your code. Restructure the code to make the happy path unindented as much as possible. It is the ‘unusual’ cases that should be indented. Someone reading the code should not get distracted by alternative paths taken when error conditions happen. One technique that could help in this regard is the use of guard clauses.
Example:
Bad
if (!isUnusualCase) {  //detecting an unusual condition
    if (!isErrorCase) {
        start();    //main path
        process();
        cleanup();
        exit();
    } else {
        handleError();
    }
} else {
    handleUnusualCase(); //handling that unusual condition
}
In the code above,
- Unusual condition detection is separated from their handling.
- Main path is nested deeply.
Good
if (isUnusualCase) { //Guard Clause
    handleUnusualCase();
    return;
}

if (isErrorCase) { //Guard Clause
    handleError();
    return;
}

start();
process();
cleanup();
exit();
In contrast, the above code
- deals with unusual conditions as soon as they are detected so that the reader doesn't have to remember them for long.
- keeps the main path un-indented.
W9.5m Can explain the need for good names in code
W9.5n Can improve code quality using technique: use nouns for things and verbs for actions
Implementation → Code Quality → Naming → Basic →
Every system is built from a domain-specific language designed by the programmers to describe that system. Functions are the verbs of that language, and classes are the nouns. ― Robert C. Martin, Clean Code: A Handbook of Agile Software Craftsmanship
Use nouns for classes/variables and verbs for methods/functions.
Examples:
| Name for a | Bad | Good |
|---|---|---|
| Class | CheckLimit |
LimitChecker |
| method | result() |
calculate() |
Distinguish clearly between single-valued and multivalued variables.
Examples:
Good
Person student;
ArrayList<Person> students;
Good
student = Person('Jim')
students = [Person('Jim'), Person('Alice')]
W9.5o Can improve code quality using technique: use standard words
Implementation → Code Quality → Naming → Basic →
W9.5p Can improve code quality using technique: use name to explain
Implementation → Code Quality → Naming → Intermediate →
A name is not just for differentiation; it should explain the named entity to the reader accurately and at a sufficient level of detail.
Examples:
| Bad | Good |
|---|---|
processInput() (what 'process'?) |
removeWhiteSpaceFromInput() |
flag |
isValidInput |
temp |
If the name has multiple words, they should be in a sensible order.
Examples:
| Bad | Good |
|---|---|
bySizeOrder() |
orderBySize() |
Imagine going to the doctor's and saying "My eye1 is swollen"! Don’t use numbers or case to distinguish names.
Examples:
| Bad | Bad | Good |
|---|---|---|
value1, value2 |
value, Value |
originalValue, finalValue |
W9.5undefined Can improve code quality using technique: not too long, not too short
W9.5undefined Can improve code quality using technique: avoid misleading names
Implementation → Code Quality → Naming → Intermediate →
Related things should be named similarly, while unrelated things should NOT.
Example: Consider these variables
colorBlack: hex value for color blackcolorWhite: hex value for color whitecolorBlue: number of times blue is usedhexForRed: : hex value for color red
This is misleading because colorBlue is named similar to colorWhite and colorBlack but has a different purpose while hexForRed is named differently but has very similar purpose to the first two variables. The following is better:
hexForBlackhexForWhitehexForRedblueColorCount
Avoid misleading or ambiguous names (e.g. those with multiple meanings), similar sounding names, hard-to-pronounce ones (e.g. avoid ambiguities like "is that a lowercase L, capital I or number 1?", or "is that number 0 or letter O?"), almost similar names.
Examples:
| Bad | Good | Reason |
|---|---|---|
phase0 |
phaseZero |
Is that zero or letter O? |
rwrLgtDirn |
rowerLegitDirection |
Hard to pronounce |
right left wrong |
rightDirection leftDirection wrongResponse |
right is for 'correct' or 'opposite of 'left'? |
redBooks readBooks |
redColorBooks booksRead |
red and read (past tense) sounds the same |
FiletMignon |
egg |
If the requirement is just a name of a food, egg is a much easier to type/say choice than FiletMignon |
W9.5undefined Can explain the need for commenting minimally but sufficiently
Implementation → Code Quality → Comments →
Good code is its own best documentation. As you’re about to add a comment, ask yourself, ‘How can I improve the code so that this comment isn’t needed?’ Improve the code and then document it to make it even clearer. --Steve McConnell, Author of Clean Code
Some think commenting heavily increases the 'code quality'. This is not so. Avoid writing comments to explain bad code. Improve the code to make it self-explanatory.
W9.5undefined Can improve code quality using technique: do not repeat the obvious
W9.5undefined Can improve code quality using technique: write to the reader
Implementation → Code Quality → Comments → Basic →
Do not write comments as if they are private notes to self. Instead, write them well enough to be understood by another programmer. One type of comments that is almost always useful is the header comment that you write for a class or an operation to explain its purpose.
Examples:
Bad Reason: this comment will only make sense to the person who wrote it
// a quick trim function used to fix bug I detected overnight
void trimInput(){
    ....
}
Good
/** Trims the input of leading and trailing spaces */
void trimInput(){
    ....
}
Bad Reason: this comment will only make sense to the person who wrote it
# a quick trim function used to fix bug I detected overnight
def trim_input():
    ...
Good
def trim_input():
"""Trim the input of leading and trailing spaces"""
    ...
W9.5undefined Can improve code quality using technique: explain what and why, not how
Implementation → Code Quality → Comments → Intermediate →
Comments should explain what and why aspect of the code, rather than the how aspect.
What : The specification of what the code supposed to do. The reader can compare such comments to the implementation to verify if the implementation is correct
Example: This method is possibly buggy because the implementation does not seem to match the comment. In this case the comment could help the reader to detect the bug.
/** Removes all spaces from the {@code input} */
void compact(String input){
    input.trim();
}
Why : The rationale for the current implementation.
Example: Without this comment, the reader will not know the reason for calling this method.
// Remove spaces to comply with IE23.5 formatting rules
compact(input);
How : The explanation for how the code works. This should already be apparent from the code, if the code is self-explanatory. Adding comments to explain the same thing is redundant.
Example:
Bad Reason: Comment explains how the code works.
// return true if both left end and right end are correct or the size has not incremented
return (left && right) || (input.size() == size);
Good Reason: Code refactored to be self-explanatory. Comment no longer needed.
boolean isSameSize = (input.size() == size) ;
return (isLeftEndCorrect && isRightEndCorrect) || isSameSize;
🅿️ Project
W9.6 Follow a coding standard, improve code quality
Extract from the Admin Info page:
Week 9
- Enhance your project (TaskManager or otherwise) as explained in the exercise below:
This exercise continues from the TaskManager Level 1-9 exercises quoted above.
Ensure the code follows the basic rules (optional to apply intermediate/advanced rules) specified in the provided Java coding standard.
- Recommended (but not required): Improve the code quality of your code by applying the practices taught in the module.
Tutorial 9
W8.1b Can clone a remote repo
Tools → Git and GitHub →
Clone the sample repo samplerepo-things to your computer.
Note that the URL of the Github project is different form the URL you need to clone a repo in that Github project. e.g.
Github project URL: https://github.com/se-edu/samplerepo-things
Git repo URL: https://github.com/se-edu/samplerepo-things.git (note the .git at the end)
File → Clone / New… and provide the URL of the repo and the destination directory.
You can use the clone command to clone a repo.
Follow instructions given here.
Evidence:
Able to clone the samplerepo-things in your Computer.
W8.1c Can pull changes from a repo
Tools → Git and GitHub →
Clone the sample repo as explained in
Delete the last two commits to simulate cloning the repo 2 commits ago.
Can clone a remote repo
Clone the sample repo samplerepo-things to your computer.
Note that the URL of the Github project is different form the URL you need to clone a repo in that Github project. e.g.
Github project URL: https://github.com/se-edu/samplerepo-things
Git repo URL: https://github.com/se-edu/samplerepo-things.git (note the .git at the end)
File → Clone / New… and provide the URL of the repo and the destination directory.
You can use the clone command to clone a repo.
Follow instructions given here.
Right-click the target commit (i.e. the commit that is 2 commits behind the tip) and choose Reset current branch to this commit.

Choose the Hard - … option and click OK.
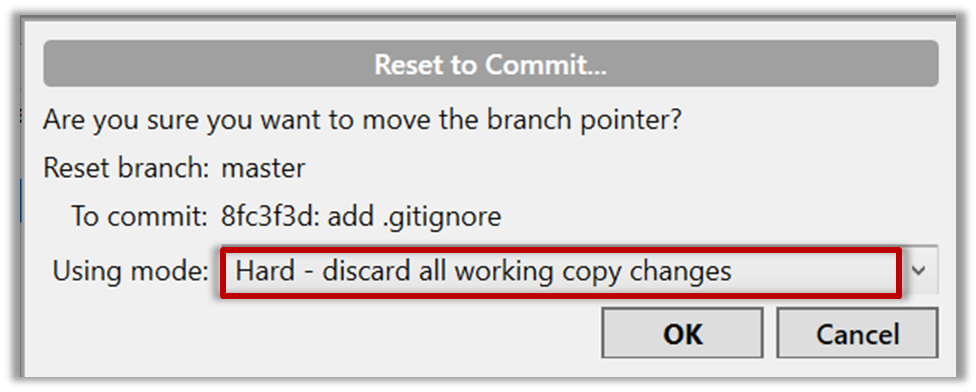
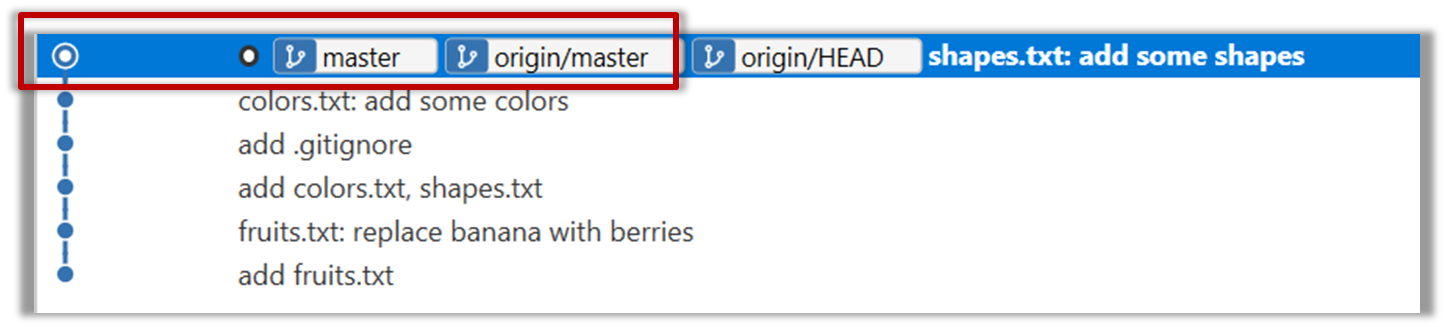
This is what you will see.
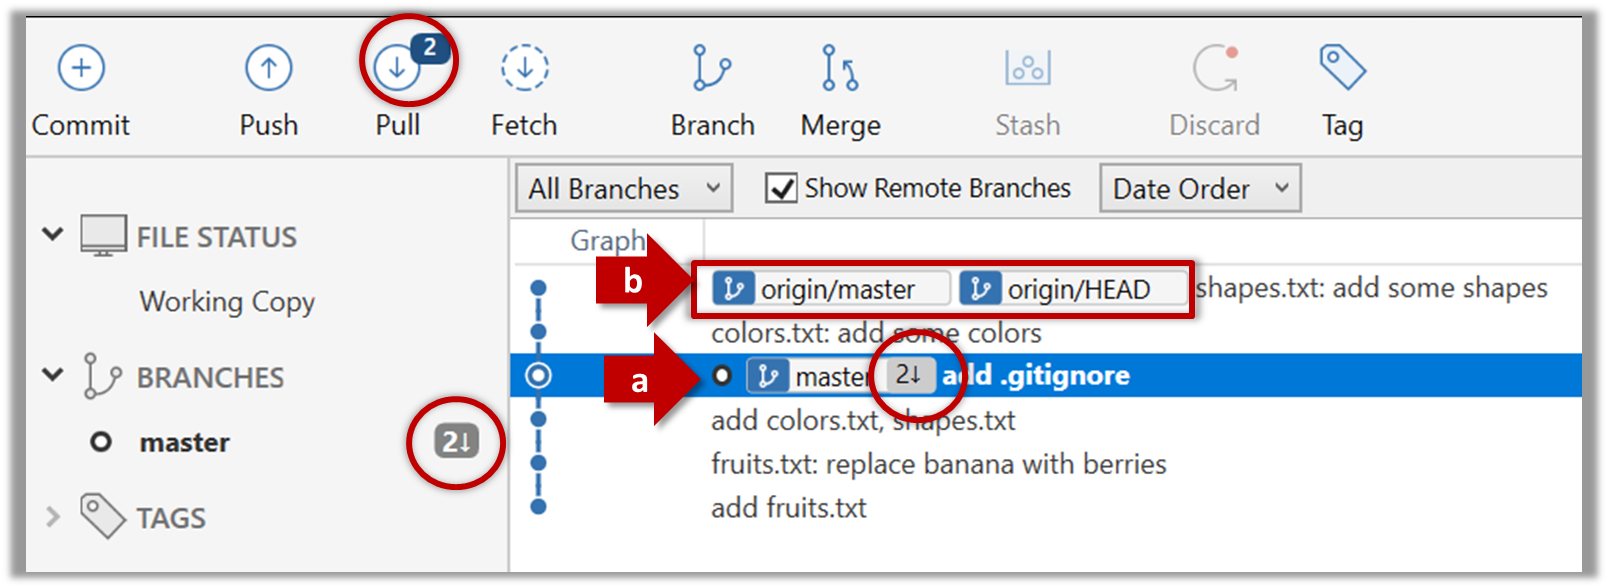
Note the following (cross refer the screenshot above):
Arrow marked as a: The local repo is now at this commit, marked by the master label.
Arrow marked as b: origin/master label shows what is the latest commit in the master branch in the remote repo.
Use the reset command to delete commits at the tip of the revision history.
git reset --hard HEAD~2
Now, your local repo state is exactly how it would be if you had cloned the repo 2 commits ago, as if somebody has added two more commits to the remote repo since you cloned it. To get those commits to your local repo (i.e. to sync your local repo with upstream repo) you can do a pull.
Click the Pull button in the main menu, choose origin and master in the next dialog, and click OK.
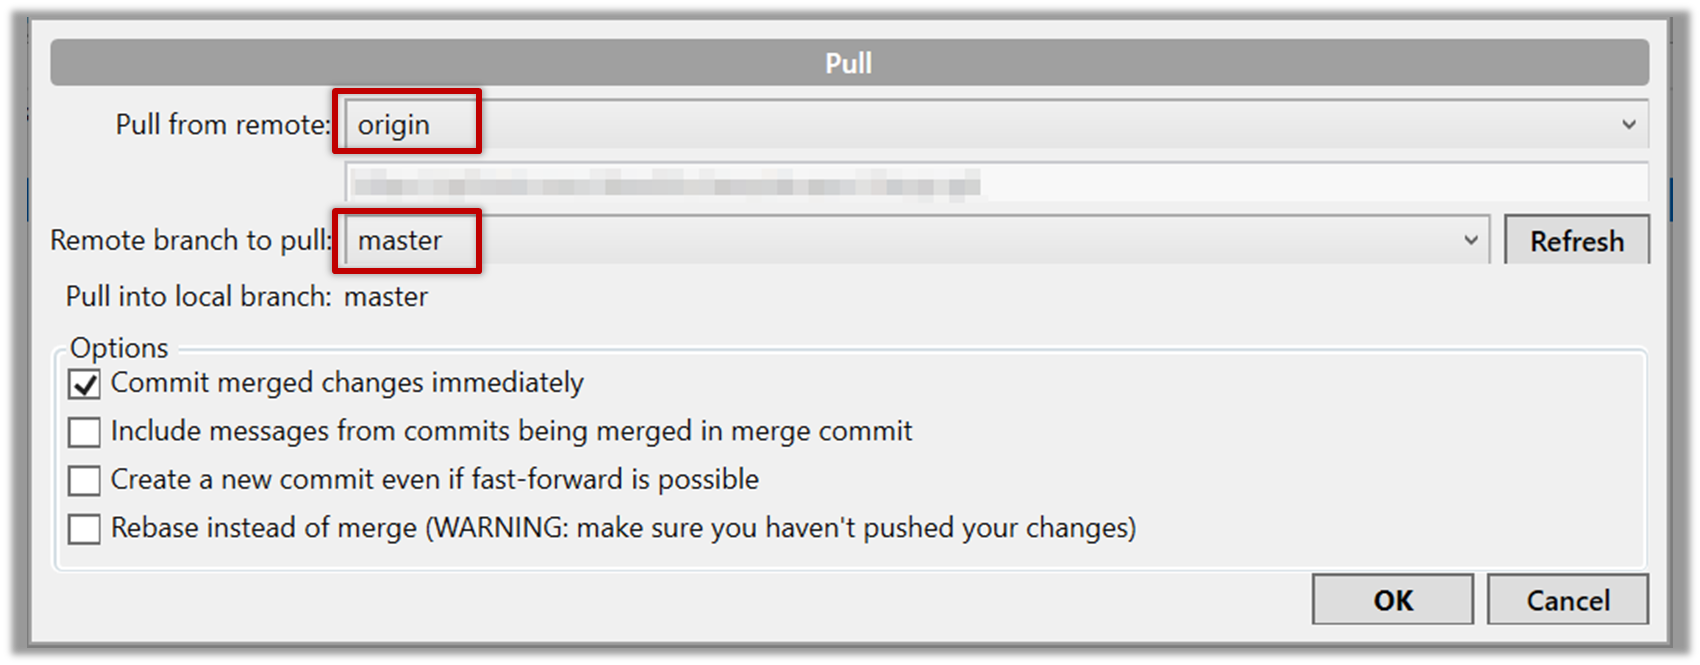
Now you should see something like this where master and origin/master are both pointing the same commit.
git pull origin
Evidence:
Being able to demo pulling from a remote repo.
W8.1d Can push to a remote repo
Tools → Git and GitHub →
-
Create a GitHub account if you don't have one yet.
-
Fork the samplerepo-things to your GitHub account:
Navigate to the on GitHub and click on the
 button on the top-right corner.
 -
Clone the fork (not the original) to your computer.
-
Create some commits in your repo.
-
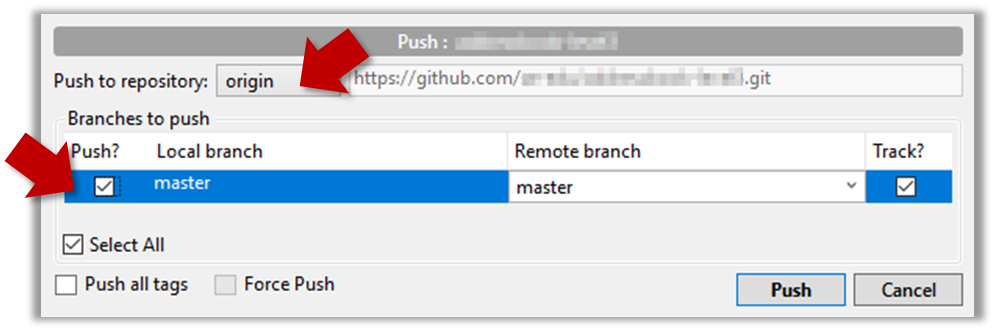
Push the new commits to your fork on GitHub
Click the Push button on the main menu, ensure the settings are as follows in the next dialog, and click the Push button on the dialog.

Use the command git push origin master. Enter Github username and password when prompted.
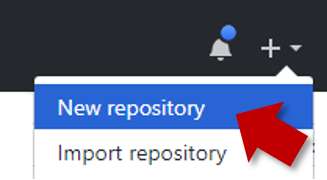
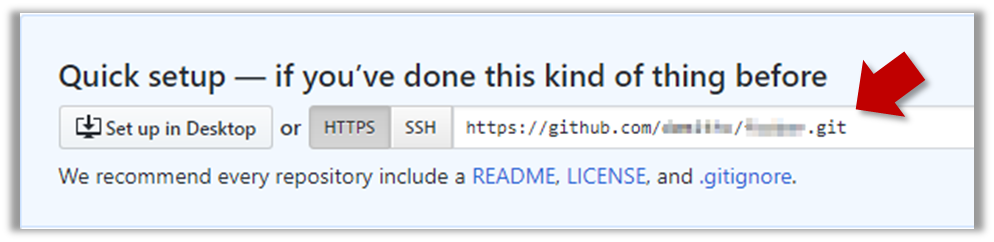
To push an existing local repo into a new remote repo on GitHub, first you need to create an empty remote repo on GitHub.
-
Login to your GitHub account and choose to create a new Repo.
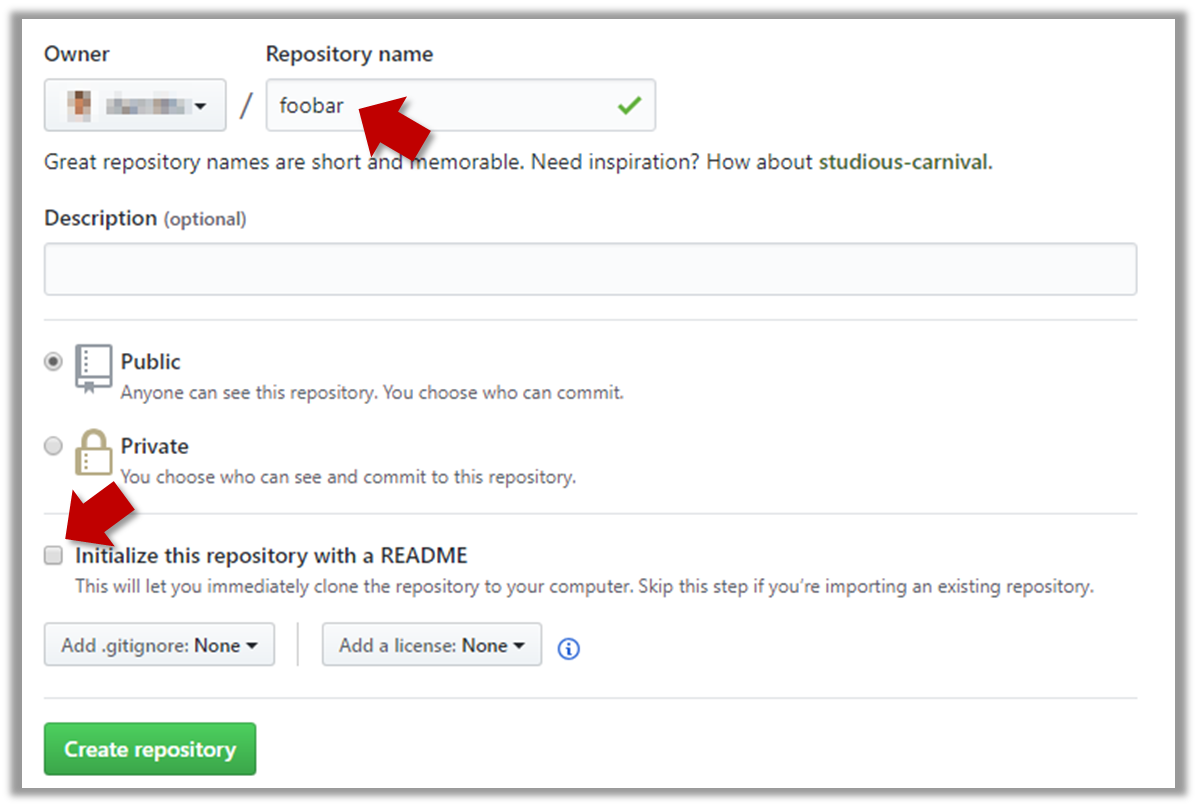
-
In the next screen, provide a name for your repo but keep the
Initialize this repo ...tick box unchecked.
-
Note the URL of the repo. It will be of the form
https://github.com/{your_user_name}/{repo_name}.git
e.g.,https://github.com/johndoe/foobar.git
Next, you can push the existing local repo to the new remote repo as follows:
- Open the local repo in SourceTree.
- Choose
Repository→Repository Settingsmenu option. - Add a new remote to the repo with the following values.
Remote name: the name you want to assign to the remote repo. RecommendedoriginURL/path: the URL of your repo (ending in.git) that you collected earlier.Username: your GitHub username
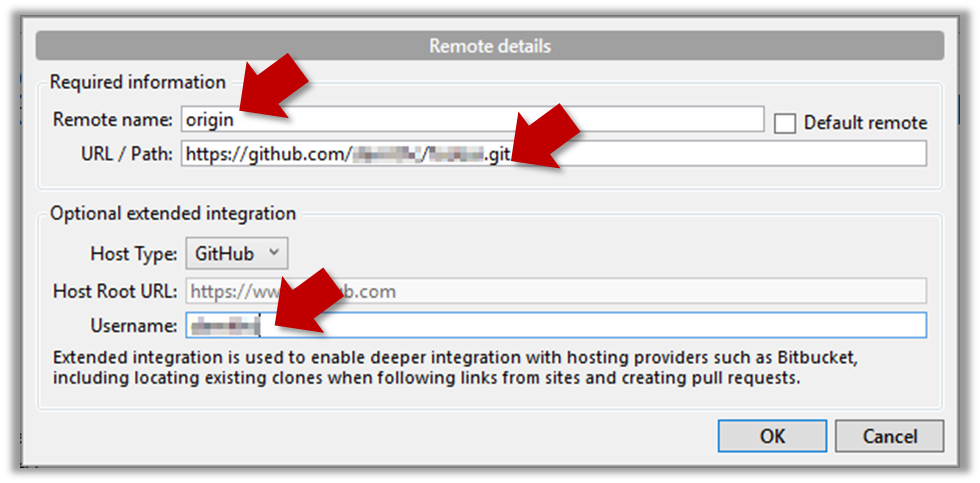
- Now you can push your repo to the new remote the usual way.
- Navigate to the folder containing the local repo.
- Set the new remote repo as a remote of the local repo.
command:git remote add {remote_name} {remote_repo_url}
e.g.,git remote add origin https://github.com/johndoe/foobar.git - Push to the new remote the usual way. You can use the
-uflag to inform Git that you wish totrack the branch.
e.g.,git push -u origin master
Evidence:
Being able to demo pushing to a remote repo.
W8.7e Can use user stories to manage requirements of project
Requirements → Specifying Requirements → User Stories →
User stories capture user requirements in a way that is convenient for
[User stories] strongly shift the focus from writing about features to discussing them. In fact, these discussions are more important than whatever text is written. [Mike Cohn, MountainGoat Software 🔗]
User stories differ from
User stories can capture
Requirements → Requirements →
There are two kinds of requirements:
- Functional requirements specify what the system should do.
- Non-functional requirements specify the constraints under which system is developed and operated.
Some examples of non-functional requirement categories:
- Data requirements e.g. size,
volatility ,persistency etc., - Environment requirements e.g. technical environment in which system would operate or need to be compatible with.
- Accessibility, Capacity, Compliance with regulations, Documentation, Disaster recovery, Efficiency, Extensibility, Fault tolerance, Interoperability, Maintainability, Privacy, Portability, Quality, Reliability, Response time, Robustness, Scalability, Security, Stability, Testability, and more ...
- Business/domain rules: e.g. the size of the minefield cannot be smaller than five.
- Constraints: e.g. the system should be backward compatible with data produced by earlier versions of the system; system testers are available only during the last month of the project; the total project cost should not exceed $1.5 million.
- Technical requirements: e.g. the system should work on both 32-bit and 64-bit environments.
- Performance requirements: e.g. the system should respond within two seconds.
- Quality requirements: e.g. the system should be usable by a novice who has never carried out an online purchase.
- Process requirements: e.g. the project is expected to adhere to a schedule that delivers a feature set every one month.
- Notes about project scope: e.g. the product is not required to handle the printing of reports.
- Any other noteworthy points: e.g. the game should not use images deemed offensive to those injured in real mine clearing activities.
We may have to spend an extra effort in digging NFRs out as early as possible because,
- NFRs are easier to miss e.g., stakeholders tend to think of functional requirements first
- sometimes NFRs are critical to the success of the software. E.g. A web application that is too slow or that has low security is unlikely to succeed even if it has all the right functionality.
Given below are some requirements of TEAMMATES (an online peer evaluation system for education). Which one of these are non-functional requirements?
- a. The response to any use action should become visible within 5 seconds.
- b. The application admin should be able to view a log of user activities.
- c. The source code should be open source.
- d. A course should be able to have up to 2000 students.
- e. As a student user, I can view details of my team members so that I can know who they are.
- f. The user interface should be intuitive enough for users who are not IT-savvy.
- g. The product is offered as a free online service.
(a)(c)(d)(f)(g)
Explanation: (b) are (e) are functions available for a specific user types. Therefore, they are functional requirements. (a), (c), (d), (f) and (g) are either constraints on functionality or constraints on how the project is done, both of which are considered non-functional requirements.
An example of a NFR captured as a user story:
| As a | I want to | so that |
|---|---|---|
| impatient user | to be able experience reasonable response time from the website while up to 1000 concurrent users are using it | I can use the app even when the traffic is at the maximum expected level |
Given their lightweight nature, user stories are quite handy for recording requirements during early stages of requirements gathering.
💡 Here are some tips for using user stories for early stages of requirement gathering:
- Define the target user:
Decide your target user's profile (e.g. a student, office worker, programmer, sales person) and work patterns (e.g. Does he work in groups or alone? Does he share his computer with others?). A clear understanding of the target user will help when deciding the importance of a user story. You can even give this user a name. e.g. Target user Jean is a university student studying in a non-IT field. She interacts with a lot of people due to her involvement in university clubs/societies. ... - Define the problem scope: Decide that exact problem you are going to solve for the target user. e.g. Help Jean keep track of all her school contacts
- Don't be too hasty to discard 'unusual' user stories:
Those might make your product unique and stand out from the rest, at least for the target users. - Don't go into too much details:
For example, consider this user story:As a user, I want to see a list of tasks that needs my attention most at the present time, so that I pay attention to them first.
When discussing this user story, don't worry about what tasks should be considered needs my attention most at the present time. Those details can be worked out later. - Don't be biased by preconceived product ideas:
When you are at the stage of identifying user needs, clear your mind of ideas you have about what your end product will look like. - Don't discuss implementation details or whether you are actually going to implement it:
When gathering requirements, your decision is whether the user's need is important enough for you to want to fulfil it. Implementation details can be discussed later. If a user story turns out to be too difficult to implement later, you can always omit it from the implementation plan.
While use cases can be recorded on
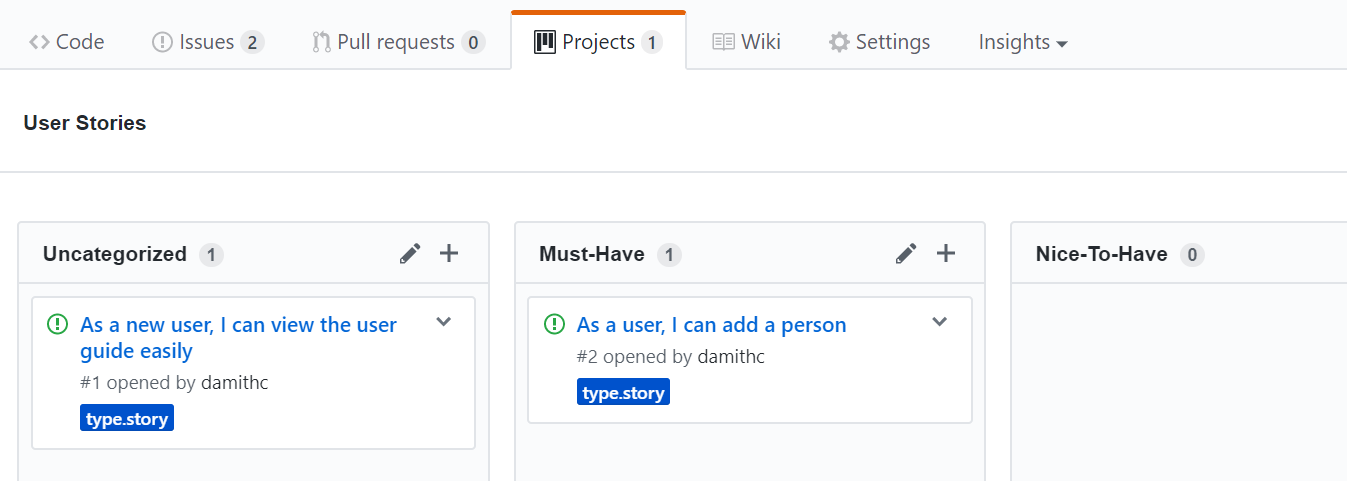
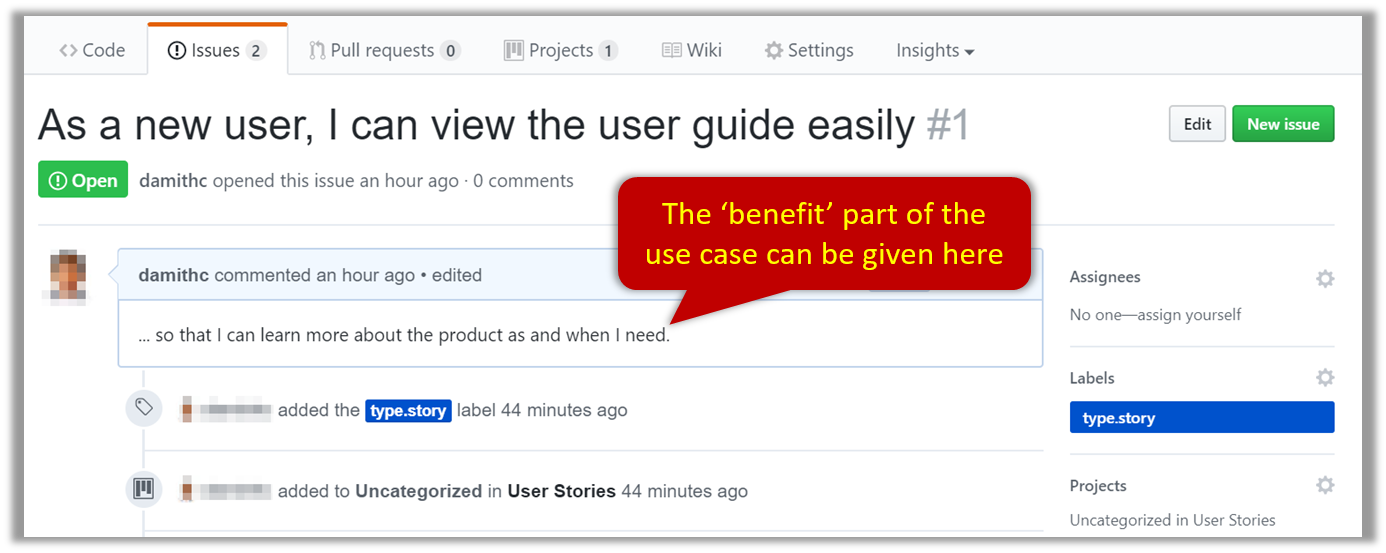
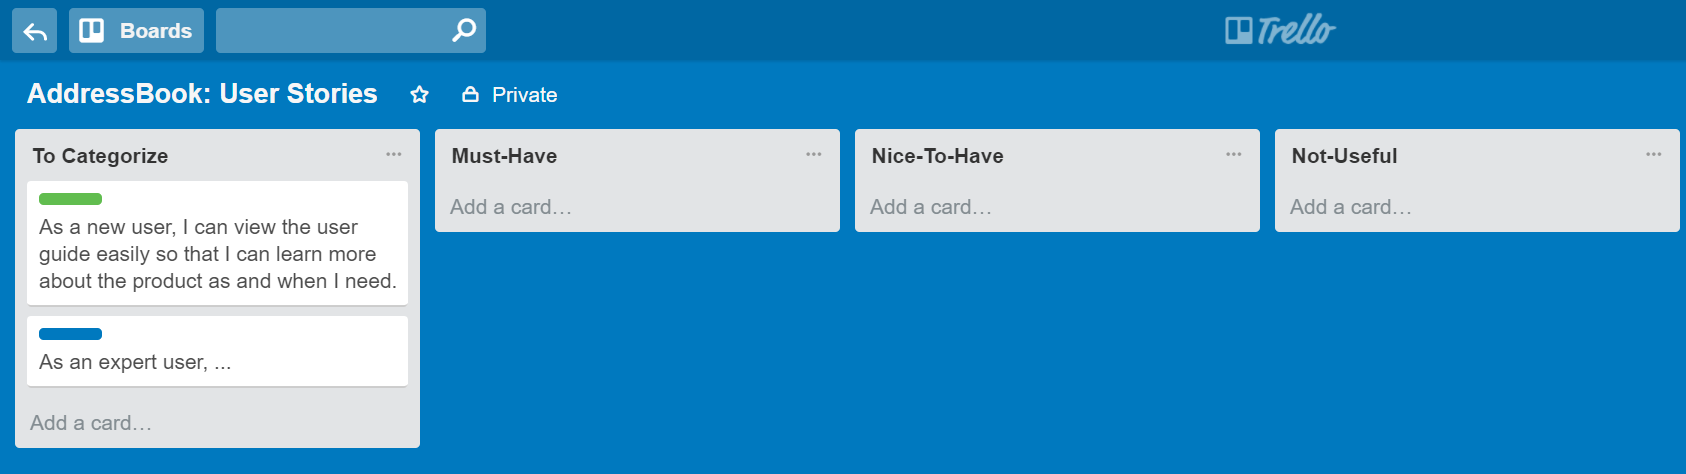
You can create issues for each of the user stories and use a GitHub Project Board to sort them into categories.
Example Project Board:
Example Issue to represent a user story:
A video on GitHub Project Boards:
Example Google Sheet for recording user stories:

Example Trello Board for recording user stories:
Extreme programming (XP) is a software development methodology which is intended to improve software quality and responsiveness to changing customer requirements. As a type of agile software development, it advocates frequent "releases" in short development cycles, which is intended to improve productivity and introduce checkpoints at which new customer requirements can be adopted. [wikipedia, 2017.05.01]
This page in their website explains the difference between user stories and traditional requirements.
One of the biggest misunderstandings with user stories is how they differ from traditional requirements specifications. The biggest difference is in the level of detail. User stories should only provide enough detail to make a reasonably low risk estimate of how long the story will take to implement. When the time comes to implement the story developers will go to the customer and receive a detailed description of the requirements face to face.
- This article by Mike Cohn from MountainGoatSoftware explains how to use user stories to capture NFRs.
Evidence:
Ability to write user stories to match your project.
W8.8 Use packages, javadocs
Extract from the Admin Info page:
Week 8
- As in the previous week, enhance your project (TaskManager or otherwise) as explained in the exercises below:
This exercise continues from the TaskManager Level 1-7 exercises quoted above.
Move the classes in your TaskManager into a package. For example, assuming your name in John Doe, you can move it to a pacakge johndoe.tojava.taskmanager. Optionally, you can add sub-packages too.
This exercise continues from the TaskManager Level 1-8 exercises quoted above.
Add javadoc comments to all non-trivial public classes and methods. Follow the format of the minimal javadoc comment examples given below.
Lecture 9
[slides]